Friday, November 29, 2019

Purple Pom Pom Dahlia and Columbine


I hope you are enjoying your holiday weekend.  Today I have another card using Susan's Garden Club Pom Pom Dahlia, Columbine, and Japanese Painted Fern die sets.

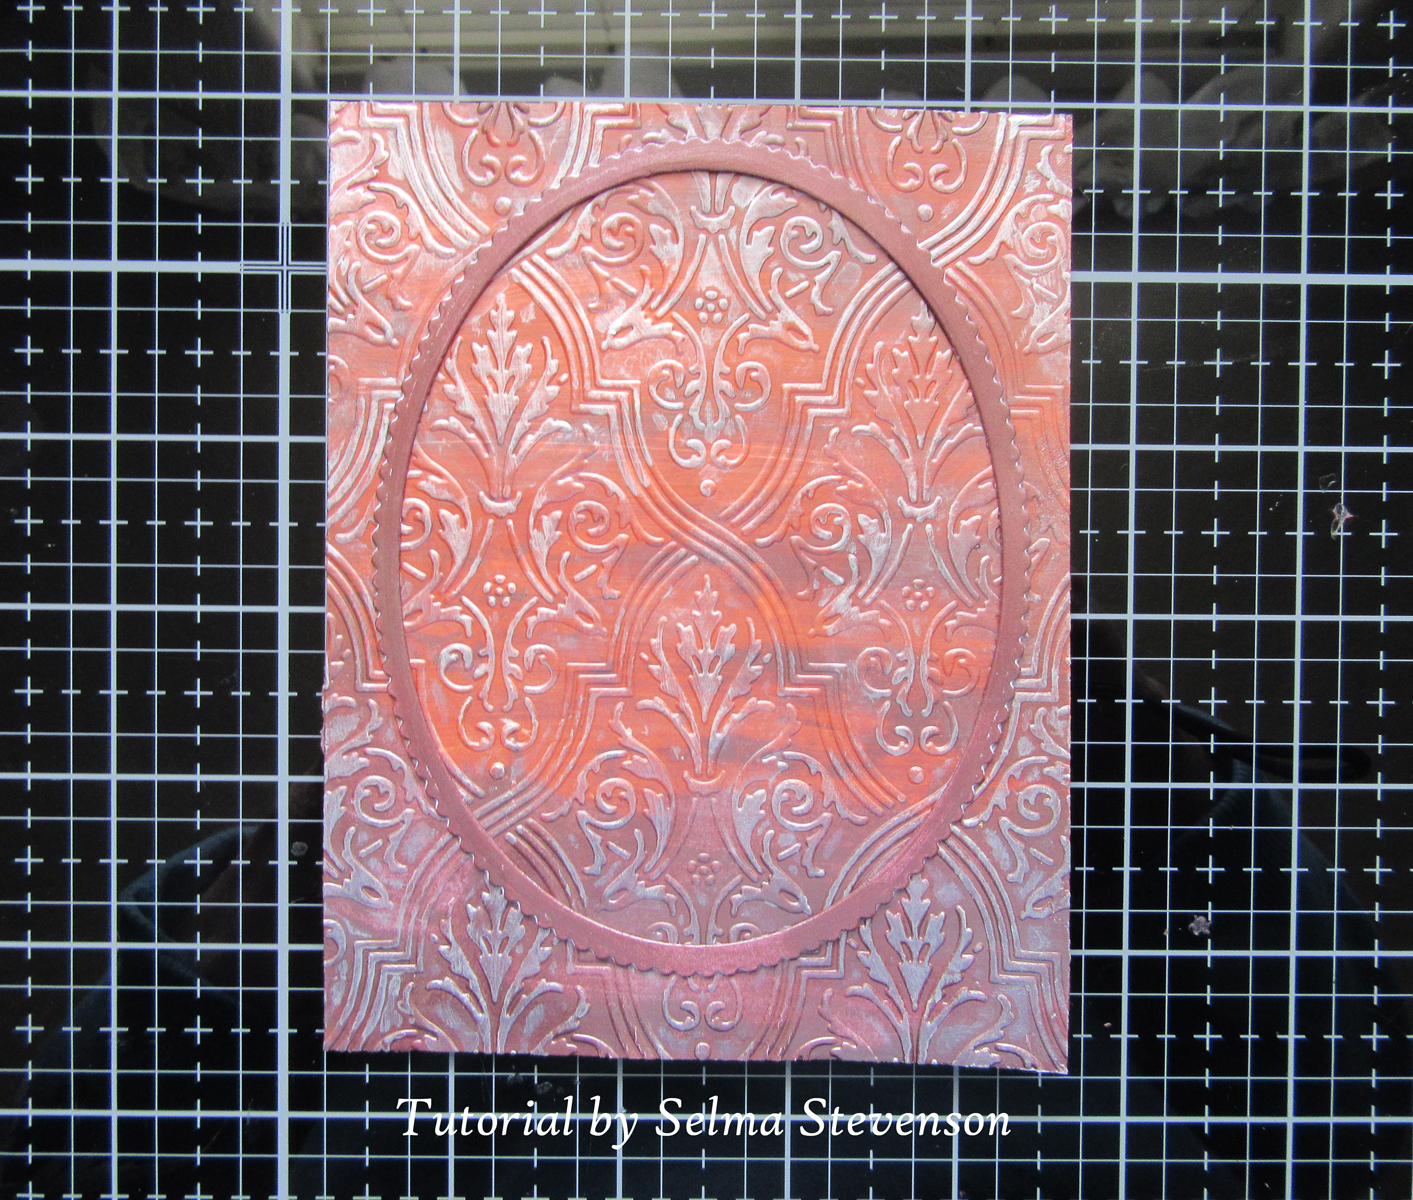
This is a 6x6-inch card.  For the front panel, I used a piece of the card stock from the  Tonic Studios Dream In Color 6x6 Card pad.  For the die cut design in the upper right corner, I used a corner  die that was in the Tonic Craft Kit #21.  It is fun to sign up for the Tonic Craft Kits and receive exclusive dies/stamps plus beautiful card stock and many Nuvo products.  You can check out the next kit by clicking on the link below.

Around the edges of the striped  card stock, use the Tonic paper trimmer and score 1/8" around all four corners for a finished edge.


Use the Garden Club Pom Pom Dahlia die set and die cut petals using white card stock.  Use two shades of purple markers to color the petals from the base out toward the tips, leaving the ends white.  For the smaller petals, color the entire petal purple.  Be sure to color the back of the petals as they will show once they are shaped.  I know Susan says not to spritz the petals with water, but in order to get the petals to hold a rolled appearance, I had to lightly mist the petals, then used the tweezers from Susan's Tool Kit to roll each petal in. I used the Nuvo Light Mist Spray Bottle which just lightly moistened the petals.   Put the tweezers on one side and roll toward the middle, then roll the other side of the petal to the center.  With the tweezers holding the petal in a rolled position, pinch the base of the petal with your fingers to help keep the roll in the petal.  Continue around rolling each petal. Allow the petals to dry completly before assembling the flower. When you glue the petals together, alternate petals and push down in the center, which will help the ends stand up. I assembled the flowers on the Glass Mat and pressed down hard in the center of each row of petals with the medium stylus in Susan's Flower Tool Kit.   Add as many rows of petals as you like for the fullnessyou want.   


Here is a closeup view of the finished Pom Pom Dahlia.

Use the Garden Notes Columbine die set and and create 3 purple and white flowers.  Use the Tim Holtz fine pointed scissors to cut each die cut stamen in half.  Apply a small amount of  Nuvo Deluxe Adhesive to the tips of the stamens and dip into Susan's yellow Pollen.  

Use the Garden Club Japanese Painted Fern die set and die cut three ferns.  I like to die cut the ferns using white card stock and sponge on green ink.  Use Magenta PanPastel to color down the stem and veins of the fern.

Use the Garden Club Holly & Berries Die set and die cut one berry branch.  Use Nuvo Crushed Grape Crystal Drops for the Berries.  Allow the berries to dry then cut the branch in half to attach behind the flowers.

Below, I have added links to Tonic Studio's products I use.  If you use these links to purchase products, I will receive a small commission which helps me purchase supplies at no additional cost to you.  I appreciate you visiting my blog and appreciate your support.


Sunday, November 24, 2019

Winter Wishes


I want to remind you that today is the last day for the Tonic Studio Weekend Special for the Susan's Garden Club Bundles.  You can purchase all of Susan's dies and other products at a great savings.  

Today I created another Christmas card using Susan's Helleborus, Pom Pom Dahlia and Holly & Berries die sets.  For the sentiment a used a Tonic Studio die set.

For the background I used a piece of blue card stock from the Tonic Studios December Skies 6x6 card pack.  

For the sentiment, use the Tonic Studios Mythical Glade Layering Die Set and die cut the sentiment die inside the smallest tag frame die using white card stock.  I attached a piece of holigraphic glitter paper, from my stash, behind the die cut and attached it to the right side of the card front.  This die set includes 9 dies, inctluding a beautiful Christmas sentiment and multiple layering dies.   

Use the Garden Club Hellebrouse die set and create two white flowers.  Add Susan's yellow pollen to the stamens.  

Use the Garden Club Pom Pom Dahlia die set and create one dark red flower.  

Use the Garden Club Holly & Berries die set and die cut six holly branches and extra leaves, using Tonic Champagne card stock.  Use a dark green marker to color the leaves, leaving the edges uncolored.  Use the Nuvo Crystal Glaze and a small brush to add glaze to the top of all the leaves.  

Die cut two or three Garden Club Berry Branches and use Nuvo Autumn Red Crystal Drops for the berries.  Once dry, cut the branches in smaller pieces.

Arrange the holly on the left side of the card and add the two Helleborus, the red Pom Pom Dahlia then glue the berries branches around on the holly.

Below, I have added links to Tonic Studio's products I use.  If you use these links to purchase products, I will receive a small commission which helps me purchase supplies at no additional cost to you.  I appreciate you visiting my blog and appreciate your support.


Saturday, November 23, 2019

Basket of Brunnera


 I want to remind you that Susan's Garden Club die sets and other Garden Club products  from  Tonic Studios are now available in the USA.   You can purchase her products individually or take advantage of Susan's Garden Club discounted product bundles in the Tonic Studios Weekend Specials.  I have added links  below.

 I love the tiny little flowers on the Brunnera and thought they would be pretty in Susan's Garthering Basket.  For the background, I used one of Tonic's Dot & Drop dies.

This is a 6-inch square card.  I used Tonic's Craft Perfect Cornflower Blue card stock for the layers.  On a piece of white card stock, the Tonic Dot & Drop Twisting Leaves die was used to die cut the design across the top.  Nuvo Cornflower Blue Crystal Drops were used to fill the die cut dots in the design.  This piece was set aside to dry while I worked on the basket of flowers.

Use the Gathering Basket & Galvanized Bucket die set and die cut one white basket.  Because the Dot & Drop design nearly covered half the card, I needed to cut some off the bottom off the bottom of the basket, so when filled with the flowers, it wouldn't cover the design on the top.  The basket was attached with a piece of the Craft Perfect Dimensional Pads on the back of the basket, right in the center.  The Nuvo Deluxe Adhesive glue was added around the sides and bottom of the basket.  

The Garden Club Brunnera die set was used to die cut five groups of stems.  The small flowers were die cut using Cornflower Blue card stock.  The leaves were die cut using white card stock and sponged using two shades of Nuvo green ink.  A small dot of black Nuvo Crystal drops was used inthe center of each flower.  After the flowers were glued to the stems, they were tucked down in the basket and the leaves arranged around the flowers.

Below, I have added links to Tonic Studio's products I use.  If you use these links to purchase products, I will receive a small commission which helps me purchase supplies at no additional cost to you.  I appreciate you visiting my blog and appreciate your support.


Friday, November 22, 2019

Susan's Garden Club Die Sets Available in the USA


EXCITING NEWS!  Susan's Garden Club die sets and other Garden Club products  from  Tonic Studios are now available in the USA.   You can purchase her products individually or take advantage of Susan's Garden Club discounted product bundles in the Tonic Studios Weekend Specials.  I have added links  below.  

 For the Christmas card above, I used Susan's Gathering Basket & Galvanized Bucket, Holly & Berries, Ladybug& Stems, and Spider Mum die sets.  The sentiment is a die cut using a die from Suzanne Cannon's A Way With Words die set.

Using the Gathering Basket die, one basket was die cut using 100# card stock.  The heavier card stock will help to hold the shape of the basket and also gives a better impression of the woven score lines in the die cut. I like to use white card stock and sponge on color.  Several shades of brown inks were sponged on then using a fine tip ball stylus and the Nuvo Toasted Almond Embellishment Mousse, thin lines wer drawn in to bring out the weave in the design.  A Craft Perfect Dimensional Pad was added on the back of the basket, right in the center to create dimensional, and the Nuvo Deluxe Adhesive was used around the sides and bottom to attach to the card.

Using Tonic's Candy Red Card Stock, the petals of the Spider Mum were die cut.  For the petals in the center of the flower, yellow card stock were used.  For the long center piece that is to be rolled, use a very light green  marker to color over the yellow card stock.   The flower was assembled using Nuvo Deluxe Adhesive

Use the Holly and Berries die set and die cut five or six holly branches and some extra holly leaves.  Color the leaves with two shades of green ink, with the lighter ink on the tips.  Color the stems with a mixture of green and brown inks.  Shape the leaves and paint the leaves using a small paint brush and Nuvo Crystal Glaze. This will give the holly leaves the glossy appearance of real holly.

 Using the berry branch die, die cut two or three branches.  Color the branches to match the stems on the holly.  I like to color the berries on the die cut with a red maker before adding the dimensional red berries.  Use the Nuvo Autumn Red Crystal Drops to create the berries on the branches.  Once dry, cut the branches into smaller pieces to place on the stems of the the holly.

Use the Ladybug and Stems die and die cut the ladybugs.  I die cut a lot of the ladybugs, using white card stock and store in a small container.  Color the ladybug red using a marker, then add the black dots and line down the center of the back.  You can add Nuvo Crystal Glaze to the ladybugs while they are on a non-stick mat or wait and add the glaze once you attach it to your piece.  

Arrange the holly/berries, and spider mum in the gathering basket.

For the sentiment on this card, the A Way With Words Merry Christmas was die cut using glitter card stock.  I used the Nuvo Smooth Precision Glue Pen to add adhesive to the back of the sentiment, but you can also use the Nuvo Medium Flat Tip Glue Pen.  

I have added links to Tonic Studio's products below.  If you use these links to purchase products, I will receive a small commission which helps me purchase supplies -- no additional cost to you.  I appreciate you visiting my blog and appreciate your support.

Happy Crafting!


Great News!


GREAT NEWS!    The complete collection of Susan's Garden Club products from Tonic Studios is now available in the US.  You can purchase her products individually or take advantage of Susan's Garden Club discounted product bundles in the Tonic Studios Weekend Specials.  If you check the links below, you will see the individual die sets, die bundles, as well as the latest products added to the Garden Club line, which includes card stock, pollen, prills, PanPastels, acrylic boxes etc.  

This card was designed using the Garden Club Columbine and Beauty Berry Bush die sets.  The new Pollen from Tonic Studios was added to the Columbine Stamens and to the little flowers on the Beauty Berry Bush.  For the background, I used Nuvo Pink Carnation Mica Mist sprayed on which card stock.

I will be posting more cards over the weekend to give you more inspiration.  Be sure to check out all the Weekend Specials!

 I have added links to the Susan's Garden Weekend Specials and all of Susan's products in the links below.  If you use these links to purchase products, I will receive a small commission which helps me purchase supplies -- no additional cost to you.  I appreciate you visiting my blog and appreciate your support.


Friday, November 15, 2019

Echinacea and Cattails


This week on Susan's Garden Club Live video on Facebook, she demonstrated how to assemble echinacea and how to create cattails.  She inspired me to create this card. 

Currently Susan's Garden Club die sets are not available right now, but Susan will be announcing soon when they will be in stock.  

For the background, I used the Tonic Classic Quatrefoil die set to die cut the design in the upper portion of the white card stock.  Behind it I attached a piece of card stock I created using Brusho Powders.  

After watching Susan's video, I created the four cattails.  Using the Garden Club Japanese Painted Fern die sets, four ferns were die cut and colored.  The berry branch from the new Holly & Berries die set was used to create two berry branches.  For the berries I used Nuvo Ripened Pumpkin Crystal Drops then while the berries were still wet, I added a small drop of Nuvo Autumn Red Crystal Drops. The berries were allowed to dry before cutting the branches in smaller pieces to add behind the flowers.  The flowers were created with the Garden Club Echinacea die sets.  

 I have added links to Tonic Studio's products below.  If you use these links to purchase products, I will receive a small commission which helps me purchase supplies -- no additional cost to you.  I appreciate you visiting my blog and appreciate your support.


Tuesday, November 12, 2019

Lacecap Hydrangea and Pom Pom Dahlias


Today I worked with Susan's Garden Club Lacecap Hydrangea, Pom Pom Dahlia, Brunnera and Japanese Painted Fern die sets from Tonic Studios.


To create the background I decided to work with Nuvo Mousse.  This is a new product to me and I am having fun working with it.  To start with, I used the Tonic Twisting Circles Stencil to add just a little solid color.  I used the Nuvo Boatyard Blue Mousse.  In the picture you see a small jar of the mousse -- I received this jar in one of the Tonic Craft Kits, but it is available in a large size.   Using the Nuvo Spatula, I put a small amount on the Tonic Glass Mat, used the Nuvo Spray Bottle and spritzed  water into it to make it thin enough to paint with.  I used one of the Nuvo Paint Brushes and painted an area in the middle.  I could have used the spatula to add the mousse without diluting it, but wanted to try something different.   I took the stencil off and put in water right away so the mousse wouldn't dry on it.   Next, I used the paint brush to pick up some of the mousse and tapped it against my finger to create splaters on the card stock.  As it ended up, the portion of the background that had the stenciled design is covered up with the flowers.

For the tag for the sentiment, one of the die frames in the Tonic Craft Kit 25 dies was used.  The sentiment is one of Susan's old sentiment stamps.

Using the Garden Club die sets, the Lacecap Hydrangea, Pom Pom Dahlia, Brunnela, and Japanese Painted Ferns were die cut, colored, shaped and assembled.  If you need help in learning how to assemble Susan's flowers, you can watch her Live Videos which are on her Susan's Garden Club FaceBook page at this LINK.

To finish the card, I created three bees using Nuvo Crystal Drops. Susan explained how to do this on her last video.

I have added links to Tonic Studio's products below.  If you use these links to purchase products, I will receive a small commission which helps me purchase supplies -- no additional cost to you.  I appreciate you visiting my blog and appreciate your support.


Monday, November 11, 2019

Maroon Pom Pom Dahlias


Today I created six macroon Pom Pom Dahlias using Susan's Garden Notes  Dahlia die set from Tonic Studios. You can click on the link below that says "Image Available Soon" to purchase any of Susan's Garden Club die sets.  I created one card using  three of the dahlias using a beautiful background die from Tonic Studios.   I wasn't sure if I liked the arrangement, so using the other three flowers, created a second card with the same die cut background.    I decided to post both cards.  


The card stock used for the background is the Tonic Speciality Luxury Embossed Card -Cinnamon Silk.  I placed the Tonic Vibrant Damask die onto a piece of  the Tonic Cinnamon Silk card stock so it die cut toward the top.  Behind the die cut design I added a piece of Tonic Ivory card stock then layered onto a piece of Tonic Maroon Red card stock.  When I added the die cut piece, I used the Nuvo Deluxe adhesive and added small dots of glue around on the die cut design so it would lay nice and flat.

The Beauty Berry Bush branches were die cut using white card stock and Nuvo Safari Green Ink was sponged on both the front and back of the die cuts.  Nuvo Plum Pudding Crystal Drops were used for the berries.  The branches were shaped and placed on the card then three of the Maroon Pom Pom Dahlias were added.  I like to create my flowers right on the Tonic Glass Mat.  I start with the bottom petals and keep adding layers.  Some of the glue will stick to the glass mat and holds the flower in place until all layers are added.  I used the scrapper in the Tim Holtz Media Tool Set to gently remove the flower.  The glass mat cleans up really easily by just using a baby wipe.  

I have added links to Tonic Studio's products below.  If you use these links to purchase products, I will receive a small commission which helps me purchase supplies -- no additional cost to you.  I appreciate you visiting my blog and appreciate your support.


Sunday, November 10, 2019

Orange and White Floral Arrangement


Today I used Susan's Pom Pom Dahlia, Hellebrous, Berry Branch, Japanese Painted Fern and Galvanized Bucket die sets to design this card.

For the background, I wanted to do something different.  I used the Nuvo Solar Flare and Cherry Bomb Shimmer Powders on Watercolor Paper.  First I used the Nuvo Fine Mist Spray Bottle and spritzed water on the paper, then lightly tapped the Shimmer Powders onto the paper.  Do not squeeze the bottle because a lot will come out and you only need a very small amount - just tap the bottle with your finger.  Then I spritzed the powder again until it was all wet.  I also have the Brusho powders and used the orange on top of the Shimmer Powders.  I love what a beautiful background the Nuvo Shimmer Powders give you.  

The Galvanized Bucket was die cut using Tonic Steel Diamonds Luxury Embossed Card Stock.  Nuvo Grey Matter Embellishment Mousse was lightly rubbed over the embossed design, using my finger.

The Japanese Painted Fern die set was used to die cut a bunch of ferns.  To make the background for the arrangement full looking, I glued 7 or 8 ferns in the bucket.

The Holly and Berries die set was used to die cut two berry stems.  Nuvo Autumn Red Crystal Drops were used to create the berries.  The stems were cut apart to place behind the flowers.

Two Hellebrous and three Pom Pom Dahlias were created using Susan's Garden Club die sets for this arrangement.

I have added links to Tonic Studio's products below.  If you use these links to purchase products, I will receive a small commission which helps me purchase supplies -- no additional cost to you.  I appreciate you visiting my blog and appreciate your support.


Saturday, November 9, 2019

Purple Flowers & Ladybugs


I love creating purple flowers.  Today I have an arrangement of Susan's Garden Club Echinacea, Spider Mums, Butterfly Bush, and Brunnera and Fern.

This is a 6-inch card.  A piece of gray card stock was used for the background.  I pulled out a brick wall stencil, from my stash, and used the Nuvo Soft Truffle Embellisnment Mousse to create the bricks.  Working on the Tim Holtz Glass Media Mat, I used a Nuvo Media Spatula to take out the Mousse and soften it on the mat, then spread it over the design in the stencil.  The Mousse spreads like butter and is so fun to work with.  Once all the bricks in the stencil were covered, I used the side of the spatula to tap up and down for a textured appearance. Carefully remove the stencil. You need to put the stencil in water immediately so the mousse doesn't dry on it,  and wash the spatula.  I used the Nuvo Spray Bottle to spritz water on the glass mat and wiped up any left over mousse that I couldn't pick up and put back in the jar of mousse.  I let this piece dry while I worked on the flower arrangement.

This card did not take me long to create because I had the pieces die cut out of white card stock and had them all colored and shaped ready to assemble.  When I work with a die set, I usually will die cut enough pieces to complete a lot of flowers, then work in an assemble line to color and shape.  I then store the pieces for each flower in a small box, ready to assemble.

I used the Garden Notes Japanese Painted Fern die set to add foilage behind all the flowers.  I only colored the fern green, leaving off the magenta on the stems.  The flowers on the card include echinacea (coneflower), spider mum, buddleia (butterfly bush), and brunnera.  For the ladybugs, Susan's Stems and Ladybug die set was used.  Right now, Susan's die sets can only be purchased from Create & Craft.  

I have added links to Tonic Studio's products below.  If you use these links to purchase products, I will receive a small commission which helps me purchase supplies -- no additional cost to you.  I appreciate you visiting my blog and appreciate your support.


Friday, November 8, 2019

Echinacea


Today I have a card designed using Susan's Echinacea die set.  

The card is a 6-inch card base.  A piece of the Tonic Emerald Hessian Luxury Embossed Card stock was attached to the top of the card.

The Garden Notes Gathering Basket and Galvanizedd Bucket die set was used to die cut one Bucket.  Die cut the bucket out of silver card stock and stipple Tonic Mother of Pearl Embellisment Mousse over the surface to give it a galvanized appearance.

The Garden Club Japanese Painted Fern die set was used to die three ferns.  The Ferns were colored using Susan's PanPastels.

The Garden Club Echinacea die set was used to die cut pieces to create five flowers.  The petals were colored using yellow, yellow orange and hot pink inks.  The petals were glued together using the Tonic Deluxe Adhesive.  Two shades of brown card stock were used to die cut the tiny pieces for the center of the flower.

I have added links to Tonic Studio's products below.  If you use these links to purchase products, I will receive a small commission which helps me purchase supplies -- no additional cost to you.  I appreciate you visiting my blog and appreciate your support.


Wednesday, November 6, 2019

Just to Say


Today I used Susan's Garden Club Pom Pom Dahlia, Brunnera, and Beauty Berry Bush die sets from Tonic Studios.  Today Susan will be doing her LIVE Susan's Garden Garden Club Facebook Video.  She is back from Create and Craft and will be showing how to create more of her new release plus I am sure giving a lot of great ideas for creating background for your cards.  This video starts at 10:00 am EST.  

On this card I created score lines with the paper trimmer along the top and bottom of a piece of textured card stock.  It was attached to a black card base using the Tonic Tape Runner.

A circle layering die set was used to create a narrow white frame that was placed in the center of the background.  It was attached using the Tonic narrow Tape Runner.

The Tonic Studios sentiment was die cut using black card stock and attached in the die cut circle.

Susan's Beauty Berry Bush die set was used to die cut 5 branches.  The little flowers were die cut using Tonic Craft Perfect  Ballet Pink card stock.  They were attached using the Nuvo Deluxe Adhesive.

One Garden Notes Pom Pom Dahlia was created using Craft Perfect Ballet Pink card stock.

The Garden Notes Brunnera die set was used to die cut three branches of flowers.  Craft Perfect Cornflower Blue card stock used to die cut the tiny flowers.  You can watch Susan's Live videos for instructions on how to assemble her flowers.

I want to remind you that today the new Tonic Craft Kit will be revealed on Facebook.  I have links to the kit below.

I have added links to Tonic Studio's products below.  If you use these links to purchase products, I will receive a small commission which helps me purchase supplies -- no additional cost to you.  I appreciate you visiting my blog and appreciate your support.


Monday, November 4, 2019

White Helleborus


I am still working on designing my Christmas cards.  Susan's Garden Club Hellebrous, Holly & Berries, and Galvanized Bucket die sets from Tonic Studios were used.

For the background I used the Tonic Golden Satin Luxury Embossed card stock.  I used the Tonic Dot and Drop Diamond Corner Die and then used Nuvo Bottle Bottle Green Crystal Drops for the Dots in the die cut corner.

Susan's Hellebrous die set used to die cut three white flowers.  The Holly & Berries die set used to die cut eight holly branches.  Three berry branches were die cut and Nuvo Autumn Red Crystal Drops used for the berries.  Nuvo Crystal Glaze was used to make the holly leaves shiny.  Nuvo Deluxe Adhesive was used to assemble the flowers.

The Garden Club Gathering Basket and Galvanized Bucket die set used to die cut the Bucket using Tonic Steel Diamonds Luxury Embossed Card stock.  A Tonic Dimensional Foam Pad was placed behind the bucket then Tonic Adhesive Tape Runner used on sides and bottom to adhere to the bottom of the card.

The sentiment is from Suzanne Cannon's A Way With Words die set. 

I have added links to Tonic Studio's products below.  If you use these links to purchase products, I will receive a small commission which helps me purchase supplies -- no additional cost to you.  I appreciate you visiting my blog and appreciate your support.


Orange Echinacea


Echinacea flowers come in many different colors.  Today I chose to create orange flowers using Susan's Garden Club Echinacea die set from Tonic Studios.  I usually like to die cut my flowers out of white card stock and color them, but for these I used orange card stock and lightly shaded the middle (at the base of the petals) with a bright pink ink. Different shades of brown card stock was used for the center of the flowers.  Nuvo Deluxe Adhesive was used to assemble the flowers.

The Garden Club Japanese Painted Fern die set was used to die cut 5 ferns.  Green was sponged on the leaves and Magenta PanPastel was sponged down the veins.  Susan's new PanPastels will be out soon.


For the background I used a piece of white card stock and brushed Burnished Bronze Embellishment Mousse on using the Nuvo Blending Brushes.  About 1/4 of the card stock was colored with Bronze then Nuvo Orange Blush Embellishment Mousse was brushed on the rest of this piece.  The Mousse give such a beautiful pearl sheen to the card stock.  Next I used an old embossing folder from my stash to emboss this piece.  Nuvo Chai Latte Embellishment Mousse was then lightly sponged across the raised embossed design.

For an added embellishment, I used the Tonic Mixed Edge Oval die set to cut a narrow frame.  I am not sure if this die set is still available.  Using my finger, I rubbed Nuvo Burnished Bronze Embellishment Mouse over the die cut oval to color it.  


The Burnished Bronze Oval was attached to the center of the background.  I used the Nuvo Adhesive Tape Runner to add adhesive to the back of this narrow frame.  This is how the background piece looked prior to adding the flowers and ferns.

A piece of black card stock, slightly larger than the decorated panel was distressed using the Tonic Distresser.  It was attached using Nuvo Adhesive Tape Runner.


Closeup of the Echinacea

I have added links to Tonic Studio's products below.  If you use these links to purchase products, I will receive a small commission which helps me purchase supplies -- no additional cost to you.  I appreciate you visiting my blog and appreciate your support


Sunday, November 3, 2019

Pink and White Helleborus


Hellebrous or Christmas Rose, is such a pretty little flower. This flower comes in a large variety of colors.   I did a search and found a pretty 'Helleborus Double Ellen Collection' flower and decided to try to duplicate these flowers for my card.  I may not have added enough petals, but it is pretty close.

The background for this card is a piece of the Tonic Studio Speciality Paper Pewter Slates Cotton Papers.  I like the woven effect on this pretty paper.

Susan's Garden Club Gathering Bsasket and Galvanized Bucket die set was used for the container.  The basket was die cut using 100# card stock.  When you use a heavy weight card stock, the score lines show up very well.  Different shades of golden yellow and brown inks were used to color the basket.  It was attached to the bottom of the card by placing a Dimensional Foam Pad in the center and Tonic Deluxe Adhesive around the sides and bottom.  Be sure to leave the top open so you can add your flowers/leaves/branches.  

The Garden Club Beauty Berry Bush die set was used to die cut 5 branches.  I used white card stock and sponged on green ink.  The leaves were shaped using Susan's old Flower Tool Kit.  Susan's new Tonic Flower Tool Kit will be available soon.  The small flowers were die cut using light pink card stock and glued to the branches using Tonic Deluxe Adhesive.  These branches were arranged in the basket with three branches on the left side of the handle and two branches on the right of the handle.

The Garden Club Helleborus die set was used to create three flowers.  The flowers were attached over the Beauty Berry Bush branches.  The Helleborus leaves were die cut using white card stock and colored, shaped and glued around the flowers.

I have added links to Tonic Studio's products below.  If you use these links to purchase products, I will receive a small commission which helps me purchase supplies -- no additional cost to you.  I appreciate you visiting my blog and appreciate your support


LinkWithin

Related Posts with Thumbnails