Friday, March 31, 2023

Foamiran Spider Mums


Good Morning.  In the past, I have created many different flowers using Susan's Garden Flower die sets and Foamiran.  Today I have a card I designed using Susan's new Spider Mum, from her Victorian Garden Garden release.  I have to say that this is probably the easiest of all flowers to create with the foamiran.  It does not take a lot of shaping.  Each size of the petals were die cut out of white silk foamiran, which was sent to me by a very sweet friend in the Netherlands. I used all of the petals except the very smallest one.   The petals were colored by sponging on Pink Ink.  The different size layers were glued together seperately then pulled up and twisted pretty tightly to give the petals shape. (I feel you get better shaping by doing this in each different size of petals because you can twist a smaller amount tighter for good shaping.)  Open up and flatten to create that layer.   This foamiran is pretty thin and I did not have to use an iron to shape it. The heat from your hand will shape it.  Once each layer was shaped, they were glued together to create the flower.  I did use a hot glue gun to put the layers together.

In the background for this card, I used an old Anna Griffin die.  It was glued to a pink 5x7 inch card.  

Using Susan's new Victorian Garden Foliage die set, the Ginkgo was die cut out of Susan's Specialty cardstock, colored using OLO markers, and shaped using Susan's Flower Tool Kit.  

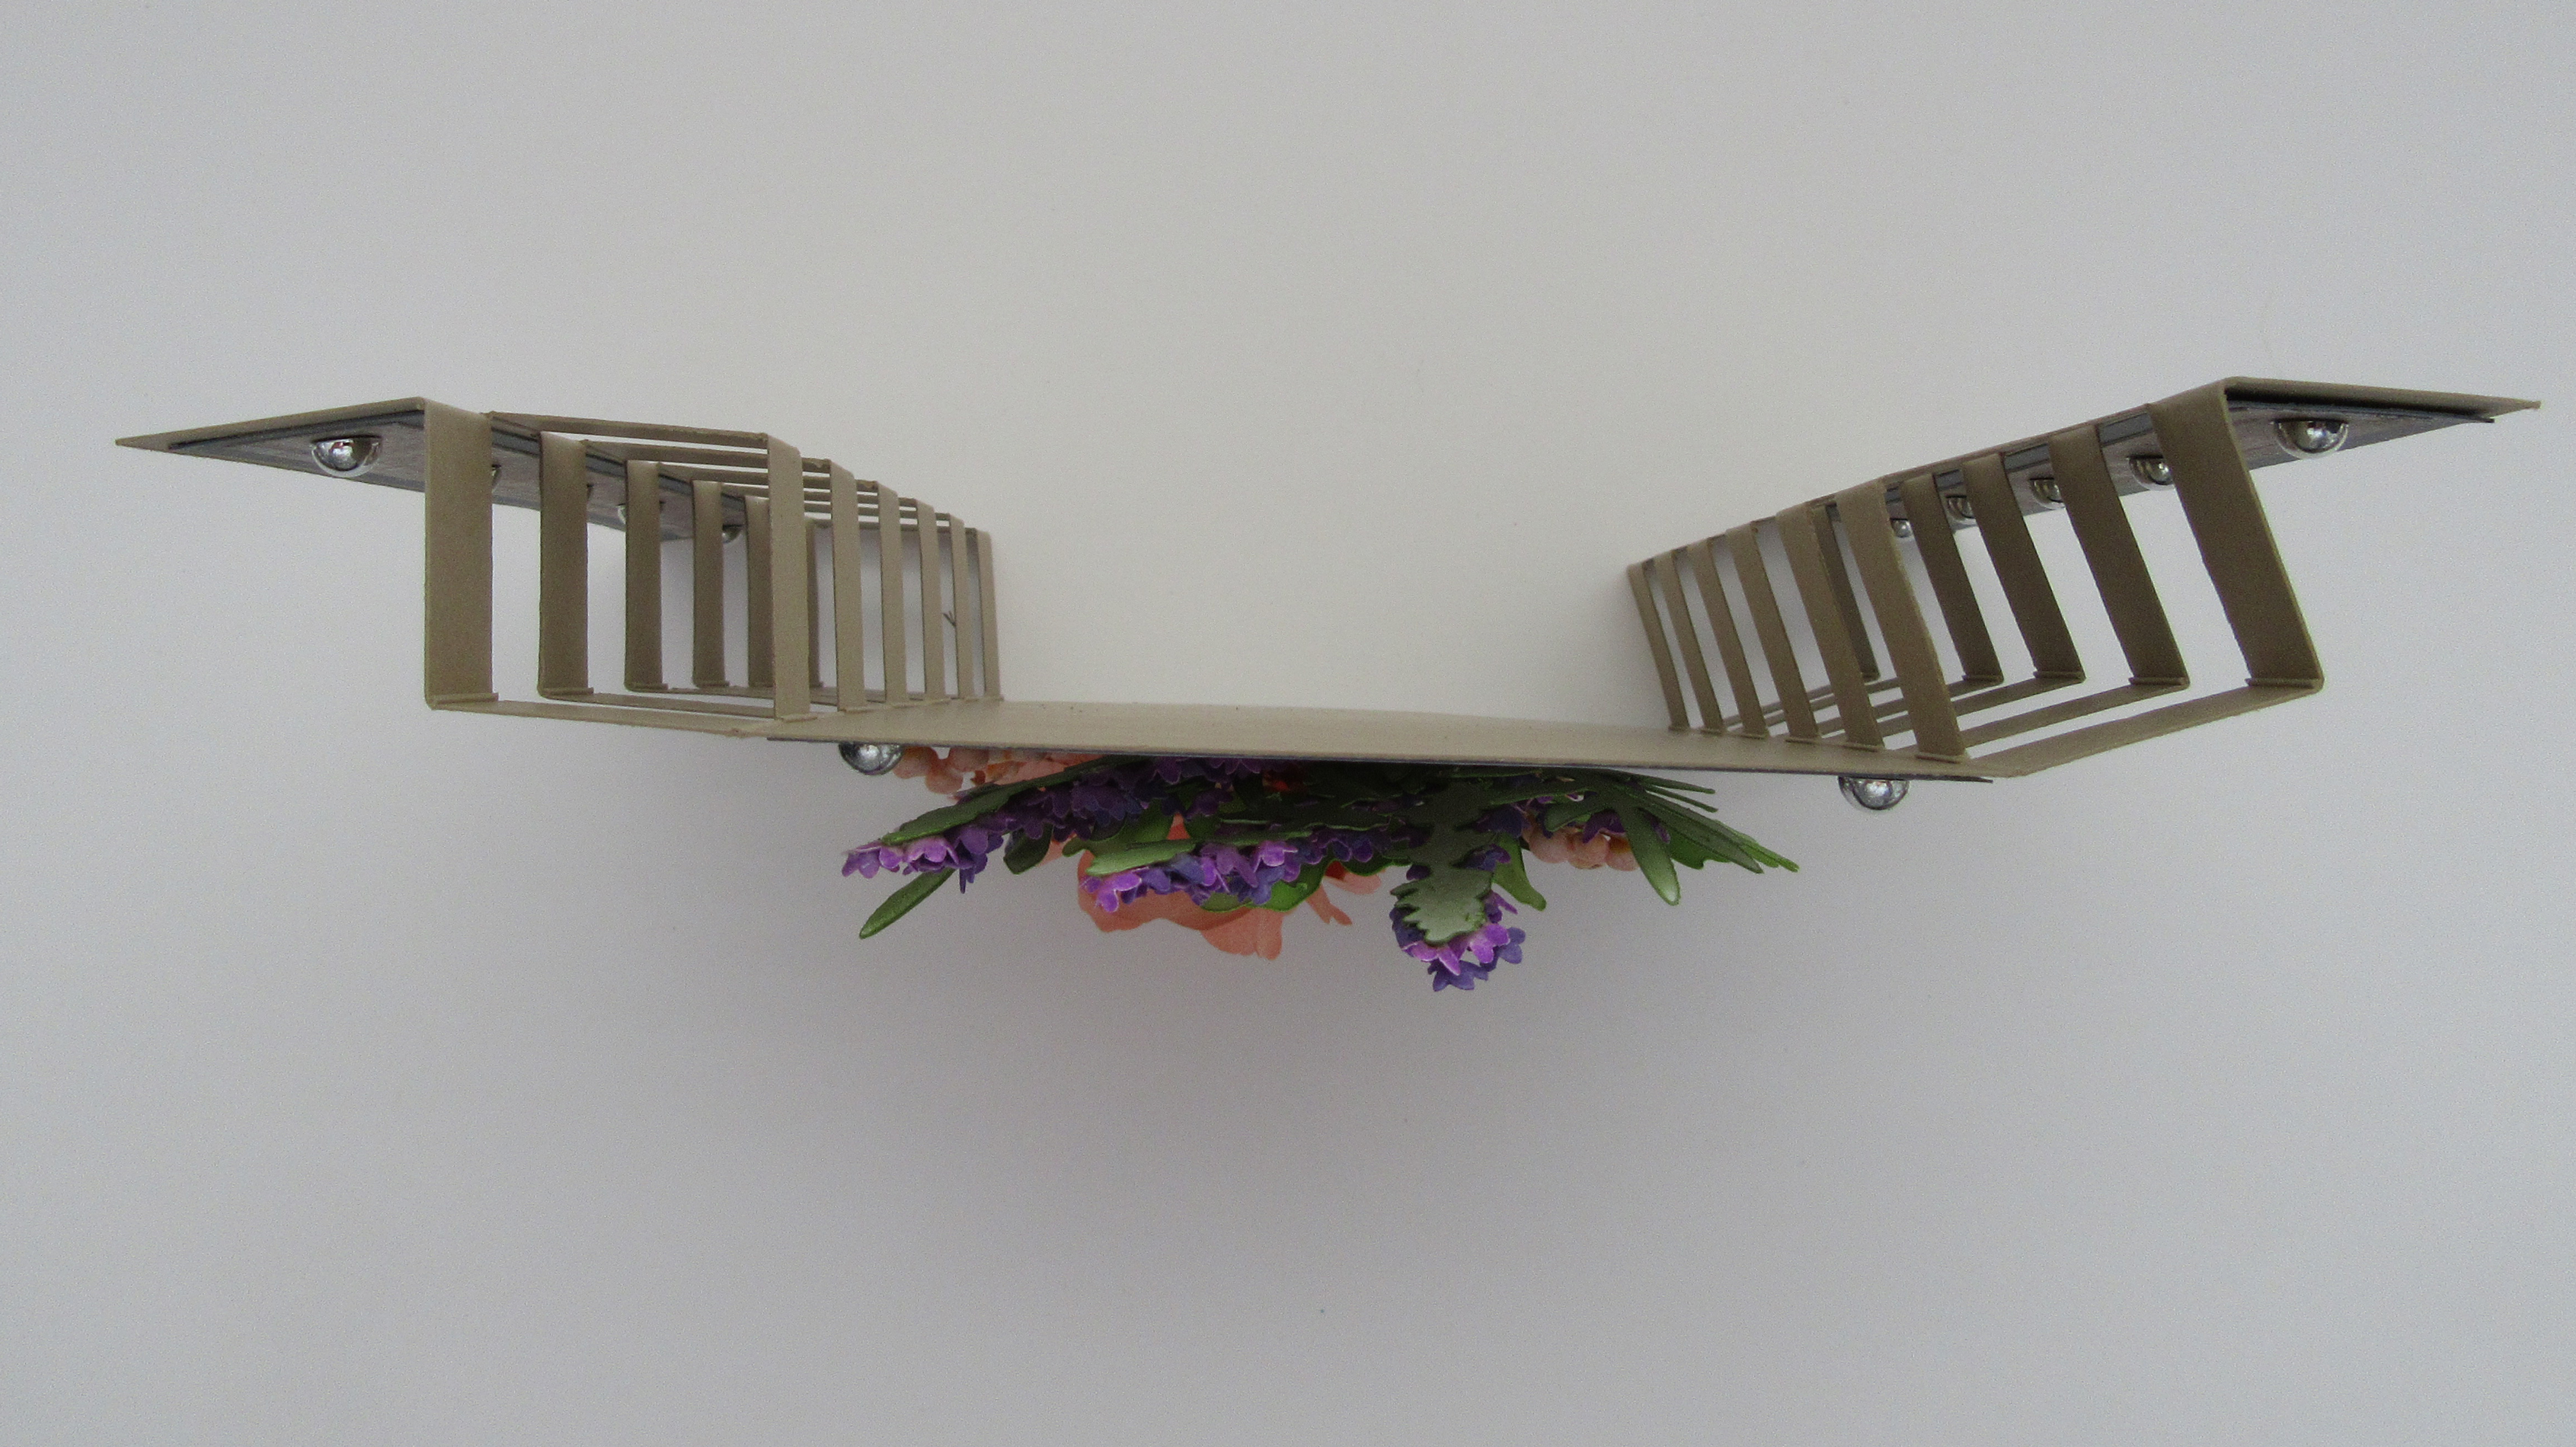
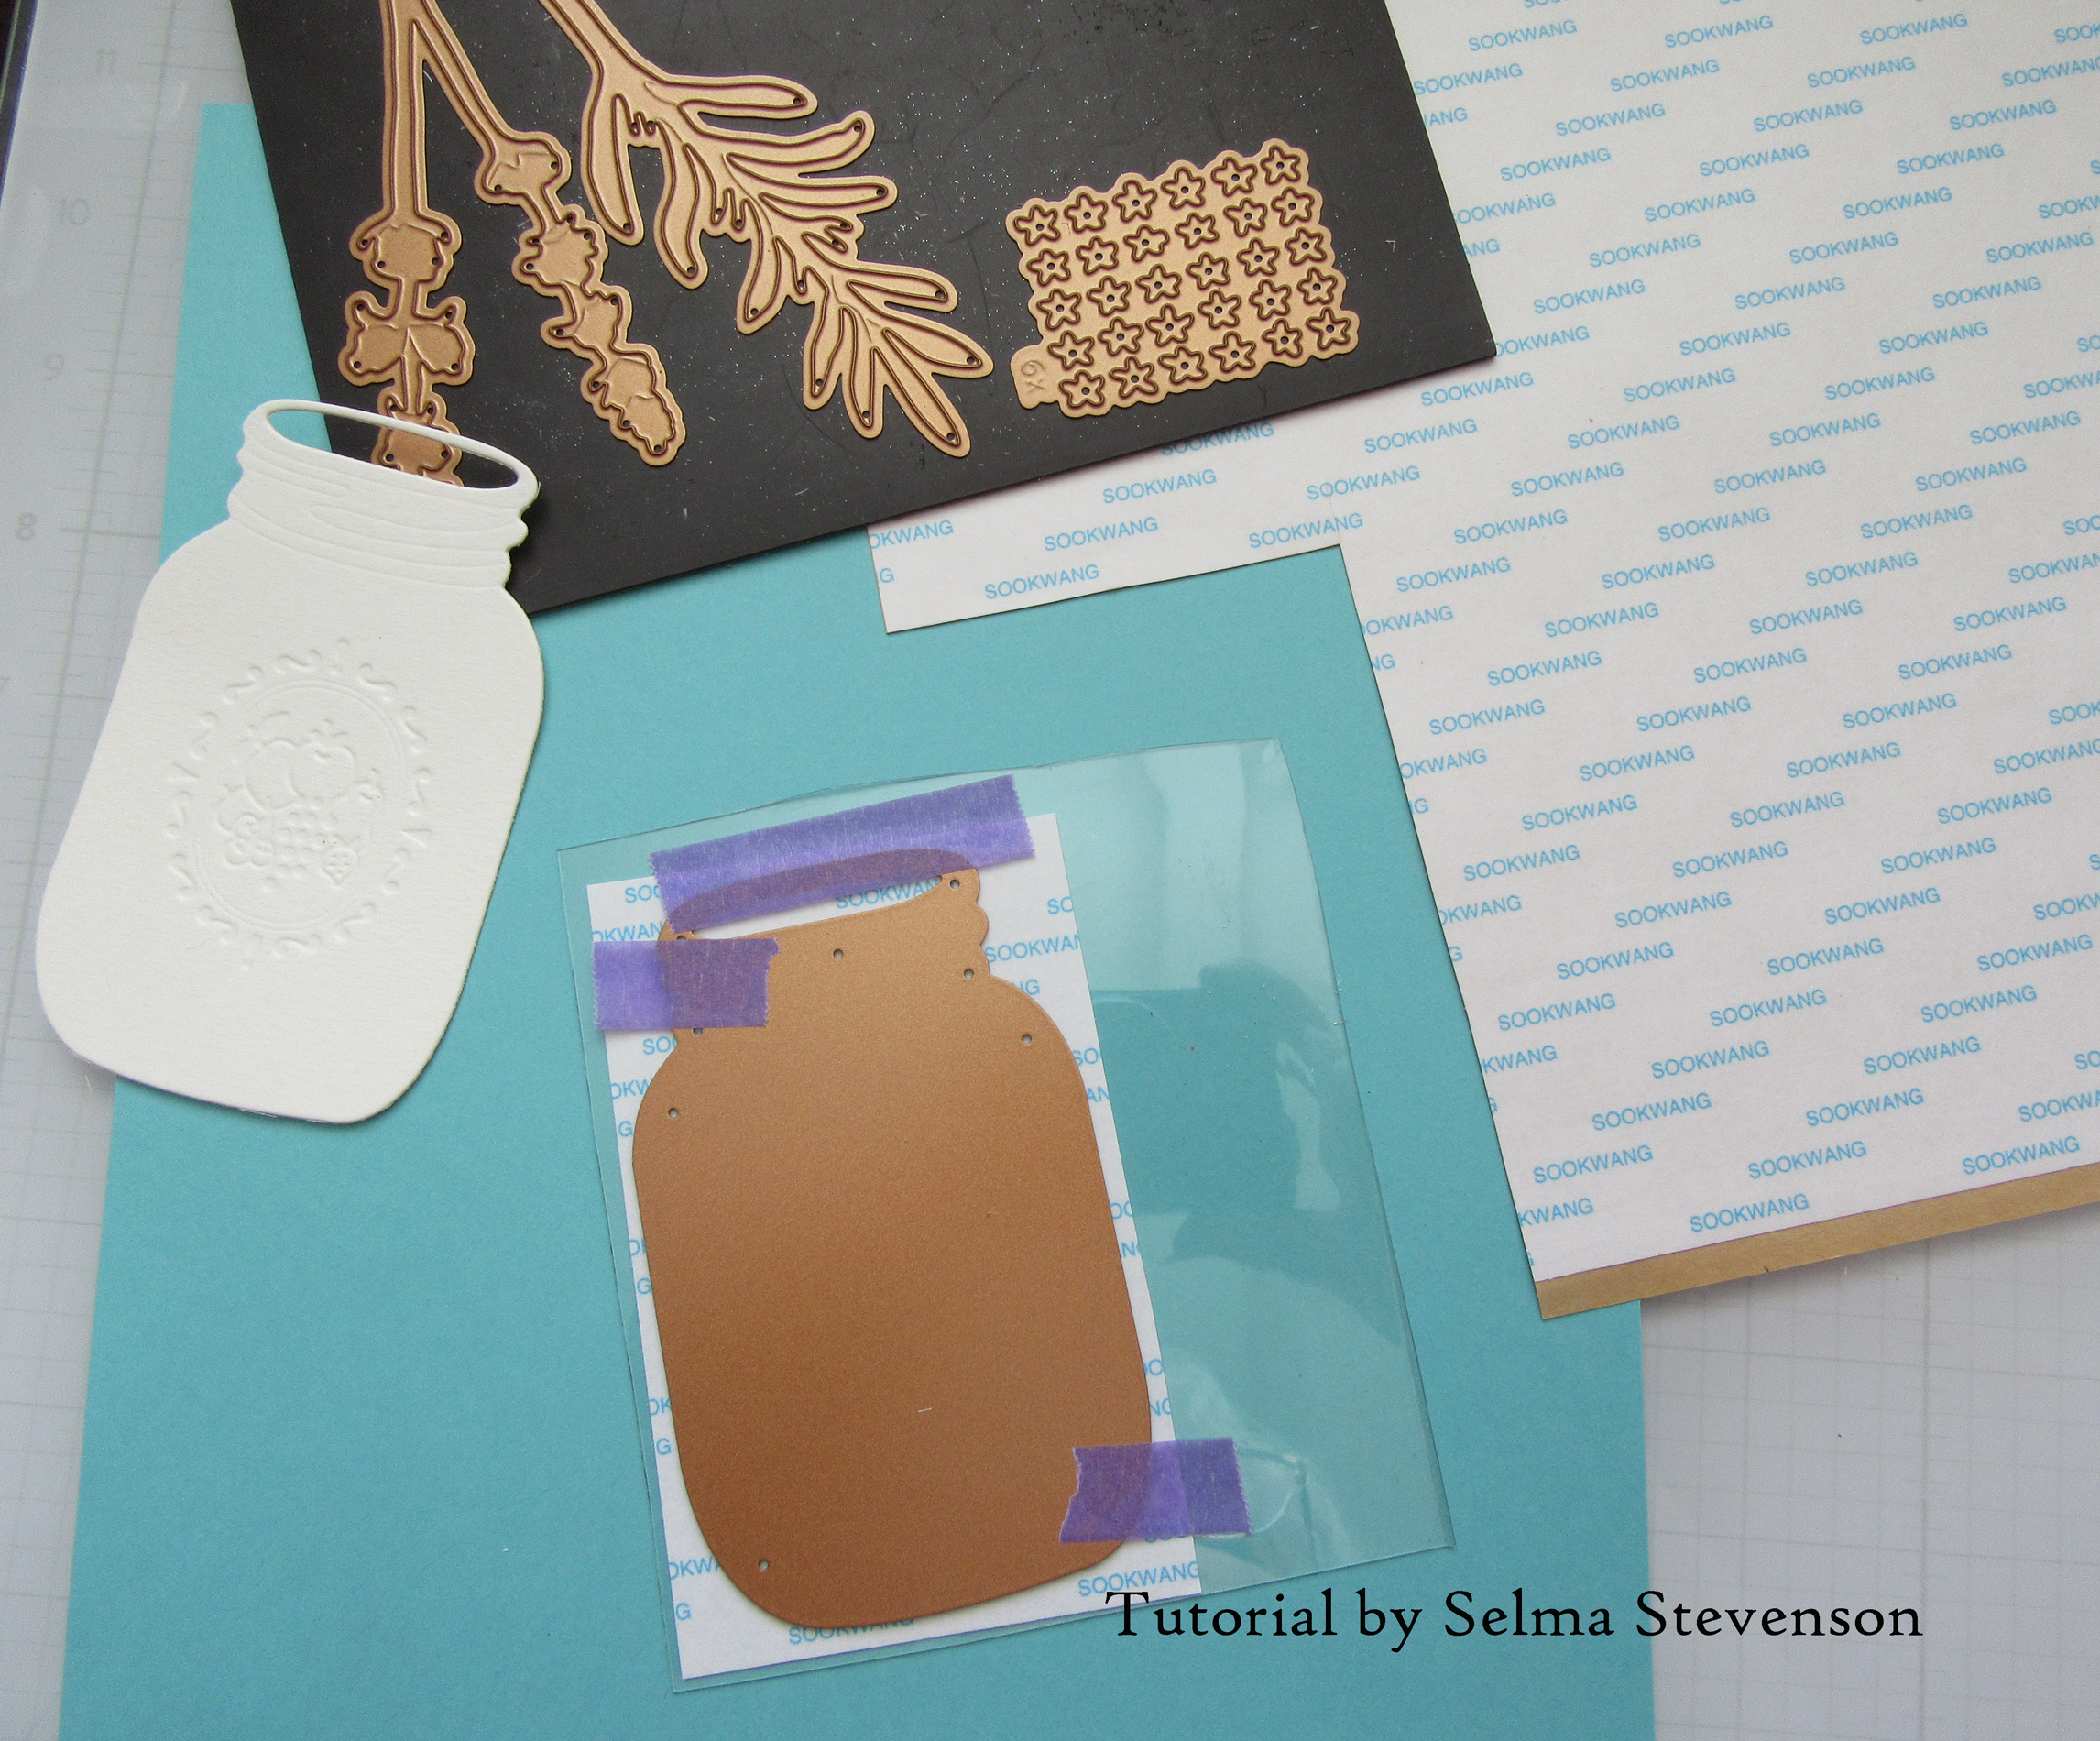
Using Susan's Berry Branch die, several branches were die cut from watercolor paper and colored green.  For the berries, I used tiny styrofoam balls, which you can purchase from the craft store or Amazon.  A few were put in a small plastic storage bowl, that I got from the  Dollar Store, ($1.25 for 5 bowls) then purple alcohol ink was squirted in the bowl.  The lid was put on the bowl and it was easy to shake the bowl until the balls were all covered with ink.  I used to put the balls in a zip lock bag, but they were hard to get out so they could be dried.  By using the small bowl, they were very easy to pour out on a piece of wax paper to dry.  Once they were dried, I glued them to the Berry Branch.  I glue berries in one layer on the branch and let the glue dry, then add another layer on top to create clusters.  Once they are dry, I use a fine tip black or brown pen to push down on each berry help make them look realistic.  The branches were cut apart and arranged behind the flowers.

Pearl Embellishments from Spellbinders were added to the card for a finishing touch.

Tuesday, March 28, 2023

Spider Mum


Hello Paper Crafters.  Today I have created a 5x7 inch card using Susan's Garden new Spider Mum, Carolina Allspice and Cactus Dahlia die sets.  The background was die cut using a Quatrefoil die and a stitched rectangle frame placed over the top.  It was backed with a piece of design paper and attached to the card front with dimensional tape.

Susan's new Spider Mum die set, from her Victorian Garden release, was used to create one white Spider Mum.  It was die cut using Susan's Specialty Cardstock, shaped using her Flower Tool Kit and assembled using Beacon Kids Choice Glue.

The Carolina Allspice die set was used to create two branches of white flowers  They were also die cut out of Susan's Specialty Cardstock and the centers colored using a maroon marker.

The Cactus Dahlia & Ornamental Garden Pottery die set was used to create a maroon flower.  

Behind the arrangement, I used Susan's new Ginkgo die from her Victorian Garden Foliage die set.   

Many of Susan's die set include a ladybug die.  One was die cut, colored and added to one of the flower leaves.  Crystal Glaze was added to her for a shiny back.


For instructions on how to create any of Susan's flowers can be found on YouTube.


Monday, March 20, 2023

Camellia and Lilacs


I always love when Spring comes around so I can create lilacs for my cards.  Also on this card is Susan's new Camellia and Eucalypus from her Victorian Garden Release which is now available.  I have these die sets linked below.

This is a 6x6 inch card.  I used two discontinued dies from Spellbinders for the die cuts on the front of the card.  A piece of lavender metallic cards stock, from Tim Holtz Metallic Jewels 8x8 pad was used under the die cut openings.  

The Camellia die set was used to die cut one white camellia.  Susan's Specialty Cardstock was used and it was shaped using tools from  Susan's Flower Tool Kit.  It was assembled using Beacon's Kids Choice Glue.  The leaves were die cut using watercolor paper, colored with OLO markers then Clear Crystal Glaze added to give them a waxy appearance.

Susan's Lilac die set from her  Garden Favorite's release was used to die the flowers.  The flowers were left in the sheet of card stock to make it easy to color just  the tips of the flowers.  The petals were shaped using the tweezers in the Flower Tool Kit.  A Yellow Prill was glued to the center of each flower.  

The Victorian Garden Foliage die set was used to die cut the Eucalypus.  


Friday, March 17, 2023

Masculine Floral Card


Good Morning.  I was asked to create a Masculine floral card.  I used Susan's new Southern Magnolia, Spirea, and Oriental Lily die sets.

For a masculine card I used a dark background.  This is a 6x6 inch card.   I used an older Becca Feeken die set and cut it apart to create corners under the circles.  A large solid circle was die cut then a piece of design paper, from my stash, was die cut and glued over the larger circle.

Susan's Woodland Wreath die set was used to die cut two brown wreaths.  

Using Susan's new Southern Magnolia die set, one magnolia was created.  It was die cut using Susan's  Specialty Cardstock.  For instructions on how to create this flower, you can watch Susan's instructions on YouTube.

Susan's Oriental Lily die set was used to create two yellow lilies.  They were die cut using Susan's Specialty Cardstock, colored with OLO markers, and pollen added to the tips of the stamens.

The Spirea die set was used to create one branch of spirea.  

Using the Lemon Verbina die from Susan's Victorian Garden Foliage die set, three branches were die cut, colored with OLO markers, and shaped using Susan's Flower Tool Kit.

Susan's new Victorian Garden release is now available from Spellbinders and are linked below. 


Wednesday, March 15, 2023

Spider Mum and Peach Blossoms


Good Morning Paper Gardeners.    Today I designed a slimline card using Susan's new Spider Mum from her Victorian Garden Release.

For the background, I used the Spellbinders Flowering Slimline die set.  The sentiment is from Susan's Garden Favorite stamp set.  It was stamped using VersaFine black ink, die cut and attached with dimensional tape.

The Spider Mum die set was used to die cut the mum.  It was die cut using Susan's Specialty Cardstock.  The petals were colored using R.1 OLO markerSusan's Flower Tool Kit was used to shape the flowers and leaves.  Kids Choice glue was used to assemble the flowers.

Susan's Peach Blossom die set was used to create pear blossoms.  Peach blossoms are pink and pear blossoms are white.  

Behind the arrangement, I used Susan's new Lemon Verbena die from the Victorian Garden Foliage die set.  

Right now, Susan's Victorian Garden release is available from Spellbinders.  I have these dies linked below.


Monday, March 13, 2023

Spider Mum, Lilacs, Carolina Allspice


Good Morning.   Today I have another card created with one of the new die sets in Susan's Garden Victorian Garden Release from Spellbinders.  

The Spider Mum die set was used to create one purple and white mum.  It was die cut using Susan's Specialty Cardstock and colored using OLO markers. The colors I used are R 1.8 and V 1.6.   The petals were shaped using Susan's Flower Tool KitKid's Choice Glue was used to assemble the flower.

The Lilac die set from the Garden Favorites release was used to create two lilac flowers.  Lavender Prills were used to add one prill to each blossom.  

The Carolina Allspice die set from the Painter's Garden release was used to create the white flowers.  The centers were colored with OLO markers 5.7 and 5.5.

The Mason Jar & Lavender die set was used to create the lavender.  In order to get a variegated shade on the flowers, I played around with several ink combinations to get the color I wanted.  I ended up  rubbing Journey Pretty Amethyst and GinaK Wild Lilac ink pads across both sides of cardstock, blending the colors.  The flowers were then die cut, shaped and added to the Lavender stems. 

A ladybug from the Sunflower die set  was die cut, colored and attached to one of the leaves.  Clear Crystal glaze was added to give her shine.  

The background paper on this card is from the Parklane Timeles Textures paper pad.


Saturday, March 11, 2023

Camellia with Lavender


This morning I created this card and love it so much I can't wait to post it even though I have already posted today.  I had a lot of fun creating this Mini Double Tower Fold Card.  For the instructions for this card I watched Sam Calcott's YouTube Video here Lhttps://www.youtube.com/watch?v=Jj51-RNaCaIINK.

Sam always has such easy instructions for creating unique cards.  This one folds up to fit into a 6-inch square.  Because it is so dimensional, I will mail it in an acrylic box.  The card base was created using Spellbinders Portobello Cardstock. This is a nice heavy cardstock which holds up well for this card design.   I found a piece of design paper in my stash that I really like and designed the card around that paper.  It has a mix of gray, tan and peach in the woodgrain design.  

I used Susan's new Camellia die set to create a peach colored flower.  It was die cut using Susan's Specialty cardstock   and colored with OLO markers.  The camillia looks similar to a rose but the shaping is different.  Susan will have YouTube instructions up soon for her new Victorian Garden die sets.  

The Mason Jar and Lavender die set was used to create the Lavender.  

The Victorian Garden Foliage die set was used to die cut the Ginkgo leaves.  

Susan's Berry Branch was die cut and small styrofoam balls, that have been colored with acholol ink, were glued on the branch.  

I found a piece of design paper in my stash that I really like and designed the card around that paper.  It has a mix of gray, tan and peach in the woodgrain design.  

For enbellishments, I used Spellbinders Silver Embellishments.  


Closeup of the beautiful Camillia.


Picture of card looking down from the top.

This card really was very easy to create.  I think you will enjoy making it.


Lavender in Mason Jar


Hello Paper Gardeners.  

One of the new die sets in Susan's new Victorian Garden release is the  Mason Jar and Lavender.   Lavender is such a great die set to have because it can be used alone,  in a bouquet or arranged in a container.  In this die set,  Susan has included a mason jar and  I have a tutorial here on how I created it.  


To begin, die cut the Mason Jar out of watercolor paper. 
Cut a piece of double sided adhesive to stick to the back side of a piece of acetate.
Tape the Mason Jar Die to the top side of the acetate and run it through the die cutting machine.  I had to fussy cut around the outline because the acetate I used was pretty thick. This was not hard to do  The acrylic will make the mason jar look like glass.


On the left is the mason jar with the double sided adhesive on the back.  The backing paper is still on the adheive.  On the right is the mason jar die cut from watercolor paper.  The design embossing shows up well on the watercolor paper.


To make it look like the jar has water in it,  I used Stormy Sky Distress Ink.  The watercolor paper was spritzed with water.  The ink pad was pressed on my glass work surface,  then lightly spritzed with water.  The brush was wet.


Brush the ink lightly over the lower half of the jar.  Dipping brush in darker portion of the ink, draw a circular area on both the top and bottom of the jar.  Allow this piece to dry while creating the Lavender stems.


Create the lavender stems.  Use several shades of purple ink pads and rub over a piece of Susan's Specialty cardstock.  You can brush or sponge ink on the cardstock if you want. You want a variation of color for the flowers.  Add ink to both sides of the cardstock.  Use the lavender flower die and die cut all the flowers.  Shape with the small ball stylus, which is in Susan's Flower Tool Kit.  Die cut the stems from either 100 lb card stock or watercolor paper.  It needs to be a heavier weight cardstock in order to hold the flowers.  Color green.  Add the lavender flowers to the stems.  


Glue the stems on top of the watercolored mason jar.  I cut a few extra stems and glued at the bottom to make them fit down into the water.


Remove the adhesive protective sheet off the back of the acetate.  Press the acetate over the mason jar with the flowers.  Press it down well with a bone folder but avoid the embossed area in the middle.  

I used one of Susan's stamps for the quote.  It was gold embossed, fussy cut, and attached with a foam pad.  Fine gold cording was tied around the neck of the jar and tied in a bow.


Friday, March 10, 2023

Magnolia


This is an exciting day for you paper gardeners!  Susan's new Victorian Garden release is now available from  Spellbinders.  I have the individual die sets, plus the bundle, linked below.  This release includes Southern Magnolia, Camillia, Mason Jar & Lavender, Spider Mum, Victorian Garden Foliage, Tea Cup & Saucer, plus a Ferns Glimmer Foil Plate.

This is a 6x6 inch card.  A piece of 6x6 inch white cardstock was scored using a Score Board, 1/8 inch all around the edges.  Pink ink was sponged in the center of the card then Altenew Iridescent Shimmer sprayed over the pink ink.  

Using the Spellbinders Diamonetta Background Glimmer Plate, and gold foil,  the design was foiled onto a piece of white card stock.   It was backed with gold mirror cardstock and attached with 3-D Foam Squares to the front of the card.

This card was designed using the Southern Magnolia die set.  Susan shows how to create white Southern Magnolias on her YouTube Video, but I decided to create a red magnolia.    The flower was die cut using Susan's Specialty Cardstock, colored using a variety of OLO markers, and shaped using Susan's Flower Tool Kit.  It was colored using OLO R 1.8,
 R 5.7, R 5.5, R 5.3, and R 5.1.  The leaves were colored on top with OLO YG 8.7 and the bottom of the leaf with OLO YO 2.7.    Orange Shade PanPastel was sponged over the caramel color to give it a suede look.    Clear Crystal Glaze was brushed on the top of the leaves to give them a waxy appearance. Do not add glaze to the bottom of the leaf.  

Susan's Bee Blossom die set, from the Through The Garden Gate release, was used to create the smaller flowers.  

This is such a beautiful flower to create.  I know you are going to love Susan's new Victorian Garden Release.


LinkWithin

Related Posts with Thumbnails