Wednesday, March 31, 2021

Hyacinth


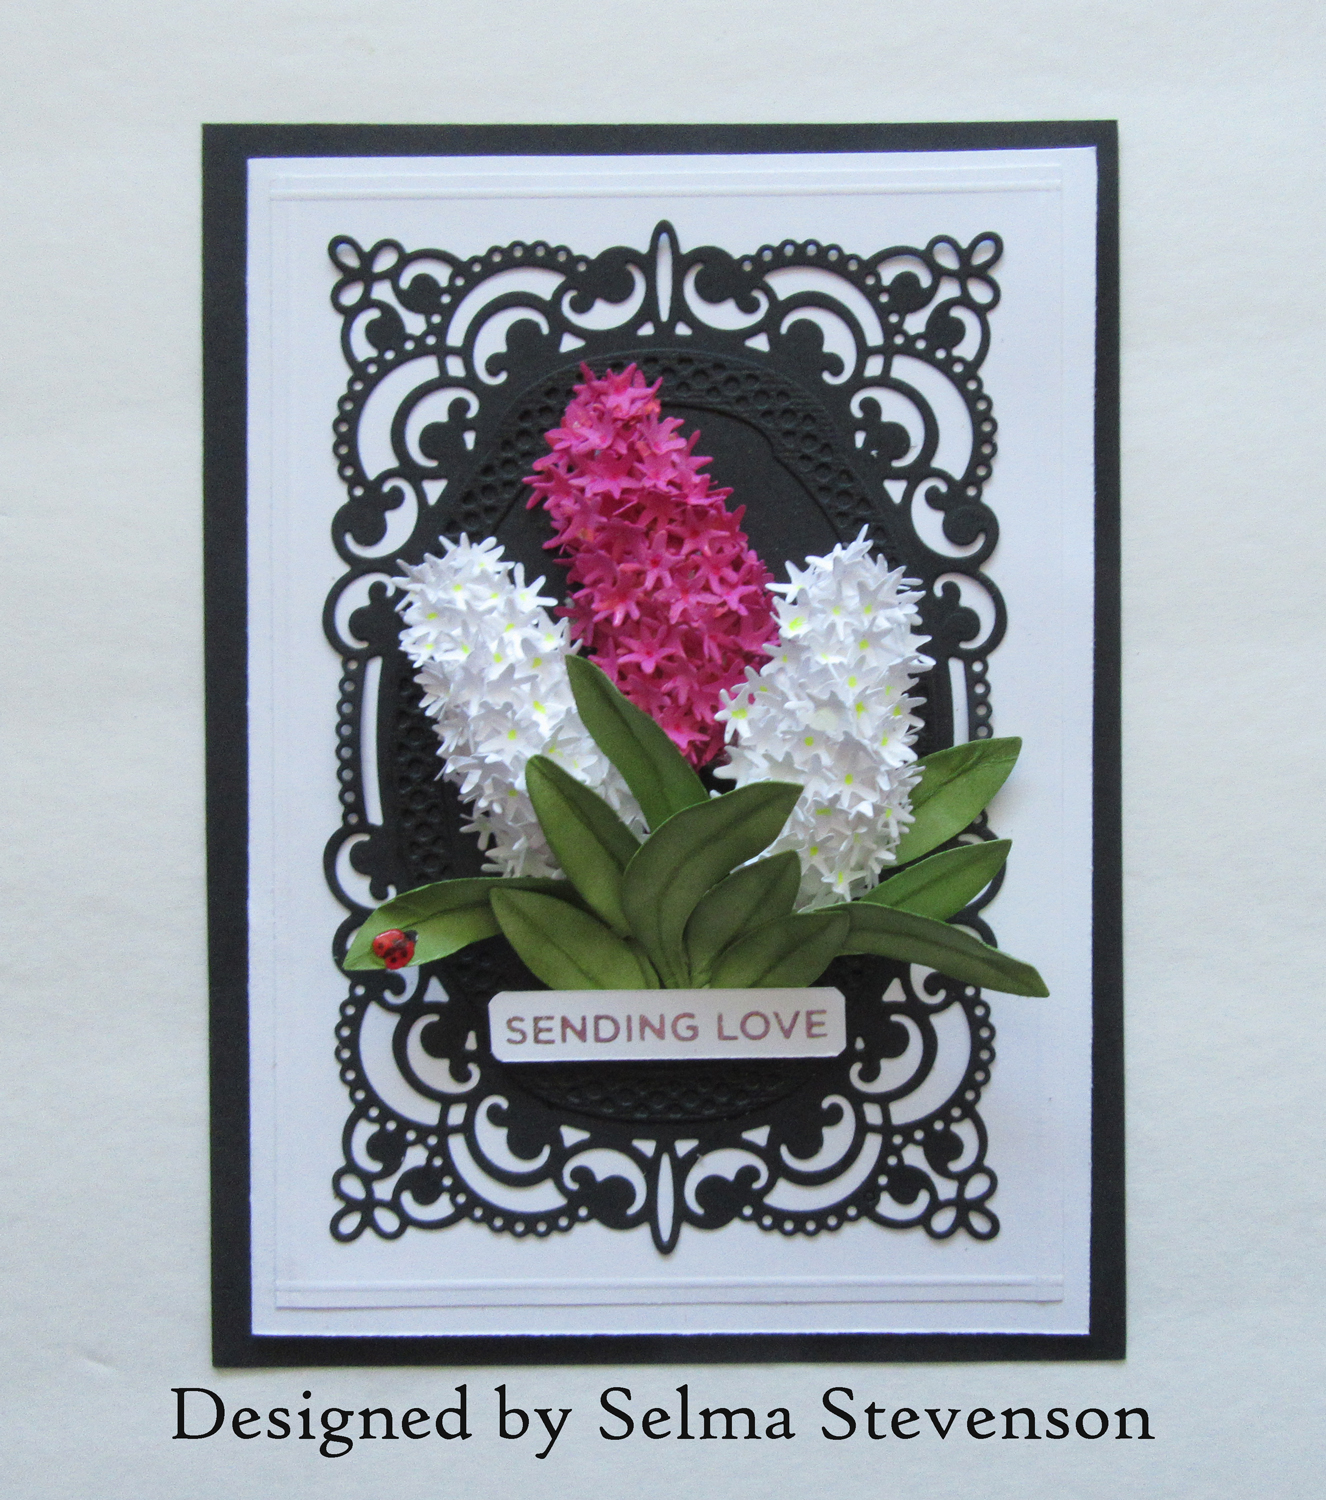
Good Morning.   My card today has three beautiful hyacinths created with Susan's Garden Club Hyacinth die set.  

This is a 5x7 inch card.  A piece of white card stock was cut 4 3/4 x 6 3/4 inches and scored around the edges on a Score Board.  

The Spellbinders Annabelle's Trousseau Layering Frame Medium die set was used to die cut the frame using black card stock.  It was attached using Spray Adhesive.  

Using Susan's Hyacinth die set, three hyacinths were die cut, using Susan's White Specialty card stock. Picked Raspberry Distress Ink was brushed on a piece of the white specialty card stock before die cutting.  The little flowers were shaped using Susan's Flower Tool Kit.  The little flowers were glued to the flower base using Barely Art Glue.  The leaves were brushed with Distress Mowed Lawn ink.  

The Foliage & Ladybug die set, from Susan's Autumn Release, was used to die cut the ladybug.  It was colored with a red Copic marker and the details added with a black fine line pen.

Using the Spellbinder Glimmer Hot Foil System, the sentiment was gold foiled on a piece of white card stock.  The Glimmer Plate used was the Everyday Sentiments II Hot Foil Plate.  The Spellbinders Quick Trimmer for Cardstock and Foil was used to cut out the sentiment.  The corners were rounded using a corner rounder.  


Monday, March 29, 2021

Kerria Japonica


Today I designed a card using Susan's new Spellbinders Kerria Japonica die set.  The Kerria Japonica is also known as the Japanese marigold bush.  The bush is loaded with these pretty little yellow flowers.

I used a piece of design paper from my stash for the background.  I used a Score Board to emboss a frame around the edges.  Susan's Spring Quote was stamped  with black VersaFine ink on a Spellbinders Elegant Twist Oval die cut.  The oval was attached with double sided foam squares.

Susan's Foliage & Ladybugs die set was used to die cut the foliage, berry branch and lady bug.  Small pearls were used for the berries.  I used white pearls and colored them with an orange alcohol marker, then attached to the berry branch.  Crystal Glaze was added to the ladybug. 

Susan's Kerrria Japonica die set was used to die cut the flowers out of her white Specialty Card Stock, then were colored by brushing on Distress Inks. Susan's Garden Flower Tool Kit was used to shape the flowers and Bearly Art Glue used to assemble the flowers.  The leaves and foliage were also brushed using green Distress Inks. I like to used watercolor paper to die cut the foliage.   I use the Waffle Flower Water Media Mat to place die cuts on, then brush on color with the Picket Fence Brushes.  The mat holds the die cuts still while brushing.  I created six large and 3 small flowers.  For the smaller flowers, I used only the two smallest dies for this flower.

To complete the card, Spellbinders Gold embellishments were added.

Thank you for visiting my blog today.


Thursday, March 25, 2021

Yellow Peony


Closeup of Peony created with Susan's Garden Peony die set.

Here is a photo I found on the Internet of a yellow peony used to create my flower.


Today I have another card with a Peony that was created with Susan's new Spellbinders Garden Notes Peony die set.

A background was created using Distress Inks.  The inks were brushed on using the Picket Fence Brushes then lightly spritz using a mini mister.  

The doily was created using the Spellbinders Timeless Grace Doily Build a Doily die set.  

Susan's new Spellbinders Peony die set was used to create the flower.  The petals were die cut using Susan's white Specialty Card Stock.  Distress Scattered Straw ink was brushed on the petals.  I place the petals on the Waffle Flower Mini Water Media Mat and brush the ink on with Picket Fence Brushes.  The base of the petals were brushed with both Distress Wild Honey and Carved Pumpkin inks.  The ferns were die cut using the new Ivy and Ferns die set.  

One of Susan's Spring Quotes was stamped on a piece of white card stock and added with dimensional tape.

Using Susan's Foliage & Ladybug die set, from her Autumn Release, was used to die cut the ladybug.  

A green silk ribbon was added to complete the card.


Sunday, March 21, 2021

Tulips and Lily of the Valley


Good Morning Paper Gardeners.  We always know Spring has arrived when we see tulips blooming.  My card today has Parrot Tulips and light pink Lily of the Valley created with Susan's Garden Notes die sets.

This is a 6x6 inch card.  A piece of pink card stock from my stash was cut 5 1/2 inch square, scored around the edges using a Score Board and attached to a white card.  Spellbinders Elegant Twist Squares die set was used for the die cut squares - the largest die cut using white card stock, the middle size die cut using matching pink card stock and the smallest die cut using white card stock.  The small die in this set was used for the quote.   One of Susan's Spring Quotes was stamped on the small die cut square.  The squares were all attached using dimensional tape.

Susan's Parrot Tulip die set was used to create three tulips.  They were die cut using Susan's Speciality white card stock.  Distress Inks Spun Sugar and Kitsch Flamingo was brushed on the petals for a two tone effect.  The flowers were shaped using Susan's Flower Tool Kit and assembled using Bearly Art Glue.  

Susan's Lily of the Valley die set was used to create two stems of flowers.  I found using watercolor paper to die cut the stems was easiest to push the stems through the top of the flower.  The flowers were die cut using Susan's white Specialty Cardstock.  The cardstock was brushed with Distress Spun Sugar ink prior to die cutting.  The flowers were shaped with the ball stylus in Susan's Flower Tool Kit.  

Susan's Foliage & Ladybug die set was used to die cut the eucalyptus branch that is attached behind the Lily of the Valley.

To finish the bouquet, a small pink organdy bow was attached under the tulips. 


Wednesday, March 17, 2021

Light Pink Peony and Spirea


The peony is one of my favorite  flowers!  It is so rewarding to me to be able to use cardstock and create such a realistic peony for my cards.  Susan's Garden Club Peony die set makes creating this beautiful flower so easy.

For this card, I used the Amazing Paper Grace, January Die of the Month die for the die cut background.  It is backed with a piece of pale pink card stock to match the pretty flower.

Susan's Garden Spirea die set was used to create the white Spirea behind the peony. All the die cuts were cut using Susan's white Specialty Cardstock from Spellbinders. To color the peony, I used Distress Spun Sugar and Scattered Straw inks.  The inks were brushed on using one of the Picket Fence Brushes.  The die cut pieces were placed on the Waffle Flower Mini Water Media Mat, which holds the die cut pieces still while brushing on the inks.  To shape the petals, Susan's Garden Flower Tool Kit was used.  This tool kit contains everything you need for creating your paper flower garden.  Bearly Art Craft Glue was used to assemble the petals.

One of Susan's stamps, from her Spring Quotes stamp set was stamped on a piece of white card stock, using VersaFine Black Ink.  The quote was clear embossed.  The corners of this piece were rounded with a corner rounder, then attached using adhesive foam squares.


Saturday, March 13, 2021

Tulips, Poppies and Spirea


Today my card has two of the new Susan's Garden Club die sets and a quote from her new Spring Quotes stamp set, from Spellbinders.

This is a 6x6 inch card.  A piece of design paper from the First Edition  - Gardenia paper pad, was added to the front of the card.  The large Spellbinders Elegant Twist Square die was attached in the center, using foam squares.  In the center of this square the Altenew Mid-Century Frame die was added.  

The quote was stamped using Susan's new Spring Quotes stamp set.  It was stamped using black VersaFine Ink and clear embossed.

The new Garden Notes Spirea die set was used to create two branches of spirea.

The new Garden Notes Parrot Tulip die set was used to create three tulips.  Susan's White Specialty Cardstock from Spellbinders was used to die cut all the pieces. Some Parrot Tulips have fringed edges, so I used the scissors in Susan's Tool Kit and made short cuts around the petals.   I used the new Kitsch Flamingo Distress Ink and Picked Raspberry Distress Ink at the base of the tulip petals.  I worked on the Waffle Flower Mini Water Mat  to brush on the inks.  I really like using the Picket Fence Brushes to apply ink to my die cuts.  Susan's new Flower Tool Kit was used to shape the flowers and Bearly Glue used to assemble the flowers

The Oriental Poppy die set, from Susan's Autumn release, was used to create two poppies  The Garden Notes Foliage & Ladybugs die set was used for the ladybug.  She was colored with a red Copic marker, then a black fine line pen used for the black details.  Nuvo Crystal Glaze was used to give her a shine.

I decided the corners of the Elegant Twist Square needed an embellishment so added large pearls that were colored with a dark pink Copic marker.   

Tuesday, March 9, 2021

Twisted Easel Card with Kerria Japonica


What a fun card this was to create!  Susan showed us how to create this card on her Susan's Garden Club Facebook Live Video.  

For the background I used a Tonic die (discontinued Classic Quatrefoil) to die cut an open design in the right side of the design paper I used.  It was backed with a piece of brown cardstock and attached to the a piece of white card stock 6x6 inches square.

For instructions to create the twisted easel card, watch Susan's video.  

Susan's new Garden Club Kerria Japonica die set was used to create the little yellow flowers on the left side of the card.  The Foliage & Ladybug die set was used to die cut the ladybug.  It was colored, shaped, and glued to one of the leaves.  Crystal Glaze was added for a shine.

On the inside of the card, I used a piece of design paper that has bees in the design.  The design paper is from the First Edition-Gardenia 12x12 pad.  A bee was fussy cut from that design paper.  It was shaped, and attached with a pop-up glue dot.  Glue was added to the wings and sprinkled with clear glitter.


Front of Card


To enable the easel (front of the card) to stand up, one of Susan's Spring Quotes was stamped with black ink, on a piece of ivory card stock,  and die cut using a scallop die.  A piece of the same brown card stock used on the front of the card was cut slightly larger than the scallop rectangle.   It was glued at an angle on the inside of the card.  The scallop rectangle was centered over the brown card stock and attached using dimensional tape.  Another bee was fussy cut and added with a pop-up glue dot.


Monday, March 8, 2021

Easel Card with Parrot Tulips


Good Morning Crafty Friends, 

Easel Cards are fun to create and always fun for the recipient.   This is a Floating Swinging Easel Card.  I found the directions for creating it on Sam Calcott's YouTube video.   It is a fun card because the middle panel is connected on a piece of acetate that gives the illusion of floating.


This is a 6x6 inch square card.  It will lay flat for mailing in an acrylic box.

On the floating panel, I added the small Spellbinders Elegant Twist Square Die Cut, with dimensional foam squares.  The small square in this set was die cut and one of Susan's Spring Quotes was stamped.  It was also attached with dimensional foam squares.  A butterfly was added to the upper right corner.

For the scallop design, I used the Spellbinders Vintage Starburst Valance & Gatefold die set.  The outline die was used to die cut just the edge of one side of the card.  The same die was used again to die cut the edge of a piece of design paper, leaving the other end long enough to fit up to the score line on the bottom panel. (This will make sense after watching the video.)  That piece was glued to the bottom, matching the scallop edges.  Using the same outline die along with the Vintage Starburst Valance die, cut it out of white card stock. Trim along across top edge.  This will be where the top easel piece with rest. Glue it to the bottom of the card, matching scallops.  I used a 3/4 inch circle punch to create three circles.  They were cut in half, glued together, then attached to the circle in the center of the die cut, using a circle dimensional, trimmed flat along the middle.  This half circle will hold easel open.

Susan's Parrot Tulip die set was used to create five tulips.  They were die cut using Susan's white Specialty Card Stock from Spellbinders.  Light green and yellow markers were used to color the petals.  The edge of the petals were cut with the scissors in Susan's Flower Tool Kit, then shaped.  Three tulips were added to the left side and two tulips attached to the left.  Before adding the flowers, close the card down to be sure there is room for the card to close.


When all the way pushed down, the floating panel will fit down between the tulips and will fit into an acrylic box.


Sunday, March 7, 2021

Diamond Easel Card


Today I have a Diamond Easel Card.  This week on Susan's Facebook Live Video, she gave instructions on how to create this type of card.  Now that I look back at her card, I added colored card stock differently than she did.  I will have to create this card again!!!

The design paper used to decorate this card is from the P13 Forest Tea Party design paper pad.  

Susan's Fern's & Ivy die set was used for the ferns behind the arrangement.

Susan's Lily of the Valley die set was used to create four stems of these flowers.  They were die cut using Susan's Specialty White Cardstock.  The flowers and leaves were shaped with her new Flower Tool Kit.  

The Kerria Japonica die set was used to create three flowers.  They were also shaped using the Flower Tool Kit and the glue used was the Bearly Art Glue.

One of Susan's Spring Quote stamps was used for the quote.  It was die cut using a scallop rectangle die.  Two additional rectangles were die cut and the three rectangles glued together for strength.  The quote was attached with foam squares.


Friday, March 5, 2021

Purple Parrot Tulips


Tulips are a sure sign of Spring!  Today I created a card with pretty tulips using Susan's Garden Notes Parrot Tulip die set from Spellbinders.  

This is a 6x6 inch card.  The background paper is from the Stamperia Lilac Flowers Pad.  It was scored around the edges with a Score Board, 1/8" from all edges.  

In the center I attached a Spellbinders Elegant Twist Circle with foam squares.  In the center of it is an oval from the Spellbinders Floral Oval die set that I believe is discontinued.  

For all flowers die cut with Susan's Garden dies, I always use her Spellbinder's Specialty White Cardstock.  It is the perfect weight for shaping the flowers and colors beautifully.  I also use her Spellbinders Flower Tool Kit for shaping.  The glue I use is the Bearly Art Craft Glue.  I usually use Distress Inks to color the flowers and leaves and like doing this using the Waffle Flower Crafts Mini Water Media Mat and Picket Fence Brushes.

Susan's Foliage and Ladybug die set was used for the foliage behind the tulips.  The ladybug was die cut from this set.  She was colored with a red Copic Marker and details added with a fine line black penClear Crystal Glaze was added.

Nine tulips were die cut using the Parrot Tulip die set.  Around the tips of the white and purple tulips, I cut small slits around the edges, using the fine tip scissors in the tool kit.  The solid tulips were not fringed that way.  

One of the quotes from Susan's Spring Quotes stamp set was stamped on a piece of white cardstock and trimmed.  Lavender ink was sponged around the edges.  It was added at the base of the flowers with dimensional tape.  

A butterfly from 49 and Market - Vintage Artistry Wedgewood embellishment sheet was added plus a few lavender rhinestones.  

Dark Pink Peony


Before creating a flower, I like to do a little research and find different varieties and colors, then chose one to duplicate.  Today I have a simple card featuring a rose-pink peony with a frilly center.    I used Susan's new Garden Notes Peony die set, from Spellbinders, and gold foiling.  Below is the peony I created and the picture I used for inspiration.  


Closeup of the peony I created with Garden Notes die set


Picture of pink peony from Internet used for inspiration


This is a 6x6 inch card.  The foiled design behind the peony is the Spellbinders  Monogram Laurel Glimmer Hot Foil Plate.  I used the Spellbinders Glimmer Hot Foil System and Spellbinders Gold Foil.  The design was foiled to the center of of piece of white card stock cut 5 1/2 inch square.  Using a Score Board, a 1/8" line was scored around the edges of this piece before adding to the card front.  

Using Susan's Garden Notes Peony die set, the peony petals were die cut using Susan's new white Specialty card stockDistress Kitsch Flamingo and Picked Raspberry inks were brushed on the petals.  Susan's new Flower Tool Kit was used to shape the petals.  Bearly Glue was used to glue the petals together.  For the center of the flower, I die cut the stamen 6 times, using yellow card stock.   The scissors in Susan's Flower Tool Kit were used to cut the stamen points in half, to make them frilly. Using the tweezers the stamens were rolled together to create the large stamen, then fluffed out. The peony leaves were die cut using white card stock and brushed with Distress green inks, and shaped.  

The Garden Notes Foliage and Ladybugs die set was used to die cut the lady bug.  She was colored with a red Copic marker, and a fine line black pen used for the details.  Nuvo Crystal Glaze was added to her for a shine.

For the sentiment I used the Spellbinders Everyday Sentiments II Glimmer Hot Plate set.  The new Spellbinders Quick Trimmer for Foil & Paper was used to cut the gold foil then used again to cut the sentiment strip straight.  This piece was added using Foam Squares cut to size with scissors.  Spellbinder Gold Embellishments were added at each end of the sentiment.


Monday, March 1, 2021

Clear Card with Peony


Good Morning.

I have wanted to try creating a card from clear card stock, or acetate, for a long time and finally did it today.  This is a 5 1/2 x 5 1/2 inch card.  I used clear card stock and cut it 11 x 5 1/2 inches.  Using a Scoreboard, I scored the clear card stock in half to create a 5 1/2 inch square card.  

In order to have a solid background I created 2 more 5 1/2 inch square white cards.  These cards were cut at an angle as shown.  These cards were then cut down the center seam because it makes it easier to close the card.  One of the pieces of white card stock was embossed with an embossing folder, but ends up not showing much of the embossing with all the flowers added to that piece.  The four white pieces were attached with strips of clear double sided adhesive to the bottom of the card - front, inside, and back.

A pink peony was created using the Garden Club Peony die set.  All the pieces were die cut using Susan's new white Specialty card stock.  Distress Spun Sugar and Picket Raspberry inks were brushed on the flower petals.  The petals were shaped using Susan's new flower tool kit.  

Susan's new Lily of the Valley die set was used to create two stems of pink Lily of the Valley.  The flowers were die cut using Susan's card stock.  Before die cutting, I brushed Distress Spun Sugar ink onto a piece of the card stock, then die cut.  The flowers were shaped using the tool kit.  I found it was easier to die cut the stems using watercolor paper because it was a little thicker and was easier to push the stem through the top of the Lily of the Valley flower.  Once the stem is pushed through the top of the flower, add a drop of glue on the inside.

The Ferns & Ivy die set was used to die cut the ferns and Ivy.  Susan's Foliage & Ladybug die set was used to die cut the berry branch. The berries were created using Nuvo white crystal drops.

The purple flowers were created using Susan's Daisy Chrysanthemum die set, from her Autumn release.  Once the flowers were assembled, yellow Prills were added to the center.

From my stash, I added a gold border sticker across the top edge of the white card stock on the front and also added a sticker butterfly.


This is a view of the card partially open.  White card stock was attached to the left side on the inside to hid the tape used to attach the white piece to the front of the card.  The other half of that card stock was attached to the right bottom portion on the inside.  You can add a sentiment and/or your personal message on the inside.


On the back, the other half of the white card stock attached on the front is attached so it hides the tape used to attach the card stock on the inside.


LinkWithin

Related Posts with Thumbnails