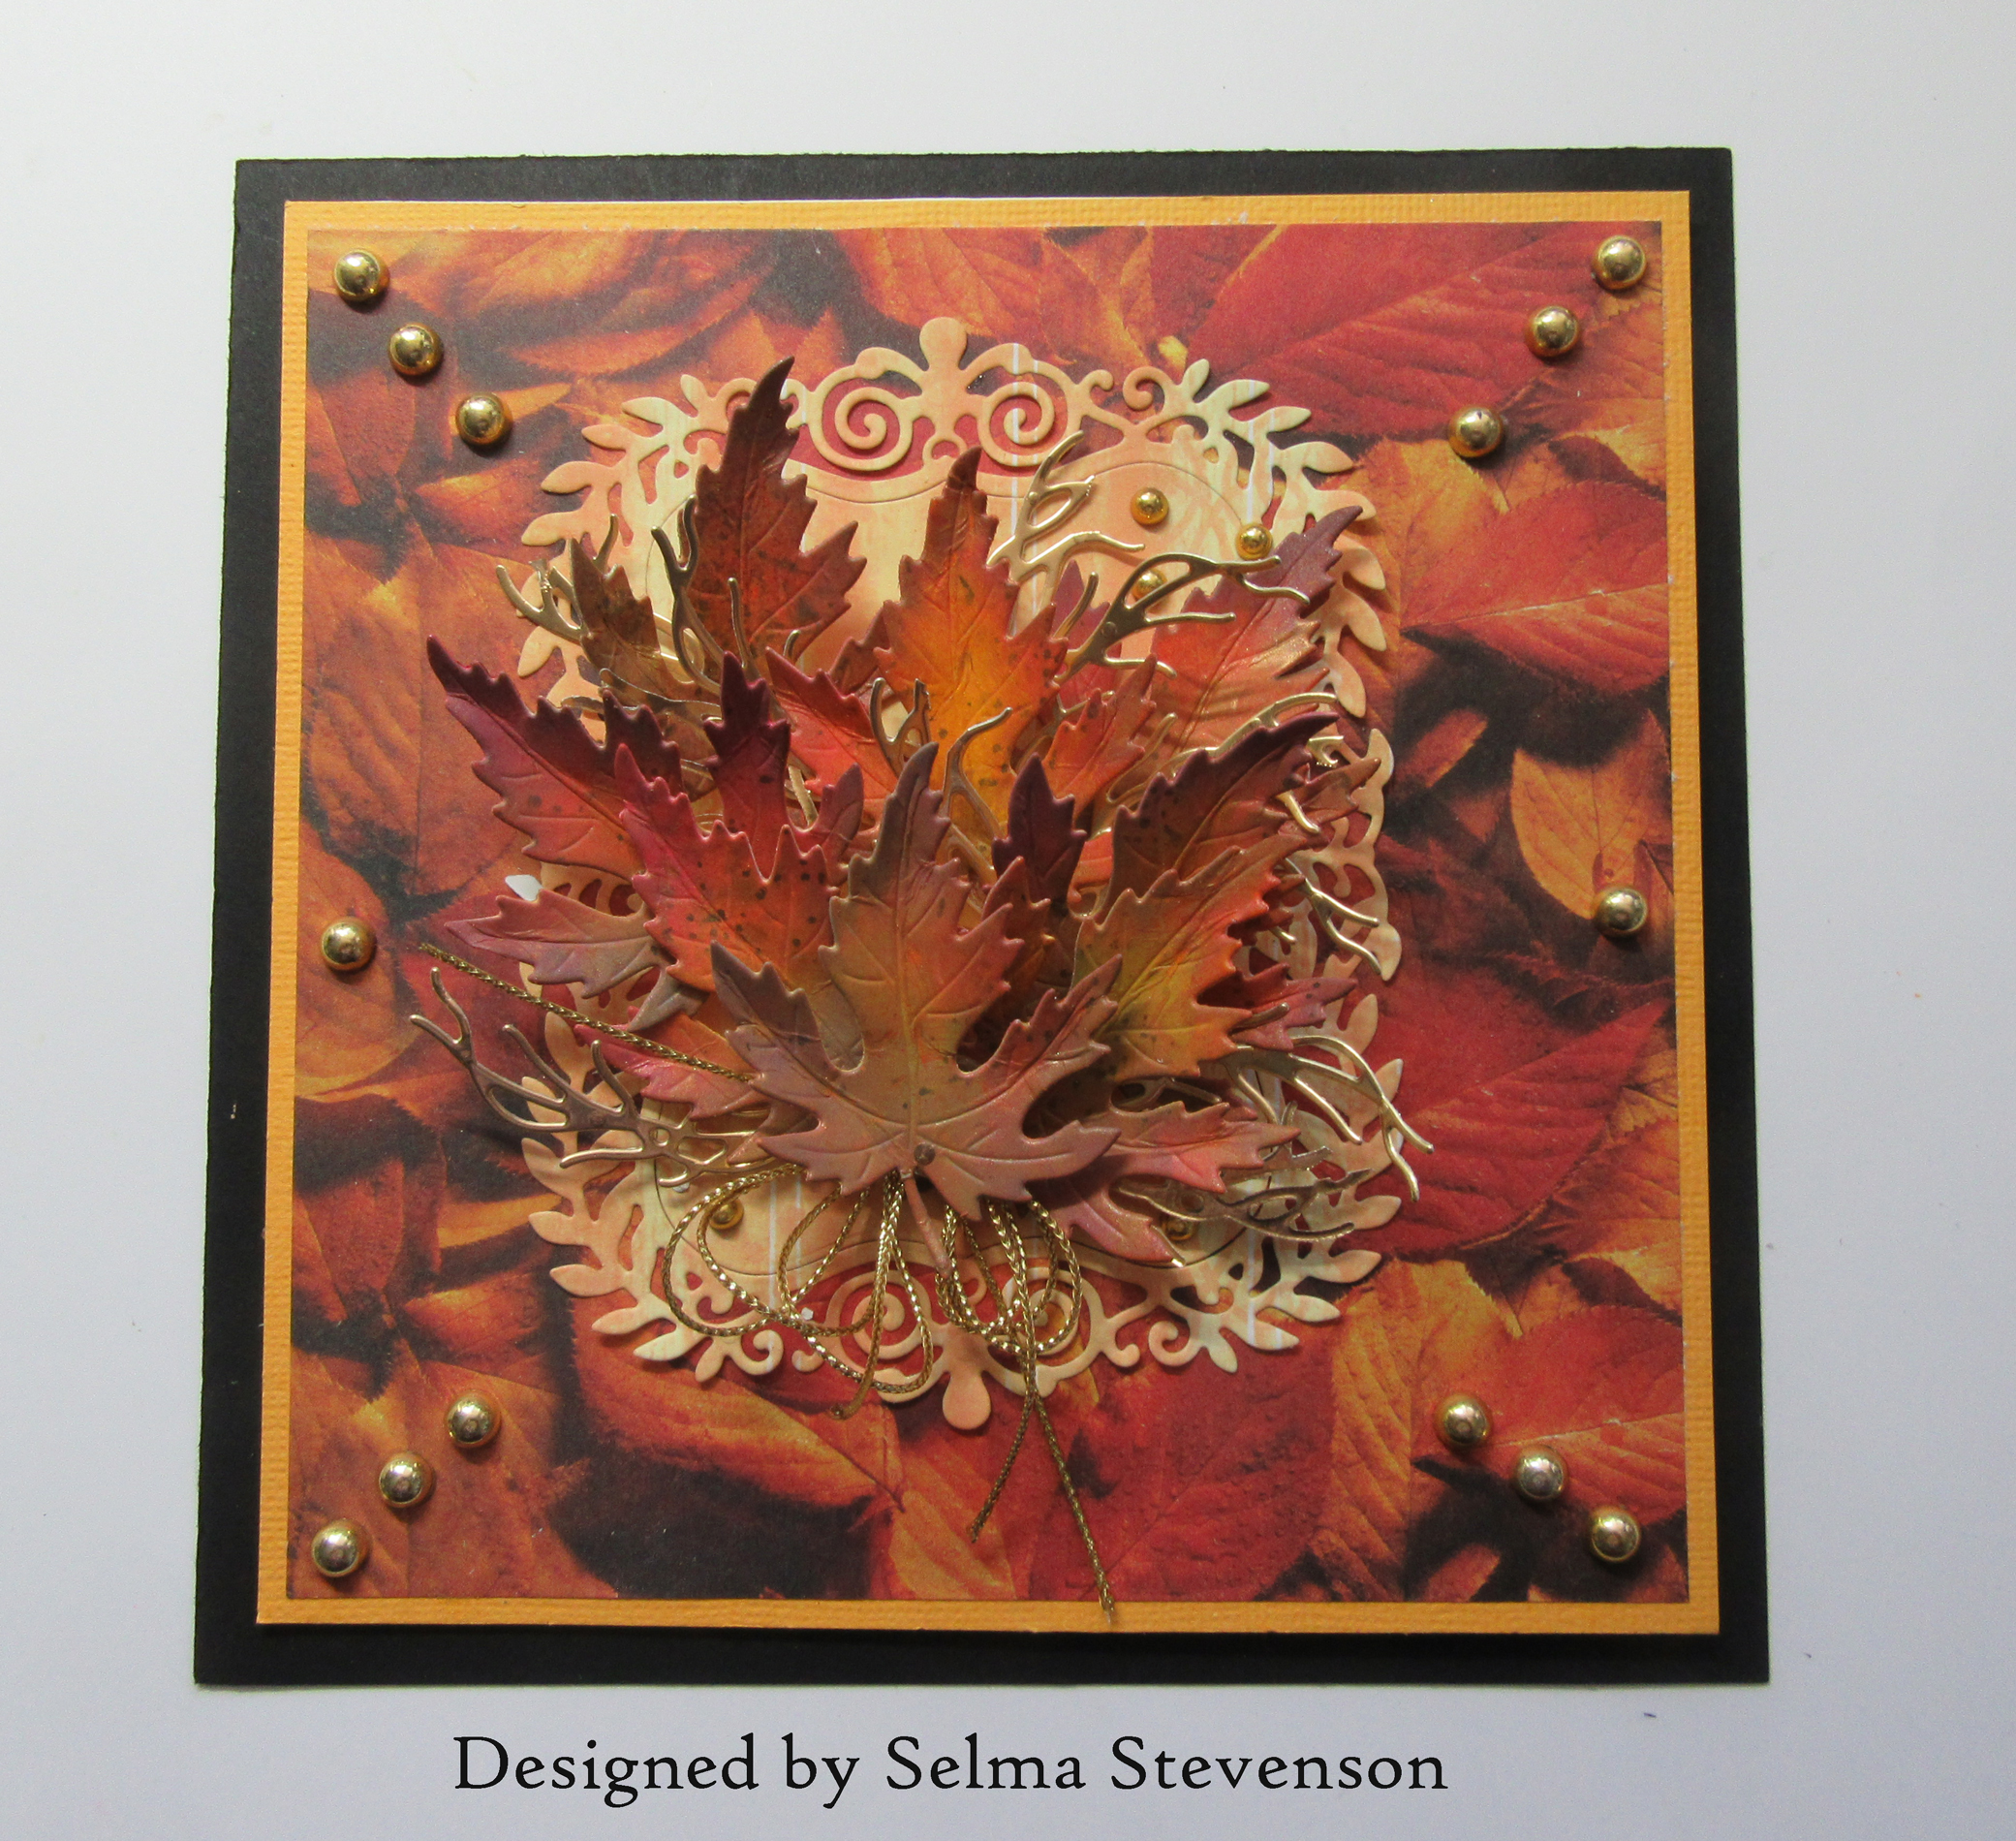
Monday, December 18, 2023

Autumn Bouquet


Good Morning,

Today I have an wooden bucket filled with an Autumn bouquet.

The bucket was die cut using Susan's Antique Wooden Bucket die set.  It was colored and shaped and attached using dimensional tape.  This bucket is still available in Spellbinders Bundle.  

Susan's Black-Eyed Susan die set was used to create the two yellow flowers.  They were die cut using Susan's Specialty Cardstock, colored using OLO markers, and shaped using her Flower Tool Kit.

Three different color Asters were made using the Aster die set.  Susan has instructions on YouTube on how to create all the different flowers in her releases.  You can search -  Spellbinders Susan's Tierney Cockburn and type in name of flower you are looking for, or just scroll through to see all the different flowers she has instructions for using her die sets.

To complete this bouquet, I used Susan's Autumn Foliage die set.  I used Ranger's Distress Mica Sprays to color the leaves.  I have several tutorials on my blog on how to color autumn leaves using Mica Stains - one is at this link.

Friday, November 17, 2023

Slimline Christmas Card


Good Morning,

I am still working on a few more Christmas cards.  Today I have a slimline card created using a Spellbinders Christmas border die set and Susan's Garden Poinsettia.

Using the Spellbinders Christmas Strip & Borders die set, a variety of dies in this set were used to create the pretty border. This die set originally sold for $40 and is on sale right now at Spellbinders for $10.  I have it linked below.   The borders were die cut using white card stock and layered over red cardstock.  Some red flat-back pearls were added to the berries on the border and a yellow rhinestone added to the center of the die cut poinsettia in the design.

Susan's new Hemlock & Chickadee die set was used to die the hemlock branches.  They were die cut using watercolor paper, colored with OLO markers and shaped using tools in Susan's Flower Tool Kit.

Susan's Poinsettia die set was used to create the poinsettia.  Sorry but I couldn't find this die set to link.  The poinsettia and leaves were die cut using Susan's Specialty Cardstock, colored using OLO markers and shaped using her Flower Tool Kit.  I used Beacon Kids Glue to assemble.  In the center I used small Styrofoam balls colored yellow green and on top added a red Prill.  A tiny bit of yellow pollen was added.

I used Susan's new Snow Garden Sentiment set to red foil the Merry Christmas and die cut it using the matching die in this set.  It was attached using dimensional tape.    

For additional embellishment, I added a few tiny rhinestones around the border and additional red flat pearls.  Along the top, I added a narrow strip of red mirror cardstock. 

This card can be mailed in a slimline acrylic box purchased from clearbags.com.

If the links aren't showing below, click on this post title (Slimline Christmas Card) right above the picture of the card.

Thursday, November 9, 2023

Creating dimensional berry branch tutorial


Good Morning,

What weird weather we are having!   Autumn did not last long.  We have already had some snow and now days of cold rain, frost and fog.   Good time to stay indoors and work on a few more Christmas cards.  

Today, I decided to experiment and see if I could create dimensional berry branches.  If you need directions on creating berries with the little Styrofoam balls, you can go to my blog on this  link.

Susan has several different berry branch dies.  I used one of them and die cut the berry branch using watercolor paper. Die cut two identical branches.  This is a little heavier weight than Susan's Specialty Cardstock that I use for creating her flowers. Color the branches either brown or green. 
i


In order to create the branches so they could be dimensional in the arrangement, I cut the berry branch apart into small clusters and glued them to a piece of thin floral wire.  When cutting apart, place two identical branches together because you will glue one piece on top of the wire and one identical piece on the bottom.  This gives the berry branch stability.  The wire is thin so it fits along the center of the branch and the two glued pieces hold it inside the branch. 

T

 Now you can glue the berries on to the berry branch on to each berry space on the branch.  I let them dry a little to set, then glue a few more on top in between the berries to create dimension.  Once they are dry, use a black fine tip pen to push down on top of each berry for realism.  When you are ready too insert the berry stems into your arrangement, you can cut off some of the extra wire below the berries.  With the berries on the wired branch, you can lift the ends up so they are very dimensional in your arrangement. This was a little extra work, but I really like how they look in the arrangement.  

 For my background, I used the Spellbinders Holiday Floral Swag 3-D embossing folder.  

Create the poinsettia using Susan's Poinsettia die set It was die cut using Susan's Specialty Cardstock, colored and shaped using tools from Susan's Flower Tool Kit.  In the ecnter I added green Styrofoam balls with yellow and red Prills on top.  

Susan's new American Holly die set was used for the holly.  They were die cut using watercolor paper, once shaped, clear crystal glaze was brushed on to give them the waxy appearance.  

Susan's Hemlock & Chickadee die set was used to die cut the hemlock branches.

For the sentiment, I used a GinaK foiled greeting.  It was die cut using a circle die and attached with dimensional tape.

Hope you have fun creating your dimensional berry branches.

Thank you for stopping by today.


Wednesday, November 1, 2023

Black-Eyed Susan Shadow Box


Good Morning,

Today I have a 5x7 inch Shadow Box Card.  For instructions for this style card, I followed instructions on Jennifer McGuires YouTube Video - Shadow Box Cards.  On both the top and bottom edges, I used the Score Board to add three score lines. On the inside of the card, I used the Spellbinders Leafy 3-D embossing folder to emboss a 5x7 inch piece of white cardstock.  This shadow box does fold down flat.  

Using Susan's new Black Eyed Susan Die Set, the three flowers were created.  They were die cut using Susan's Specialty Cardstock, colored with OLO Markers.  For the center I used a half pearl bead and glued pollen over the top.  You could cut a Styrofoam ball in half and do the same thing.  Our neighbor has a yard full of these flowers and I was trying to duplicate them.

Susan's Autumn Foliage die set was used for the Acacia leafy branch.  They were did cut using watercolor paper, colored and shaped using the tools in Susan's Flower Tool Kit.  Red Styrofoam berries were added.  

On the outside of the shadowbox, I used the Autumn Foliage die set and die cut the maple leaves.  Ranger Mica Stain was used to color the leaves.  

On of Susan's stamps was used for the Sentiment.  It was die cut using a rectangle die.  A slightly larger rectangle was also die cut and the sentiment added in the center with dimensional tape.  One leaf was added behind the smaller rectangle on the upper right corner.


Monday, October 30, 2023

Using Ranger Mica Stain for Autumn Leaves


Good Morning,

I have debated on doing this post.  Before Susan did her FaceBook  Live on Susan's Garden Club 2, (Tri Fold Card & Another Autumn Leaf Technique),  I used her Autumn Foliage die set and colored the leaves with Ranger Mica Stains.  I guess great minds think alike - LOL.   Our techniques use the same products but since our techniques are different, I decided to go a head and post my tutorial.


This is card created using Maple Leaves


These are the colors of Mica Stain I used to color the maple leaves.  Once you start coloring the leaves, you find you want to experiment with some of the other colors too.


Susan used glossy photo paper in her video and I used watercolor paper.  Instead of coloring the paper first then die cutting, I die cut the leaves then colored them.  I found, since these stains have mica in them, they create a glossy finish on any paper, which eliminates having to brush on clear gloss glaze after they are shaped. 
 

I placed the die cut leaves on a non-stick sheet inside a Splat Box.  You can put them in any box to keep the spray from going all over other things on your workspace.  Having them on the non-stick sheet helps to reuse the extra spray.  Once I have sprayed all the colors on the leaves, I turned them over on the sheet and used a wet baby wipe to pick up the extra spray and rub it on the back of the leaves so both front and back are colored.  I used tweezers from Susan's Flower Tool Kit to turn over leaves.  You may want to use plastic gloves to keep your fingers clean.  Dab off any excess spray on front/back, with a baby wipe or paper towel, and place on clean non-stick mat to dry.  Once dry you can shape.  I like to use a mechanical pencil to lightly draw on veins then use tweezers to shape.  

If you haven't used Mica Spray yet to color autumn leaves, I suggest you watch Susan's video too and you can decide which technique you want to try.  


I wanted to include this picture to show how shiny the mica spray is using regular card stock.


I hope I have inspired you to create some beautiful autumn leaves.  Be sure to check out all the new dies in Susan's new Birds & Bees Garden Release.  I appreciate your support by using the links I have provided below for ordering the products you need.  

Saturday, October 21, 2023

Pink Asters


Hello,

Today I decided to go through some of my older Spellbinders die sets to come up with a background for today's card.  I used the Romantic Rectangles and Shapabilities Floral Oval die sets.  

For the pretty flowers, I used Susan's new Aster and Autumn Foliage die sets from her new Birds & Bees Garden Release.  

The Asters were die cut using Susan's Specialty Cardstock and colored using OLO markers.  They were shaped using the tools in Susan's Flower Tool Kit.  To give the aster petals shape, they were lightly misted with water on the back then each petal was pinched around the tip of the tweezers.  Prills were added to the center once each flower was completed.  

For additional foliage, the leafy branch (acacia) in the Autumn Foliage die set was die cut using water color paper, colored and shaped then tucked behind the arrangement.

For the sentiment, I used one of the Spellbinder's BetterPress Sentiments.

It was fun going through all my older Spellbinders sets to come up with a different background for these pretty asters.

I have links below for Susan's new Birds & Bees Garden Release.

Thanks for visiting my blog.


Thursday, October 19, 2023

Garden Parasol with Pom Pom Dahlias


Hello Paper Crafters,

Today I have a card designed with Susan's new Parasol and Pom Pom Dahlias.  These die sets are in her new Birds & Bees Garden Release from Spellbinders.

I used the Spellbinders Raindrops 3-D embossing folder for the background.  

The Parasol was die cut using a piece of design paper from my stash. The handle and tip at top of parasol were die cut using mat silver metallic cardstock.   It was created just like Susan's shows us in her YouTube Video.   It has a small brace inside the parasol to help it from collasping when flowers are added.

The Pom Pom Dahlia die set was used to create all the flowers.  They were die cut using Susan's Specialty Cardstock then colored with markers. The flowers and leaves were shaped using the tools in Susan's Flower Tool Kit and assembled using Beacon Kids Choice Glue.   I used dimensional Pop-up glue dots to attach them.  

For the additional foliage I used Susan's Autumn Foliage die set.  The lemon verbena was die cut using watercolor paper, colored and shaped.  Purple berries were added plus one little lady bug.  Susan has included her little lady bug in many different die sets. 

I have included links below for Susan's new Birds & Bees Garden Release plus other products used.  Thank you for visiting my blog.   

Saturday, October 14, 2023

Gathering Autumn Birch Leaves


Good Morning.  I hope you have a nice weekend.  In our area, the leaves have changed colors and the scenery everywhere is beautiful.

If you follow me, you know I have been busy creating a lot of leaves using Susan's Autumn Foliage die set in her new Birds & Bees Garden Release from Spellbinders.   I have used the Birch Leaf for this card.   I have a tutorial on my blog at this LINK.

For this card I was trying to do something very different from my usual card.  I decided to try and create an Autumn scene.  What do you think?  Did it come together ok?

This is a 5x7 inch card.  I cut a piece of white cardstock slightly smaller and lightly sponged two shades of blue ink on the upper 3/4 of the card.  Two shades of green were sponged on the lower portion.   For the bare tree branches, I used Susan's  Winter Bough and Evergreen Shrubs die set.  

I filled the bucket, from Susan's Geranium & Antique Bucket die set,  with Birch Leaves and a few Acacia branches.  On the side I created a small pumpkin using small egg dies from an old Easter die set.  A couple of sprigs of grass were added behind the pumpkin.  I used an old grass die from my stash.

A stamp from one of Susan's Quote's stamp set was gold embossed, fussy cut, sponged and attached with dimensional tape.


Friday, October 13, 2023

Tutorial for coloring Maple Leaves using ink pads and blending brushes


Hello Paper Crafters,

This is the third tutorial for coloring leaves in Susan's new Autumn Foliage die set.  This tutorial shows how I color Maple Leaves.  My favorite way to color leaves is to using Blending Brushes and dye ink pads to blend a different colors on each leaf.  


Die cut the leaves using watercolor paper.  Use the Leaf Tool that is in Susan's Flower Tool Kit and trace over all the score lines in the dye cut leaf.  For Maple Leaves, I like to start off by coloring the whole leaf using bright yellow ink on the front and back.


Use an orange ink to brush around the edges of the leaves.


Here I brushed on a  Crimson Red to blend over some of the orange ink.


To make the edges of the leaves darker, a brown ink was brushed around the edges. and lightly over the whole leaf.

- - - - - - - - - - - - 

Here is how I colored the second set of leaves I had die cut.


 I used bright yellow ink to just color small portions of each leaf.


Next I brushed on green ink leaving a small portion of the leaf uncolored.


To fill in the rest of the leaf, bright red ink was brushed on.   (Half the leaves here have red ink brushed on.)


I forgot to take a picture here, but I brushed mahogany ink over edges of leaves.  


After the leaves were colored, I used a mechanical pencil and lightly drew over the scored lines.


As with the other leaves, some dark spots were stamp on some of the leaves with  brown ink.


The leaves were lightly misted, on the back, with water and shaped using the tweezers from Susan's Flower Tool Kit.  Each point on these leaves were shaped.  It's a little extra work to shape the leaves, but it really makes them look very realistic. To finish the leaves, Clear Crystal Glaze was brushed over the top of each leaf.

I hope these tutorials give you inspiration for coloring autumn leaves.  You don't need to use the exact color ink pads I used or even use as many colors, but I'm sure you will have fun once you start creating your autumn leaves.  

I have Susan's new release linked below.  If you haven't ordered your dies yet, I would appreciate your support by clicking on the links below.  Thank you.

SELMA

Tutorial for coloring Oak Leaves using ink pads and brushes


Hello Paper Crafters,

This is the second tutorial for coloring leaves in Susan's new Autumn Foliage die set.  This tutorial shows how I color Birch Leaves.  Susan demonstrates on her FaceBook Live Videos how she colors the leaves using OLO markers.  I prefer to color the leaves using ink pads and blending brushes.  When using bushes, it is easy to blend several different colors.

To get started, die cut a lot of the leaves out of watercolor paper.  Use the Leaf Tool in Susan's Flower Tool Kit and go over score lines in the die cut leaves.  

Below are a series of pictures showing the ink pads I used for each step of coloring the leaves.  I like blending a variety of colors.  


Be sure to over lap and blend the colors as you color.


Ater coloring the leaves on the front and back, use a fine line pen to draw over the score lines on the leaves.  


If you want, you can add dark spots onto the leaves that you often see on leaves that have fallen to the ground.  I use a stamp and dark brown ink and add a few spots on each leaf.

Once you are finished coloring the leaves, lightly spritz the backside of the leaves and shape them using the Tweezers from Susan's Flower Tool Kit.  Once they are shaped, I like to add a Clear Crystal Glaze over the top.  This not only gives a little shine to the leaves, it also helps to hold the shape.

I will have one more tutorial for coloring Maple Leaves.

Susan's new Birds & Bees Garden release plus other products I use are linked below.


LinkWithin

Related Posts with Thumbnails