Thursday, February 27, 2020

Bouquet in Gathering Basket


In Susan's last FaceBook Susan's Garden Club Live video, she showed us how to assemble the Bachelor's Button.  This is a flower I have not made for a while and was happy to see the tips she gives us in creating it.

 Today I created a pretty bouquet of lilacs, pom pom dahlias, Beauty Berry Bush, and Bachelor Buttons in Susan's Gathering Basket.  All the flowers and the basket were created using Susan's die sets.


Wednesday, February 26, 2020

Prairie Roses


Today I worked with Susan's Garden Notes Prairie Rose die set and some Foamiran to create these flowers.  I am not real happy with my work creating the roses, but thought I would go a head and create a card with them.  With a little more practice, I think they will be perfect! 

The petals were die cut out of white Foamiran.  First a light pink ink was sponged on the ends of the petals then a bright pink sponged on the edges.   The petals were shaped then glued together using hot glue. Two buds were created using five flower petals. The leaves were die cut using light green Foamiran.   They were sponged with a dark green ink and highlighted with red ink.  The stamens were created using some small white stamens. I used a yellow marker to color the stamen and a rusty brown marker to color the tips.  A small round yellow stamen was used in the middle.  The small stamens were glued around the yellow stamen.  I had to cut the flowers apart -- 2 petals in one piece and 3 petals in the other.  They were glued around the stamen.  To create the stems, I heated, stretched, and rolled green Foamiran.  

I had fun working on these flowers, but want to create them again with Foamiran and see if I can make them perfect.

I love that we can use Susan's dies to create paper flowers but also use them for Foamiran flowers.  

Wednesday, February 19, 2020

English Roses in Framed Mirror


Today I created two decor pieces, using the same colors of English Roses, created with Susan's English Rose die set.  On the petals of the roses, I used Nuvo Embellishment Mousse (Burnished Bronze, Tuscan Gold, and Mother of Pearl).   The mousse was placed on the craft mat and picked up with my finger then rubbed on the edges on slightly on the top of some of the petals.  It gave the roses an antique look.   The leaves were die cut using white card stock, sponged green, then edged with Burnished Bronze Embellishment Mousse.  

A leafy branch die was used to die cut three branches, using white card stock.  Nuvo Mother of Pearl Embellishment Mousse was rubbed over the leaves.  

The leafy branches and roses were attached to the mirror.  


This is a second one made with the same color of roses.  I added some off white pearls over the leafy branches.   


These pieces are being sent to a friend who is moving into a new home.

(It was hard to photograph these pieces without getting myself in the mirror behind the arrangement.)

Wednesday, February 12, 2020

Flowering Trees of Spring


I am so tired of snow so wanted to think about Spring.  Today I created my card using Susan's Flowering Trees of Spring die set.  

The branch was die cut using brown card stock.  Cut two branches and glue them together for strength.

The flower petals were die cut using white card stock to create 8 flowers and 3 buds.  Leaves were also die cut using white card stock.  Light pink ink was sponged lightly around the tips of the flower petals. The two die cut petal pieces were glued together to form the flower.   The stamens were die cut with yellow card stock and a light green marker  used to color the base.  The stamen pieces were cut down the center of each stamen to make them thinner.  A small dot of ink was added to the tips and then dipped into Susan's Yellow Pollen.  The stamen was then rolled and glued into the center of the flower.  The tree buds were created by using the two die pieces for the flower.  The petals were lightly sponged with light pink ink.  On the outside of the three petal die cut, a bright pink ink was sponged at the base.  A small pearl was used to create the round shape of the bud.  First the two petal die cut was hot glued around the bead, then the three petal die cut, with the bright pink inked side on the outside, was glued around the two petal die cut.  Pinch the petals close together to form the bud.  The leaves were detailed with the leaf tool, sponged with green ink, then shaped.  

The background on this card is a piece of design paper from the Tonic Studios Craft Perfect Blue Blossom 6x6 pad.  The Tonic Classic Quatrefoil die was die cut using white card stock and attached to the top portion of the card.  

Suzanne Cannon's A Way With Words 4-Seasons die set was used to die cut the Sentiment.


Monday, February 10, 2020

Dogwoods and Butterfly


I am thinking Spring!   Today I used one of Susan's older die sets and sentiment stamp set to create this card.

This is a 6x6 inch card.   To create the background, green, blue and purple Distress Inks were sponged onto a piece of white card stock.  The edges were scored for a finished appearance.

Susan's Garden Notes  Dogwood die set was used to create the dogwoods.  One of Susan's Grapevine Wreaths was die cut, sponged with two shades of brown ink, then cut a part to create the branches behind the flowers.  

The butterfly was die cut from one of the dies in the Tonic Craft Kit #29.  Color was sponged on and a black marker used to define details.


Sunday, February 9, 2020

Columbines & Daisies


Today I designed a card using Susan's Garden Club Columbine die set and an older Shasta Daisy die set.  

The background was created using the Spellbinders Vine metal foil plate with the Spellbinders Glimmer Hot Foil Machine.  The Sentiment  was die cut using one of Suzanne Cannon's A Way With Words dies.  A few Nuvo Pink tutu Sequins were added around the arrangement.


Saturday, February 8, 2020

Foamiran Hydrangea


It is fun to create Susan's flowers using Foamiran.  They are easy to shape and look so realistic.  Today I have a Hydrangea created using Susan's Garden Club Lacecap Hydrangea die set.  Instead of using the flower base in the die set, I used a die cut 2-inch circle, using 120 lb card stock.  Shape the circle in a dome.  All the flowers were die cut using white Foamiran and removed from the die plate.  A small sponge dauber was used to add light blue and purple ink to the petals.  The sponge dauber was loaded with ink and pressed down on each die cut flower.  Approximately half of each one was blue and half purple.  Both sides of the die cut flower was inked.  Once colored, each flower was placed against a hot iron, holding it with tweezers.  You only need to hold it on the iron for a second or two.  The petals touching the iron curled inward shaping it perfectly.  Don't press down in the center like you do the lilac, because you want a more open flower.  Add Aileens Clear Tacky Glue to a small portion of the die cut circle and add the flower petals.  Repeat until the entire dome is covered.  Allow to dry and then you can bend the flower to round it out more.  Add three dimensional pads to the center of the flower to attach to the card.  

The background was die cut using a die from the Tonic Craft Kit #29.  The sentiment is foiled using one of the Spellbinders Everyday Sentiment II metal plates and the Spellbinder Glimmer  Foiling Machine.


Friday, February 7, 2020

Forever Friends


Today I have a card designed using Susan's Garden Club Spider Mum and Heleborus die sets.  

The background is a piece of patterened paper from Tonic Studios.  The butterfly was die cut using one of the dies in the Tonic Craft Kit 29.  

The Sentiment was foiled using the Amazing Grace Elegant Affirmation Sentiments metal plates/die and the Spellbinders Glimmer Foiling Machine.


Wednesday, February 5, 2020

Just to Say Spider Mum


I love creating spider mums with Susan's Garden Club die sets from Tonic Studios.
Today I used one of the Tonic Studio's 5x7" Ivory White Card Blanks for the card base.  The Tonic Studios Deco Diamond Patterned Panel was used for the die cut background.  

Use the Garden Club die Spider Mum die set and die cut the flower petals using white card stock.


Using a small sponge dauber, sponge pink ink on the upper half of the flower petals.  Sponge on both sides of the petals.  I used Nuvo Diamond Hybrid Ink pads


Using a different small sponge dauber, sponge dark purple on the very tips of all the petals on both the front and back.  Use the Leaf Tool from  Susan's Tool Kit  and draw a line down the center of each flower petal, starting from the base of the petal and drawing down to the tip.  If you don't put your hand on the die cut,  each petal will curl up and shape.  Do this step on Susan's Leaf Pad.  Once all the petals have been shaped with the Leaf Tool, use the ball stylus to cup the petals. Assemble the mum using Nuvo Deluxe Adhesive.   Create two Spider Mum buds.  If you need help in learning how to assemble any of Susan's flowers, you can go to her Susan's Garden Live Videos on Facebook. 


You can add as many petals as you wish to create the Spider Mum for the fullness you want.  You usually begin with 4 or 5 of the largest petals the build toward the center.  

Behind the Spider Mum I added to of the Garden Club Beauty Berry Bush die cut.  The berries were created using Nuvo Crushed Grape Crystal Drops.  


Sunday, February 2, 2020

Flowers for a Special Friend


Today I have a basket of dahlias and lilacs for a special friend.

For the lattice background I used the Tonic Studios Classic Quatrefoil die.  It was die cut using white card stock and attached to the front of a purple card front.  I used the Nuvo Adhesive Tape Runner to add adhesive to the back of the Quatrefoil die cut.  Once you attach it to the front of the card, you can use your fingers to rub off any extra  adhesive that shows through the die cut design. 

The Garden Club Gathering Basket was die cut, colored and attached to the bottom of the card using Tonic's Craft Perfect Adhesive Pads in the center.  Around the edge of the basket I used the Nuvo Tape Runner and pressed it down well.  The top of the basket was left open to insert the flowers. 

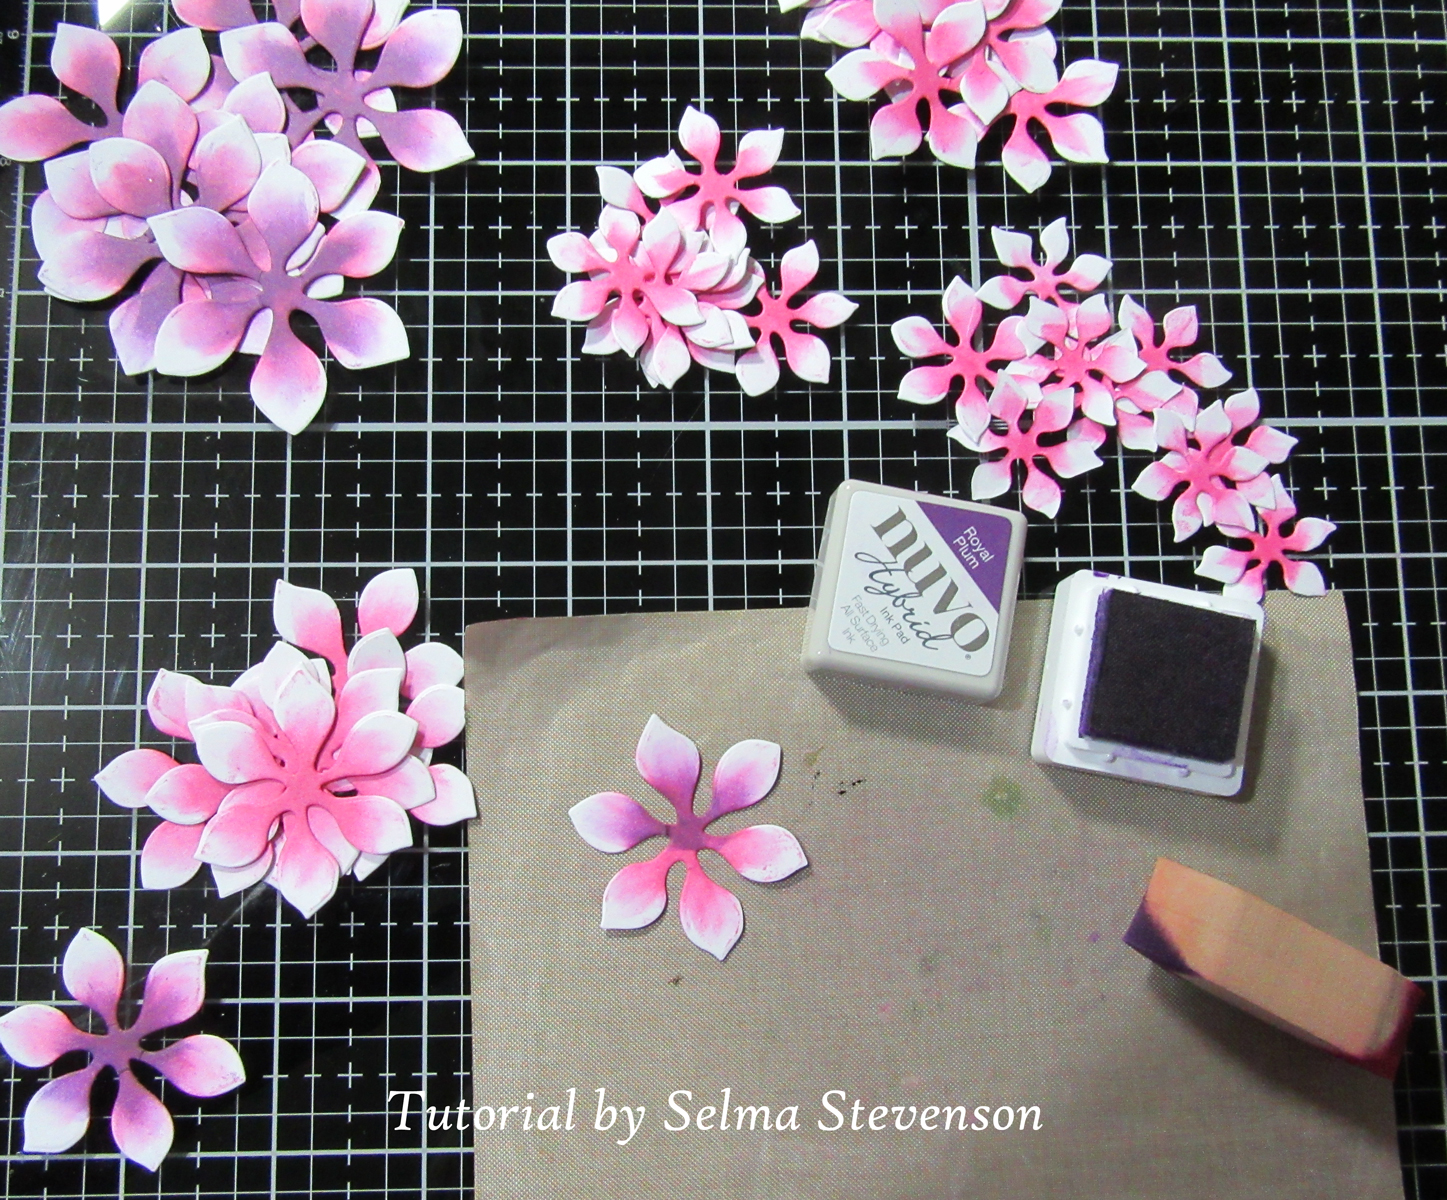
The Garden Club Pom Pom Dahlia die set was used to die cut 8 sets of petals, using white card stock.  I always like to prepare a lot of petals at one time, even if I don't need all of them for the project I am working on.  


Using Nuvo bright pink hybrid ink, the center of all the petals were sponged on both the front and back.  Leave the tips of the petals white.


Once all the petals were sponged with the bright pink ink, Nuvo Hybrid dark purple ink was sponged on, leaving some of the pink showing toward the tips.  Next all the petals were shaped and assembled.  On this card there are 2 large mums, 1 medium and 2 buds.

Using an older Garden Notes die set, lilacs were created.  Light purple card stock was die cut and the edges of the petals were sponged with Nuvo Hybrid dark purple ink.  

To assemble the arrangement, an ECD leafy branch was die cut and placed in the basket, then the lilacs.  The dahlias were attached using dimensional glue dot then the dahlia buds added.  

The sentiment and butterfly are from the the Tonic Craft Kit #29.  


LinkWithin

Related Posts with Thumbnails