Showing posts with label Easel Card. Show all posts

Monday, September 24, 2012

Framed Birched Trees


I love Birch Trees and have some in our front yard.  . The tall tree is about 5" tall and has the little notches in the trunk.  I die cut three of the trees and sponged the edges with "Weathered Wood" Distress Ink.  To create this project, I used the three largest Spellbinders "Labels Seventeen" to create frames for the trees.  The marbled background was created by using a piece of glossy card stock and applying different colors of Distress Inks. I put the reinker colors on the Craft Mat and laid the card stock down on the inks, then spritzed with water to blend the colors. To add interest to this, I used the Adirondack "Gold Metallics Acrylic Paint Dabber" which added pretty gold highlights in the marbled design.  The Birch Trees were placed in the framed layers.  

Along the bottom of the frame I die cut the Cheery Lynn "Cinderella's Pumpkins" using brown card stock and applied the Adirondack Metallics Gold Acrylic Paint on it, to match the design in the background.  The leaves are the Cheery Lynn "Small Leaves #1".  They were die cut using a mustard colored card stock then sponged with different colors of Distress Inks.  They were shaped with the tools from the Flower Tool Kit.  The flowers were created with the Cheery Lynn "Build A Flower #1" embellishments.  I used the six point base to create them.  The stamens were created with the embellishments from the Build A Flower #2 embellishments.  Along the side of the top, I cut two strips of the burgundy card stock and added some pearl embellishments I had in my "stash".  


This is a picture to show you the back.This project is large, so I decided to add the Tim Holtz Sizzix small easel to the back.  This easel die comes in so handy for so many projects; it is very easy to die cut and add to the back of any card or project.

I sure hate to see summer end but we can tell Fall is not far away.  I have been planting Spring blubs and trying to get the flower beds ready for Winter.  Normally we can see mountains all around us, but there are so many fires in Washington that we can't even see the mountains, because of all the smoke.   All the smoke causes lots of us to be coughing, sneezing, and have runny eyes.  Maybe we will have a rain soon to put out all the fires!  Guess this is a good reason to stay inside and create, huh!

Memory Box "Tall Birch" (98336)
Memory Box "Row of Trees" (98369) (not used on this project)
Cheery Lynn "Cinderella's Pumpkin" (B139)
Cheery Lynn "Small Leaves #1" (D133)
Cheery Lynn " Build A Flower #1" embellishments
Cheery Lynn "Build A Flower #2" embellishments
Spellbinders "labels Seventeen"
Tim Holtz Sizzix "Small Easel" 
Adirondack " Gold Metallics Acrylic Paint Dabber"

754977

Monday, August 27, 2012

Joan's Gardens Workshop Projects


Today Joan and I are showing you the projects that were created in her workshops this past weekend. For those of you who don't know, Joan offers about four workshops a year and there is no charge for attending.  She always wants to have projects that everyone will be proud to create and enjoy learning many new techniques while creating them.  I love working with her coming up with ideas for very creative projects.  This year we had most of our projects pretty well planned before going to CHA but did get ideas from the Graphic 45 booth.  We used the design paper from the Graphic 45 "A Ladies Diary" 12" x 12" paper pad on two of the projects.  

The project above is an easel card.  We used mat board for the backing and layered it with different pages from the design paper pad.  The flower was created with the new Cheery Lynn Build A Flower #2. 

We used the Tim Holtz  Sizzix "Small Easel" for the back.  When die cutting this easel, you should use the "Premium Crease Pad" so the score cuts don't go all the way through the board.  
The next project was a card using the new Marianne Design (LR0236) doily.  As soon as we saw this gorgeous die, Joan and I knew we wanted to use it for a workshop project.  Again, my card is different from the one taught in the workshop but will give you another idea.  When at CHA, we saw the 6x6 Template, by the Crafters Workshop, that we used for the background on this card.  There are other templates but this one has "writing" on it.  We used a paste called "Liquitex Light Modeling Paste".  You press the modeling paste over the stencil and have to let it dry.  So fun because it give some dimension to the background.  I used Distress Ink to add color.  I will do a tutorial later on how to do this.  

I am adding this closeup so you can see this beautiful (LR0236) doily by Marianne Design.  There are four pieces in this die:  The pretty die cut doily, a backing die cut so you can add a different color behind it, the small shape you see behind the lady, and also a flourish.  I'm sure you will want to add this gorgeous die set to your collection.

This is the tea box they created in the workshop.  I worked on the template and created the box while at Joan's house, but did not have the paper to recreate it after I came home. I was gone on vacation so this is the box Joan designed using that template. Stamps from Heartfelt Creations were used for the front of the box and the flower on top was created with "Clearly for Art" Modeling Film.

I did visit the workshops via Skype and I think they all had lots of fun creating these projects. 


Sunday, February 20, 2011

Easel Card

This is the Easel Card showing the entire front when it is closed.

Easel Card Open -- you can see the glare on the acetate layered over the scene.


This is another card created with the new release from Heartfelt Creations.  The products used are:  HCPC 3369 Outside My Window PreCut Set; HCPC 3363 Inspire Me Sentiments PreCut Set; 198E Daisy Border.

This is a 5.5 inch square easel card. Design Paper from Basic Grey was layered on both the outside and inside of the card. The picture was stamped and colored with Copic Markers. I wanted to create a framed picture scene so cut a black frame with Nestabilities, plus a piece of acetate and layered them. The Decorative Oval Window was cut out with brown card stock. To get the gold highlights, I used a VersaMark pen while the card stock was in the die to ink it then took it out of the frame. These areas were gold embossed. The frame was attached over the window. The top portion of this frame was cut off and another piece of black card stock was attached to the back to give it a finished look. I was trying to create an easel for the picture. The daisy border was added above the frame and can only be seen when the card is closed. The sentiment was stamped and cut out with a Nestability tag. It was sponged with green ink prior to taking it out of the die.

My son and his family are here from San Diego.  They are currently up in Canada on the ski slopes and tomorrow my DH and I will be going up to visit with them and to wish our DIL a happy birthday.  I did get a set of cards completed for her.

Hope you have a great week.


Wednesday, October 20, 2010

Holiday Greeting Cardinal Mailbox


I have had so many emails about how much everyone loves the cardinal projects I have been posting, so today I am posting another one of my Heartfelt Creations design team projects.   To create this easel card I used Kraft card stock for the frame. The "Cardinal Holiday Mailbox" image was stamped and colored using colored pencils and OMS. I cut around the lid of the mailbox then used a circle Nestability to cut out the image. It was sponged with Distressed Ink prior to taking it out of the die. A scalloped background was cut out using Kraft card stock. Glitter was added to the image.

For the bottom of the easel, the greeting from "Cardinal Holiday Mailbox was stamped then cut out with a long rectangle Nestability. It was sponged prior to taking it out of the die. The greeting was placed near the bottom of the cut out so I could add one of the cardinals from the Cardinal Pine Cone Border set. I stamped the border then just used the cardinal on the left end. I cut around the image and attached it partially over the greeting. A matching cardinal from the "Cardinal Family Precut set" was stamped, colored and cut out with the matching die. It was attached with dimensionals. Glitter was added to give it some sparkle. A few little snowflakes were cut out of the design paper and added on the greeting piece. A button was attached on the line where I wanted to place the top when opened. A bow, made out of natural fiber, was created and added over the button. A decorative button was added to the top of the card. I really LOVE both these stamp sets.

You can see all the projects the design team created this week here.

Products used on this project:  HCPC 3349 Cardinal Holiday Mailbox Precut set; HCPC 3348 Cardinal Pine Cone Border Precut Set; HCPC 3353 Cardinal Family Precut Set; HCD 706 Cardinal Family Die

Tomorrow I will be posting a fun card I made for the Joan's Gardens Challenge.  Hope you will visit again in the morning.


Monday, July 26, 2010

A Picture is Worth a Thousand Words Challenge

This card won the JustRite Challenge


Today I made a card for a challenge I didn't think I could make.  This week's JustRite Friday ChallengeA Picture is Worth a Thousand Words, sponsored by Copic, is to use a photo on your card combined with JustRite stamps, to make a one-of-a-kind greeting card!   I have never made this type of card.  I love to participate in the JustRite challenges, but I really thought I would need to skip this one.  This afternoon I was looking at this picture of my granddaughter and it always makes me smile.  Her hat has a big yellow flower on it and I realized I have a JustRite stamp flower set with a a similar flower stamp, so maybe I should give this challenge a try after all.   I have to say I really enjoyed working on it.

The two JustRite stamps sets used are:  "My Garden" and "Seeds of Kindness".  The flowers were colored with sponge daubers and cut out with scissors.  Copic markers were used to add a little extra color in the center.  Leaves were cut out with a BossKut  "Daisy Leaves" die.  The background paper is from the Basic Grey "LilyKate" paper pad.  Alexandra's picture was  matted with red card stock.  When this picture was taken, we were out in my garden admiring all the flowers and a butterfly flew by.  I love the expression on her face.

When I had the front of the card completed, I did not have room for the salutation I wanted to add "You make me Smile".  The only thing I could think of doing was to convert it to an easel card.  This worked out perfect.  The salutation is from the JustRite "Seeds of Kindness" set.  It says exactly my feelings every time I look at this picture.  The border was added along the bottom and three butterflies added.  Flower soft was added to the center of all the flowers.  Pearls were added to the bodies of the butterflies and up in the corners to complete the card.

Aren't challenges fun; sometimes they push you to try new things and can give you a real feeling of satisfaction.  I am so happy that I gave this challenge a try.  I will always cherish this card and also have a chance to win  a great prize I would love to have.

Saturday, June 26, 2010

Red, White & Blue Sketch Challenge

Front view of card


JustRite Sketch Challenge

Easel card opened


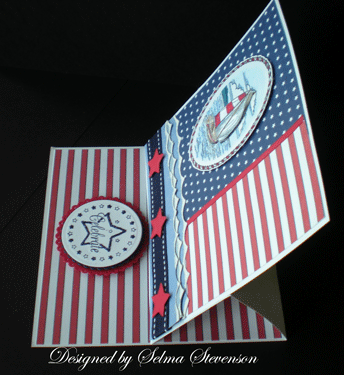
Side view of easel card


Close up of dimensional sails


For this week's JustRite Friday Challenge #024, you must use the above sketch combined with JustRite stamps and the requirement of a red, white & blue Americana color scheme in honor of the upcoming U.S. Independence Day.  This challenge has a really big incentive for me because this week's challenge winner will receive the two newly-released 2" square Christmas stamp sets (From Our House & Hearts Come Home) debuted earlier this week on the JustRite bog, PLUS a 2" Square Wood Stamper!  I REALLY want these new stamps!!!! 

When I read about this challenge I immediately thought about using the sailboat from the JustRite stamp set "By the Sea".  One of my favorite Fourth of July celebrations was a year when our son took us out on his sailboat in the San Diego bay. 

I did use the JustRight sketch to create the front of my card.  However, I took it one step further because I wanted to make my card resemble an American flag.  In order to do this I made an easel card so I could add the red and white strips below the blue and white piece.  I started off with a 5.5 inch square of white card stock for the front.  Gina K digital papers were used to carry out the red, white and blue theme.  For one of the lower borders in the sketch I decided to create some waves.  I used a Martha Stewart punch  to create layers of waves.  The "caps" of the waves were white embossed.  There are three rows to create depth.  Along the bottom, a piece of Gina K ribbon was added then three red stars cut with Nesties and added on with dimensionals. 

The JustRite sailboat and border are from the "By the Sea" stamp set.  It was colored using colored pencils and oms.  A second image was stamped and the sailboat cut out.  I wanted the sails to have a "billowed" look so attached the boat with adhesive then used dimensionals under the sails to make them bow out for the 3-D look.  I really like how it turned out. 

Next I cut out the base for the easel card.  Another strip of the digital paper was attached to the base.  The salutation is from the JustRight stamp set "Just A Note".  What a perfect stamp for what I was creating.  It was stamped using Navy ink then cut out with a Nestie.  It is attached on a navy and a red scalloped Nestie circle and attached with dimensionals.  To give my card some "glitz" I added glitter to the waves around the boat and on the stars in the salutation. 

My son is coming today for a visit and I will give this card to him.  I think it is one he will really like.

Hope you have a great weekend.


Monday, June 21, 2010

Easel Box Card


I have seen several easel box cards and thought they looked so neat.  I'm not sure how I found it but this morning I came across Joani's blog and her tutorial for making this box.  Here is the link to Joani's tutorial.  It was very well written and easy to follow.

I used red card stock to match the paper I wanted to use from the Mariposa paper stack.  I love this paper.  I followed Joani's tutorial for the box then decorated it the design paper.  I used two JustRite stamp sets "Birthday Wishes" and Victorian Wishes".   Victorian Wishes is a brand new release this month.

To decorate the top of the card I arrange some of my red vellum flowers around one corner of the sentiment.  Some yellow Flower Soft was added to the middle of the flowers.   A small red Martha Stewart punched butterfly was added.  This portion folds down flat on top of the box.  On the top of the box I stamped the sentiment from the Birthday Wishes set and cut it out with a Nestie.  A piercing tool was used to pierce holes in each scallop.  It was attached with dimensionals on top of the red Martha Stewart punched border.  Small pieces of the design paper were added to the front of the drawer and the sides of the box.  A black button was added for the drawer pull.  I plan to put a gift card in the drawer of this box for a birthday gift.

The Mariposa paper, vellum, Martha Stewart punches, Nestabilities, Flower Soft and the JustRite stamps sets can be purchased from Joan's Gardens.


I love making new projects and want to thank Joani for this easy tutorial.


LinkWithin

Related Posts with Thumbnails