Friday, February 23, 2018

Krista Schneider Birds & Branches Background


One of the new stamps in the Krista Schneider collection is the Birds & Branches Background stamp.  

1.  This is a 6x6 inch card.  

2.  Stamp the Birds & Branches background onto a piece of white card stock and color.  I used colored pencils to color with.  

3.  Use the Garden Scene die set and die cut one green frame.  Attach the frame over the Birds & Branches Background.  Attach the background on the front of the card.  Use black Peel Off Stickers to line the edge of the green frame, as shown.

4.  Use Susan's Garden Notes Dahlia 2  die set and create one Dahlia.  Attach to the lower left side of the card.

5.  Use the Plant, Grow & Bloom stamp set and stamp the sentiment.  Use the Dotted Scallop Rectangle die set and die cut the sentiment.  Cut a small purple piece of card stock to frame the white Scallop Rectangle.  Attach to the lower right corner of the card.

Krista's Birds & Branches Background stamp is great to use for quick and easy cards.  


Thursday, February 22, 2018

Thinking of You


This was a fun card to create.  I used the Lovebirds die set to create this cute scene.
This is a 6-inch square card.  A piece of blue card stock was attached to the front.

Use a piece of white card stock cut 5 1/2 inches square.  Use the  5th largest Fitted Square die and die cut an opening in the center of the card.  Use a piece of white fun foam cut into a slightly smaller square and die cut an opening using the same Fitted Square die.  The foam will be attached under the 5 1/2 inch square for dimension.  Attach the Fun Foam using Clear  Double Sided Adhesive.

Use the 5th largest Fitted Square die and 3rd largest Postage Stamp Square die and die cut a white frame. Use 3mm Clear Double Sided Adhesive around the opening. Attach the die cut frame over the opening of the 5 1/2 square.

Use the Garden Scene die cut and die cut the frame and place the largest Fitted Square die inside to die cut a frame for the front of the card.  Run through die cutting machine.  Use 3mm Clear Double Sided Adhesive to attach this frame.

Use a piece of watercolor paper and create a colorful background using watercolors or Distress Oxide Inks.  Cut the watercolor paper to fit behind the opening in the front of the card.  

Use the Lovebirds die set and die cut the image twice, using 100 lb white card stock.  

Attach a strip of Clear Double Sided Adhesive around the back of the 5 1/2 inch square, around the die cut opening.  Attach one of the die cut Lovebirds attaching some of the die cut on all sides of the opening.  Use the second Lovebirds die cut and attach only one of the birds, as shown.  Be sure to attach the edges of this single bird onto the adhesive on the back to hold it in place.  Use small pieces of dimensional tape on the back of the birds and some of the leaves, to help hold the design up.

Attach the watercolored background behind the Lovebirds.

Use Joset's Sentiments 1 - Celebration stamp and die set for the sentiment.  Attach to the bottom of the card.

This card is dimensional but will fit into a regular size 6 inch square envelope.

You can purchase the Elizabeth Craft Designs products used by clicking on the products below.


Tuesday, February 20, 2018

Easter Basket


This is a second card I designed for the design team Easter Card Challenge.   Be sure to go over to the Elizabeth Craft Designs Blog at this LINK so see all the fabulous cards created by the design team for this challenge.

As in the past, you will be eligible to win a prize by commenting on the Elizabeth Craft Designs challenge post.

For today's challenge, Elizabeth Craft Designs is giving away a $20 Gift Card to use on their website to 3 winners


To enter simply leave a comment on the Elizabeth Craft Designs Challenge post and tell us "What Elizabeth Craft Designs dies or stamp sets would you use to create an Easter Card?

Three lucky winners  will be selected in a random drawing and will be announced on Friday, March 2nd on the Elizabeth Craft Designs blog.

Good Luck in the drawing.

* * * * * * * * * * * * * * * * * * * *

1.  Cover the front of a 6-inch square card with a piece of the ModaScrap Thinking About Polinesia design paper.

2.  Use the Dotted Scallop Circle die set and die cut the largest circle, using white card stock.

3.  Use the Dashing circles die set and die cut the largest cirlcle, using white card stock.  

4.  At the top of the Dashing Circle, use the Spring Sentiments stamp set and stamp the sentiment using VersaFine black ink and clear emboss.

5.  Use yellow PanPastel and a sponge to color  below the sentiment.  

6.  Attach the circles in the center of the card.

7.  Use the Spring Basket die set and die cut the basket, bow, five eggs, seven grass and  nine daisy flowers.  You can use design paper or use markers to color the eggs.  Shape the flowers using the Flower tool kit and add Prills to the center of each flower.

8.  Use the Trio of Leaves die set and die cut four branches.  Shape using the leaf tool in the flower tool kit.

9.  Attach the basket using dimensional tape around the sides and bottom, as shown.

10.  Fill the basket with the eggs, grasses, leaves and flowers.   


Easter Card Challenge


Today the design team was challenged to design Easter cards.  Joset Designs has a new release with really cute die sets that I used for my window Easter card.  Be sure to go over to the Elizabeth Craft Designs Blog at this LINK so see all the fabulous cards created by the design team for this challenge.

As in the past, you will be eligible to win a prize by commenting on the Elizabeth Craft Designs challenge post.

For today's challenge, Elizabeth Craft Designs is giving away a $20 Gift Card to use on their website to 3 winners


To enter simply leave a comment on the Elizabeth Craft Designs Challenge post and tell us "What Elizabeth Craft Designs dies or stamp sets would you use to create an Easter Card?

Three lucky winners  will be selected in a random drawing and will be announced on Friday, March 2nd on the Elizabeth Craft Designs blog.

Good Luck in the drawing.

* * * * * * * * * * * * * * * * * * * *

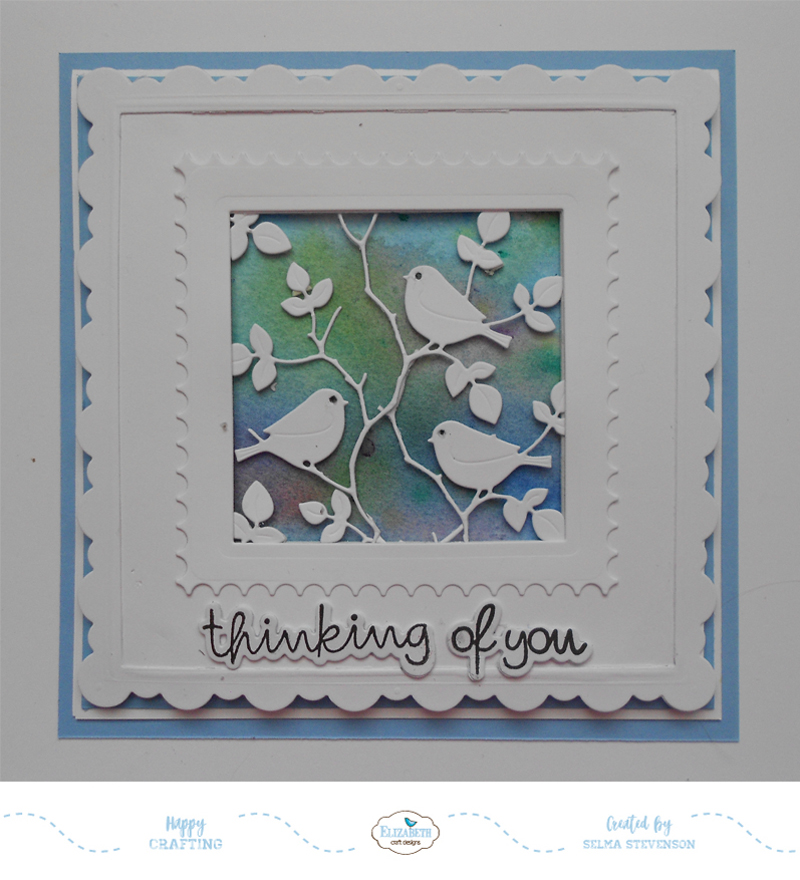
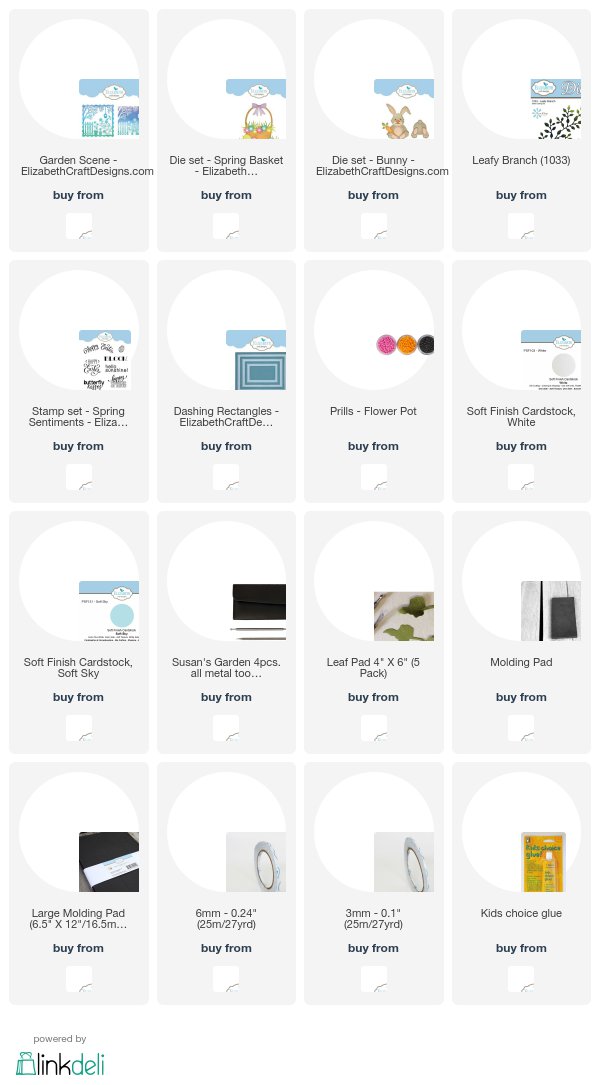
For my Easter card I created a window card.


This is a 6-inch square card.  


Step 1.  Cut a piece of white card stock 5 3/4 inches square and attach around the edges with a removable tape, to the front of the 6 inch square card front.  

Step 2.  Use the 5th die down in the Dashing Rectangles die set to die cut an opening in the two front pieces for the front of the card. Tape the die down on the front of the card using removable tape.  Lift the back panel up and run through the die cutting machine.


Step 3.  The two pieces you have will be the 5 3/4 inch piece of card stock with a rectangle opening and a rectangle opening in the front panel of the 6 inch card.  


Step 4.  A frame to go over the die cut opening is created by die cutting it using the 3rd and 5th down dies in the Dashing Rectangle die set.  Die cut two of these frames - pictured on the left side in the photo above.  One frame will be used on the front of the card, and one will be used on the back of the front panel for a finished appearance (picture shown below).

Step 5.  Use the 3rd and 4th down Dashing Rectangles to die cut a narrow frame to go on top of the previous rectangle - pictured on the right side in the photo above.  Only die cut one that will be used for the front of the card.  

Step 6.  Use the 4th down Dashing Rectangle die and die cut a piece of acetate.  The acetate rectangle is attached with 3mm Clear Double Sided Adhesive over the opening in the rectangle die cut on the 5 3/4 inch square card.

Step 7.  Attach the wider frame over the acetate then attach the narrow die cut frame on top.  This gives the window opening a dimensional looking frame.

Step 8.  Attach the second wider frame you die cut on the inside of the card, around the die cut rectangle opening.

Step 9.  For the front of the card, use the Lots of Dots Embossing Folder and emboss a piece of white card stock.  Cut a strip to fit along the left side of the frame.

Step 10.  Use the Bunny die set and die cut and assemble the bunny and carrots.

Step 11.  Use the Spring Basket die set and die cut grass to go by the bunny and two pieces that will be used on the inside of the card.  Die cut four eggs using this same die set.  Use design paper for eggs with designs.

Step 12.  Use the Garden Notes Pansy die set to die cut the violets.  Color and shape using the Flower Tool Kit.  Add Prills to the center of the flowers.

Step 13.  Use the Garden Notes Maidenhair Fern die set and die cut one fern.  

Step 14.  Use the Garden Notes Hydrangea die set to die cut a few small purple flowers.  Shape the flowers and add a Prill to the center of each.

Step 15.  Arrange the Bunny, Carrots, Grass, Violets and Maidenhair Fern, and small purple flowers on the lower left side of the card front.


Step 16.  The above picture shows the inside of the window card.  Arrange the die cut eggs and grass so they will show through the window  when the card is closed.  

Step 17.  Use the Spring Sentiments stamp set and stamp the sentiment inside the card so it will show through the window, when the card is closed.


Be sure to go over to the Elizabeth Craft Designs Challenge Blog Post and leave a comment for a chance to win one of the prizes.


Monday, February 19, 2018

Happy Birthday Card


Today I have a floral birthday card I created for my daughter-in-law. 

This is a 6-inch square card.  A piece of white card stock was embossed with the Heart Strings embossing folder, for the background.

Two Scalloped Hearts were die cut.  Two of the stamps from Suzanne Cannon's Happy Birthday Collection Stamp Set were used for the sentiment. 

The hearts were attached with double sided dimensional tape and attached to the card using dimensional tape. 

Susan's Garden Rose die set was used to create the pink and white rose.  The white die cut petals  and leaves were shaded using PanPastels. The petals and leaves were shaped using Susan's Flower Tool Kit and assembled using Kids Choice Glue.

The Garden Notes Lilac 2 die set was used to die cut the lilacs.  Dark purple card stock was used to die cut the small flowers, to create French Lilacs.  Prills were added to the center of the flowers.

The Garden Notes Queen's Ann Lace die set was used to create the Baby's Breath.  


The flowers were arranged on the lower left side of the card.  

You can shop for the products used to create this card by clicking on the product links below.  


Monday, February 12, 2018

Happy Valentine's Day


Today I have another quick and easy Valentine Card.  The background is a piece of the ModaScrap Baby Love design card stock.

Use the Entwined Hearts die set and die cut the heart, using white card stock.  Attach to the front of the card.

Use the A Way With Words Baby Love die set and die cut the love with adhesive on the front of the cardstock.  Add Silver Soft MicroSoft Glitter to the sentiment and polish with your fingers.

Use the Garden Notes Jasmine die set and create 6 Jasmine flowers.  Use Susan's Flower Tool Kit to shape the flowers.  Attach to the left side of the heart.  

Use the Love Sentiments stamp set for the sentiment.  Stamp with VersaMark Ink and Gold Emboss.

Use the Valentines Edges die set and die cut the white border for the bottom of the card.

Product links are shown below.


Thanks for stopping by today.


Sunday, February 11, 2018

You Are My Missing Piece


Valentine's Day is just a few days away.  Today I created a card using the Puzzle Heart die set from Elizabeth Craft Designs.

Start with a 6-inch square card.

Cut a 5 3/4 inch piece of white card stock; this piece will be attached to the front of the card.    Use a ScoreBoard and score seven lines down one side.  

Use the Bricks die set and a piece of white card stock that has adhesive on the back, to die cut the bricks.  Attach this die cut to the right side of the 5 3/4 inch card stock.  Attach this piece to the front of the card.

Use the Puzzle Heart die set for the large glittered heart.  Use a piece of white card stock that has Clear Double Sided Adhesive on the front and die cut the puzzle heart.  Peel off the adhesive and pour on red Silk Microfine Glitter; polish with your fingers.  Die cut the solid heart with Clear Double Sided Adhesive on the front.  Sprinkle on Silver Silk Microfine Glitter and polish.  Attach the puzzle pieces over the silver heart, leaving one piece out.  Attach this heart to the front of the card as shown.

Use the Entwined Heart die set and die cut the small red hearts and the two outline hearts.  Use white card stock that has clear double sided adhesive on the front and sprinkle on red glitter.  Attach these hearts as shown.

Use the Love Sentiments stamp set and stamp the sentiment using black ink.  Fussy cut around the sentiment and attach to the lower right corner.  

You can purchase the products used by clicking on the links below.


Wednesday, February 7, 2018

Spring Fever


I love to create different scenes combining different die sets.  Today I used Joset's new Spring Basket and Bunny die sets to create a scene.  To add  additional fun Spring items to this scene, I used Becky Sneddon's Garden Scene die set.

This is a 6 inch square card.   

A piece of white 5 3/4 inch square card stock was scored around the edges.  

One of the Dashing Rectangle dies was used to die cut an opening at the top of the 5 3/4 inch square.   

Die cut a frame to go over the Dashing Rectangle opening.  The same Dashing Rectangle and one size larger Dashing Rectangle was used to die cut the frame. 

A piece of Soft Sky Soft Finish Cardstock was cut to fit behind the die cut opening.  

Use Joset's new Spring Sentiments stamp set for the sentiment.   It was stamped using VersaFine black ink and clear embossed.  

Attach the Soft Sky card stock behind the opening.  Attach the die cut frame over the opening, using 3mm Clear Double Sided Adhesive.  

Use the Bunny die set and create the back side bunny.  Attach the feet using a small piece of dimensional tape.  Use the same die set and die cut 9 carrots.  Color and attach the top to each carrot.  

Use the Spring Basket die set an die cut the Basket, grass and small flowers.  Attach a few of the die cut grass pieces just inside the front edge of the basket.  Attach 8 carrots inside the basket.  Attach the bunny to the right side of the basket, as shown.

Use the Leafy Branch Die and die cut one branch.  Cut the branch apart.  Attach some of the branches on the lower left side of the basket and a few on the right side.  Attach two of the die cut grass pieces to the left side of the basket.  Attach the remaining carrot down in the grass.  

Shape two of the flowers die cut from the Spring Basket die set and attach to the lower right side of the basket.  Prills were added to the center of all the flowers.

Use the Garden Scene die cut and cut it apart to add the extra Spring items to the card.  The pieces used include a piece of the tree, birdhouse, bird, fence and two pots of flowers.

I hope you enjoyed my card today.  

You can purchase the products used by clicking on the product links below.

Thanks for visiting my blog today.


Monday, February 5, 2018

Be My Valentine


Today I have a valentine designed using red, white and kraft colors.

Start with a 6 inch square card and cover the front with a piece of the design paper from the ModaScrap Simply Love paper pack.  

Use the Dotted Scallop Squares and die cut a red square.  Use a piece of corrugated  board and cut a small square to fit inside the red square.  You can use Deckle scissors for an uneven edge.  Attach the squares at an angle as shown.

Use the Love Sentiments die set and die cut 'Be My Valentine' using both red and white card stock.  Attach the Red sentiment on top of the white sentiment, for dimension.

Use the A Way With Words Calligraphic Elements 3 die set and die cut the heart on  a string.  

Die cut three white flowers using the Bunch of Flowers 3 die set.

Use the Heart Cutouts die set and die cut red hearts.

Attach the sentiment, flowers, and heart on top of the corrugated square, as shown.  Glue one of the small die cut hearts in the center of each flower and around on the design paper.

Use the A Way With Words Love Joy & Piece Christmas Ornament and die cut the 'love' sentiment, using red card stock.  Die cut it again using white card stock.  Attach the red sentiment over the white.  Attach the love sentiment in the lower right corner. 

Links are provided below for the products used.


Sunday, February 4, 2018

Balloon Race


I had so much fun creating this card. 

This is a 6-inch square card.  Use the piece of ModaScrap Relax In The Garden card stock, as shown, for the front of the card.

Use the striped piece of ModaScrap Relax In The Garden card stock  and the Becky Sneddon Vintage Balloon Race die set to die cut the Hot Air Balloon.  Use the same die and die cut it using a tan card stock.  Use tan card stock  and the solid balloon, to die cut the backing for the balloon.  Glue the solid balloon to the back of the detailed balloon.  Cut the strings/basket off the tan card stock and glue over the  front of the balloon.  Sponge brown ink on the basket for shading.

Use Gold Line stickers to decorate the top edge of the basket and use the small diamond stickers up on the top of the balloon and base of the balloon as shown.

Use the Flying High die set and die cut one white piece.  Use the same circle die and the next to the largest Stitched Circle die to create a round frame for the front of the Flying High die cut.  Remove the airplane from this die cut, using scissors.

Use the circle die from the Flying High die set and die cut one blue circle from a piece of the card stock from the ModaScrape Fly & Scrap card stock.  Glue this blue card stock to the back of the Flying High die cut.  Glue the circle frame to the front of this die cut piece.  Sponge light tan ink around edges of the white frame and very lightly over the edges of some of the clouds.

Attach the framed clouds to the front of the card.  Attach the Hot Air Balloon over the area where you cut out the airplane, using dimensional tape.

Use the gold line peel off stickers to frame the edge for the background card stock.

You can shop for the products used by clicking on the links below.


Friday, February 2, 2018

Love Birds


This card could be used for a Valentine or for almost any occasion.  It was created using the Flowers Lace Frame, Lovebirds, and Garden Notes Dahlia 2 die sets.

Start with a 6-inch card.  Cut a piece of Lavender Soft Finish Cardstock to cover the front of the card.

Use the Flowers Lace Frame die set and die cut one white frame.  Trim to fit inside the lavender card stock.

Use Susan's Garden Notes Dahlia 2 die set and create one flower.  This flower was die cut using 85 lb white cardstock and a purple marker used to color around the edges of all the petals.  Shape the petals and leaves using Susan's Flower Tool Kit.  Attach the flower to the lower left corner of the frame.

You can purchase the products used by clicking on the links below.


Thursday, February 1, 2018

Free As A Bird


Today with a card designed using Becky Sneddon's Free As A Bird  die set and Susan's CountryScapes Garden Edges Rose Hedge die set.  

 This card could be used for a Valentine, a Wedding, or someone special.
 Create a 6 1/2 x 5-inch card and cut a piece of the ModaScrap Christmas Holidays card stock to cover the front.

Use the Els van de Burgt Studio Dotted Scallop Rectangle die set and die cut a vanilla colored rectangle that matches background in the design paper.  Attach over the design card stock. 

Use the Free As A Bird die set and die cut the bird cage and the birds using White Soft Finish Cardstock.  Sponge Aqua ink onto bird cage then use your finger to rub silver metallic paste over the top to achieve a patina finish. Sponge light green ink on the flourish on the side of the birdcage.  Add Silver metallic paste over the chain.  Attach to the center of the die cut rectangle.

Sponge the die cut birds with Aqua ink and add a little light tan on their chests and over the blue ink.  Add an eye using a fine tip black marker.


Use Susan's CountryScape Garden Edges Rose Hedge die set and die cut around 12 pieces to create the roses.  Shape each petal with small stylus in Susan's Flower Tool Kit,  and use tweezers to roll and create the roses.


 Use the CountryScapes Garden Edges Rose Hedge die set and die cut light green leaves.  Use the leaf tool to draw a small line in center of each leaf.


 Use the CountryScapes Flora 5 die set and die cut a few of leaves.  I used these smaller leaves at the end of the larger leaves.

Arrange the Roses and leaves around the bird cage as shown.

Use Suzanne's  Love & Hearts Collection stamp set and stamp the sentiment using VersaFine black ink and clear emboss.

 Use The Dotted Scallop Circle die set and die cut the stamped sentiment.

 Use the Hearts Cut Outs die set and die cut the hearts.  Glue three hearts around the sentiment.  Use a marker to add the stitch marks around the edge of the scallops and inside each of the dots in the scallops.  Attach to the upper left corner of the card.

 Attach the birds with dimensional tape as shown.


Cherish Valentine with Violets


Valentine's Day is just two weeks away.  Today I designed a card using the new Love Struck die set, Susan's Garden Notes Pansy and Leafy Berry Branch, and the beautiful A Way With Words Wishing You A and the Cherish die sets.

This is a 6-inch card.


Use a piece of White Soft Finish card stock cut 6 inches square.  Lay the back of the Love Struck die on the card stock with the back facing the card stock. Use the embossing plates and embossing pad and run through your die cutting machine.  This will 'deboss' the heart into the card stock.  Use a Scoreboard and score around the edges of this piece.

Use the Garden Notes Leafy Berry Branch die set to die cut one branch.  For the berries, use Nuvo drops.  Let the berries dry while working on the rest of the card.

Die cut the Love Struck heart using the pink section of the ModaScrap Fly & Scrap design paper.  Attach the pink heart down in the debossed heart.

Use the Garden Notes Pansy die set and create 10 lavender pansies (violets).  Use 85 lb Soft Finish Cardstock to die cut.  Color the flower petals, shape with the Flower Tool Kit, and assemble. Add Prills to the center of each flower.  

Use the A Way With Words Cherish die set and die cut four Cherish die cuts.  Glue the sentiments together for dimension.  Attach to the Love Struck heart as shown.

Use the A Way With Words Wishing You A  die set and die cut the 'you' sentiment.  Attach the ModaScrap Fly & Scrap card stock, that has clear double sided Adhesive on the back to white card stock before die cutting.  This will give it some dimension.  Attach the sentiment on the lower right corner of the heart.

Attach the Leafy Berry Branch to the left side and bottom of the heart, as shown.  Attach the pansies and pansy leaves.

Have you started your Valentine cards yet?  Valentines are always beautiful when completed with any of Susan's beautiful flowers.

You can shop for the products used by clicking on the links below.


LinkWithin

Related Posts with Thumbnails