Monday, October 31, 2011

We Are Happy Tonight


I'm sure you all know that I love snowmen.  This little guy is from JustRite and I added lots of die cuts.  Seems like everyone is loving creating cards with die cuts right now.  The stamped image is from the new JustRite "Blizzard Bunch Set".  It was colored with Copic markers, cut out with a Spellbinders oval Nestie and sponged with Distress Ink.  In fact, all ivory die cut pieces were sponged with "Tea Dye" Distress Ink.    The accent under the snowman was die cut using one of the Spellbinders "Floral Doily Motifs" dies.  The beautiful flourish at the top of the card is the Cheery Lynn "Victorian Romance Flourish" (DL151).  The snowflake up in the corner is layered - the larger snowflake is one of the Marianne Designs (LR0123) snowflakes (there are three in this package).  On top I added a Martha Stewart snowflake. This is a 5.5" x 6" card.  The designer paper used is from the Graphic 45 "Christmas Emporium" pad. 

Have you seen all the new Sizzix dies Joan's Gardens is now carrying?  This is the Tim Holtz Alterations "Holiday Lamppost" (657469) that Joan just received.  Isn't it beautiful.  The die includes the lamppost, the holly and the holly berries.  I distressed the bottom of the lamp post with the Cuttlebug "Distressed Stripes" embossing folder then used the "Delicata" Golden Glitz Pigment Ink pad to antique it.  This is a beautiful gold and perfect for using on your Christmas cards.  I put the holly leaves in the Sixxiz "Triad Leaves" embossing folder to give the leaves texture.  I sure use this embossing folder a lot, don't I!  The leaves were then sponged with brown ink.  A fine tip marker defined the 3 berries.  I wanted my lightpost to be "lit" so I added a piece of dark yellow card stock behind the light then used a "Quickie Glue" pen to scribble in glue and added some multicolored yellow (with a hit of wine) glitter.  This is something I have had for a long time.  To complete the card I added some snowflakes punched with one of the snow flake "Punch a Bunch" punches Joan and I use for creating some of our flowers.  Oh, can't forget the little bow to help make it more festive!

All these products can be purchased from Joan's Gardens.  If you don't see them on her site, please just ask her about them.

Sunday, October 30, 2011

Stair Step Card


 I saw this idea about a month ago and did not bookmark the blog I saw it on, and now can't find it so I can give credit to the person who originally came up with is cute idea. I can't remember exactly how the original card was created, but the main idea is the same.  You start out with a side step card. Here is the link at SCS for directions on how to create this type card. The card was created completely with a sheet of design paper from the Graphic 45 "Christmas Emporium"  paper pad.  The only item that was not from this paper pad is a die cut tree using Marianne Designs "LR0136".  Gold Stickles was used for lights on the tree.  Cover each of the stair steps with your choice of cut out images from this design paper to create your scene.  I used a manila shipping tag to attach the music to, because it needed stability.   This is such a fun idea and I am sure there are many different ways to create your scene.    Joan's Gardens still has a supply of these Graphic 45 Christmas pads if you would like to give this a try. 

Thanks for stopping by today.

344369

Saturday, October 29, 2011

Merry Christmas Reindeer


This is my second post today.  Hope you didn't miss my Heartfelt Creations box posted earlier.

It is only 56 days until Christmas; can you believe it!  How are you coming along creating your Christmas Cards?  I'm still working away on mine, and today worked with the beautiful reindeer.  He was die cut using the Sizzix Reindeer die (657246).  Joan's Gardens does have a good supply of these dies.  I always like to dress up my die cuts and today was no exception.  The reindeer was die cut, using Kraft card stock,  then the body was inserted into the Sizzix "Triad Leaves (657259) embossing folder to give him some texture.  Christmas is a time for lots of glitter and shine so I used Mica Gloss "Chocolate" Metallic Effects Ink" over the body.  This is a beautiful color.  The shine does not show up well in the picture but in real life it has tiny little sparkles in it.  On the antlers I used the Adriondak "Gold" Acrylic Paint Dabber.  I tried using the Mica Gloss gold but it was a very bright gold and I wanted this more muted gold on the reindeer. A black pearl was added to his eye.  To make him even more festive I used thin gold cording to wrap around his neck, twice, then added three tiny jingle bells using "Crafter's Pick "The Ultimate" glue.  This glue works great on just about anything, including metal. 
I found a scrap piece design paper from last year that has glittered snowflakes I thought would be perfect because I wanted to use the new Cheery Lynn "Laced Pine Snowflake" (DL175).  It was die cut using white card stock and lightly glittered with an aqua glitter that matches the snowflakes in the design paper.  For the sentiment I used one of the JustRite stamps from "Sparky and Friends" and cut it out with a Spellbinders oval Nestie.   It was attached to the center of the snowflake.  Under the reindeer I attached the Cheery Lynn "Polynesian Sails Oval" doily (DL153) which was die cut on a pearlized card stock.  The center does come out of this die because there is a smaller circle doily die in the middle.  I wanted a solid center so the reindeer would show up, so I used a Spellbinder "Petite Scallop Oval" to cover that opening. 

Thanks for stopping by.  Hope you have a wonderful weekend and even find time to create some of your Christmas cards.

As you know, all the products I use can be purchased from Joan's Gardens.


Heartfelt Creations Christmas Ornament Box


This is a box I designed with some of the new Heartfelt Creations Christmas stamps last month and realized I forgot to post it.  This is a 6x6" box.  The pretty ornament is from the Heartfelt Creations "Poinsettia Ornament 1 PreCut Set" (HCPC 3416).  It was gold embossed on Vanilla card stock and cut out.  To give it a "glass" appearance, I applied VersaMark Ink over the entire piece then poured Ranger's Clear "Ultra Thick Embossing Enamel" over it and melted the embossing enamel.  This is a very thick embossing powder so in order to get a really smooth glass look, I repeated these steps two more times - more VersaMark and embossing enamel.  You actually can just apply more embossing enamel on the piece as soon as you stop using the heat gun ten heat again - the embossing enamel will stick to the melted enamel.

There is a pretty poinsettia design on the ornament, but to make it dimensional, I stamped four of the flowers from the Heartfelt Creations "Petite Poinsettia PreCut Set" (HCPC 3415) using VersaMark and Detail Gold Embossing Powder.  They were shapped with the tools from the Flower Tool Kit and arranged.  The stamen in the center was punched using the "Medium Sky Flake" punch.  

The design paper used on the box is from Webster's Pages.  Before attaching the ornament to the box I white embossed the pretty flourish from the Heartfelt Creations "Holiday Dove PreCut Set" (HCPC 3420).  A Gold and white bow was attached at the top of the ornament and a pretty lace attached around the side of the box.  I plan to fill this box with some of my Christmas cards and send it to a friend.

You can purchase all your Heartfelt Creations stamps from Joan's Gardens.

I will be posting another card later this morning.


Friday, October 28, 2011

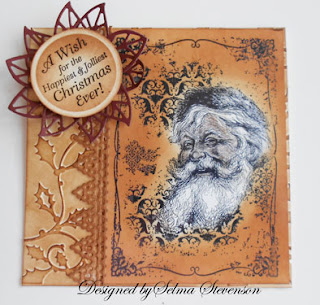
Santa With Fur Hat


Joan's Gardens now has a new supply of this pretty LaBlanche "Santa with Fur Hat" (LB1087) stamp so I wanted to create a card with it today.  I did add some color to  Santa but it does not show up in this photo.  I used Tim Holtz Distress inks and "nibs" to color.  After completing the Santa, I used the Blending Tool and added "Tea Dye" Distress Ink around the image then used "Vintage Photo" to go around the edges.  I was trying to create a vintage looking card.  For the background I embossed a 5.5" square with the Sizzix "Holly Swirls" (657139) embossing folder and used the "Vintage Photo" Distress Ink over the entire embossed area.  This was attached to the card.  A Cheery Lynn "Lace Light Deco Border" (B133) was die cut and also sponged with the same Distress Ink .  The stamped image was attached over the embossed background then the border added along the edge.  For the embellishment on the top I die cut two Marianne Design flowers (LR0128) out of dark wine card stock and sponged over them with the Vintage Photo Distress Ink.  The sentiment is from the JustRite "Whimsical Christmas" stamp set.  It was cut out with a  Spellbinders circle die and sponged with both the "Tea Dye" and "Vintage Photo" Distress Inks prior to taking them out of the die.  The flower was layered and glued to the card then the sentiment was attached with foam pop dots.  I didn't think this card needed any other embellishing. 

As you know you can purchase all the products I use from Joan's Gardens.  If you have been waiting for the new LaBlanche Christmas stamps, be sure to contact Joan so you can get started on your Christmas cards.

342541


Thursday, October 27, 2011

Joan's Gardens Challenge - Creating a Snowy Background


The Challenge at Joan's Gardens this week includes a technique. We thought it would be fun to teach you how to create a fun background. Above is my card completed using this technique.  You will be able to see the snowy background better in photo below.  The stamps I used are the two new Heartfelt Creations  "Magnificent Spruce Trees" (HFC 3432) stamps from the Classic Christmas CollectionI wanted to make the larger tree the focal point and use the stamp with the three trees to create depth in the background then create a snowy scene without using stamps -- this was done by using water!   I have never seen this technique before - it kind of happened by accident and I love the results. I'm going to call it "Snowy Background Technique".  After completing the background, I added some die cuts to complete the card -- they are the Marianne sleigh (LR0178) and reindeer (LR)179).  A gold cord was used to connect the two images.  The corners are from Spellbinders.  The flourish is one of the new Cheery Lynn dies "Holly Flourish" (B148).  The flowers were punched using the "Super Giant Lilacs/Daphne"  Punch  shown below:


Now for the Challenge

This week Joan and I would like to challenge you to create a card using the following technique.  We would like for you to create an "outdoors" scene using tree stamps, if you have them, but you may use any other stamps.  The challenge is to do the "snowy background technique".   You may embellish your card any way you would like.


Here are the steps taken to produce the snowy background for this challenge:

Step 1:   you need a piece of Glossy Card Stock, a light ink and a darker shade of ink.  Blend (or sponge) the lighter ink over the glossy card stock covering the entire piece.

Step 2:  It is hard to see in the photo, but the glossy card stock is completely covered with light green ink.  Next use VersaMark Ink and ink up the stamp you want to use in the background.  Stamp onto the sponged background.  I stamped the three trees  twice, reinking the stamp before stamping the second time.  It will be really hard to see your stamped image at this point.  Use your heat gun to dry the ink.


Step 3:  Use a darker shade of ink and sponge all over the front of the card.  The more sponging you do around the stamped images the better they will show up.  Be sure to add the darker ink all over the entire piece.


 Step 4:  Use the embossing buddy and rub it all over the the card.  Ink up the stamp that will be your focal point with VersaMark Ink and stamp it.  You will notice that part of my larger tree is stamped over one of the smaller trees in the background.  The background is a smooth image so the image you white emboss will stamp perfectly.  See how the trees in the background seem to add depth to the  card.


Step 5: Next you will need a spray bottle with a fine mist.  With your card on the table, hold the spray bottle up about 10 inches and lightly mist the entire front of your card.  Do NOT over spray.  It takes a little while for the water to do it's thing - it will remove some of the ink and create a "snowy" effect.  I did not use a heat gun to speed up this process.  Once you can see the water spots you can decide if you want to lightly spray certain areas again.  Warning - if you spray too much you will get a washed out area.  I like this technique using the trees because it looks like snow falling.   You now can add additional embellishments or just use this as your entry in the challenge. I think these trees are so beautiful you really don't even need other embellishments.   Be sure to go over to Joan's Gardens and link your card to the challenge.  We always look forward to seeing your beautiful cards.  You will be eligible to win a prize plus the winner will be in the drawing at the end of the year for a $100 gift certificate to Joan's Gardens.

Below is how I completed the inside of the this card.

 The sentiment is from Penny Black, the trees are from Heartfelt Creations, and the Christmas Sleigh Border (B140) from Cheery Lynn.


I hope you will join us in the challenge this week at Joan's Gardens.


Wednesday, October 26, 2011

Pretty Ornament


It has been a while since I have used purple so decided to use this pretty Sizzix Ornament and glam it up with purple glitter.  This is the Sizzix "Ornament #4". Joan (Joan's Gardens) has a good supply of these ornament dies and she asked me to create a card with it. I always feel like I don't do a very good job when using ornaments on my projects.  I was a little nervous even getting started but  I am really pleased with the way this turned out.  Do you think it might be the purple since that is one of my favorite colors???  No, not really; this was just such an easy die cut to work with.

I started out by using the Sizzix "Peace Poinsettia" embossing folder (656988) and embossed the right side of a 6x6" card front.  On the left side I scored 1/4" lines down all the unembossed area using my ScorBuddy. 

The Ornament was die cut using dark purple card stock.  I love the openings in the ornament.  I used a piece of shinny silver design paper left over from another project to line the openings in it.  The top of the ornament (the hanger) was silver embossed.  You can't really see that in the picture.  Before attaching the silver paper to the back I used "Glue N' Seal" adhesive on the front of the ornament, then sprinkled on purple glitter.  I love using "Glue N' Seal".  I am finding I can use it for so many things.  I used a brush to "paint" the glue all over the ornament.  Since I used silver on the ornament, I decided to use a gold cording to go in between each of the scored lines on the left side of the card to kind of balance the colors on the card.  

For my embellishment I used my favorite poinsettia stamp set, which is the Heartfelt Creations "Petite Poinsettia" set (HPC3415).  I used a stamping glue pad  to stamp the flowers onto a light lavender card stock.  You have to heat the glue then I poured the same purple glitter over it.  I hand cut the flowers because I was afraid some of the glitter would come off if they were die cut with the Spellbinder poinsettia matching dies.  They were shaped and purple glitter added to the center of the flower.

I am disappointed you can't see it in the picture, but behind the flower, peaking out at the top, I added one of the new Marianne dies I just received from Joan's Gardens (LR0192).  It is a "fanned" leaf and is so pretty.  There are three different leaf dies in this set.  Coming down towards the bottom of the card I added one of the new Cheery Lynn die "Holly Flourish" (B148).  I love this flourish for Christmas cards.  It just adds that little added touch to finish off a card.  

The ornament was added in the center of the embossed area.  I wound a bunch of silver cord around my hand and tied it in the center to create a bow, then snipped the ends of each loop and added it to the top of the ornament with a large glue dot.  A pretty purple silk bow was added over the cording.  

I think I might have gotten over my fear of working with ornaments - this was a very easy card to create.  

Be sure to check back tomorrow for the post showing the Joan's Garden's challenge think you will have fun with this one!


Tuesday, October 25, 2011

Heartfelt Creations Alumni Blog Hop


It is time for another Heartfelt Creations Alumni Design Team Blog Hop.  This month there are only four of us participating and I will include all the links at the bottom of this post.

I have been working with the beautiful Heartfelt Creations "Magnificent Spruce Trees" (HCPC 3432) for another post I will be doing Thursday, this week. I love working with these gorgeous trees.  To create this card I started out with a piece of watercolor paper 5.5" x 5.5".  The tree was stamped with black Archival Ink and dried with a heat gun.  A dark green colored pencil was used to color it.  I like using a colored pencil to color the branches because you can go over all the pine needles leaving a very detailed image.  I did not use OMS.  I received a "Snow" background from Heartfelt Creations last year when I was on the design team, but was unable to find the name and product #.  I used an embossing buddy to wipe over the card and embossed the snowflake border over most of the card.  I then used Ranger's "Bridal" Embossing Tinsel so the snow would have a sparkle.  There are little sparkles in this embossing tinsel.  Joan's Gardens will be carrying a lot of different colors of this beautiful embossing Tinsel.  Using a blending tool and "Stormy Sky" Distress Ink, I applied color over most of the card,  going over the snowflakes and tree.

Across the top of the card I die cut the Cheery Lynn "Anastasia Border" (B136) and attached it with adhesive.  It was also sponged with the Stormy Sky Distress Ink.  The sentiment is from the Heartfelt Creations "Dove of Peace" set (HCPC 3421).  It was black embossed on watercolor paper and cut out with a Spellbinders "Petite Scallop Oval".  It was sponged with the Stormy Sky Distress ink prior to taking it out of the die.  A paper piercer was used to punch holes in each scallop.  The sentiment was attached with dimensional dots. Tiny white pearls were glued on the tree.  To complete the front of the card, a pretty blue silk bow was added. 

Below is the inside of the card.  The sentiment is from the Heartfelt Creations "Holiday Poinsettia Candle" (HCPC 3419) set.  It was colored in with a blue Copic marker.  The flourish below the sentiment is the Memory Box "Frosty Border" die.  All the products I used can be purchased from Joan's Gardens.


Be sure to see the  beautiful cards created by the  other Heartfelt Creations Alumni Design Team Members.  Here are the links to their blogs:


I hope the Heartfelt Creations Alumni Design Team inspires you with these additional ideas using the gorgeous Heartfelt Creations stamps and dies.  .


Monday, October 24, 2011

Christmas Wishes


Today I have a card created with one of the pretty Cheery Lynn Snowflakes.  This is the "Snowflake 1" (DL165).  It was attached to a Spellbinders "Label 22".  The sentiment was white embossed and is from the JustRite "Deck the Halls" stamp set. The white background was embossed with the Sizzix "Snow Flurries" embosssing folder.  A piece of design paper from my stash was added along the bottom with a strip of blue card stock glued across the seam.  The cute little snowman is from the JustRite "Blizzard Bunch Set".   It was stamped, colored with  Copic markers and cut out around the image.  Diamond Stickles was applied to the snow bank below the snowman.  To complete the card a dotted Swiss bow was added.

As you know, all my stamping supplies come from Joan's Gardens.

We have received lots a beautiful cards in the Joan's Gardens challenge this week.  Have you posted your card?


Sunday, October 23, 2011

Merry Christmas to You


I didn't realize how hard it is to take a good photo of a sparkly silver paper.  This is a card done completely in Silver and white, but colors are showing up in the photo.  I decided to make a center step card using a few more of the new Memory Box dies I received yesterday from Joan's Gardens.  I love working with these dies because they pop right out of the die and are so easy to work with.  I know you will enjoy working with them too. 

The products used today are:  Heartfelt Creations "Petite Poinsettia PreCut Set" (HCPC 3415); Memory Box "Flowering Christmas Tree" (98195), Memory Box "Crisp Bows" (98197); JustRite "A Merry Little Christmas Set"; Cheery Lynn "Snowflake 2"  (DL166); Marianne Designs "Holly"  (LR0127).  All the design paper used is from my scrap Christmas paper.  I believe the button is from a package of Tim Holtz buttons and the trim something from my stash.

A piece of silver and white design paper was put on the two side panels and a piece of white on white, large polka dot, paper attached to the center section.  The beautiful Memory Box "Flowering Christmas Tree" was die cut using a sparkly silver paper.  The boxes were created with two different silver papers.  It is just a square cut then a piece cut for the lid - very simple to do.  The bow on the box to the left was die cut three times and the bow on the smaller box die cut twice.  I love these Memory Box Bows.  The bows are beautiful used single, but I wanted nice full bows so cut out more, and just layered them.  Isn't it cool how they have the ribbon that goes down around the box!   

You know how much I love the new Heartfelt Creations poinsettia stamps and matching Spellbinder dies.  I silver embossed three layers, shaped and glued them together.  Three small silver rhinestones were added to the center.  Joan sent me a new "Holly" die from Marianne Designs.  I decided to silver emboss white leaves after they were die cut.  I just patted them down on the VersaMark pad and sprinkled on silver embossing powder.  The pretty doily behind the poinsettia is actually a Cheery Lynn Snowflake but is the perfect size for a little frill behind the flower.  The sentiment from JustRite was silver embossed and die cut using the Spellbinders Lacy Circles die. 

This was another very fun card to design.  I hope you like it.  Tomorrow I will be posting a cute snowman card I design using a Cheery Lynn Snowflake, the Sizzix Snowflake embossing folder, and a cute snowman from JustRite.  Hope to see you tomorrow.

All the products in bold can be purchased from Joan's Gardens.

338967

Saturday, October 22, 2011

JOY Popup Card


SECOND POST TODAY:  After I posted the "Pumpkin" card this morning,  I received a package from Joan's Gardens that has the new Memory Box dies  and could hardly wait to design with them.  Have you seen them on Joan's blog?   I had so much fun creating this card and just couldn't wait until tomorrow to post it.  

The Memory Box dies  used are:  Pop Up JOY (98192);  Arboscello Tree (98155); Country House (98165); Snowfall (98182) and Frosty Border (98171).   

I love the inside of this card so much I am going to start with that.  This is a 4 1/4" x 5 1/2" card.  I cut one blue card this size, for the main card, then cut another white card to fit inside just a little smaller.  Using the white piece, I die cut the "Joy" pop up.  I taped the die close to the middle of the card and taped it down - see photo below.  It does not cut along the bottom edge.  The Joy was cut out again using  silver and white design paper and these letters were attached over the letters on the white card stock. (You just have to cut the letters, on the design paper, across the bottom to separate them.  Very easy to do!  This die cut piece was attached to the inside of the card. 


A pearlized textured blue card stock was cut to fit onto the top panel of the inside of the card.  Using the "Snowfall" die, twice, across the top of the card, I created the snow.  When the blue panel is attached to the white card stock put inside the card, the die cut holes look like snow. I love this look.  Next I die cut the "Country House" and the Arboscello Tree using white card stock.  To put some color in the windows and door, I cut a small piece of pale yellow card stock and glued it to the back of the house.  Glitter was added to the windows and over the roof -  also to some of the leaves on the tree.  I wanted to add a snowy ground below the tree and house, so die cut the Cheery Lynn "Anastasia Border" (B136) and attached it along the fold in the middle of the card.  Some glitter was also added to it.  All the pieces were attached to the blue background behind the popup JOY.  To complete the bottom panel I added the gorgeous "Frosty Border" below the JOY.  

Below is a photo of the front of the card.


For the sentiment on the front of the card I used the JustRite "Christmas Nested Frames" stamp set.  The sentiment reads "Hearts come home for the Holidays".  This sentiment goes with the theme on  the inside of the card so well.  The sentiment used has two frames of holly, so I used the new Cheery Lynn "Holly Flourish" (B148) for an embellishment, as well as some lace across the bottom.  Joan's Gardens now sells "Liquid Pearls" and that is what I used  to add pearls across the top of the lace. These liquid pearls are so easy to use.
I know many of you have already ordered your Memory Box dies from Joan's Gardens, but if you haven't, I know you will have fun designing with them.

338114


Beautiful Pumpkins


I really love working with the new Cheery Lynn dies that Joan's Gardens now has in stock.  Aren't these pumpkins beautiful; this is the "Cinderella's Pumpkin (B139).  These new dies are so easy to work with that you can easily create a beautiful card with very little else on it.    I used a piece of design paper from the BoBunny "Forever Fall Collection" paper pad for the backgroundThe sentiment is from the Heartfelt Creations "All Seasons Tree PreCut Set" (HCPC 3331).  It was stamped, then die cut with the Spellbinders Label 4 dies.  Before taking it out of the die, it was sponged with  yellow and pumpkin inks then attached with dimensional dots.  Three rhinestones were added to complete the card.

There are other many very pretty Cheery Lynn dies like this one that I am sure you will love working with.  You can see all of them at Joan's Gardens.

Enjoy your weekend.   Hope you have time to work on the challenge at  Joan's Gardens challenge, if you haven't done so.  We love to see your beautiful cards. 

337401

Friday, October 21, 2011

Luminary plus Mini Tutorial

 Front view of Luminary using the Cheery Lynn "Christmas Candlelight" die
 Side view of luminary - can you see the embossing on the side panel?

I know you all love the new Cheery Lynn dies you can now get from Joan's Gardens because Joan has had so many orders since they were posted on her blog.  I thought I would give you another idea using this gorgeous "Christmas Candlelight" die (DL174).  Joan and I showed you two different ways to use it on cards for this week's challenge and today I created a luminary, using the base from a "Fabreeze" Luminary, to give you an additional idea for using these delicate dies. Below is a mini tutorial on the steps taken.

My cover was created with vellum card stock.  It is heavy enough to stand up well.  Two pieces were cut 6 1/8" x 6 1/4".  On the 6 1/8" side, both pieces were scored at 3" and 6" leaving a 1/8" panel to connect the sides.  I used two different sets of Spellbinders Edgeabilities to create the design on the top --  Classic Triple Scallop and Classic Scallop.  These dies fit just perfect to create 3 scallops on each side.  They were taped to the vellum and the cutting plate of the die cut machine so they would not move.  Do not put the die on the 1/8" panel that will be used to connect the two pieces. You will need to cut a straight line over from the side to cut off the top portion that was die cut.  You can see this well in the photo below showing two separate pieces.

I wanted to add some embossing to the sides of the cover so I used the new Sizzix "Thank You Set #5" (646983) small folder.  You can see in the picture above how I lined it up.  You only want to emboss three sides because the candle die cut will be placed on one of the sides.  Be sure to tape the embossing folder down to the vellum and the embossing plate so it doesn't twist when going through the die cut machine.

After you have three panels embossed, this is how they will look prior to taping.  I put ScorTape down both narrow flaps, then connected just one of the sides so I could add my "Candlelight" die cut.


This is how it will look after connecting the two panels together.  Now you need to die cut your candles and glue it to the unembossed panel using a glue such as Glue N' Seal.  Lay your die cut on your Teflon Craft Mat and brush the glue all over the back  of the delicate die cut. Do not add glue to the delicate die cut if it is laying on a paper work sheet because it might stick to the paper.  Press it down firmly on the front panel of the vellum.  Now you can pull the other backing off the remaining ScorTape and seal the seam to form your luminary cover.  

I hope you enjoyed seeing another way to use these beautiful Cheery Lynn dies.  As you know all the products I use are available from Joan's Gardens.


336726

Thursday, October 20, 2011

Joan's Weekly Challenge


It is time for a new challenge at Joan's Gardens.  This week Joan and I have each used one of the new Cheery Lynn Christmas dies to show you the versatility of these pretty dies.  We used the "Christmas Candlelight" (DL174) die.  It is a beautiful very dainty die. Below is Joan's gorgeous card created for this challenge showing how to use just the outline die cut of this Candlelight die. 


Even though we both used the same die, our cards look very different, don't they!  Joan's card is very "elegant", die cut using shinny gold card stock,  and mine is more traditional.   I used black card stock to die cut the image, and in order to add color to the image, have filled in the open spaces by die cutting additional pieces of the die using colored card stock,  i.e. red for the poinsettia, white for the candle, etc.  
Before I explain how I added color to the candles, I want to tell you I used a piece of design paper from the "Authentique " Christmas paper pad.  The green doilies are the two largest Cheery Lynn  "Doily Stacker Circles 1,2,3 (DL164).  You get 3 doilies in this set and each one is solid in the center.  Using the smaller stacker doily, I glued the dainty candle outline to it using "Glue n Seal".  You need to glue down the outline image prior to gluing in the colored pieces.  This is a glue that comes in a jar and it is very easy to brush it onto the back of this candle die cut. It dries clear so if some of it get on the top, it won't show. I also used the same glue to attach the colored pieces to the image.  This was kind of like putting a puzzle together.  I suggest when you die cut, for instance the poinsettia out of red, you push out one red petal at a time and place it in the same place in the main die cut.  It is easier to know exactly where they go if you push them out one at a time and glue in the main outline you are using.  When I pushed out the white portions of the candles, I decided to put an embossed design on them.  They were placed in the Sizzix "Ribbon Set" (656980) embossing folder, taped down, then embossed to give them some texture.  I don't know if you can see it very well in the photo because I then added some glitter to the candles.  

To give my card lots of shimmer I used the "Glue n Seal" to brush glue just inside the black outline to either add beads or glitter.  There are tiny red beads on the flower, and glitter on everything else.  I'm sorry it is hard to see the glitter and beads but they look beautiful on the card.  Gold Stickles was added to the center of the poinsettias.  Red corners were die cut using the Spellbinders "Lace Doily Accents" dies.  The JustRite sentiment is from the "Christmas Trimmings" stamp set and die cut using the new Spellbinders "Picot Edge Circles".  It was attached with a dimensional dot.

Please go over to Joan's Garden's to get all the details about this week's challenge.  I hope you will play along with this fun challenge.  Remember, you will be eligible to win a prize, plus the winner will be entered in the drawing at the end of the year for the $100 gift certificate to Joan's Gardens

336368

Wednesday, October 19, 2011

Sunset


I have this new Penny Black stamp from Joan's Gardens that I just love.  It is called "Winter Sky" but I made it an "autumn" sky.   I stamped the image using Archival Black Ink on glossy card stock then used Distress Inks and the Blending Tool to create a sunset over the lake.  To frame the scene, I die cut one of Cheery Lynn's square doily frames "Dainty Dutch Deco Frame" (DL141).  The framed scene was attached to a piece of design paper from the Kaiser Craft "Velvet Ensemble" paper pad.  The flourish on the left side was die cut using the Spellbinders "Twisted Metal Tags and Accents" dies.  The leaves were die cut using the Cheery Lynn Leaves dies (D133 and D134).  They were die cut using bright yellow card stock then sponged using autumn colors.  A Tim Holtz button was added as well as a twine bow over the leaves.  The sentiment is from the JustRight "Autumn Blessings" stamp set.  It was black embossed on bronze textured card stock.  

Joan has a supply of these beautiful Penny Black  "Winter Sky" stamps.  As you know, all the products I use can be purchased from Joan's Gardens.

Thanks for stopping by.  Tomorrow Joan and I each have designed a card for tomorrow's Joan's Gardens Weekly Challenge.  Hope you will come back and see what we have designed for this challenge. 

336059

Tuesday, October 18, 2011

Beautiful new Dies


Do you want to make some gorgeous, quick and easy Christmas cards?  Have you seen all the beautiful new dies you can now get at Joan's Gardens.  I didn't time it, but I'm sure this card took less than 30 minutes to create.  I used a pretty blue pearl, textured card stock for the background.  The beautiful bell and border are some of the new Cheery Lynn dies that Joan now has.  The bell was die cut using  the "Bow and Bell" die (DL163).  The bell and bow are die cut as two separate pieces.  The border along the bottom is the new Cheery Lynn "Dancing Doily Lace Border" (DL134).  I used only a portion of it on my card because the die cut border is longer than my card.  The embellishment behind the sentiment is from the Spellbinders "Ironworks Motifs" die set.  The sentiment is from the JustRite "Christmas Trimmings" stamp set and was cut out with a Spellbinders oval Nestability then attached with dimensionals over the Ironworks motif.  The sentiment reads "May all the Blessings of the season fill your Heart and Home with Joy."  A few pearls were added to complete the card.

This bell could also be used for anniversary or wedding cards.  These new dies, from Cheery Lynn, are as beautiful as some laser cut designs that I remember were so expensive. Now you can create as many beautiful cards as you want using these great dies.  Even though this is a very delicate design, it popped right out of the die.  I know you will love designing with it.

I am looking forward to using some of the other new dies you will see at Joan's Gardens.  They are all so beautiful, it was hard to decide where to start.  I think I might use the delicate die cut Santa's Sleigh and border for my next card.  What are your favorite new dies that Joan recently posted?   Maybe you can help me decide where to start!

335349
 

LinkWithin

Related Posts with Thumbnails