Monday, February 28, 2022

Praying for You


Today I have another Sunflower card in support for Ukraine.

The dies used for the background are the Spellbinders Fluted Classics Ovals.  Each layer was attached with dimensional tape.

A Sunflower was created using Susan's new Sunflower die set from Spellbinders.  I used Susan's Specialty cardstock.  The petals were brushed with two shades of yellow inks.  For the centers, Yellow Pollen and Taken For Granite Prills were used.

The Ivy & Ferns die set was used to die cut four ferns.  The Winterberry & Mistletoe die set was used to die cut the berry branch and red berries added.  I used white pearls that were colored with a dark red Copic marker.

The Foliage & Ladybug die set was used to die cut the ladybug.  She was colored then Clear Crystal Glaze was added to her.

The sentiment at the bottom of the card is from the Spellbinders All Occasions Stamp Set.  It was attached with dimensional tape.


Sunday, February 27, 2022

Pray for Ukraine


Today I am posting a card in support for Ukraine.  Their national flower is the Sunflower.

Normally I create sunflowers with a dark brown center, but have seen several pictures of sunflowers with a light green/yellow center, so decided to try and duplicate that.  However, after taking a photo, I decided to cover the green/yellow center and pour on the dark Prills.
I like the sunflowers with the dark center better.  Which ones do you like best?

For the background, I used a piece of blue cardstock and used the Spellbinders Christmas Foliage Strip & Borders die set to die cut the design at the bottom of the card.

Using Susan's Garden Favorites Sunflower die set from Spellbinders, I created three Sunflowers.  The petals were die cut using Susan's Specialty Cardstock.  Using the Waffleflower Media Mat, a bright yellow ink was brushed onto the petals, front and back.  A darker golden yellow ink was brushed on at the base of the petals.  They were shaped using Susan's Flower Tool Kit.  For the stamen, Yellow Pollen was used for the outer stamen die cut circle.  For the very center, I first glued in green Prills and let them dry, then added glue around the green Prills and poured on yellow Prills.  Like I said above, I decided I wanted the sunflowers to have the dark center, so I added glue on top the existing Prills and pour on the Taken For Granite Prills.  The leaves were die cut using watercolor paper, veins drawn on and brushed with dark green ink.  Around the edges, I sponged on white PanPastel.  

The sentiment is from the Altenew Sentiment Strips stamp set.  It was stamped with black VersaFine Ink and die cut using the dies from that set.

Pearls and rhinestone were added to complete the card.


Saturday, February 26, 2022

French Lilacs


I always love when the lilacs start blooming in my yard.  The dark purple French Lilac is very fragrant and is so beautiful in bouquets.

This is a slimline card.  I used the Spellbinders Christmas Foliage Strip & Borders (Die of the Month Nov '21) die set to create the bottom border.  It was die cut twice and a small piece of the second die cut border was cut to fit behind the middle of the border along the bottom edge of the card.  A piece of purple cardstock was glued to the inside of the white card.

For the long branch for this lilac, I used Susan's Winter Bough & Evergreen Shrubs die set.  The branch was die cut 4 times using watercolor paper.  Two branches were glued together for thickness.  They were brushed first with green ink then a second time with brown ink.  The two branches were glued down across the top of the card.

Susan's Garden Favorites Lilac die set from  Spellbinders was used to create the lilacs.  I used Susan's Specialty Cardstock.  Before die cutting, I placed the cardstock on the Waffleflower Media Mat and brushed on different shades of purple inks, on both the front and back before die cutting the florets.  This gives a lot of shading on each lilac.  Some of the darker purple florets were shaped so they looked as if they are just opening up.  After shaping the petals on the molding mat using the tools in the Flower Tool Kit, they were glued to the lilac base.  A Prill was added to the center of each floret.  The glue used is Bearly Art Glue.  The leaves were die cut using watercolor paper, colored with two shades of green ink, spritzed with water and shaped using the tools in the Flower Tool Kit.  

To finish the card, the Foliage & Ladybug die set was used to die cut two ladybugs.  They were colored, glued on the leaves, then clear glaze added.

The sentiment is from  Susan's Garden Favorites Quotes Stamp Set.  It was stamped with black VersaFine Ink.  I used a very old Spellbinders Scallop Oval die set to die cut the oval for the sentiment.  It did not have the punched holes in each scallop, so I used a piercer, laid the die cut on the molding mat, and punched holes in each scallop.  It was attached using dimensional tape.


Thursday, February 24, 2022

Clematis


Good Morning.  Today I created another card using Susan's new Garden Favorites Clematis die set from Spellbinders.  

For the background, I used the Penny Black Hello Winter Collection Window Die and an older Spellbinders Candlewick Lace Card Front (S5-402) die for the lacy design behind the window openings.  A piece of light pink card stock was used for the backing.  

Susan's Heirloom Daffodil/Vase die set was used to die cut the vase.  I used a dark maroon pearl cardstock to match the maroon on the Clematis stamens.  I know the vase looks black in the photo, but is very pretty maroon.  It was attached to the lower left of the window.

The Clematis die set was used to die cut three flowers.   They were die cut using Susan's Specialty card stock.  Light pink ink was sponged at the base and up the middle of each petal.  A bright pink colored pencil was used to draw lines up from the base of each petal, to create dimension.  The stamens were die cut and each spoke was cut in half.  They were colored light yellow and a maroon marker was used to color just the tips.  On the center die cut stamen, red pollen was added.  The flowers were shaped using Susan's Flower Tool Kit.  The leaves were die cut using watercolor paper, colored and shaped.  

In the lower right corner, one of the stamps from Susan's Quotes stamp set was stamped using VersaFine black ink.


Friday, February 18, 2022

Peach Blossoms


I am looking forward to the first signs of Spring.  That usually means seeing a lot of flowering trees.  For my card today, I used Susan's Garden Favorites Peach Blossom die set from Spellbinders.  

For the background design, I used one of the dies in the Spellbinders Amazing Paper Grace February Die of the Month.   The long narrow die was die cut three times across the front of a piece of 5 1/2 inch white card stock.  I used a T-Ruler to tape the die down so they would be straight.  A piece of light green cardstock was glued to the front of a 6-inch card front.  Dimensional tape was added to the back of the die cut design and centered on the front of the card.  

Susan's Peach Blossom die set was used to die cut seven blossoms, plus two extra three petal pieces to create the buds.  I used Susan's Specialty Cardstock from  Spellbinders to die cut the blossoms.  Light pink ink was brushed on the petals, trying to leave the very ends white.  At the base of each petal, a bright pink ink was sponged on then a bright pink marker used to create small lines coming up from the base of each petal.  The stamens were die cut using pink card stock, the bottom portion colored with a brighter pink ink, and the very tips of the stamen were colored using a maroon marker.  The flowers were shaped using tools from the Flower Tool Kit and assembled using Bearly Art Glue.  The three petal blossom pieces were colored, shaped and rolled into buds.   The leaves were die cut and sponged using light green ink then a darker green ink sponged along the center and around edges.  

The Winter Bough & Evergreen Shrubs die set was used for the long tree branch for the Peach Blossoms.  There is a shorter branch in the Peach Blossoms die set.  

At the bottom of the card, I stamped one of the quotes from Susan's Garden Favorites Stamp Set using VersaFine Ink, then cut it apart and glued it to the card.  

To finish the card, Spellbinders pearl embellishments were added to the die cut design.


Wednesday, February 16, 2022

Trillium Peony Wreath


Today I decorated this wreath with Susan's new Trillium die set and her Double Peony die set from Spellbinders.  

This is a 6-inch card.  A piece of design paper from my stash was used for the background.  

The Woodland Wreath was die cut twice, using two different shades of brown cardstock.  

The bird, which is included in the Woodland Wreath die set, was die cut, colored, and attached with dimensional tape.

The Trillium die set was used to create five flowers.  They were die cut using Susan's  Specialty card stock, colored, and shaped using tools from  Susan's Flower Tool Kit from  SpellbindersYellow Pollen was added to the tips of the stamens.

The Double and Single Peonies die set was used to create a pink double peony. The petals were die cut using Susan's Specialty card stock.  To color, I placed the petals on the Waffleflower Media Mat and used the Picket Fence Brushes to brush on color.  A finger sponge was used to sponge a slightly darker ink on the very edge of all the petals.  The petals were shaped using Susan's Flower Tool Kit and glue together using Bearly Art Glue.   

The Foliage & Ladybug die set was used to die cut the Ladybug.


Tuesday, February 15, 2022

Sunflowers


Susan's new Garden Favorites die sets are now available at Spellbinders.  I have the new dies linked below.  Right now the Garden Favorites Bundle is on sale and you save over $24.00.

This is a 5x7 inch card.  For the background, I used a piece of green gingham card stock from my stash and distressed the edges.  

The Spellbinders Picot Petite Oval Etched Die set was used for the white background.  It was die cut three times and the three pieces glued together, then attached with dimensional tape.

Susan's Geranium & Wooden Bucket die set was used for the container. I used a piece of woodgrain design paper, drew the vertical lines with a brown marker and sponged brown ink on the bucket for dimension.  The die cut piece has an embossed line across the bottom.  I die the bucket a second time using brown cardstock and fussy cut the band.  It was glued to the bucket and Spellbinders Gold Embellishments were attached.  The smallest embellishments were added to the bucket and the largest were added to the four corners of the background.

The Sunflower die set was used to die cut three flowers, using Susan's Specialty Cardstock.  The petals were placed on the Waffleflower Media Mat and bright yellow ink brushed on.  At the base of the petals a marker was used to add a golden yellow shading. The petals were shaped using Susan's Flower Tool Kit and assembled using Bearly Art Glue.   In the center, the stamen was created adding pollen to the round die cut piece, and on top of the little brown die cut pieces, Taken For Granite Prills were added.  The Sunflower leaves were die cut using watercolor paper, colored and shaped.  

The Winter Bough & Evergreen Shrubs die set was used to die cut 5 branches.  They were colored and added behind the bouquet.  I only used the top 1/3 of each of the branches because I didn't want them real long for this bouquet.

At the base of the bouquet, a thin twine bow was added.  


Monday, February 14, 2022

Bearded Iris


Hello my friends.  Today I designed a slimline card using Susan's new Bearded Iris die set from Spellbinders.

The background die cut is the Spellbinders Flowering Slimline die.  

Susan's Gladiolus/Berry Basket die set was used for the container for the Iris.  It was die cut using lavender pearlized card stock.

I wanted to create the flowers on stems.  I used the flower stem from Susan's Amaryllis die set.  Two stems were attached in the basket.  For the Lilac bud, I used a die from the Daffodil die set


The petals for the Bearded Iris were die cut using Susan's Specialty Cardstock.  The three smaller petals were brushed with light yellow ink on the Waffle Flower Media Mat.  In the center of each petal purple ink was brushed up the center.  These petals were then shaped using the tools in Susan's Flower Tool Kit. Before shaping, the petals were lightly misted with water so they would hold their shape.  The stamen was rolled and yellow pollen added to the tips before adding to the center.   The lower petals were brushed with light purple ink.  Yellow ink was brushed at the base of the petals.  Just above the yellow, a darker purple ink was brushed out towards the edges of the petals.  A purple pencil was used to draw darker purple lines out toward the tips of the petals.  The petals were shaped from the back, with the Flower Loop Tool.  A line of glue was spread from the base of the purple petals and yellow pollen added.  The yellow petals were added using Bearly Art Glue.  The Iris were added to the stems. 

I used the Pinkfresh Small Butterfly foil plate to gold foil the butterfly.  The matching stencils were used to color the butterfly then they were die cut using the matching dies.  It was attached above the floral arrangement.  I used the Spellbinders Hot Foil System to do the foiling.


Friday, February 11, 2022

Dogwood branch with Robin


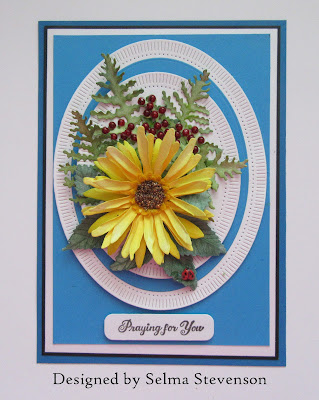
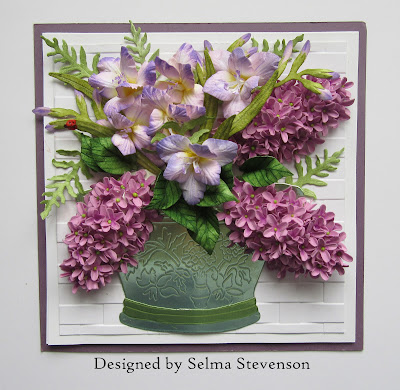
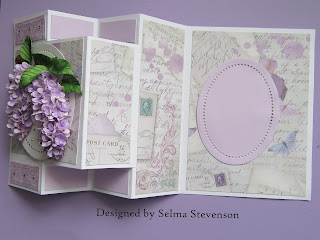
Some of the first things you see in the Spring are beautiful Dogwood trees and Robins.  Today I designed my card using Susan's new Dogwood die set from Spellbinders.

This is a slimline card.  For the background, I used the Pinkfresh Slim Diagonal Stripes die.  I die cut it twice and reversed the bottom die cut to create diagonal stripes.  

I love dogwood trees.  I have tried several times to have one in my yard, but so far have not had luck having one that blooms.  The next best thing is to create pretty cards with dogwoods.

Using the dogwood die set, I die cut enough flower petals to create twelve flowers. I used Susan's Specialty cardstock from Spellbinders.   A marker was used to color the small indention in the end of each petal.  Green PanPastel was used to color the base of all the petals then they were shaped using the loop tool that is in Susan's Flower Tool Kit.  The petals were pressed down in the center, on the molding mat, to 'cup' them.  There are two size petals, so they were separated until ready to assemble.


When I was working on the stamens, I decided you might like to see my technique.  I do this different than Susan, who rolls the stamen then dips the tips in glue, then in the Prills.  After using scissors to cut each of the four spokes in the stamen in half, I dip the tips in glue, then in the Prills.  Once the Prills have dried on the stamen, I roll it.  It it now easy to spread the tips out.  In the picture above, I have the Prills in a little bead tray.  By adding the Prills before the stamen is rolled, I found each spoke will stay separated.  When I rolled them, then added the Prills, they ended up being in one big clump.  The flowers look great with either technique.


Here is a closeup to show how the Prills are just on the tips of the separated stamens.

The Dogwood die set has a small branch die but I wanted a long branch for this slimline card.  I decided to use the branch die from Susan's Winter Bough and Evergreen Shrubs die set.  I love using this branch for many of the different flowers you can create with Susan's die sets.    Two branches were die cut and sponged with green and brown inks.  They were attached across the top of the card.  The Dogwood flowers were attached, then the stamens glued in.  The leaves were die cut using watercolor paper, colored, shaped and attached to the branch.

The Woodland Wreath & Feathered Friends die set was used for the bird die cut.  It was colored to look like a Robin, then attached with dimensional tape to one of the branches.  

Susan's Spring Quotes clear stamp set was used to stamp the quote.  It was stamped using black VersaFine Ink and clear embossed. I used a die from my stash to die cut the quote then sponged matching ink around the edges to help it stand out on the white background.  It was attached under the branch, using dimensional tape.   


Wednesday, February 9, 2022

Lilac and Freesia Bouquet


Good Morning.  Today I designed my card using Susan's new Lilac and Freesia die sets from Spellbinders.

For the background, I used the Lisa Horton 3D Weave embossing folder.  

For the vase, I used Susan's Cactus Dahlia/Pottery die set.  It was die cut using mirror cardstock.  For the trim along the bottom, I used a little different color green mirror card stock to die cut the vase, then fussy cut out the two bands along the bottom of the vase and attached with glue.  

Using the Lilac die set, three lilacs were die cut using Susan's Specialty white card stock.  They were colored using purple ink, shaped using Susan's Flower Tool Kit and assembled using Bearly Art Glue.  A green Prill was added to the center of each little flower.

Using the new Freesia die set, six flowers were die cut.  Light purple ink was sponged around the edge of all the petals then a slightly darker purple ink sponged just along the very edge.  Two flower stems were die cut and purple buds added to the top buds on the stems.  

The Ivy & Ferns die set was used to die cut the ferns and the Foliage & Ladybug die set was used to die cut the Ladybug.  She was colored red with a marker, black details added using a microfine marker and crystal clear glaze added.   


Sunday, February 6, 2022

Pink Dogwood


Today I created my card using Susan's new Dogwood die set from her Garden Favorites release from Spellbinders.  

For the background, I used the Spellbinders Slimline Kaleidoscope Hearts die set.  It was die cut 3 times using white card stock and once using light pink card stock.  The die cut pieces were glued together for dimension and attached to a light gray piece of card stock.  Additional layers behind it are light pink and dark pink cardstock.

Using the die cut hearts from the Kaleidoscope Hearts die set, I placed them in the Lisa Horton Padded Quilt embossing folder and embossed all the hearts.  They were glued together, then dimensional tape added to the backs and attached inside the die cut design.  Spellbinders pearls were added for additional embellishment.  These hearts stand higher then the background.

Using Susan's Dogwood Die set, five flowers were die cut using Susan's Specialty Cardstock.  The edges of the petals were sponged using bright pink ink.  A brown marker was used to color the indention on the end of each petal.  The flowers were shaped using Susan's Flower Tool Kit.  The stamens were rolled and green Prills added to the the tips.  The glue used was Bearly Art Glue.

Susan's new Garden Favorites Stamp set was used for the quote.  


Saturday, February 5, 2022

Clematis Vine


Clematis are a beautiful flower that has many varieties and colors.  On the Internet, I found a picture of a Tulpen-Clematis Princess Kate that I thought was very pretty and tried to duplicate it for this card.  In Susan's new Garden Favorites Spellbinders release is a Clematis Die set.  

This is a 5x7 inch card.  The die cut design on the right side of the card is from the Spellbinders Flourish Fleurit - Oct 21 APG Die of the Month die set.  Across the middle, I used one of the stamps from Susan's new Quotes stamp set and die cut it using a label die from my stash.


To show you how I colored all the pieces for this flower, I took a picture of the flower pieces after I had them all colored. I die cut pieces to create three flowers.   Around the edges of the clematis petals, I sponged Altenew Purple Wine ink and also colored the back of the petals with this color. The back of the petals was lightly misted with water and shaped using the Loop Tool from the Flower Tool Kit.  The tips of each petal was pinched and twisted to shape them.   In the center of the petals I sponged on Altenew Limeade Ink.  For the 'wagon wheel' stamen  piece, I sponged the tips with the purple wine ink and limeade ink in the center, sponging both sides the same.  For the center stamens, I color one with the purple wine, and one with the limeade.  When they were rolled, I first rolled the wine colored one then on the outside of this continued to roll the limeade colored stamen.  Before coloring, I used the scissors in the tool kit to cut each point of both type stamens in half to make them very narrow.  Once they were colored, I used the loop tool to curl the ends up on the wagon wheel stamens then pressed down in the center to cup them.  The rolled stamen was glued down in the center.


After the Clematis petals fall off, the stamen stays on the vine.  I created two extra stamens to attach to the vine.  

To attach to the card, I used the Garden Notes Winter Bough Branch from an earlier release.  Two branches were die cut, colored and attached along the left side of the card.   The flowers were assembled on the branches, using Bearly Art Glue.

I always find it so amazing we can create such realistic flowers using Susan's Garden Die Sets.   I hope this tutorial inspires you to create this beautiful flower.  


Wednesday, February 2, 2022

Lilacs on a Tri Fold Card


Good Morning Paper Crafters.  

Today I am posting a card I designed using  one Susan's new Garden Favorites 2022 release die sets from Spellbinders.  The new die sets included in this release include:  Lilac, Freesia, Sunflower, Clematis, Bearded Iris, Dogwood, Trillium, and Peach Blossom.  She also has a new stamp sets in this release.

The style of card I used for this beautiful lilac is called a Tri Fold Card.  You can get instructions on how to create this style of card on Susan's Garden Club Tri Fold Card & Hershey Kiss Gift Card Box Video on Facebook.  


The design paper I used to cover the different panels is from a Stamperia Lilac Flowers paper pad.  The die cut ovals are dies from the Spellbinders Essential Ovals die set.


The lilac was created using Susan's new Lilac die set.  The flower petals were die cut using Susan's Specialty Cardstock from Spellbinders.  Before die cutting, I brushed light purple ink all over the card stock, then die cut all the petals.  The petals were lightly misted before shaping with Susan's Flower Tool Kit.  They were glued to the flower branch using Bearly Art Glue.  The leaves were die cut using watercolor paper.  To color I placed them on the Waffle Flower Media Mat and brushed them with green ink.  They were shaped using the Leaf Tool and small ball stylus from the Flower Tool Kit.

The Foliage and Ladybug die set was used to die cut the ladybug.   She was colored, attached with glue, and then a drop of Crystal Glaze added to give her a shiny effect.  

A few tiny rhinestones were added to complete the card.

I appreciate you visiting my blog.  Below are links to all the new die sets in Susan's new Spellbinders release.

LinkWithin

Related Posts with Thumbnails