Thursday, May 29, 2014

Susan's Garden Flower Wreath


What is your favorite flower?  I find it hard to pick a favorite and especially from this wreath because I had fun creating all these flowers with Susan's Garden dies.  I have a wonderful collection of flowers I created and wanted to display them, so decided to add them to this wreath.  There are flowers here from all three of the Susan's Garden collections.  You can click on this LINK to see my individual Susan's Garden flower posts and many tutorials. 

Your Susan's Garden Dies can be purchased from Ellen Hutson, LLC.  To find individual Susan's Garden flower collections, go to the SEARCH box and type  "Sizzix name of flower", then click on "search" button.   This will take you directly to the flower you are looking for.

Have a great day.

1160508

Wednesday, May 28, 2014

Susan's Garden Forsythia Tutorial


This is a beautiful card my friend Eva created. Thank you Eva for allowing me to post your work.   She had some questions on how to form the branch and I have had several others ask for detailed instructions on how I created my forsythia.   To learn how to create this pretty forsythia, I watched Susan Tierney-Cockburn's video at this LINK.  I have created my Forsythia slightly different and have a tutorial below showing you the steps I took.

These are the two Forsythia branches I created for this tutorial.

Die cut the petals using the Susan's Garden Forsythia die.  Place the die cut piece on the Susan's Garden Molding Mat and press down in the center of each flower with the 2mm stylus from the Susan's Garden Flower Tool KitTIP:  When I receive my Susan's Garden dies, I like to go through the package and put the name of the flower on each die in that package.  The dies do have a number on them, but when I have several die sets out, it is easy to see which one goes back on the correct package when they are marked with a Sharpie Pen.

 When you push the flower out of the die with the stylus, it will shape the flower.  This is an easy way to shape these little flowers and makes it less time consuming to make this pretty branch.

 To give some dimension to the flowers on the branch, I like to die cut several shades of card stock.  This picture shows two shades but I actually die cut three shades of yellow.
 I like to have all the pieces ready to use before I start the assembly of the flower.  In this picture I am using the leaf tool from the Susan's Garden Flower Tool Kit to shape the leaves.  With all these pieces ready, this flowering branch goes to gather pretty quickly.

 In order to have a nice branch for the forsythia or any other flowering tree branch, Susan uses Wired Sisal Rope which is available at your craft store in the florist department.  This rope usually comes in brown, tan and/or green and is easy to shape and will be strong enough to hold the shape you want.

I have had questions on how to actually fold this rope to form a branch.  I will give you step by step pictures to show you how I did it.  It depends on how large you want you branch, but I have used a 10 inch piece of rope for my branches.

 Start by folding the rope in half or slightly off center.

 Twist the rope on the folded end as shown above.  This will cause one end to become shorter, which you probably want.


 Twist the rope as many times as you want -- there is no right or wrong.  Shape the branch any way you want.

 To attach all the little flowers to the rope, I find it easiest to put glue all the way down the rope to start.  I use The Ultimate Glue because it is thick and dries quickly.  If you use too thin a glue, the flowers tend to want to slide off real easy.

 I have the different shades of flowers all mixed on my work area.  I add a little glue to the Teflon work sheet and use the tweezers in the Flower Tool Kit to pick up a flower, dip the middle of the flower in the glue then attach it to the glued area on the rope.  The glue on the rope has started to set up so it seems to grab the flowe,r with the dot of glue on the bottom, and it won't slide around.  Randomly pick up different shades of flowers and glue them down the branch.  Continue doing the same thing on the other branch.

 I like to turn the branch over and make sure the sides and the back are covered.  It is ok to have some of the branch showing.  In real life, you always see the branch, but for my projects, I usually try and get a good coverage.  Again there is no right or wrong -  add as many petals as you want.

 Here is my first completed branch.

I completed two forsythia branches.  In the center of each little flower, you can use a marker in a darker shade and create a little center, add a dot of Susan's Garden Viva Decor yellow Paper Pen, or even add a little yellow bead.  Add leaves to the base and you are ready to add it to your project.

This is a pretty flowering branch I'm sure you will have fun creating.  I hope this tutorial is helpful.

You can purchase the products for this project, from the links below, from Ellen Hutson, LLC.


1159957

Tuesday, May 27, 2014

Heartfelt Creations Alumni Design Team Blog Hop


Today is "Inspiration Day" from the Heartfelt Creations Alumni Design Team and a chance for you to win a $25 Gift Certificate to shop at Heartfelt Creations.  This blog hop will close Friday, May 30th at midnight.  You have until then to join in for a chance to win the $25 gift certificate.  There are 14 designers participating in this hop and for a chance to win, all you have to do is leave a comment on each blog.  A random drawing, from comments on one of the blogs, will be drawn and announced Saturday May 31st.

Before I list the designers participating in this blog hop,  I will tell you about my card.  It is 6x6".  I used a piece of design paper from the Sunny Day Paper Collection.  The beautiful doily is from the Raindrop on Roses die set.  The flowers were created with the Sun Kissed Fleur PreCut Set and die cut using the coordinating Sunkissed Fleur Die.  The flowers were white embossed on white card stock then sponged at the base with Tumbled Glass Distress Ink.  The tips of the petals were sponged with Scattered Straw Distress Ink.  Leaves from the Open Leaf PreCut Set were stamped with green ink on green card stock and die cut using the coordinating Classic Leaf Dies.  To add some glimmer, I added Diamond Stickles to the flowers, the leaves, and the butterfly.  White pearls were added to complete the card.

I know you will enjoy seeing all the beautiful projects the design team has for you today.  Below are links to each designer's blog.  Be sure to leave a comment so you have a chance to win that $25 gift certificate!

Vicki Dutcher 
Giovana Smith
Candy Slabaugh  
Caroline Duncan 
Cibele Glazer http
Sarah Miller 
Emilia van den Heuvel
Selma Stevenson (you are here)
Glenda Brooks  
Amarilys Doria
Mary Faus
Alissa Wells
Lisa Allen
Lisa Gregory 

All the Heartfelt Creations products I used are linked below:


Monday, May 26, 2014

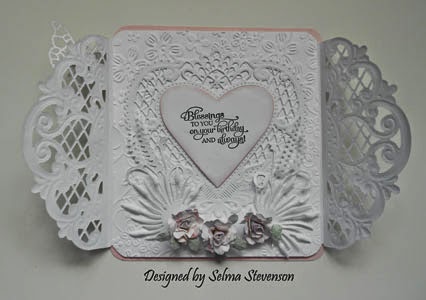
Blessing To You

 Today I have designed a special fold card using the Marianne Design Anja's Vintage Decoration Die.  The middle of the card is 5" wide x 5 1/2" and the Anja's Vintage Decoration is 2" wide.   I cut a piece of card stock 5 1/2" x 9   and die cut the Vintage Decoration on each end to create the fold. I scored down the edge of the decoration and again 1/8" over give some room inside the card.  The butterfly was die cut using the Memory Box Pippi Butterfly die.  Ribbon was strung through the opening at the end of the Vintage Decoration die cut to hold the card closed.

A piece of card stock was cut to cover the center section (5"x5 1/2") then embossed with the Embossalicious, Crafters Companion Floral embossing folder.  It was attached to the back of the card.   In the center I die cut the Marianne Design Anja's Fillagran Heart and attached it in the center of the card.  The solid heart die cut from the center of this die was sponged lightly with Spun Sugar Distress Ink then I stamped the verse from the Our Daily Bread Birthday Blessings in the center.  

On the bottom I used the Susan's Garden Mini Petals dies to create three small roses and attached them with a glue dot.  Along each side I added  Marianne decorative elements (Decorative Elegance LR0157 and Creatable Leaves LR0192). 


1158783

Wednesday, May 21, 2014

Heartfelt Creations Baby Plaque


I have never considered myself as being very creative making baby cards/projects,  but Heartfelt Creations makes it so easy to design beautiful baby items.  Today I created a plaque for a baby's room using the new Sweet Lullaby Collection.  For the frames I used different pieces of design paper from the Sweet Lullaby Paper Collection.  I used one of the smaller frames in this collection and die cut a scalloped oval from the center of it, using Spellbinders Classic Ovals.  The stamped ark is one of the stamps from the Precious Lullaby PreCut Set.  It was stamped on white card stock and colored using colored pencils and Gamsol.  The ark and the die cut scallop were both attached with dimensional tape.  This frame was mounted onto a piece of light blue card stock.  The pretty doily was die cut using the Heartfelt Creations Raindrops on Roses die.  This doily was attached to the corner of a larger frame from the Sweet Lullaby Paper Collection. then the smaller frame attached in the center with more dimensional tape.  The blue flowers were created with the Heartfelt Creations Majestic Blooms die.  The leaves were stamped using the Heartfelt Creations Open Leaf PreCut Set and die cut using the Classic Leaf dies.  The sentiment was cut from the Sweet Lullaby Paper Collection.  Diamond Stickles was added to the waves, Yellow Stickles added to the tips of stamens in the flowers, and Glossy Accents added to the dolphins.   Light blue pearls were added to complete this project. 


Today you can see the beautiful creations, created by the Design Team using the new Heartfelt Creations Sweet Lullaby Collection at this LINK.

Below are the links to the Heartfelt Creation products used:


1156623

Thursday, May 15, 2014

Heartfelt Creations


I love the new Heartfelt Creations Sweet Lullaby paper collection.  This collection is fabulous for creating gorgeous baby cards, and other baby projects, but there are so many other things you can create with this beautiful paper.  This card was created with one of the 6x6" card panels and backed with a piece of pink card stock.  The smaller panel was cut down slightly and attached to a Spellbinder Fleur De Les Rectangle.  The "A Gift of Love"  sentiment was cut from another piece of this design paper -- the words were cut apart to fit in the panel.  The Happy Birthday sentiment is from the Heartfelt Creations "Lullaby Darlings PreCut Set" (HCPC 3607).  A few pearls and a bow were added to complete this quick and easy card.

You can see the six Sweet Lullaby stamps sets, dies, and the paper collection at Heartfelt Creations at this LINK, under NEW PRODUCTS.

Wednesday, May 14, 2014

Heartfelt Creations Baby Buggy


This card was created using the new Heartfelt Creation's Sweet Lullaby Collection.   For the background, I used a piece of the design paper card panels from this collection and added the die cut baby carriage.   This is the same die I used to create the umbrella on my previous post.   The "Little Angel" sentiment is from the Heartfelt Creations "Sweet Lullaby Sentiments PreCut Set".  The pink flowers were created with the Heartfelt Creations "Botanical Floral 2 PreCut Set".  The flowers were stamped using pink ink on white card stock then the edges of the petals sponged with pink ink.  The little yellow daisies are from my flower stash -- they match the little yellow flowers in the design paper.   The border was created with the Martha Stewart "Double Arches" Large Punch Around the Page punches. 

You are going to be able to create so many beautiful cards, package decorations, baby scrapbook pages, shower invitations, and mini albums  with this new Sweet Lullaby Collection.

For a lot more inspiration, be sure to go over to the Heartfelt Creations Blog to see all the creative ideas created by the Design Team.

Tomorrow I will be posting another card using just the beautiful Sweet Lullaby Paper Collection.  There are so many different card panels, tags, etc to help you create gorgeous quick and easy cards. 

You can purchase the Sweet Lullaby Collection from Heartfelt Creations at this LINK.


Tuesday, May 13, 2014

Heartfelt Creations Sweet Lullaby Collection


Everybody loves a baby, and the Heartfelt Creation's new release "Sweet Lullaby Collection" is available to help you preserve special moments with this endearing baby and toddler themed assortment of papers, stamps and dies.   Shades of sunshine yellow, rose- petal pink and baby blue are the perfect complement for delightful hand drawn images of napping infants and frolicking toddlers enjoying their favorite toys and activities.  Six detailed stamp sets are ideal for creating cards, shower invitations, mini albums, scrapbook embellishments and more.  Delicate dies allow you to create lacy baby booties, flowers and a stylish baby carriage. Everything about Sweet Lullaby is precious and adorable.

One of the adorable dies in this Sweet Lullaby Collection is a baby carriage.  I have created a card using the baby carriage die cut, to create the cute umbrella, for a dainty baby girl card. I just cut off the baby carriage hood and added the die cut handle, which is also included in the die set.  The top of the umbrella was backed with a piece of pink card stock then slightly shaped.  Tiny rosebuds were created using Susan's Garden rose dies.  The baby blocks are from the "Sweet Lullaby Background PreCut set" They were white embossed on pink card stock, cut out and attached with dimensional tape.  A piece of lace was added along the bottom of the card, and six small roses added along the top it.

You can see the complete Sweet Lullaby Collection at Heartfelt Creations.

1153409

Friday, May 9, 2014

Susan's Garden Lilacs with Tutorial


The lilacs are starting to bloom!  I love how we can create such realistic lilac blooms with the Susan's Garden Lilac dies.   I can almost smell them.   You can find Susan Tierney-Cockburn's instruction for creating her lilac at this LINK.  On my last blog post, I had a request from Laura to show how I create these lilacs, so below I have a tutorial showing the steps I took. I hope this helps you Laura.

For the background on this card I used the Marianne Design, Anja's Delicate Corner.  I personally like having two of these corner dies so I can die cut both corners at the same time.  Between the two corners, I added the Marianne Design, Anja's Decoration (CR1271).  In the middle of the card I used the Marianne Design, Anja's Vintage Decoration.  It was backed with purple card stock.  On the bottom portion of the card I added a Dotted embossed background.  The Lilacs were attached with Glue Dots and a silk bow added.  White pearls were also added.

A tutorial on how I created the lilacs using the Susan's Garden Lilac Dies.

I followed Susan's instructions and die cut two branches for each lilac.  I am creating two lilacs so have four branches die cut.  To create the lilac, I used Designer Dries Clear Adhesive, which is a liquid glue.  This is in a bottle with a nozzle and worked well for this flower.  I followed Susan's instructions and drew a line down the middle of all the branches with the Leaf Tool from the Susan's Garden Tool Kit.    I spread the glue over two of the branches, then placed the second one on top and pressed it firmly to glue them together.  By gluing two branches together, you get a stronger branch. 


 While the glue is still wet, I pressed in on all the branches, with my fingers, to give them a rounded shape, rather than just leaving them flat.  The branch on the left, above,  has been shaped.  I colored them using Pan Pastels.

When I die cut the petals for the lilac, I used three different shades of purple card stock.  I always die cut a lot to make sure I have enough when I get started assembling my flowers.  I used the smallest stylus and pushed down on the point of each petal then pushed down in the center to really give the little flower a lot of shape.  I worked on the foam mat from the tool kit.

Here are the pieces needed to get started creating my lilacs; the flower petals, branches and the leaves.  I die cut the leaves using white card stock and colored them using Green Pan Pastels. The vain was colored with Susan's Garden Rust Pan Pastel.

I spread glue over the branch then picked up the individual flowers with tweezers and placed them on the branch.  

Alternate the colors of the flowers when you attach them to the branch.  This will give the lilac more depth of color which I think makes it look more realistic.  Cover the entire branch (above the bottom stem) with petals.  Let the flower completely dry, on your non-stick Teflon pad, so the petals will stay in place. 

Once the petals are dry, go back and add a dot of the glue to the bottom of a petal and place as many as needed over the dried petals to get a nice full lilac branch.  Pick the branch up and add flower petals to the sides of each branch.  Glue on the leaves.  At this point it is still going to need some more shaping.

 Once all the petals are dry, go back and and shape the branches to resemble a real lilac.  Twist the branches so the bottom (stem end) is wider than the top.  You want to make it come up in a point. 

What do you think?  Doesn't it look like a real lilac!

You can purchase the products I used from Ellen Hutson, LLC.

Susan's Garden Lilac dies
Marianne Design Anja's Delicate Corner
Marianne Design Anja's Vintage Decoration  
Elizabeth Craft Designs, Lots of Dots embossing folder 
Susan's Garden Flower Tool Kit
Designer Dries Clear Adhesive
Green Pan Pastels
Susan's Garden Pan Pastels
Glue Dots
Non-Stick Craft Sheet 
Hero Arts Accent Pearls

1151020

Friday, May 2, 2014

Springtime Birdcage with Tutorial

 Many times I am asked what I do with all the flowers I create with the Susan's Garden flower dies.  Oh my gosh!  There are so many things you can do with them beside create gorgeous greeting cards.  I also create beautiful gift boxes, frames and there are endless home decor items you can create with them that can be used for your own home or for gifts.  You can also create beautiful flowers for weddings and/or showers.

I purchased the above birdcage from Hobby Lobby and decorated it with some of the  flowers I created with the Susan's Garden new flower release.  On the top of the cage I created a draping, flowering vine using the Susan's Garden Forsythia dies.  

 Here is a picture of Susan's Forthythia and pictured below is a totally different flower I created using the same dies.


I die cut the Forsythia flowers using two shades of purple card stock.  To create the "vine" I used a thin green florist wire.  Five pieces were cut and knotted together at one end.  The flowers were shaped, then glued onto the wire using Ultimate Glue.  When you glue down your petals, always use just a small amount of glue.  If you use too much, it takes a long time for the glue to dry and the petals (flowers) will not stay in place.  Attach as many green leaves as you want.

Here is a closeup of the top of the cage.

 Inside the cage, I added Susan's Garden Alstroemeria and Stephanotis.  Across the bottom, I attached three Lilac branches.  I use glue dots to attach the flowers to the birdcage.  The pretty flowers I created really dressed up this plain birdcage. 

Susan's Garden Forsythia dies
Ultimate Glue
Susan's Garden Alstroemeria dies
Susan's Garden Stephanotis dies
Susan's Garden Lilac dies
Glue Dots

1147098

LinkWithin

Related Posts with Thumbnails