I received a beautiful new JustRite Background stamp called "Secret Garden". When you stamp this background the "background" is what stamps leaving the design the same color as your card stock. I wanted to find a way to get various colors on this background. I decided to stamp with VersaMark on white card stock and to add color used the Susan's Garden PanPastels. Before I show you how I did this, I will tell you about the other products used to create this card.
On the background behind the stamped image, I used the eBosser "Delicate Dots" embossing folder. The pretty die behind the flower is the Joy Crafts 6002/0258 doily. I created a flower to somewhat match the one in the stamped background by using the Susan's Garden "Daffodil" die for the flower and the leaves from the Susan's Garden "Rose" die set.
TUTORIAL USING PAN PASTELS ON STAMPED IMAGE
First I have to tell you it was so easy and very fun blending the Pan Pastels over the VersaMark to color this pretty background. I used one the blending tools that comes with the PanPastels and started rubbing the bright yellow over the design.
Next I used
a little Orange Pan Pastel and ended by blending in the Rust PanPastel. When you pick up the color, you want to lightly go around in circles to pick up just a small amount. It takes much less than using traditional pastels (chalks). The colors blended together so well. Once I was happy with the color
combination, I used a soft cloth to rub over the entire design. This
actually left a slight sheen that is beautiful.
The next thing I wanted to do was create a flower that was similar to
the one in the stamped background. I found the perfect dies. I used
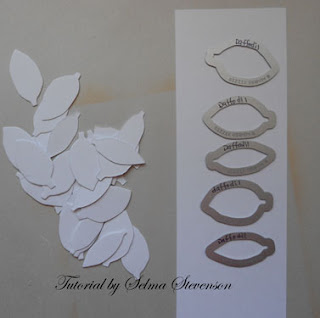
the Susan's Garden "Daffodil" dies. I die cut all the flower petals four times, each time with a double piece of card stock. Many times I die cut my flower petals using white or vanilla card stock and color them with the Pan Pastels to achieve a specialized color to match my project.
Next I used the rust Pan Pastel over the rest of each petal blending down into the yellow. I did add the rust to the back of each petal because I knew some of the petals would be formed up and show the back.
Once the petals were all colored, I used the tools in the Susan's Garden Flower Tool Kit to shape them. I started by using the pointed tool in the Kit to draw lines, using the leaf pad, then used one of the stylus to "cup" each one. After that I used the self-closing tweezers in the kit to pinch the base of each petal for further shaping.
You can see the lines drawn on each petal in this picture. I created three layers of petals for this flower. There are 5 sizes of petals in the Daffodil set and I used the largest ones for the bottom layer. They were attached to the 6-point calyx that is in the daffodil set. I created two more layers; for the middle layer I used the medium sized petals and for the top layer used the longer, more narrow petals.
The lower petals were shaped down and the narrow petals were shaped up. For the center of the flower you can use the stamen from the Susan's Garden "Lily" die set.
The leaves were dies cut using the Susan's Garden "Rose" leaf dies. They were also shaped and colored with the Pan Pastels.
I hope this tutorial helps give you additional ideas for using the Susan's Garden Pan Pastels. Also don't be afraid to use those flower dies to create many different types of flowers. It is always fun to try and create flowers that are in design paper or in a stamped image such as this pretty JustRite "Secret Garden" Background Stamp.
Products used:
JustRite "Secret Garden Background Stamp" (CL-04490)
Joy Crafts Doily (6002/0258)
eBosser "Delicate Dots" embossing folder
Susan's Garden Pan Pastels
Susan's Garden "Daffodil" die set (658414)
Susan's Garden "Rose" die set (658411)
Susan's Garden "Lily" die set (658275)
Susan's Garden Flower Tool Kit
990557


