Showing posts with label Marianne Designs. Show all posts

Sunday, March 16, 2014

Basket of Violets and a Ladybug Tutorial


 Today I have created a basket of Violets for an Easter card.  The violets were created using Susan's Garden Pansy/Violet dies.  The violets were created as shown on Susan's Video at this Link.  In the center of each flower I added a dot of the yellow Paper Pen from the Susan's Garden Viva Decor Paper Pen Set.

The gorgeous die cut at the top of the card is a new Marianne Design Anja's Border, which is now in stock at  Ellen Hutson, LLC. There are two dies in this set.   The basket is also a Marianne Design die (CR1207). The small leaves behind the violets is the Impression Obsession, Leafy Branch.   The little bunny is one of the three bunnies from the Impression Obsession Bunny die.  I added a tiny black pearl to its eye and a small white pom pom to the tail.

Did you notice the cute little ladybugs on some of the leaves and in the grass? I have had some of you ask me how to create these  ladybugs.   They were made with the Susan's Garden Lady Bug Kit.  I just received my Ellen Hutson, LLC  Newsletter and in it is the following statement: "Have you noticed the ladybugs Susan adds to each of her flowers?  We are so happy to share that we have a very special Viva Decor Susan's Garden Ladybug kit now available.  Don't delay... get your kit now because we are not certain how long it will be available!"

Viva Decor Paper Pen, Susan's Garden Ladybugs, 3 pk
 Below is a tutorial on how I created the ladybugs for my card:


When you receive your Susan's Garden Ladybug Kit, be sure to watch for the thin wire that will be in the package.  This wire is used to unclog the narrow tip after you finish using the black Viva Decor Pearl Pen.  In is shown at the bottom between the two bottles of Pearl Pens.  The fine tip should be used with the Black Pearl Pen to create the small dots on the back of the ladybug.

Work on your Non Stick Craft Mat and first add a dot of the Red Pearl Pen the size you want your ladybug to be.  Try to get a nice round circle.  Next use the Black Pearl Pen with the fine tip on it and add a dot of black to one end of the red dot, kind of pressing in so it "melts" into the red body.  I like to make a lot of these at one time.  It is not necessary for you to wait for these to dry, but I like to continue once they are dry, because I think I get better looking black dots.  Susan does this step while the red is still wet.   If you are using your Craft Mat from the Susan's Garden Tool Kit, it is easy to set your ladybugs aside until they are dry.  Don't leave them right where you are working, because I found out the hard way, you may end up laying something on them and it will totally mess them up if they are touched while wet!

 Once they are dry, I go back with the fine tip and add the black dots to the back.
 You can make very tiny ladybugs or larger ones, it is going to depend on the amount of red Paper Pearl that you use.  if the ladybug is large enough, you can add a very thin black line right down the center of the back, then add your black dots.  I have created a variety of sizes and save them in a little plastic box so I always have them ready to use.  (The truth is that they are so fun to make I can't stop!!!!)

 Aren't these little guys cute!

I have had some questions about my sister in law.  She had a pretty rough time of getting through the double mastectomy surgery.  She ended up with two surgeries - the first one was seven hours long, and the next day had to go back for a second surgery because something was left inside.  She has been in a lot of pain but doing much better. We thank you for all your prayers and well wishes. If you would like to send her a card to cheer her up through her recovery, here is her address:

Judy Blackmore
1529 Sandpiper Place
Pueblo, CO  81006
USA

You can purchase the following products from Ellen Hutson, LLC:


1123323

Thursday, March 6, 2014

Susan's Garden Quince with Marianne Design Dies


 I have been working with the Susan's Garden Quince dies to create both Quince and Cherry Blossoms. This is a great die to have in your flower collection for creating small flowers.  You can see my tutorial for creating these flowers at this LINK. The card I created for you today has a branch of Quince and two different Marianne Design dies.  I thought I would show you how to create the border along the bottom of the card, using three of the Marianne Design Anja's Delicate Corner dies. 

 The Marianne Anja's Delicate Corner is one of  my favorite corner dies.  It always gives the feel of "elegance" to your work.   There are so many different things you can create with it.  To create the border along the bottom of my card today, I started with a 6 inch square and die cut two corners.  I have two Anja's Delicate Corners so could tape them down and cut both at one time.  If you only have one corner, you can tape it down and run it through your machine to die cut then use the embossing pad and run it through one more time, to bring out the embossed design.  For the second corner, you cannot run it all the way through again because it will flatten the first one.  You need to only run it through half way, then back it out.  Do that to both die cut and to embossed the second corner.

To create that third corner, I die cut and embossed just one corner of card stock then cut across the bottom of the embossed design, as shown in the picture above. 

 You could use that second die cut corner without a backing as shown here and center the corner between the two other corners.

 I wanted the aqua color behind the third corner I die cut so I cut a piece of card stock to fit behind the openings and attached it to the back.

A piece of polka dot design paper was added to the top of the card.  I used the Marianne Design Frame and Swirls frame for the Penny Black Sentiment.  The Quince were added across the middle of the card.

The Susan's Garden Quince dies can also be used to create Cherry Blossoms.  In this package of dies there is a die cut petal that has two little petals attached; this is the extra piece you add in the center of the completed Quince flower to create a Cherry Blossom.  I am working on a large project that requires a lot of Cherry Blossoms.  Here are the Cherry Blossoms I am working on.

You can purchase the following products from Ellen Hutson, LLC:


1117716

Monday, March 3, 2014

Susan's Garden Jumping Jacks


I always smile when I see Jumping Jacks.  Today I have designed a card using the crepe paper Jumping Jacks I posted yesterday, using Susan's Garden Pansy/Violet dies.   To show off these cute little flowers, I have used Marianne Design dies for the background.  I always love to design using Marianne Design dies and wanted to let you know you can purchase them from  Ellen Hutson, LLC.
 
This is a 6"x6" card.  I embossed a slightly smaller piece of card stock and over it placed two die cut Marianne Design, Anja's Delicate Corners. These corner die cut so the corner is attached to a larger piece of card stock, but I cut around the bottom edge  of the corner (which is embossed so it is easy to cut off) to place it over the embossed background.  Along the bottom of the card I added the die cut Marianne Design, Anja's Edge.  To bring out the purple, I backed the delicate openings with a piece of the purple crepe paper.   For stems for the Jumping Jacks, I used two Impression Obsession grass die cuts.  The grass on this die cut is very tall and works great for flower stems.  The bottom of the grass was tucked down under the  Anja's Edge then the Jumping Jacks attached to the grass with small glue dots.  The leaves were glued under the flowers.   Along the bottom I added a piece of Webster's Pages green trim. 

The following products can be purchased from Ellen Hutson, LLC:


1116285

Monday, February 24, 2014

Pansies


 It has been snowing at our house for several days now.  I keep hoping that Spring is just around the corner, but I think we will have winter weather for a while.

Today I have designed a card using Susan's Garden Pansy diesSusan Tierney-Cockburn has a video to show you steps for creating the pansy with her dies at this LINK.  Behind the pansies I added Impression Obsession Leafy Branch.  Pieces of the branch were cut off and glued under the flowers.

The yellow background was embossed with the Embossalicious (EF6-ELFME) folder.  A sweet friend sent me the beautiful Marianne die (LR0300).  Just above the pansies I die cut two of the Cheery Lynn "Horizon Coved Rectangle Boutique Stacker Frames".  The sentiment is from Heartfelt Creations.  

The two butterflies were die cut using the Memory Box, Precious Butterflies die. There are two butterflies in this set and each one is attached to a bow. I cut off the bows and sponged the butterflies with yellow and tan ink.  White pearls, colored with a yellow Copic marker,  were added to complete the card.

The following products can be purchased from Ellen Hutson, LLC:
.  

1112610

Thursday, October 10, 2013

Wood and Sparkle

 Today I have a card that has a wood look background that I created using my ScorPal and a variety of brown shades of Distress Inks.  I started with a piece of ivory 6x6" card stock and scored it every 3/4" across, to resemble seams in a piece of wood paneling.  I then placed the piece on a foam pad and added some squiggle lines,using a stylus,  for some distressing in each panel.  I pulled out all the shades of tan and brown Tim Holtz Distress Ink pads and started sponging on color, starting with the lightest color, until I was happy that it resembled wood. 


 Here is a little closer view and I think you can see the lines drawn in the card stock.  I wanted to create a Fall theme card.  I used the Marianne Design LR0128 flower die for the flowers,  and created stamens using the Cheery Lynn Build A Flower dies.  The flowers were die cut using burgundy card stock then using a sponge, I added Viva 3D Stamp-Paint for a beautiful sparkly shine.  The large leaf was die cut using the MFT, Hibiscus, die.  It was die cut using dark tan card stock and then sponged with , Viva Moss Green Metallic, Copper and Carmine Red-metallic 3-D Stamp-Paint.  These paints blend together really well for beautiful results. I purchased these paints from Heartfelt Creations. Emma Lou has a Heartfelt Creations video showing how to use these paints, on their blog under Tutorials.

Here is a close up so you can see how well the 3-D Stamp-Paint blended on the leaf.  Under the flowers I added a piece of multi-colored mesh that has some metallic gold in it.  I bought a roll of this several years ago at Michaels.  I also added three Marianne Design embellishments (LR0192) behind the flowers that also have the 3-D paint on them.  A little burgundy cording is under the flowers.

 For the sentiment on this card, I used an old JustRite stamp set called "Autumn Blessings".  It was die cut using a Spellbinders Oval Nestability then sponged.  I used the Tim Holtz punch to add holes around the die cut frame.  Three leaves and a butterfly were added to complete the card.

I have had a lot of emails asking about my daughter.  She just had her first doctor's appointment since surgery, and was told she is progressing well.  She had no damaging effects that were a possibility, so we are very thankful.  She will not be able to move her head much, and can not lift any thing until after she starts physical therapy in four weeks.  She is not able to tilt her head down to write or get on her computer,  so asked me to thank all of you that sent her cards.  She was so thrilled. They are on display in her home.   We thank you for all your thoughts, prayers and beautiful cards.   

Products used on this card:
ScorPal
Distress Inks
JustRite, Autumn Blessings Stamp Set
Marianne Design flower, LR0128
Marianne Design embellishment, LR0192
MFT, Hibiscus die
Cheery Lynn, Build A Flower Embellishments
Viva, 3D Stamp-Paint, Moss Green-Metallic, Copper, and Carmine Red-Metallic

1036699

Monday, October 7, 2013

Purple Poinsettias

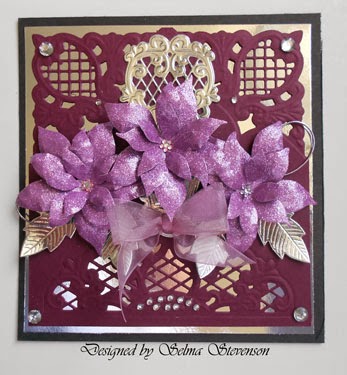
 Today I have a card for you that I used something I haven't tried before.  I used a piece of purple glitter card stock from a DCWV pad called Complementary Colors.  It die cut very easily. I love the look of the glitter paper to really make these flower "pop"!   I used the Poppy Stamps "Blooming Poinsettia" dies for the flowers and leaves.  The leaves were die cut using a piece of silver shiny card stock from this same pad.   In the center of the flowers I added rhinestones.

To create the background, I used the Marianne Design LR0200 corners and the die cut design on the bottom is the Marianne Design LR0269 die.   I have had questions before on how I die cut these corners.  This picture shows how  I have two corners and tape them down right along the edge.  The other die is placed a little above the bottom of the card stock and taped; this die does not cut along that bottom edge.  Run it through your die cutting machine then you will need to cut the outside edge off around the upper die cut corners.

 I placed a piece of shiny silver card stock behind the die cut background, to match the leaves. The color of the die cut background isn't showing up it's true color -- it matches the poinsettias very well in real life!  Also, I used the Marianne LR0265 die cut to place behind the poinsettias.  It is hard to see in the picture, but I also used some silver cording behind the flower,s then added a bow at the bottom of the arrangement.  Silver rhinestones were added to complete the card.

One more Christmas card completed!

1034514

Thursday, October 3, 2013

Moments I Treasure With You


This pretty card was quick and easy using the Heartfelt Creations Season Of Joy Collection stamp sets.  The finished card measures 6" x 6".  

I started out thinking I was going to create a tag, but saw this beautiful piece of design paper from the Heartfelt Creations "Frosty  Blanket" design paper pad that matched, so created a card.  The sentiment is from the "Moments With You PreCut Set".  It was stamped using VersaFine black ink and clear embossed then die cut using one of the Spellbinders "Picot Edge Circle" dies. The die cut sentiment was then added to one of the Marianne Design doily die cuts.  There are three die cut pieces which are all attached with dimensional tape.  The Sentiment was colored with Copic markers.  A bow was added to complete this card.  

You can see the entire Heartfelt Creations "Season of Joy" collection here.

Products used:
Heartfelt Creations "Frosty Blanket Collection" design paper
Spellbinders" Picot Edge circle" S4-345
Marianne Design, doily LR0279

1032186

Monday, September 16, 2013

Warm Holiday Wishes


We had a big storm last night and today is very cloudy and dreary.  I decided to dig out an old Inkadinkado stamp set that has my favorite snowman to make another Christmas card.  

To frame this darling snowman, I first used the Marianne Design DS0908 embossing folder to embossing the bottom of the card.  This is a 6x6" card and I had some empty space on top of the embossed frame,  so embossed that space using the eBosser Darling Dots embossing folder to resemble snow.  The Snowman was stamped in the widest portion of the frame and colored with Copic Markers.  

The poinsettia was die cut using the Poppy Stamps "Blooming Poinsettia" dies.  The center of each petal was shaded with a very light sponging of Milled Lavender Distress Ink.  The sentiment is from the same Inkadinkado stamp set.  I do not know the name of this set or if it is still available because I have had it for a long time.  The sentiment was die cut using scallop Nestabilities and each scallop pierced.  The large snowflakes were punched using the Martha Stewart "Polar Snowflake" punch.  The tiny snowflakes were some previously punched in my stash.  I believe they came out of a border punch.

Well, one more card completed before the holidays arrive!

1022692

Saturday, September 14, 2013

Mum Tutorial using Susan's Garden Dies

Don't you love Autumn with all the beautiful mums, colorful leaves and pumpkins!   Today I have added all these to my card, plus I have a tutorial below on how I created the mums.  The background paper is from the Bazzill "All Hallows Eve" design paper pad.  The pretty lacy pumpkin background was die cut using the Cheery Lynn "Fall Harvest" die.  It was backed with a piece of light yellow card stock that was sponged around the edges with a darker yellow.   

Two different sets of pumpkin dies were used; the larger pumpkins were die cut using the SB pumpkin dies and the smaller pumpkins were die cut using the Cheery Lynn "Fall Pumpkins" die.  All pumpkins were die cut using orange card stock and sponged  to give them additional texture.  The two crows were cut out of a piece of design paper from the Webster's Pages "Once upon a Halloween" design paper pack.  For the leaves, I used SB Fall Leaves dies.   The sentiment is from GKD (Theresa Momber) "Life is Good" stamp set and was die cut using SB Romantic Rectangles.  The Mums were created with the Susan's Garden "Mini Lily" dies and leaves under them were die cut using Marianne Design dies.

Here is a tutorial on how I created the mums using a mini lily die:

Did  you know you can create pretty little mums using the Susan's Garden "Mini Lily" dies?   Don't you love it when you can use your dies for more than just one purpose!  It was not hard at all; I created three different colors of mums for this card. 

I used both the "leaf" and "petal" plates from the Mini Lily die set for petals for the mum.  The outer petals are a little wider and I used the narrow "leaf" petals to form the center bud of the mum.  Because I am l creating 5 layers to create this flower, I die cut the base (calyx) piece in yellow (or same color as flower) so it won't show.  

 All the petals were shaped with the small end of the loop tool from the Susan's Garden Flower Tool Kit. 

The calyx (base) that comes in the Mini Lily die set has 6 points.  As I have stated before, I always attach a petal to every other point then go back and add the remaining petals.

After the six petals were dry, I added additional petals inside because I want a very full flower - alternate petals as you go around.  Notice that all the petals are shaped curling up rather than down.  For the very center of the mum, I created the bud using the very narrow petals.  When creating that center bud, it is easiest to add the six petals to the calyx, let it dry, then add additional petals to the bottom pushing up to get a closed center.   Once all the layers have dried, I layered (glued) them on top of each other, pushing the petals up to form a closed flower.  Once it was dry, I pulled some of the petals out to shape the mum.

I hope you enjoy having another tutorial showing you how to create a totally different flower with your Susan's Garden Mini Lily dies.

1021479

Friday, September 13, 2013

Susan's Garden Sunflower


 Everywhere you go you can see beautiful sunflowers in bloom.  Today I created a Fall card using one of the Marianne Design embossing folders for the background.  The leaves were create by applying Kaleidacolor Late November ink over glossy card stock then die cutting them with the Cheery Lynn Small Leaves dies.  They were shaped with the tools from the Susan's Garden Flower Tool Kit.  In the center of the leaves I added a sunflower; it  was created using the Susan's Garden Sunflower dies.  The petals were die cut using yellow card stock, then the center of each petal colored with the Susan's Garden Pan Pastels.  For added embellishments I added some berries from a floral stem from Michaels and colored twine that matches the colors in the leaves.  The sentiment is from GKD and was die cut using a Spellbinders scallop Nestability. 

Have a great weekend.

1020698

Thursday, September 12, 2013

Merry Christmas Popup

 Today I have another Christmas card.  I used the Memory Box "Merry Christmas Tiding" die for the main image.  In the upper corner I added the Memory Box "Snowflake Corner".  Along the bottom edge is the Cheery Lynn "Francesca Border".

For the inside of the card, I used the Joy! Crafts "Popup Trees" die on the right side and on the left side, I used one of the Marianne Design Houses and Lamp Post. The popup tree die also die cuts holes to represent snow; these are under the reindeer.  Polar White Flower Soft was added to the trees and house. The Santa in the sleigh is from Impression Obsession.  A yellow moon was punched for the background then the three Memory Box "Puffy Clouds"  attached.  The "Ho Ho Ho"  sentiment is from one of the Marianne Design Vintage Christmas stamp sets.  The large sentiment on the bottom is the Penny Black "A Wonderful Christmas" stamp. 


This picture shows the dimension of the popup trees. There is dimensional tape under the house, Santa/reindeer and the clouds.

1020228

Friday, September 6, 2013

Winter Wonderland


This week the challenge at Joan's Gardens is to create a Christmas card with the following requirements:
  • Christmas pattern Paper for background
  • Warn and Cozy Colors
  • Snow Flakes
  • Christmas Trees or Santa or anything reflecting Christmas
The design paper I used for my card is from the MME "Vintage Christmas" 6x6 Pad.  The pretty winter scene is a stamp from the Heartfelt Creations "Winter Season PreCut Set".  It was stamped with black VersaMark ink and clear embossed on a piece of sparkly white card stock.  The beauty of the sparkles does not show up in this photo.  The image was colored then Ranger Distress Stickles added for additional shine.  The image and background were die cut using Spellbinders Oval Nestabilities.     This image was attached with dimensional tape.

In front of the Winter Scene, I added a die cut tree from Marianne Design.  The pine branch at the top was die cut using a Impression Obsession die.  On the branch I added one of the Heartfelt Creations "Petite Poinsettia" flowers.  It was die cut using the matching dies.The sentiment is from the Heartfelt Creations "Winter Season PreCut Set".  It was white embossed then die cut using the Spellbinders "Labels One" die.  The snowflake by the sentiment is from the Marianne Design, COL 1330, die set.   To add snow effects on this card, I used Tulip Puffy paint.  It was heat set and glitter added.  

I hope you will join in on this challenge.  It is so nice to get a head start on all your Christmas cards.

Well I am off for a short vacation with my husband and son up to Canada.  Hope you have a wonderful weekend. 


MME, Vintage Christmas 6x6 design paper pad
Heartfelt Creations, Winter Season PreCut Set, HCPC 3543
Heartfelt Creations, Petite Poinsettia PreCut Set, HCPC 3415
Heartfelt Creations, Spellbinders, Layered Poinsettia Shapeabilities
Marianne Design, Tree #1, LR0174
Marianne Design, Snowflake, COL 1330
Spellbinders, Label One, S4-161
Impression Obsession, Pine, DIE-021-N

1016598 

Monday, September 2, 2013

LaBlanche Winter Stroll


 It has been a while since I have worked with the LaBlanche stamps and thought you would love this beautiful stamp called "Winter Stroll".  One of my favorite things to do in the winter is go for a nice leisurely  walk when there are large beautiful snowflakes coming down.

This is a 5.5" x 6" card.  I started by using the Anna Griffin "Acanthus" embossing folder to emboss the background.  This folder has a lot of nice swirls that looks great behind all the other elements added to this card.  The pretty corners are the smaller corners from the JustRite "Filigree Corners" die set.  This is one of the sets designed by Becca Feeken.  After die cutting and embossing the corners, I attached them to a piece of black card stock and cut around the outside edges so they would show up on the white background.  

The LaBlanche "Winter Stroll" was stamped using VersaFine black ink and clear embossed.  I placed the Marianne Design "Petra's Ornaments" frame over the stamped image and die cut, then embossed it.  I used scissors to cut around the inter embossed area.  Next I die the Petra's Ornaments frame using white card stock, and embossed it.  The LaBlance stamped image was attached in the center.  I used a black marker to go around the edges to help frame the stamped image.

I wanted to give the card a little dimension so I die cut the Marianne Design LR0136 and COL 1330 evergreen trees to place around the stamped image.  In order to "ground" the trees, I cut out two snow bank pieces and attached them to the bottom of the card.  The trees were tucked into the snow and attached with dimensional tape.  Since the trees are white on white, I added Distress Stickles" Clear Rock Candy" glitter to them and the edges of the snow banks, to help them show up.  To give the stamped image a snowy effect, I also added glitter to it.  To finish off the card, I added a black silk bow.

Hope you enjoy this card.

You can purchase these products from Joan's Gardens:

LaBlanche "Winter Stroll" LB1393
Anna Griffin "Acanthus" embossing folder
Marianne Design "Petra's Ornaments" (LR0279)
Marianne Design, large tree, LR0136
Marianne Design, small tree, COL 1330
JustRite, Filigree Corners, AG-03950
VersaFine Black Ink Pad
Ranger Super Fine clear embossing powder
Ranger Distress Stickles, Clear Rock Candy, Glitter
Black Silk ribbon

1013791

Thursday, August 22, 2013

Winter Scene Card and Tutorial

I think it is so fun to be able to die cut images and create a scene with them.  There are so many possibilities according to how you decide to arrange them.   I posted a "Winter Village Scene" on my blog August 2, 2013 that many of you really liked and asked for a tutorial on how I created it.  Today I have created a similar card and have a tutorial below to show you how I did it.  First I will tell you about the products I used on this Winter Scene.  The design paper I used is from the Kaiser Kraft "Twig & Berry" 6 1/2" square paper pad.  The die cut house is one of the new Marianne Design houses (COL1327).  The die includes the house, the drifting show pieces you glue on, and a snowflake stamp.  The large tree on the left is the Memory Box "Magnificent Pine" tree. Isn't that a cool tree! The tree in front of it is the Marianne tree (LR0136).  There is also one on the right side of the card.  The deer, lamp post, and the small tree are die cut using the Marianne Design (COL 1330) die set.  I sponged Distress Inks on all the die cuts.  The color used on the trees is Bundled Sage Distress Ink - I love the soft green color on this card. The Sentiment is die cut using the Cheery Lynn "Merry Christmas Set".  I only used the word Christmas.  Green glitter was added to it.  The glitter added to the other pieces is the Ranger, Distress Stickles, Clear Rock Candy, dry glitter.

TUTORIAL

 The card I created today does not show the snow banks as well as the card created on August 2nd, because of all the trees I added, but they are there and this is how I created the base to start adding the pieces to create the scene.  I started with three pieces of card stock wider than the width of the card and cut them as shown above.  The bottom layer is a smaller height than the second layer, and the top one is the largest. 

 The reason I use strips that are wider than the card is so I can "play" with how I layer them.  I have sponged the top of each piece with "Weathered Wood" Distress Ink to help make them show up.  You can see how I moved them around alternating the "mounds of snow"  which made the ends very uneven.

Next I added adhesive only along the very bottom of each layer because I wanted the top open so I cut push the house, trees, etc. down in the snow if I wanted to.  This shows the back layer with the middle layer taped to it.

 Here I have taped the front down. 


 Next I placed the snow bank over the bottom of the card and marked where they needed to be cut off with the paper trimmer.

This is how it looked after the ends were trimmed off and the snowbank was attached to the card along the bottom and the sides.  I did not put adhesive along the top of the snow.
The first die cut piece added with the die cut house.  It is tucked down in the snow just a little.

Next I started adding trees and tucked some of them down in the snow.

 The next step was to add the deer and the lamp post.

I hope this helps you create your winter scene.  It is very easy and creates a lot of dimension to your snow scene.


Marianne Design, house, COL1327
Marianne Design, med tree, LR0136
Marianne Design, winter embellishments, COL 1330
Memory Box, Magnificent Pine, 98485
Cheery Lynn, Merry Christmas Set, B186
Distress Inks
Ranger, Distress Stickles, Clear Rock Candy, dry glitter

1007146

LinkWithin

Related Posts with Thumbnails