Friday, November 26, 2021

Winter Wishes


Good Morning.   Today I have a card I created a few months past, photographed but have not posted. I am not able to climb stairs to go up to my craft room to look up product names. 

 Several of you have messaged me telling me you miss seeing my posts, so will explain what has been going on.   Unfortunately I have not felt very well since my knee replacement.  My knee surgery went fine, but I have had difficulty breathing, feeling exhausted, plus having kind of blackout spells since that surgery.  It took a lot of activity in physical therapy and that is where I noticed how bad these symptoms were.  I was tested several times for blood clots, which I was happy to not have.   This condition seemed to keep getting worse, so was sent to my heart doctor who suspected I might need heart surgery.  I was sent to the Heart Institute and have been going through a series of tests to determine condition of my heart. It was determined that I will need heart surgery.   I will be going to hospital December 29 for surgery to replace my aortic valve.  This happens to be the day after my 80th birthday!  All this has been a big concern to me but then another problem.  My "good" knee and leg started hurting a lot.  My knee gave out on me and I had excruciating pain.  I was unable to put pressure on my foot or bend my knee, and still feel like my knee might give out on me.  I have a fluid build up in my knee. I went to my knee surgeon and he gave me shots to help relieve the pain but I am not taking the risk of going up the stairs, yet, in my house to go up to my craft room.  Therefore I don't have product info for you for this card.   I am really looking forward to feeling great in 2022!

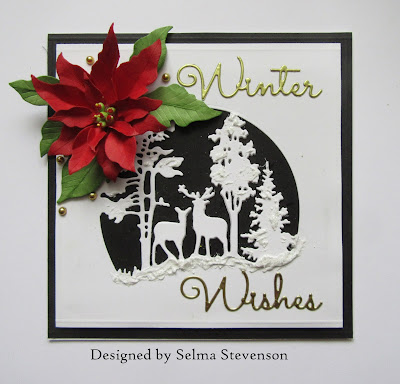
Now, info on the card.  The deer design was die cut in the center of a piece of white cardstock, twice. I don't remember the name of the die set.   On one of the die cut pieces, the deer were cut out of the design and glued on top of the solid die cut piece, for dimension.  Snow paste was added along the bottom edge and a little on the trees.

Susan's Poinsettia die set was used to create the red poinsettia.  It was die cut using her Specialty Card Stock, colored, shaped using her Flower Tool Kit and assembled using Bearly Art Glue.

A few Spellbinder gold embellishments were added to the design.

I believe the sentiment is a Spellbinder die.  It was die cut using gold mirror card stock.


Saturday, November 6, 2021

Cactus Dahlia and Garden Lantern


Good Morning Paper Crafters.  I have a card that is much prettier in real life than I can get in a photo.  I wasn't going to post it, but decided to go ahead.

I started with a piece of white card stock and swiped brown, tan, and black inks over it going in both directions to try and create a woodgrain effect.  It was then embossed with the Lisa Horton Weave embossing folder.  

The Garden Lantern was die cut using a textured gold metallic card stock.  It was die cut again using a smooth gold metallic card stock and the detail for the lantern was fussy cut and glued to the lantern.  For the inside of the lantern I used a metallic designed card stock that matches the trim, but it colors do not look the same in the photo.  The lantern was attached to the left side of the card.

Susan's Cactus Dahlia die set was used to create a pretty yellow dahlia. Susan's Specialty white card stock was used, then yellow inks brushed on to color it.   It was shaped using the tweezers from the Flower Tool Kit, to bend back (shape) the petals.  It was assembled using Bearly Art Glue.  

The Winterberry & Mistletoe die set was used to die cut the Winterberry.  After coloring and shaping the leaves, Crystal Clear Glaze was brushed over the leaves to give them a waxy appearance.

The Woodland Garden Leaves die set was used to die cut the autumn leaves.  They were colored, shaped and also glazed.  A few dark red berries, created with colored bean bag Styrofoam balls, were a dded to the arrangement.

Black Glossy card stock die cut letters were added in the upper right corner.


Sunday, October 10, 2021

Autumn Triple-Diamond Point Card


Good Morning Crafty Friends.  Autumn is definitely here!  It has been very cool and all the trees have changed colors and porches and yards all decorated with beautiful Fall flowers and pumpkins.

This is a 6-inch card. On the front panel, two inches was cut off the bottom.   I used Susan's  Button & Daisy Chrysanthemum, Foliage & Ladybug, and Woodland Garden Leaves die sets to decorate this card.

I found several YouTube videos showing how to create a Triple Diamond Point card shape.  On the top panel I used a piece of tan card stock and embossed it using the Spellbinders  Falling Leaves embossing folder.  It was scored around the edges using a Score Board and attached to a piece of black card stock.

One of the stamps from Susan's Autumn Quotes stamp set was stamped using black VersaFine Ink and die cut using the Spellbinders Picot Petite Ovals die set.  It was attached using dimensional dots.  

The three diamond squares were cut and attached at the bottom of the front panel keeping them within the sides and bottom of the front of the card.    I used white, black and tan card stock for these diamonds.  A black pen was used to draw the stitching around the edge of the tan diamonds.

The Button & Daisy Chrysanthemum die set was used to create a green, tan, burgundy and orange flower.  Three were attached to the left of the Oval and one attached to the center diamond on the bottom of the card.

The Foliage & Ladybugs die set was used for the berry branches.  For the berries, I colored sticky back pearls and colored them with Copic Markers.

The Woodland Garden Leaves die set was used to die cut the Maple leaves.  They were colored, shaped and crystal clear glaze added to give them a shine.  A tiny twine bow was added below the maple leaves on the bottom of the card.  

On the inside of the card, a piece of 6-inch square, copper embossed card stock was added.  Under the top 4-inch panel, a piece of white card stock was added to be able to write a personal message. 


Thursday, October 7, 2021

Purple Hibiscus


Susan's newest release is the Tropical collection which includes Hibiscus and Plumeria die sets.  

This is a 6-inch square card.  A piece of white embossed card stock was cut 5 3/4 inches square and scored around the edges using a Score Board.

A piece of watercolor card stock was colored using Mica Powders (purple, pink, blue).  It was die cut using a oval scallop die. A slightly larger purple oval was die cut to go under the Mica colored oval.  The two ovals were attached using dimensional tape.

The Hibiscus  die set was used to create three purple hibiscus.  They were die cut using Susan's Specialty Cardstock.  Purple ink was brushed on the  petals and bright pink at the base of each petal, then they were were shaped using Susan's Flower Tool Kit.  The stamens were colored, red nuvo drops added to the tops and yellow Prills added below the red tips.

The Foliage & Ladybug die set was used to die cut the rosemary branches.  They were brushed with green ink, using the Waffle Flower Media Mat and brushes.  Each point was cut in half using scissors to make the branch appear fuller.  

Trying to think of a tropical type flower for a filler, I used the  Lily of the Valley die set and die cut white flowers.  They were not shaped like the Lily of the Valley but were shaped on the back to create an open type flower.

The Woodland Wreath & Feathered Friends die set was used to die cut the bird.  Color was sponged on the bird and detailed with a fine tip black pen.  It was attached with a dimensional dot.

I was unable to link Susan's newest Tropical release, but will link these die sets as soon as they are available in the US.

Monday, October 4, 2021

Yellow Gladiolus


I love gladiolus and now Susan has included a die set in her new release for these beautiful flowers.   Below I have included information about a great savings for all the dies in this release.

The background on this tall card is covered with a piece of P13 Stitched with Love design paper. 

Susan's Daffodil/Narcissus die set was used for the vase.  It was colored using VersaMark, Extra Thick Embossing Powder and Distress Speckled Egg Glaze.  It was attached with dimensional tape.

The Gladiolus & Berry Picking Basket die set was used to die cut pieces for seven flowers plus extra petals for buds.  The flower petals were brushed with yellow ink on the Waffle Flower Media Mat then orange ink brushed on at the base of the petals.  They were shaped using Susan's Flower Tool Kit and assembled using Bearly Art GlueYellow Pollen was added to the stamens.  The leaves were die cut using watercolor paper, brushed with green ink and shaped.  The gladiolus stems were attached to the card, then the flowers attached.  The extra petals were used to create buds on the ends of the gladiolus stems.  

I have The Paper Boutique Paper pad and decided to fussy cut some of the bees from one of the design paper sheets and add them to this card.

Right now, Spellbinders has a greatly reduced price on Susan's newest release. You can save over $30 when you purchase the Want it All Bundle  which includes 
The Want it All Bundle is linked below.

Sunday, October 3, 2021

Cactus Dahlias & Button Chrysanthemums


Fall is such a colorful time of year.  I always have fun creating flowers with Susan's Dahlia die sets.  This is the Cactus Dahlia along with a Button Chrysanthemums.  I used the vase from her  Daffodil/Narcissus & Antique Vase, Cactus Dahlia & Ornamental Garden Pottery, Button & Daisy Chrysanthemum, Foliage & Ladybug,  and Woodland Garden Leaves die sets.

For the background I used a piece of textured card stock and added three narrow strips of gold mirror card stock along the bottom to ground the vase.  Spellbinders Lattice Petal Foldover die set was used to die cut the corners from gold mirror card stock.   

On one of Susan's Garden Club Live videos (Gladiolus and Inspiration), she showed us how to create the technique I used on the vase.  It is a technique using Ultra Thick Embossing Powder and Distress Ink/Glaze to create a realistic pottery look.  The Cactus Dahlia die set comes with a Ornamental Garden Pottery die for the container, but I used the Antique Vase from the Daffodil/Narcissus die set.

The Cactus Dahlia die set was used to create three dahlias, and the Button & Daisy Chrysanthemum die set was used for the three button chrysanthemums.  These flowers were die cut using Susan's Specialty Cardstock then using the Waffle Flower Media Mat and brushes, Distress Inks were used to add Fall colors to the petals.  Light colored ink was first brushed on then darker ink brushed on the base of each petal.  The flowers were shaped using Susan's Flower Tool Kit and assembled using Bearly Art Glue.  

The Foliage & Ladybug die set was used for the small leaf branches and berry branches.  For the berries, I used small white sticky back pearls that were colored with Copic markers.  

The Woodland Garden Leaves die set was used to die cut the oak and maple leaves.  They were sponged using Distress Inks, shaped using the Flower Tool Kit then glazed for the shiny appearance.  

I always feel so happy to take cardstock, use Susan's die sets and be able to create flowers that are so realistic.  Until you feel these flowers, you would think that are real.   This is a card I think I will frame.

Below I have linked to products used.  I want to draw your attention to the Garden Club I Want it All Bundle which is a great savings to you.

I want to thank all of you who link to the products below to make your purchases.  It is greatly appreciated.  


Saturday, October 2, 2021

Christmas Cactus


This is a card I created for World Card Day. Susan has designed floral die sets for every season and the design team will be posting cards from each of these releases today.   I used Susan's Christmas Cactus, Gathering Basket, Poinsettia, Foliage & Ladybug, and Winter Bough and Evergreen Shrubs die sets to design this Christmas card.

This is a 5x7 inch card.  I cut a extra piece of white card stock to fit on the front and used a Scor-Pal Board to score around the edges.  This was attached to the front of the card.

On the left side of the card, I used the Spellbinder Splendor Slimline die set and die cut it using white card stock.  It was backed with a piece of hot pink card stock.  

The Spellbinders Elegant Twist Circle die set was used for the circle in the upper right corner.  Before attaching with dimensional tape, Susan's Holiday Quotes stamp set was used for the quote.  It was stamped using black VersaFine ink.

The Gathering Basket was die cut using white card stock and brushed with several shades of brown ink, then I used a brown fine line dark brown pen to help bring out the embossed design in the basket.  

The Christmas Cactus die set was used to die cut the pieces for the Christmas Cactus.  The flowers were shaped using the Flower Tool Kit and glued together using Bearly Art Glue.  I think this Christmas Cactus is so pretty!  

The Poinsettia die set was used to create the white Poinsettia.  The bracts were created using green Nuvo drops with a little yellow pollen glued to the very tops.  

Under the poinsettia, The Foliage & Ladybug die set was used for the foliage.  To add some Christmas glimmer to the card, I used the Winter Bough & Evergreen Shrubs die set to die cut the Winter Bough out of gold metallic card stock.  In doesn't show very well, but the gold winter bough is under both sides of the poinsettia.

For additional gold embellishment, I used Spellbinders Fashion Gold Embellishments  to tie in with the gold bough under the poinsettia.   


Pulmeria


This card is designed with Susan's new Plumeria die set.

The background on this card is multicolor - orange, yellow, peach, pink and hot pink. On top is a piece of design paper from my stash that I thought looked tropical.  It was attached using dimensional tape.

Spellbinders Elegant Twist die set was used to die cut the pretty oval.  It was attached with dimensional tape.

Using the Plumeria die set, nine flowers were die cut using Susan's Specialty Cardstock.  Yellow and Orange Distress inks were sponged on the petals.  The petals and leaves were shaped using Susan's Flower Tool Kit and assembled using Bearly Art Glue.  A small Prill was added the the center.  To make the Plumeria flower realistic, you need to twist the petals so the left side of each petal over laps the petal next to it - all the way around.  

A Spellbinders alphabet die set was used to die cut the letters for ALOHA.  Orange and Yellow inks were brushed on the letters.   White Pearls were stained using an orange Copic Marker.


Pink Hibiscus


Today is World Card Day.  Susan's Design Team will be posting cards throughout the day using a new Tropical die set release, which includes a Hibiscus and Plumeria, plus cards from each of her earlier Spellbinder releases.

This card is 6 inches square.  I used a piece of design paper from Marta Piekarczyk - Awakening Paper Pad, for the background. 

Using the Spellbinders Essential Ovals, a small and medium oval was die cut.  In the smaller oval, one of the Quotes from Susan's Spring Quotes stamp set was stamped using VersaFine black ink.  It was attached using dimensional tape.

The larger oval was attached on the lower portion of the card.  It was also attached using dimensional tape.  

Susan's new Hibiscus die set was used to create three pink flowers.  The flowers were die cut using Susan's Specialty Cardstock.  They were sponged using light pink ink then bright pink ink was sponged at the base of each petal.  For the stamen, red Nuvo drops was used on the tips and yellow pollen glued just below the Nuvo drops.  

The Foliage & Ladybug die set was used to die cut leafy branches.  In the design paper, there are pink berries on the leaves, so I added them to the leafy branches.

I hope you are inspired by seeing all the cards Susan's Design Team will be sharing with you today.


Thursday, September 30, 2021

Candle Centerpiece


Good Morning my crafty friends.  I am happy you came to visit my blog.  

This is a 6-inch square card.  For the gold design, I used a piece of white glossy cardstock and used the Spellbinders Merry Filigree Quatrefoil glimmer plate and gold foil.  I love using the Spellbinders Glimmer Foil System for adding beautiful foil accents to my cards.  

Using Susan's Poinsettia die set, one poinsettia was created.  It was die cut using Susan's Specialty Cardstock.  Susan's Flower Tool Kit was used to create the veins before coloring.  This helps to bring out the scored lines after they are colored.  Using the Waffle Flower Media Mat and brushes, red ink was applied to the leaves.  White acrylic paint was thinned then using a small paint brush to pick up the paint, it was flicked over the colored die cuts.  The bracts were made using green Nuvo drops and a small yellow Prill pressed in on the top.  

The Garden Lantern die set includes a candle die.  This was die cut using white glossy cardstock.  The flame was colored using alcohol markers.

The Pinecone & Evergreen Bough die set was used for the  Evergreen Boughs.  The Winterberry & Mistletoe die set was used for the other greenery.  Red berries were added to the Winterberry branches.  Snowflake paste was added to some of the greenery.  


Wednesday, September 29, 2021

Garden Lantern with Poinsettias


Good Morning.  I am happy you came to my blog. I would love it if you would leave a comment below to let me you came to read about how I created this card.   

I am still working on my Christmas cards.  I love Susan's new Garden Lantern and Poinsettia die sets so created another card using these  sets.

This is a 6-inch square card.  On the front I added a piece of foiled, gold striped card stock from my stash.

Using the Garden Lantern die set, the lantern was die cut using a gold metallic card stock. The lantern was die cut a second time, using gold mirror cardstock.  Using scissors, the trim on the lantern was cut out and glued to the gold metallic lantern.  The top ornament and latch for the lantern were also die cut using the gold mirror card stock.   A piece of marbled gold card stock was used for the background at the back of the lantern.  Using the candle die from the Garden Lantern die set, it was die cut using a textured white card stock.  It was cut in half length wise then edges on the cut side were rounded to match the other side.  White Nuvo Crystal Drops was used to create melted wax along the top edge of the candle.  The flames were die cut using yellow and orange metallic card stock.  The two candles were shaped to appear round and attached inside the Lantern.

Using the Poinsettia die set, three poinsettias were die cut using Susan's Specialty Cardstock from Spellbinders.  The poinsettias were shaped using Susan's Flower Tool Kit.  Watered down light pink watercolor was brushed down the center down the petals on one of the poinsettias.  For the center of each poinsettia, I used green Nuvo drops and added a yellow Prill to the top of the bract on the pink poinsettia.  The glue used for assembly is the Bearly Art Glue.

The Pinecone & Evergreen Bough die set was used to die cut the evergreen boughs.  Pink Styrofoam balls were used for the berries.  A black fine tip pen was used to push down on each berry.  

Susan's Holiday Quotes stamp set was used for the greeting.  It was die cut using a scallop oval die.  It was attached using double sided dimensional dots.  

I am often asked about different products I use, so I have tried to add links below on products I used to create this card plus a lot of other products I regularly use.  

I hope you like visiting my blog.  Happy crafting!


Sunday, September 19, 2021

Fall Bouquet


Are you ready for Autumn?  Today it is very cool outside and the leaves are changing colors.  I decided to create an Autumn bouquet using Susan's Button Daisy & Chrysanthemum, Cactus Dahlia & Ornamental Garden Pottery, Foliage & Ladybug, and Woodland Garden Leaves die sets.

Using the Cactus Dahlia & Ornamental Garden Pottery die set, the pottery was die cut using a piece of bronze metallic card stock.  It was die cut a second time using gold metallic card stock and the two gold bands were cut out with scissors and glued to the pottery.

Using the Button Daisy &  Chrysanthemum die set, flowers were die cut using Susan's Specialty Cardstock, colored, and shaped using the Deluxe Tool Kit.  They were assembled using Bearly Art Glue.  Yellow Prills were added to the center of the Button Daisies.  

The Foliage & Ladybug die set was used for the berry branch and red Nuvo drops, now sold by Spellbinders, was used for the berries.  

The Woodland Garden Leaves die set was used to die cut five of the small maple leaves.  They were colored, shaped then clear crystal glaze added.  

A piece of woodgrain design paper from my stash was used for the background.

All the beautiful mums are now out at all the grocery stores and florist shops, which gets us all ready to decorate for Autumn.  


Wednesday, September 8, 2021

Masculine Poinsettia Card


Today I wanted to create a masculine Christmas Card using Susan's Poinsettia die set from Spellbinders.  Other die sets used are shown in bold print.

This is a 6-inch square card.  I used a piece of plaid design paper from my stash for the background.  

On the upper right side, I used the Spellbinders Essential Squares die set to die cut the two white squares. In the center of the smaller square I used one of the stamps from Susan's Holiday Quotes stamp set.  Both squares were attached using dimensional tape.

Using the Poinsettia die set, three poinsettia were created.  Susan's white Specialty card stock from Spellbinders was used and her Deluxe Tool Kit was used for shaping them. The glue used is Bearly Art Glue.   Green Nuvo Drops, Prills and Pollen was used for the bracts.

The Foliage & Ladybug die set was used for the Eucalyptus leaves.  The Pinecone and Evergreen Bough die set was used for the evergreen boughs and the pinecone.    Snow was added to the evergreen boughs and clusters of red berries.  The berries were created using bean bag styrofoam balls that were painted red with acrylic paint.  

The Garden Lantern die set includes a candle.  The candle was die cut using a piece of card stock from the DCWV Mercury Glass Cardstock Pad.


I love how realistic the poinsettia and pinecones look using Susan's die sets.  For help in knowing how to assemble Susan's flowers, you can watch her Spellbinder YouTube Videos or also get instruction on her Facebook Garden Club Live Videos.

I have links for products used and a lot of other products I use below.


Saturday, September 4, 2021

Geraniums


Hello Paper Gardeners!   Today I have a card created with Susan's Geraniums & Antique Wooden Bucket die set from her Summer Release from Spellbinders.

This is a 6-inch square card.  I used a background die from my stash for the background.  It was die cut using white card stock and backed with green card stock and attached to the right side of the card front.

The Geraniums & Antique Wooden Bucket die set was used to die cut the Antique Wooden Bucket.  Gold mirror card stock was used to create the bands around the bucket.  The bucket was attached using dimensional tape in the center and glued on both sides, to give it dimension.  The same die set was used to die cut enough pieces to create three geranium flowers. They were die cut using Susan's Specialty Card Stock from Spellbinders.   They were shaped using Susan's Deluxe Flower Tool Kit and assembled using Bearly Art Glue.  The geranium leaves were die cut using white card stock, brushed with green ink and edged lightly with red ink.  They were shaped and attached around the flowers.

One of the quote from Susan's Spring Quotes stamp set was used.  It was stamped using VersaFine Black Ink then cut out using one of the square dies in the Spellbinders Essential Squares die set.  


Monday, August 23, 2021

Poinsettia Wreath


Since Susan's Christmas die sets are now available from Spellbinders, I decided to post another Christmas card.  The die sets used are: Woodland Wreath & Feathered Friends, Poinsettia, Pine Cone and Evergreen Bough, Winterberry & Mistletoe and Winter Bough & Evergreen Shrubs die sets.

The Woodland Wreath die set was used to die cut three wreath out of brown card stock.  They were attached to the card front.  

The Pine Cone and Evergreen Bough die set was used to die cut two pine cones.  They were die cut out of brown card stock, shaped and assembled using Bearly Art Glue.  Craft Snow was added to the tips.  Eight Evergreen Boughs were die cut, shaped and added to the wreath.  

The Winterberry & Mistletoe die set was used to die cut the Winterberry Holly.  They were brushed green then brushed with Crystal Clear Glaze to make them shiny.   Winter leaves were die cut using the Winter Bough & Evergreen Shrubs die set.  They were die cut using white card stock and colored with a green marker, leaving the edges white.  All the foliage was shaped using the Deluxe Tool Kit.  Snow was added to some of the boughs.

The Poinsettia die set was used to create one red poinsettia.  It was die cut using Susan's Specialty Cardstock and was brushed with red ink, then shaped using the Tool Kit.

The poinsettia and pine cones were glued to the wreath over the evergreen boughs and other foliage.  Red berries, created by coloring bean bag Styrofoam balls, were glued to the foliage and a fine tip pen used to add a black dot on the end of each berry.  

The Woodland Wreath & Feathered Friends die set was used to die cut the Cardinal.  It was colored with markers and attached with dimensional tape.  

It is nice to have most of my Christmas cards made before the holidays.   

Thanks for stopping by today. 


Sunday, August 22, 2021

Peach Gladiolus


Good Morning!  I wanted to let you know that Spellbinders now has Susan's Summer Release shown on their site for you to leave your email address so you can be notified when these dies will be available.

Today I have designed a slimline card using the new, soon to be released, Gladiolus & Berry Picking Basket and the Daffodil/Narcissus & Antique Vase with Honey Bee die sets.  I also used the leaves from the Foliage & Ladybug, and the Woodland Wreath & Feathered Friends die sets.  Susan's new release has different containers in each die set for our bouquets and I have used one flower die set and a vase from a different die set.

A piece of embossed white cardstock was attached to the front of the card.

Using the Daffodil/Narcissus die set, the vase was die cut using a piece of design paper from my stash. This cardstock was from Tonic but I was unable to find it to link below.  The vase was attached with dimensional tape in the center and glued around the edges to give it shape.  The top was left open to insert the flowers.

The Foliage & Ladybug die set was used to die cut the leafy branches.  Five branches were die cut using white card card, brushed with green ink and shaped with Susan's Deluxe Tool Kit from Spellbinders.  I like to place the die cuts on the Waffle Flower Media Mat and brush on ink.  

The new Gladiolus & Berry Picking Basket die set was used to die cut the flowers, using Susan's Specialty Card Stock.  Peach ink was sponged on the edges of the flower petals, leaving a white streak down the center.  They were lightly misted with water and shaped using the Flower Tool Kit.  They were assembled using the Bearly Art Glue.  Two branches of flowers were created and tucked in the vase.

The Foliage & Ladybug die set was used to die cut the little ladybug.  She was colored, shaped, and attached with Bearly Art Glue then Crystal Glaze added to make her shine.  

The Woodland Wreath & Feathered Friends die set was used to die cut the bird.  It was colored by sponging on color and attached with dimensional tape.

A few small clear embellishments were attached around the bouquet.


I have linked Susan's Garden products below along with other products I use.  

Thanks for stopping by today.


LinkWithin

Related Posts with Thumbnails