Showing posts with label Nellie Snellen. Show all posts

Wednesday, May 15, 2013

Susan's Garden Lily - My Tutorial


I have wanted to create very realistic lilies and now we can do that with the new Sizzix "Susan's Garden" flower dies.  There are instructions in each package of flower dies by Susan to help you, but I thought I would show you my way of creating these gorgeous lilies.  Before I do that, I will tell you about the products I used on this card:

The background was embossed with the eBosser "Dotted Elegance" embossing folder.  The oval on top was embossed with the Nellie Snellen  "Oval Frame 1" and cut out with scissors.  The sentiments are from the new JustRite "Grand Sentiments" stamp set.  The tiny leaves behind the lilies were die cut using the Impression Obsession leafy branch die.   

When you purchase one of the Susan's Garden flower die sets, you receive all the pieces needed to complete the entire flower.  I used "Dried Marigold" Distress Ink, the Copic "Dark Red" marker, and Russet Red Flower Soft to create the lilies.  The important item in shaping the flowers is the new Sizzix Flower Tool Kit.  I used 60# card stock to create the flowers.

My tutorial for creating the Susan's Garden Lily.

Here is a picture of most the items I used to create two lilies.  

Start by  adding color to the base of each petal, add dots with the Copic marker, then use one of the larger stylus in the Flower tool kit to shape the petals.  Rub the stylus around in circles to loosen the fibers in the card stock and this helps to "cup" the petal for a realistic look.

Next use the self-closing tweezers, that come in the Flower Tool Kit, to pinch the base of each petal.  Place the tweezers right in the center, as shown, then use your fingers to push the edges up to the tweezers.

In this picture, you can see the difference in the petal (on the bottom left) that has not been shaped with the tweezers, and the rest of the petals.  These new tweezers have a very long, fine point and work really great for this step.

To create the stamens, I sponged the Dried Marigold Distress Ink on the bottom of the stamen, then used the Dark Red Copic marker to color the ends of each stamen, on both sides.  Susan doesn't do this in her instructions, but I used the scissors in the Flower Tool Kit and cut down the center of each die cut stamen to create a "thinner" stamen.  I think the stamen looks more realistic and you get double the stamens.  Add a little glue to one end of the stamen, then roll it using the self-closing tweezers.  Hold your fingers on the edge a few seconds to let the glue attach, then pull out the tweezers. Wipe off any glue stuck to the tweezers with a baby wipe.  Susan is coming out with some special Woodland Powders that can be used on stamens, but it will not be out for a while, so I used some Russet Red Flower Soft to create the "fuzzy" ends of each stamen.  Just add a tiny dot of glue to front and back of the tip of each stamen and dip it in the Flower Soft.  The Flower Soft pieces are kind of large, so after the glue was dry, I used the little scissors to snip off some of the extra "fuzz".  Set the stamen aside to dry.

To assemble the flower, use the Teflon Craft Mat that comes in the kit to work on.  Place a small amount of the "Crafter's Pick" glue on one corner, then dip the base of the petal in the glue and attach it to the green (6-point) base.  Glue every other point first, then go back and add the other three petals.  This gives you a nice layered look.  As you glue each petal down, press the end down into the base with the end of the smallest stylus for a couple of second to get it to hold to the base.  This helps prevent those petals from slipping around while working on it.  

This picture shows the flower once all six petals have been attached to the base.
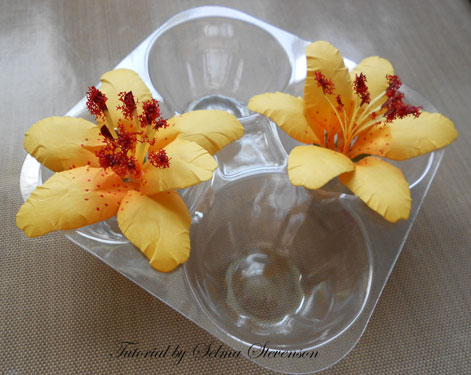
 Once you get all the petals glued to the base, place the flower in the "Plastic Flower Pots" also a Sizzix Accessory created by Susan.  This will help the flowers to stay well shaped (cupped up), until they dry.  Sometimes the flowers tend to flatten out when left to dry without any support.  There are 5 of these trays to a package and are very inexpensive.  Add a lot of glue to the end of the stamen and stick it down in the center of the flower.  You might have to check it a couple of times, while it is drying, to make sure that it stays sitting straight up.  You can pull the stamens further apart (shape them)  once they are dried in the center of the flower.

While the flowers are drying, you can work on the leaves, which are included with this set.  I forgot to take a picture of it, but if you look at the second picture above in the tutorial, you will see the tools from the tool kit.  To shape these leaves, I first used that "loop" tool to draw down the length of the leaf - do not hold the leaf with your fingers. This will shape or slightly cup the leaf. You will do this on the soft shaping mat.  Next place the little green hard mat on the soft mat, then use the tool with the point on it - shown in the above picture.

Working on the backside of the leaf, draw a line down the center of the length of the leaf with the point of this tool facing up, but you are drawing with the very tip.  It leaves a very nice line.  If you were working on leaves that needed veins down the side, you would turn the leaf over and draw those lines on the front coming out from this center line.  The lily leaf does not need the lines on the front.

Once the flower is dry, you can add the leaves to the backside.  In this picture, the Flower Soft has not been trimmed down yet.  

Here is another picture of the finished flowers on the card.

When you have all the needed flower pieces and tools, it is very, very easy to create beautiful flowers.  These flowers are very dimensional and look gorgeous on box tops, frames, and even cards.  You can purchase Plastic Flower Domes, also inspired by Susan Tierney-Cockburn that will cover and protect your shaped flowers.

I hope this tutorial gives you some additional information to help you create your beautiful paper flower garden.  I would love to read your comments to let me know if my tutorials help you.   

Products used:

Susan's Garden "Lily" (658275)
Sizzix, Susan's Garden Flower Tool Kit (658437)
60# card stock
Sizzix Plastic Flower Pots, 5 pack (658435)
Crafter's Pick Glue
eBosser "Dotted Elegance" embossing folder
Nellie Snellen "Oval Frame 1" HSF004
JustRite "Grand Sentiments" stamp set (CR-03885)
Dried Marigold Distress Ink
R89 Dark Red Copic Marker
Impression Obsession "Leafy Branch" (DIE-055-N)

949505

Sunday, May 12, 2013

Susan's Garden Violets


Today I have another card I created with violets created with the Susan's Gardens "Violets".  In case you missed it, I posted a tutorial on how I created these violets at this link.   

The lavender design paper is from the Kaiser Craft "Lil' Primrose" paper pad.  The white embossed piece was created with the Nellie Snellen "Rectangle Frame 1" embossing folder.  

I wanted to create a basket of flowers, so I die cut the Cheery Lynn "Spring Basket 1" in white card stock and lightly sponged it with lavender  Distress Ink.  The tiny leaves behind the violets were die cut with the Impression Obsession leafy branch die.  A small lavender bow was placed at the bottom of the violets and Kaiser Craft lavender pearls added to the top corners. 

I hope all you mothers are having a fabulous day.  I am looking forward to going over to my daughter's house this afternoon where my granddaughter is preparing a fabulous meal for us.  

Products used:

Sizzix "Susan's Gardens Pansy/Violet" dies   658419
Nellie Snellen "Rectangle Frame 1" embossing folder HSF005
Kaiser Craft "Lil' Primrose" design paper pad
Cheery Lynn "Spring Basket 1" DL214
Impression Obsession Leafy Branch die DIE055-N

939308

Thursday, March 28, 2013

Joan's Gardens Weekly Challenge


It is time for a new challenge at Joan's Gardens  We are thinking flowers this week.  The challenge is to create some kind of container filled with flowers.  Go over to Joan's Gardens for all the challenge information and to see what the prize is this week.

For my card I used the new Nellie Snellen  "Retro Swirls 1" embossing folder for the embossed background.  The bottom piece is from the Echo Park "Dots & Strips" design paper pad.  The little "Rick Rack" border is from the Cheery Lynn  "Expandable Tiny Borders die set. In the upper corners I added the "French Lilly Corner".   The basket is the Cheery Lynn "Spring Basket 1" and was colored with Distress Inks.  

For the mixture of flowers I used the Memory Box "Prim Poppy" and "Fancy Blossoms" die. Stamens from the Cheery Lynn BAF "Embellishments #1" set were added to the center of the yellow flowers. The tall leaf is the Poppy Stamps "Meadow Leaf" and the Cheery Lynn "Flourish Leaf Strip"  and "Build A Flower #2" were used for additional leaves in the basket.  The sentiment and flourish by it are from the Penny Black "Gratitude" stamp set.  The pretty butterfly is the Memory Box "Kaleidoscope and Moonlight Butterflies" layered. 

We are looking forward to seeing your beautiful container of flowers in our challenge this week.  


Nellie Snellen Retro Swirls 1 embossing folder
Echo Park Dots & Stripes Design Paper Pad
Memory Box "Fancy Blossoms" 98312
Memory Box "Prim Poppy" 98310
Poppy Stamps "Meadow Leaf" 806
Memory Box "Kaleidoscope Butterfly" 98261
Memory Box "Moon Light Butterfly" 98260
Cherry Lynn Expandable Tiny Borders B215
Cheery Lynn Flourish Leaf Strip   B178
Cherry Lynn Expandable Tiny Borders B215
Cheery Lynn Flourish Leaf Strip   B178
Cheery Lynn Spring Basket 1   DL214
Cheery Lynn BAF "Embellishment 1" B181A
Penny Black "Gratitude" stamps   30-105


Thursday, March 14, 2013

Joan's Gardens Weekly Challenge

This week we thought it would be fun to create a black and white card.  Please go over to Joan's Gardens to read all the challenge rules and see what the prize is for this week.  Joan has a new way of selecting the winner of the challenge, I think you will love. 

My card was created with one of the new Nellie Snellen embossing folders called "Round Frame 1".  On the left side of the card I added the new Memory Box "Trellis Border".  The flowers were created using the MFT "Royal Rolled Rose" and Spellbinders "Spiral Blossom One" dies.  The leaves are from the new Memory Box "Fresh Foliage" die.  The sentiment was stamped in the embossed frame with a stamp from the JustRite "Seeds of Summer" stamp set. Along the bottom I added a piece of "Sticky Back Lace",  which comes in a roll.   The black silk bow and black pearls were added to complete the card.  


Nellie Snellen empress "Round Frame 1"
Memory Box "Trellis Border" die 98476
Memory Box "Fresh Foliage" die 98502
JustRight Seeds of Summer" stamp set CR-03755
MFT "Royal Rolled Rose" spiral die
Spellbinders "Spiral Blossom One"  S4-351
White Sticky Back Lace
Black Silk Ribbon
Bow Easy
eBosser Die Cutting/embossing machine
Black Pearls

Saturday, December 15, 2012

Poinsettia Pop Up Card

 I always love the surprise of opening up a card to find a pop-up.  Joan has a lot of new Sizzix  pop-up dies we can work with.  The one I used today is called the "3-D Flower Pop-Up".  These are all dies we can use year round.  


Here is a picture showing what the pop-up looks like before it is decorated.  I used a piece of music design paper, from  my stash, for the inside of this card.  To give some design above the pop-up, I used the Nellie Snellen "Holly" embossing folder, then used Distress Inks and the Ranger Water Brush to add color to the embossed design. Scissors were used to trim around the top of the embossing.  A bird was die cut using the die from the Heartfelt Creations "Garden Romance Collection", and was colored using Distress Inks.  It was attached with a piece of dimensional tape.

To decorate the pop-up, I used the Tim Holtz "Tattered Poinsettia" die to die cut 6 of the smallest flowers.  Two layers were used for each flower.  I decided to try something different with these petals.  I used the eBosser "Divine Damask" embossing folder to add texture to the petals.  All six flowers fit in the folder which is larger than most embossing folders.  Since my background paper is tan, I decided to use the Tim Holtz "Tarnished Brass Distress Stain" over the red flowers.  It was dabbed on, then spritzed with some water to thin it out and dried with the heat gun.  I used the round nose pliers to shape the edges of the poinsettias.  The green leaves were die cut using the Tattered Poinsettia die, were also embossed, and the Tarnished Brass Distress Stain added.  They were cut apart and glued to the back of the poinsettias.  The banner is from the Spellbinders "Ribbon Banners".  I used a Penny Black stamp for the sentiment.
 
This is the front of my Pop-Up card.

There are six new Spellbinders "Medallion" dies These are the coolest dies to play with.  You can cut the medallion as I did on this card, right in the center of your card front, or use a backing die that comes with them to completely cut them out.  You can use different colors of card stocks for a layered look.    For the corners I used the Memory Box "Macarena Corner and stained them with the "Tarnished Brass Distress Stain".  The snowflake is from the Cheery Lynn "Snow Flowers" set.  I glued on the Twinklets  "Diamond Dust" and let it dry, then sponged on the "Tarnished Brass Distress Stain".  What a pretty outcome.  I know it doesn't show in the picture, but it is beautiful.  A Kaiser Craft rhinestone was added to the center.

Under the Medallion, the sentiment from the PaintBox Poppets "Sleigh Ride" stamp set was gold embossed.  The pretty border is the Memory Box "Tessatina Border".  

Spellbinders "Medallion One" die set (S2-014)
Memory Box "Macarena Corner" (98291)
Tarnished Brass Distress Stain
Cheery Lynn "Snow Flowers" (DL 226)
PaintBox Poppets "Sleigh Ride" stamp set
Memory Box "Tessatina Border" (98302)
Sizzix "3-D Flower Pop-Up" (657796)
Nellie Snellen "Holly" embossing Folder "HSFC004)
Heartfelt Creations "Garden Romance Collection" dies (HCD723)
Tim Holtz "Tattered Poinsettias" (658261)
Spellbinders "Ribbon Banners" S4-324)
e-Bosser "Divine Damask" embossing folder
Twinklets "Diamond Dust
Kaiser Craft Rinestones
 Round Nose Pliers

822847

Wednesday, December 5, 2012

Joan's Gardens Weekly Challenge


It is time for a new Weekly Challenge over at Joan's Gardens.  Please go over to her blog to check out all the details.

I used the Sizzix "Snow & Trees" embossing folder for the background on this card.  This is a 5.5" x 6" card so I added the Memory Box "Frosty Border" die cut down the left side of the card.  In the center of the new Marianne Design "Anja Oval", I placed a portion of the new Nellie Snellen "Snowman" embossed design.  I used the largest of the Spellbinders  "Classic Ovals"  Nestabilities to cut out an oval frame then placed it inside the "Snowman" embossing folder to get the snowman image.  These folders are large enough to complete a whole card front with the design but it is fun to be able to use just portions of them too.   I used aqua glitter around the outside edge of the embossed oval.

On the left side of the oval I added the Marianne Design tree that was also covered with aqua glitter.  Under the pretty silk bow I used two of the Memory Box "Tilth Floral" dies, offsetting the loops to make it fuller.  The box was added with a glue dot.  

I hope you will join us in our challenge this week.

All the products can be purchased from Joan's Gardens:
Sizzix "Snow & Trees" embossing folder (658197)  There are two folders in this set.
Spellbinders Oval Nestabilities
Marianne Design "Anja Oval Set" (LR0240)
Marianne Dresign "Tree" (LR0174)
Memory Box "Tilth Floral" (98320)
Memory Box "Frosty Border" (98171)
Nellie Snellen "Snowman" (PiF005) embossing folder
Box Easy
Silk Ribbon

815379 

Wednesday, November 21, 2012

Just A Note


Here is a card I made in autumn colors last week and did not post.  I started this card by first die cutting the Poppy Stamps "Lorelai Leaf" die then used the Nellie Snellen "Rectangle Frame" for the background around it.  It was easy to see the die cut shape after placing it in the embossing folder to get it centered just where I wanted it.   A piece of bronze card stock was placed behind the opening to give it color.  Another "Lorelai Leaf" was die cut out of black card stock and the actual black die cut was placed in the opening of the die cut shape in the background piece. It is a very pretty effect.  Flower petals were die cut using the Marianne Design flowers from the LR0168 and LR0169 "Doily with Flower" dies.  One flower is smaller and fits well in the middle of the larger one.  I used Ranger's "Rusty Hinge" Distress Ink to color the ivory flower die cut.  Brown stamens were cut from the Cheery Lynn Build A Flower #2 embellishment dies.  On the tips of each stamen end, I added Bronze Stickles.  Under the edge of the flower I  attached a made I made with bronze cording.  Down the right side of the card I added a strip of the bronze card stock and lined each side with a very narrow strip of black card stock to match the center of the card.  The Sentiment is from the  JustRite "Always and Forever Medallion Labels" stamp set.  

I want to wish all my blogging friends and followers from the states a wonderful Thanksgiving Day tomorrow. I am thankful for all of you, from around the world, who visit my blog and for all the comments you leave for me.  I have made many wonderful friends through blogging that I cherish.   

Are you planning to shop on Black Friday?  Be sure to go to Joan's Blog  tomorrow evening (Thursday Nov 22 after midnight EST) for information about a fabulous Black Friday Event (Free Products) at Joan's Gardens.  I am sure you won't want to miss it!

All the products used for this card can be purchased from Joan's Gardens:
Poppy Stamps "Lorelai Leaf" (840)
Nellie Snellen Rectangle Frame (HSF005)
JustRite "Always and Forever Medallion Labels" stamp set (CL-03535)
Marianne Design LR0168 AND LR0169 Doily sets with flower
Cheery Lynn "Build A Flower #2" Embellishments
Ranger "Rusty Hinge" Distress Ink
Bronze Stickles

803642

Saturday, November 10, 2012

Ho Ho Ho


Today I was trying to think of something I could create and do a little tutorial.  I decided to play with one of the alphabet die sets that I have.  I used the Die-namics "By the Letters" to create my "Ho, Ho, Ho".  I used a piece of polka dot paper to die cut the "h" from this set and added a Cheery Lynn "Snowflower" for the "O" to form the Ho,   For my background I used the Nellie Snellen "Sleigh" embossing folder.  I wanted to add a tree line below the sleigh ride so I cut the embossed piece in half.  


This picture shows how I cut along the embossed "snow bank" line to cut the panel apart.  I used the Poppy Stamps "Pine Tree Border" for the tree line.  It was die cut and then I used scissors to cut a very narrow line along the bottom of the trees so I could glue it to the lower panel.

This picture shows how I glued the tree border behind the snow bank on the lower panel.  The card I created is a 5.5" x 6".  First the top panel was attached to the card base then the lower panel, so the trees would go over the top piece.  The Ho Ho Ho was then attached. An additional snowflake was added on the top left corner.  I used some Tim Holtz "Distress Stickles Dry Glitter" on the snowflakes and along the line below the trees.    A dark green piece was added to the back of the card to create a border. 

It is fun to try and come up with something a little different for your cards.  I hope this gives you some ideas for using your embossing folders and die cuts.


Nellie Snellen "Sleigh" embossing folder (CTFD4011)
Die-namics "By the Letters" alphabet
Poppy  Stamps "Pine Tree Border" (809)
Cheery Lynn "Snowflowers 1" (DL225)
Cheery Lynn "Snowflowers 2" (DL226)
Tim Holtz "Distress Stickiles Dry Glitter" Clear Rock Candy 

Friday, November 9, 2012

Season's Greetings


Well I think winter has arrived.  We woke up to six inches of snow and it is still snowing hard!  It is beautiful but we planned to drive down to Spokane and looks like the highways are very bad.  Maybe I will have to stay home and do more creating!

I love creating cards with all those new Nellie Snellen embossing folders.  This one is the "Holly" folder.  Isn't it beautiful.  I decided to give the embossing some color so used "Peeled Paint" Distress Ink Reinkers with the Ranger Water Brush to color the holly leaves and "Worn Lipstick" Distress Ink on the berries.  Red Stickles was added over the berries once the card was finished.  To color the ribbons down the side, I used the Perfect Medium Brush to add ink over the embossed ribbon then added Rangers Detail Silver embossing powder and heat set.

The beautiful ornament is the Memory Box "Snowflake Ornament".  It was die cut using shiny silver card stock.  I glued it to a piece of pearlized red card stock with "Glue N Seal" and cut around the edges.  It was attached with dimensional tape.  A silver cord was used to make a bow and placed at the top of the ornament.  The beautiful sentiment is from the JustRite "Large Fancy Holiday Sentiments" stamp set.  I love the font on all the sentiments in this set. It was also silver embossed.


Nellie Snellen "Holly" embossing  folder (CTFD 3074)
JustRite "large Fancy Holiday Sentiments" (CR-03800)
Memory Box "Snowflake Ornament" (98231)
Rangers Perfect Medium Brush (PPP-OS-26211)
Rangers Distress Reinkers "Peeled Paint and Worn Lipstick"
Rangers "Water Brushes"
Glue N Seal (477909)
Ranger "Detail Silver" embossing power
Red Stickles
Silver Card Stock
Dimensional Tape

792242

Thursday, November 8, 2012

Joan's Gardens Weekly Challenge


It is time for another fun challenge at Joan's Gardens.  This week it is a color challenge -red, white and green.  Please go over to Joan's Gardens to see Joan's card and read all the details about the challenge.

For my card I used one of the new Nellie Snellen embossing folders.  The cute image is the Paintbox Poppets "Christmas Miss" stamp.  She was colored with Distress markers.  The corner is the Cheery Lynn "Holly Corner".

For the inside of the card I stamped the Impression Obsession "Merry Christmas".  Along the edge I added a piece of the new Fabric Tape "Red Ribbon II" you can order from Joan's Gardens.  There are three beautiful ribbons in this box of sticky back fabric tape.   

In this picture I added one of the new borders from the Cheery Lynn "Expandable Tiny Borders" die plate.  It was placed over the ribbon for a different look.  There are a lot of cute borders on this plate.  By adding the border, it gave this ribbon a different effect, which I like.  I'm sure you will have fun with all the different tiny borders on this die. 

I want to thank you for all the pretty cards you entered in last week's challenge.  Joan and I always love to see your cards and hope to receive a lot of them in this week's challenge.

All the products I used can be purchased from Joan's Gardens:
Nellie Snellen "Rectangle Frame I" embossing folder 
Cheery Lynn "Holly Corner" (B184)
PaintBox Poppets "Christmas Miss" stamp set
Impression Obsession "Merry Christmas" stamp (E8774)
Cheery Lynn "Expandable Tiny Borders" (B215)
Fabric Tape "Red Ribbon II" box of 3 sticky back tapes
Distress Markers

791177

Sunday, November 4, 2012

Silver and White Joy


Today I tried something new that I think turned out real pretty.  I used the largest Spellbinders "Romantic Rectangles" die for the background for the Memory Box "Flowering Christmas Tree".   I felt the background was to "plain" so decided to see what would happen if I embossed the new Nellie Snellen "Oval" frame inside the die cut frame.  It worked out great and I feel gave a beautiful border around this pretty die cut tree.  The tree was die cut using shiny silver card stock.  This is a 5"x7" card.  To create an embossed background for the frame, I used the Swiss Dots embossing folder.  

The sentiment was created using some Crystal Alphabet Stickers by Mark Richards.  They added the perfect "sparkle" for this pretty card.  A few extra rhinestones were added to the tree and on the background, to complete the card.  

You can purchase the products to create this card from Joan's Gardens:
Nellie Snellen "Oval Frame" (HSF004)
Spellbinders "Romantic Rectangles" (S5-090)
Memory Box "Flowering Christmas Tree" (98195)
Shiny Silver Card Stock
Kaiser Craft Rhinestones

787643

Friday, November 2, 2012

Let the Heavens Rejoice


Today I played with some new products I want to tell you about.  I used Ranger's "Emboss It Dabber-Clear", "Sticky Embossing Powder", and "Platinum" Stickles Dry Fine Glitter, on the poinsettia.  The photo does not do justice to this beautiful Platinum glitter on the poinsettia. I watched Tim Holtz work with these products at CHA and have been anxious to "play" with them. 

Here is a picture of these products used on the poinsettia.  The die cut poinsettia petals are from the new Poppy Stamps "Blooming Poinsettia".  This die also comes with the stamen and the leaf.  I love the "Emboss It Dabber".  It has the same type of ink as you have in the VersaMark pad but you are able to dab it in smaller, specific areas.  I covered each of the petals with this ink, then poured on the "Sticky" embossing powder.  I have used other sticky embossing powders, but find the Ranger sticky powder works better than what I had in the past. (I did work in small trays for the Embossing Powder and the glitter, so I could pour them back in the jars.) Use your heat gun to make the embossing powder sticky.  Once the sticky powder was "shiny", I placed the flower in a different tray and poured on the Platinum Stickles Dry Fine Glitter.  If all the area did not hold the glitter, you can heat it up again to melt the sticky embossing powder and place it back down in the glitter - press it down with your fingers.  Once it was completely covered with glitter, I heat set it again and pressed down on the glitter to make sure it as sticking well.  I did this to all three layers of the poinsettia.  To shape the flower, I found it was best to shape it with your fingers rather than placing it on the shaping mat, because the glitter will come off on the mat.  Once the petals were slightly bent, I pressed down in the center on the black mat to help make them "cup" up.  I used the white "Crafters Pick" glue to stick them together.  It worked great because this glue is thick and will stick even though you are gluing over glitter.  

The pretty embossed background was done with another one of the new Nellie  Snellen embossing folders ,  "Oval Frame".  The sentiment I used is a Penny Black stamp called "Rejoice".  Under the sentiment I used a little stamp from the JustRite "Spring Rose Medalliions" stamp set.  I love all the JustRite stamp sets because they have such a great variety of items in each set.  Most of them include medallions, sentiments plus little embellishments like the one under the sentiment on this card.   The sentiment and little flourish were stamped using VersaFine Onyx Black Ink and Ranger's Detail Clear Embossing Powder.   The holly was die cut using the Marianne Design "Holly Sprig".  Additional Platinum Stickles Dry Fine Glitter was added to the berries in the holy die cut.  

Nellie Snellen "Oval Frame" (HSF004)
Poppy Stamps "Blooming Poinsettia" (861)
Marianne Design "Holly Sprig" (LR0244)
JustRite "Spring Rose Medallions" stamp set (CL-03685)
Penny Black "Rejoice" (3732E)
Ranger "Emboss It Dabber - Clear"
Ranger "Sticky Embossing Powder"
Ranger "Platinum Stickles Dry Fine Glitter"
Crafters Pick" glue
VersaFine  Onyx Black Ink Pad
Ranger's Detail Clear Embossing Powder

785376

Friday, October 19, 2012

Nellie Snellen Embossing Folders


I have been so excited to show you this card.  For those of you who want to create beautiful, but very easy cards, this is the way to go. I used one of the new Nellie Snellen "Winter Scenes" embossing folders for this card.  You can get these embossing folders in six different scenes from Joan's Gardens. These embossing folders are a pre-order item and will appear on Joan's site tomorrow (Saturday). I was amazed at the quality of the embossing.  The folder I used is the "Snowy House".  I thought it would be fun to dress it up even a little more by adding some die cuts.  In the very front I added the Marianne Design "tree" (LR0136) kind of off the side, cutting off the portion that over hangs the edge; I did this because I didn't want to cover up the embossed house.   In the center bottom I added two of the deer from the Memory Box "Deer Trio", then along the very top is the Memory Box "Frostyville  Border", which adds snow to the scene.  I saved some of the tiny snowflakes that came out of this die cut and added them onto the tree.  

This is a 5.5" x 6" card but added a Martha Stewart punched "Aspen Snowflake" border which makes the card a little larger.  That was easy -- one embossed piece and three die cuts.  You should go over to Joan's Gardens and check out the other five winter scenes.  I so wanted to add a white poinsettia up in the corner of this card, but thought it would take away from the beauty of this winter scene.  

Tip:  If you wanted to make several of this type card, I am sure you could emboss several of these scenes at one time if you use a thinner type card stock and, depending on your die cutting machine, could cut several die cuts at the same time.  I used the card stock Joan and I use for creating our flowers.  I can see an assembly line for this card!!!

All these products can be purchased from Joan's Gardens:
Nellie Snellen "Snowy House" embossing folder (Pre-order items)
Memory Box "Frostyville Border" (98146)
Memory  Box "Deer Trio" (98166)
Marianne Design "Tree" (LR0136)

774872

LinkWithin

Related Posts with Thumbnails