Sunday, October 10, 2021

Autumn Triple-Diamond Point Card


Good Morning Crafty Friends.  Autumn is definitely here!  It has been very cool and all the trees have changed colors and porches and yards all decorated with beautiful Fall flowers and pumpkins.

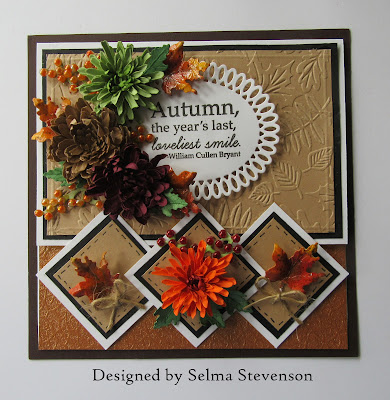
This is a 6-inch card. On the front panel, two inches was cut off the bottom.   I used Susan's  Button & Daisy Chrysanthemum, Foliage & Ladybug, and Woodland Garden Leaves die sets to decorate this card.

I found several YouTube videos showing how to create a Triple Diamond Point card shape.  On the top panel I used a piece of tan card stock and embossed it using the Spellbinders  Falling Leaves embossing folder.  It was scored around the edges using a Score Board and attached to a piece of black card stock.

One of the stamps from Susan's Autumn Quotes stamp set was stamped using black VersaFine Ink and die cut using the Spellbinders Picot Petite Ovals die set.  It was attached using dimensional dots.  

The three diamond squares were cut and attached at the bottom of the front panel keeping them within the sides and bottom of the front of the card.    I used white, black and tan card stock for these diamonds.  A black pen was used to draw the stitching around the edge of the tan diamonds.

The Button & Daisy Chrysanthemum die set was used to create a green, tan, burgundy and orange flower.  Three were attached to the left of the Oval and one attached to the center diamond on the bottom of the card.

The Foliage & Ladybugs die set was used for the berry branches.  For the berries, I colored sticky back pearls and colored them with Copic Markers.

The Woodland Garden Leaves die set was used to die cut the Maple leaves.  They were colored, shaped and crystal clear glaze added to give them a shine.  A tiny twine bow was added below the maple leaves on the bottom of the card.  

On the inside of the card, a piece of 6-inch square, copper embossed card stock was added.  Under the top 4-inch panel, a piece of white card stock was added to be able to write a personal message. 


Thursday, October 7, 2021

Purple Hibiscus


Susan's newest release is the Tropical collection which includes Hibiscus and Plumeria die sets.  

This is a 6-inch square card.  A piece of white embossed card stock was cut 5 3/4 inches square and scored around the edges using a Score Board.

A piece of watercolor card stock was colored using Mica Powders (purple, pink, blue).  It was die cut using a oval scallop die. A slightly larger purple oval was die cut to go under the Mica colored oval.  The two ovals were attached using dimensional tape.

The Hibiscus  die set was used to create three purple hibiscus.  They were die cut using Susan's Specialty Cardstock.  Purple ink was brushed on the  petals and bright pink at the base of each petal, then they were were shaped using Susan's Flower Tool Kit.  The stamens were colored, red nuvo drops added to the tops and yellow Prills added below the red tips.

The Foliage & Ladybug die set was used to die cut the rosemary branches.  They were brushed with green ink, using the Waffle Flower Media Mat and brushes.  Each point was cut in half using scissors to make the branch appear fuller.  

Trying to think of a tropical type flower for a filler, I used the  Lily of the Valley die set and die cut white flowers.  They were not shaped like the Lily of the Valley but were shaped on the back to create an open type flower.

The Woodland Wreath & Feathered Friends die set was used to die cut the bird.  Color was sponged on the bird and detailed with a fine tip black pen.  It was attached with a dimensional dot.

I was unable to link Susan's newest Tropical release, but will link these die sets as soon as they are available in the US.

Monday, October 4, 2021

Yellow Gladiolus


I love gladiolus and now Susan has included a die set in her new release for these beautiful flowers.   Below I have included information about a great savings for all the dies in this release.

The background on this tall card is covered with a piece of P13 Stitched with Love design paper. 

Susan's Daffodil/Narcissus die set was used for the vase.  It was colored using VersaMark, Extra Thick Embossing Powder and Distress Speckled Egg Glaze.  It was attached with dimensional tape.

The Gladiolus & Berry Picking Basket die set was used to die cut pieces for seven flowers plus extra petals for buds.  The flower petals were brushed with yellow ink on the Waffle Flower Media Mat then orange ink brushed on at the base of the petals.  They were shaped using Susan's Flower Tool Kit and assembled using Bearly Art GlueYellow Pollen was added to the stamens.  The leaves were die cut using watercolor paper, brushed with green ink and shaped.  The gladiolus stems were attached to the card, then the flowers attached.  The extra petals were used to create buds on the ends of the gladiolus stems.  

I have The Paper Boutique Paper pad and decided to fussy cut some of the bees from one of the design paper sheets and add them to this card.

Right now, Spellbinders has a greatly reduced price on Susan's newest release. You can save over $30 when you purchase the Want it All Bundle  which includes 
The Want it All Bundle is linked below.

Sunday, October 3, 2021

Cactus Dahlias & Button Chrysanthemums


Fall is such a colorful time of year.  I always have fun creating flowers with Susan's Dahlia die sets.  This is the Cactus Dahlia along with a Button Chrysanthemums.  I used the vase from her  Daffodil/Narcissus & Antique Vase, Cactus Dahlia & Ornamental Garden Pottery, Button & Daisy Chrysanthemum, Foliage & Ladybug,  and Woodland Garden Leaves die sets.

For the background I used a piece of textured card stock and added three narrow strips of gold mirror card stock along the bottom to ground the vase.  Spellbinders Lattice Petal Foldover die set was used to die cut the corners from gold mirror card stock.   

On one of Susan's Garden Club Live videos (Gladiolus and Inspiration), she showed us how to create the technique I used on the vase.  It is a technique using Ultra Thick Embossing Powder and Distress Ink/Glaze to create a realistic pottery look.  The Cactus Dahlia die set comes with a Ornamental Garden Pottery die for the container, but I used the Antique Vase from the Daffodil/Narcissus die set.

The Cactus Dahlia die set was used to create three dahlias, and the Button & Daisy Chrysanthemum die set was used for the three button chrysanthemums.  These flowers were die cut using Susan's Specialty Cardstock then using the Waffle Flower Media Mat and brushes, Distress Inks were used to add Fall colors to the petals.  Light colored ink was first brushed on then darker ink brushed on the base of each petal.  The flowers were shaped using Susan's Flower Tool Kit and assembled using Bearly Art Glue.  

The Foliage & Ladybug die set was used for the small leaf branches and berry branches.  For the berries, I used small white sticky back pearls that were colored with Copic markers.  

The Woodland Garden Leaves die set was used to die cut the oak and maple leaves.  They were sponged using Distress Inks, shaped using the Flower Tool Kit then glazed for the shiny appearance.  

I always feel so happy to take cardstock, use Susan's die sets and be able to create flowers that are so realistic.  Until you feel these flowers, you would think that are real.   This is a card I think I will frame.

Below I have linked to products used.  I want to draw your attention to the Garden Club I Want it All Bundle which is a great savings to you.

I want to thank all of you who link to the products below to make your purchases.  It is greatly appreciated.  


Saturday, October 2, 2021

Christmas Cactus


This is a card I created for World Card Day. Susan has designed floral die sets for every season and the design team will be posting cards from each of these releases today.   I used Susan's Christmas Cactus, Gathering Basket, Poinsettia, Foliage & Ladybug, and Winter Bough and Evergreen Shrubs die sets to design this Christmas card.

This is a 5x7 inch card.  I cut a extra piece of white card stock to fit on the front and used a Scor-Pal Board to score around the edges.  This was attached to the front of the card.

On the left side of the card, I used the Spellbinder Splendor Slimline die set and die cut it using white card stock.  It was backed with a piece of hot pink card stock.  

The Spellbinders Elegant Twist Circle die set was used for the circle in the upper right corner.  Before attaching with dimensional tape, Susan's Holiday Quotes stamp set was used for the quote.  It was stamped using black VersaFine ink.

The Gathering Basket was die cut using white card stock and brushed with several shades of brown ink, then I used a brown fine line dark brown pen to help bring out the embossed design in the basket.  

The Christmas Cactus die set was used to die cut the pieces for the Christmas Cactus.  The flowers were shaped using the Flower Tool Kit and glued together using Bearly Art Glue.  I think this Christmas Cactus is so pretty!  

The Poinsettia die set was used to create the white Poinsettia.  The bracts were created using green Nuvo drops with a little yellow pollen glued to the very tops.  

Under the poinsettia, The Foliage & Ladybug die set was used for the foliage.  To add some Christmas glimmer to the card, I used the Winter Bough & Evergreen Shrubs die set to die cut the Winter Bough out of gold metallic card stock.  In doesn't show very well, but the gold winter bough is under both sides of the poinsettia.

For additional gold embellishment, I used Spellbinders Fashion Gold Embellishments  to tie in with the gold bough under the poinsettia.   


Pulmeria


This card is designed with Susan's new Plumeria die set.

The background on this card is multicolor - orange, yellow, peach, pink and hot pink. On top is a piece of design paper from my stash that I thought looked tropical.  It was attached using dimensional tape.

Spellbinders Elegant Twist die set was used to die cut the pretty oval.  It was attached with dimensional tape.

Using the Plumeria die set, nine flowers were die cut using Susan's Specialty Cardstock.  Yellow and Orange Distress inks were sponged on the petals.  The petals and leaves were shaped using Susan's Flower Tool Kit and assembled using Bearly Art Glue.  A small Prill was added the the center.  To make the Plumeria flower realistic, you need to twist the petals so the left side of each petal over laps the petal next to it - all the way around.  

A Spellbinders alphabet die set was used to die cut the letters for ALOHA.  Orange and Yellow inks were brushed on the letters.   White Pearls were stained using an orange Copic Marker.


Pink Hibiscus


Today is World Card Day.  Susan's Design Team will be posting cards throughout the day using a new Tropical die set release, which includes a Hibiscus and Plumeria, plus cards from each of her earlier Spellbinder releases.

This card is 6 inches square.  I used a piece of design paper from Marta Piekarczyk - Awakening Paper Pad, for the background. 

Using the Spellbinders Essential Ovals, a small and medium oval was die cut.  In the smaller oval, one of the Quotes from Susan's Spring Quotes stamp set was stamped using VersaFine black ink.  It was attached using dimensional tape.

The larger oval was attached on the lower portion of the card.  It was also attached using dimensional tape.  

Susan's new Hibiscus die set was used to create three pink flowers.  The flowers were die cut using Susan's Specialty Cardstock.  They were sponged using light pink ink then bright pink ink was sponged at the base of each petal.  For the stamen, red Nuvo drops was used on the tips and yellow pollen glued just below the Nuvo drops.  

The Foliage & Ladybug die set was used to die cut leafy branches.  In the design paper, there are pink berries on the leaves, so I added them to the leafy branches.

I hope you are inspired by seeing all the cards Susan's Design Team will be sharing with you today.


LinkWithin

Related Posts with Thumbnails