Saturday, April 30, 2022

Wedding Cake Card


Good Morning.  We have some exciting news.  Our oldest granddaughter will be getting married soon.  I wanted to create a 'different' type wedding card for her.  I decided to use the instructions on how Susan created a Spring Hat on her FaceBook video.  I decorated the 'hat' card to resemble a wedding cake.  

To decorate the top of the card, I wanted to use the wedding colors, which are blue and gray.  The bottom layer on the base of the top was covered with a piece of pearlized white card stock.  On top of that is a smaller scalloped white circle.  For the raised 'cake', I covered the side with a border crisscross die cut, then a very narrow scallop die cut around the bottom edge.  On the top, I added a silver die cut doily.    I used silver metallic card stock for the gray to give it an elegant appearance.   I created two white roses and a rose bud,  using Susan's Hybrid Rose die set.  For blue, I used Susan's Forget-Me-Not die set and created the blue flowers.  Around the sides of the 'cake' I added small pieces of ivy leaves, that were die cut using Susan's Ferns & Ivy die set and attached additional Forget-Me-Not flowers.

I did not have any wedding dies or stamps.  I dug through some of my stash and found silver wedding stickers.  They worked out perfect.  The edge of the card was too plain, so I added dot silver stickers all the way around.


Silver stickers were used to decorate the inside of the card. 


Picture of card with the top  tucked in raised piece on inside of the card, for display.


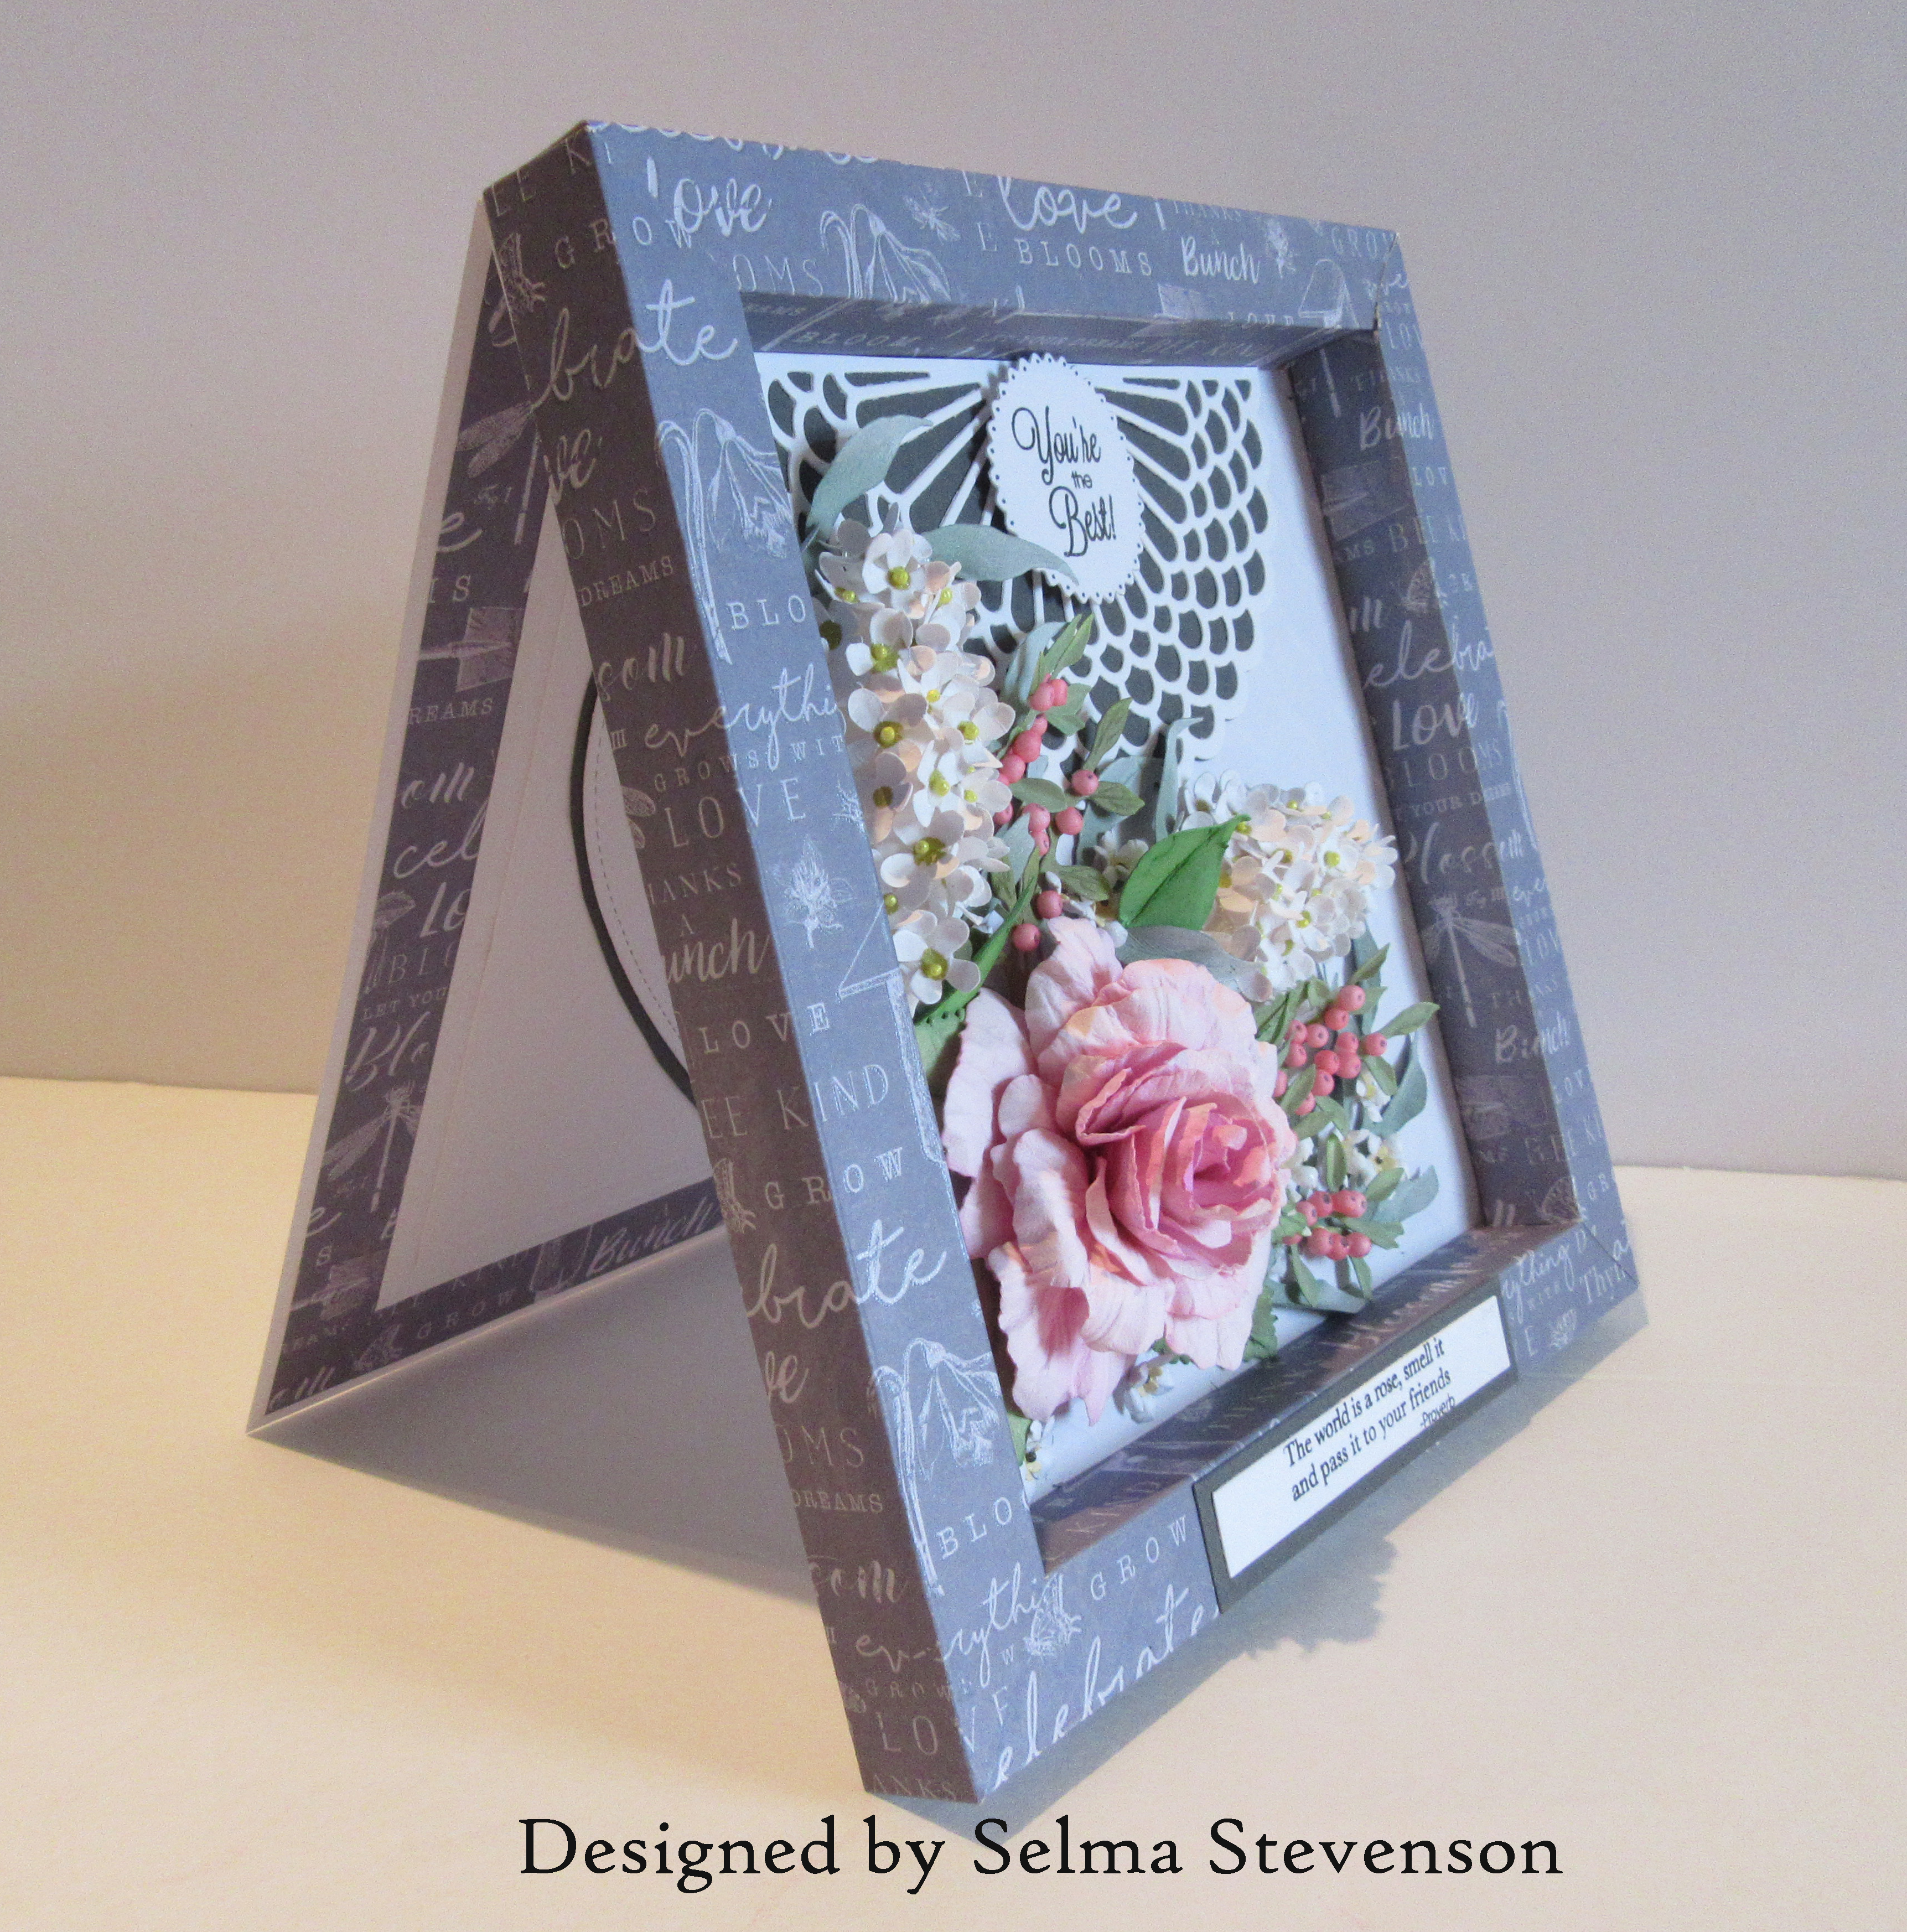
Side view showing how card stands up.

I had fun coming up with something different for her wedding card.  


Monday, April 18, 2022

Shadowbox Easel Card


Good Morning Friends.  Last week on Susan's Garden Club FaceBook Live Video, she showed us how to create a Shadowbox Easel Card.  


I created the frame following Susan's instructions.  The die cut design at the top of the shadowbox is from the Spellbinders Vintage Starburst Valance & Gate Fold die set.  I believe this die set has now been discontinued.

The Floribunda Rose die set, from the new Through The Garden Gate Release, was used to create a pink rose.  The rose was die cut using Susan's Specialty Cardstock.  It was shaped using Susan's Flower Tool Kit and assembled using Bearly Art Glue.  I used the Waffleflower Media Mat and blending brushes to brush on two shades of pink ink.

The Lilac die set, from an earlier release, was used to create two white lilacs.  In the center, a Yellow Prill was added to the center of each bloom.  

The Foliage and Ladybug die set was used for the leafy branch that I added pink berries.  I used colored tiny bean bag styrofoam balls for the berries.  Once they were glued and dried on the branch, I used a fine tip black pen to press down in the top to help make it resemble a real berry.   From this same die set, Eucalyptus leaves were die cut, colored and shaped with the tools in the Flower Tool Kit.   

The Forget-Me-Not die set from the new release was used to create white flowers.  A Taken For Granite Prill was added to the center of each flower.  

Stamps from Susan's Through The Garden Gate Stamp Set was used for both of the sentiments.  The sentiment at the top of the frame was die cut using a scallop circle die and attached with foam tape. The quote on the bottom of the frame was die cut using the Spellbinders Precision Layering Mini Slimline A die set.

One the inside panel, the same design paper that was used for the frame was added, then two white squares, one slightly larger than the other added.  In the center I used a die cut heart to attach to the center for a personal message.

Susan's instructions were very easy to follow.  I hope you try this fun project.

Susan's new release is now available from both Spellbinders and Scrapbook.com.  I have them link from both places below.  


Saturday, April 9, 2022

Tri-Fold Card


Good Morning.  Today I designed a tri-fold card and decorated it with Susan's Bee Blossom and Button & Daisy Chrysanthemum die sets.  

After creating the tri-fold card, it was decorated with a piece of the P13 The 4 Seasons Summer design paper.  The Spellbinders Elegant Twist Ovals die set was used for the two ovals.  The oval on the front of the card was attached with dimensional tape.

Using Susan's new Bee Blossom die set, from the Through The Garden Gate release, was used for the branch of light pink bee blossom flowers.  They were die cut using Susan's Specialty Cardstock.  The base of the petals was sponged with light pink ink then at the very base, a brighter ink was sponged on.  They were shaped using the loop tool in Susan's Flower Tool Kit. A purple marker was used to add a touch of purple in the indention on the end of each petal.   The stamen die cut was cut to make each stamen thinner.  The base was colored with the bright pink ink then rolled and glued with Bearly Art Glue.  The very tips were dipped in glue then into Yellow Pollen.

The Button & Daisy Chrysanthemum die set, from an earlier release, was used to create the African Daisies.  They were die cut using Susan's Specialty Cardstock.  The base of the petals was sponged using a light pink ink then sponged again with a purplish pink ink over most of the light pink ink.  A lavender colored pencil was used to draw lines up from the base over the colored base. I used a purple marker to color the indention in the tips of each petal. To create the stamens, I used Susan's Sunflower die set.  I die cut the circle portion of the sunflower stamen, using dark purple cardstock.  These were cut in half and glued together to create a smaller circle.  The tips on this circle were dipped in glue, then in yellow pollen.  Once dry, they were glued into the center of the daisy and pressed down using the large ball stylus in the Flower Tool Kit.  I then used YES Glue to add a small ball of glue in the center of the stamen then poured in Power Outage Prills.  

One of the stamps from Susan's new Through The Garden Stamp Set was used for the sentiment.  It was stamped using VersaFine Ink then cut out with scissors.  It was attached using a dimensional foam square.


To finish the card, Spellbinders Pearl Embellishments were added and a butterfly from my stash.

You can watch Susan's instruction on how to create a tri-fold card on her Susan's Garden Club FaceBook Video .


Wednesday, April 6, 2022

Rose Diagonal Lidded Box


On March 30th, Susan demonstrated how to create a very pretty Diagonal Lidded Box on her Susan's Garden Club FaceBook Live Video The Title of the Video is Roses and Hollyhocks.  

This is the box I created following her instructions.  I used a piece of heavy weight design paper that has ladybugs in the design.  

Using the Floribunda Rose die set, I created one red rose and one bud.  I used Susan's Specialty Cardstock.  The rose was colored by brushing on red ink.  The petals were placed in my Waffle Flower Media Mat and the ink was brushed on using one of the Picket Fence Brushes.  The petals were lightly misted with water and shaped using the Loop Tool in Susan's Flower Tool Kit.  In Susan's video, she demonstrates how I assemble the rose.  

I use the ladybug die that is in the Forget-me-not die set for the little ladybug.  Perfect to go with this design paper!


I have not purchased chocolates yet, but wanted to show you the little box inside the lid that pulls apart.

If you would like all the measurements and instructions for creating this box, and how to create the rose, be sure to watch Susan's Live Video on FaceBook.


Gardenias, Bee Blossoms, Lilac


Hello Paper Crafters.  Today I worked with Susan's Gardenia, Bee Blossom, and Lilac die sets.

This is a 6x6 inch card.  I used Mica Powder to create a panel for the Front of the card.  It was framed using a die cut piece of metallic cardstock.  

Using the Gardenia die set from the new Through the Garden Gate Release, two gardenias were die cut using Susan's Specialty Cardstock.  A light yellow PanPastel was used to color the base of the petals, and a dark yellow marker used to color the base of the very small petals in the center.  The petals were shaped using Susan's Flower Tool Kit, and assembled using Bearly Art Glue.  The leaves for the Gardenia were glazed to give them a waxy appearance.

The new Bee Blossom die set was used to die cut enough flowers for three stems of flowers.  They were die cut using Susan's Specialty Cardstock.  The base of the petals was colored using a very light pink marker then shading a little darker pink at the very base of each petal.  The very bottom of the stamens was also colored with the darker pink marker, but the top portion was left white.  The long stamens were divided using scissors from the Tool Kit.  The tips of the stamens were barely dipped into glue and then pushed into yellow pollen.  Only the very tips should have pollen.  

The Lilac die set was used to create the purple lilac.  A green Prill was glued to the center of each lilac blossom.

The ladybug from the Forget-Me-Not die set was used to die cut the ladybug.  She was colored and clear crystal glaze added.

One of the stamps from Susan's Through The Garden Gate Stamp Set was used for the sentiment.  It was stamped using black VersaFine Ink, cut out using scissors, then glued to a piece of the same metallic cardstock that was used for the frame.  It was attached using Dimensional Foam Tape.

Pearls were added to the corners of the frame and tiny rhinestones glued around the arrangement.


Here is a closeup of the flowers.  Susan's die sets help us create the most realistic flowers.    I love figuring out all the little details that help to turn white cardstock into beautiful flowers.  You can find detailed instructions from Susan on her Spellbinders YouTube Videos on how to assemble all her flowers.  


Sunday, April 3, 2022

Daisies and Forget-Me-Not Bouquet


Today I have a card I designed using Susan's new Forget-Me-Not die set and her Button & Daisy Chrysanthemum die set, from an earlier release.  

This is a 6x6 inch card.  The background was created using the Lisa Horton Padded Quilt 3D embossing folder.

The Geranium & Wooden Bucket die set was used for the wooden bucket.

Four Daisies were die cut using the Button & Daisy Chrysanthemum die set. I usually use three when grouping flowers, but I had created four and it just seemed I needed the fourth one in this bouquet.  The flowers were die cut using Susan's Specialty cardstock, and the base of each petal colored yellow with a marker.  The flowers were shaped using Susan's Flower Tool Kit and Yellow Prills added to the center.

The Forget-Me-Not die set, from the Through The Garden Gate Release, was used to create blue and pink flowers.  A black Prill was added to the center of each flower.  

The Forget-Me-Not flowers are beautiful by themselves on a card, but also a great size as a filler around larger flowers in a bouquet.


Saturday, April 2, 2022

Hollyhocks


Today I designed a card using Susan's Hollyhock die set.  

This is a 5x7 inch card.  Using a white piece of cardstock, I used an old circle die to die cut a circle opening in the top portion.  The Alternew Basic Plaid 3D embossing folder was used to emboss another piece of white cardstock.  A brown ink pad was rubbed over the embossed design, then attached behind the circle opening.  These pieces were attached to the front of the card.

Using the Hollyhock die set, the flowers were die cut using Susan's Specialty white cardstock.  The base of the the petals was colored with a yellow marker.  Next, a burgundy marker was used to draw thin lines up toward the end of the petal making sure to leave the very center yellow.  Next a bright pink marker was used to add color over the burgundy strokes.  As a final touch, a fineline bright pink marker was used to draw very fine lines over these colors.  Using the small loop tool from Susan's Flower Tool Kit, the petals were shaped.  They were assembled using Bearly Art Glue.  


I found a picture of a hollyhock I wanted to duplicate, on the Internet.  I tried to duplicate the stamen.  The Hollyhock die set die cuts the stamen along with the petals.  Since they were white, I needed to color them yellow.  I used my Waffle Flower Media Mat to place all the stamens on and used one of the Picket Fence Brushes to brush on yellow ink.  The mat holds all the stamens down, which makes it quick and easy to color each side.  This is much faster than coloring each one with a marker.


To create the stamen, Bearly Art Glue was added to the bottom band plus each round portion of the stamen.


When the stamen was rolled, the three stamens line up and with the glue on each one, they were pressed together to create just one stamen.


Holding the stamen at the base with tweezers, the round portion was dipped down in glue, then dipped down in the yellow pollen.  This created one large stamen.  

The stems were attached to the front of the card and the flowers glued on.  The stamens were then added in the center of each flower.  The leaves were die cut using watercolor paper, colored, shaped, then added to the hollyhock stems.  A Ladybug was die cut, which is found in the Forget-Me-Not die set, colored, shaped and added to one of the leaves.  Clear Crystal Glaze was added.

One of the sentiments of from Susan's Through The Garden Gate stamp set was stamped using VersaFine black ink, die cut, and attached with dimensional tape.  Pearls and a dragonfly from my stash was added to finish the card.


Friday, April 1, 2022

Gardenia Trio


Good Morning Paper Crafters.  

Today I designed a card using Susan's new Gardenia die set which is in the Through The Garden Gate release from Spellbinders.  

This is a 6x6 inch card.  I created a layered background.  A piece of Spellbinders Portbello Color Cardstock, a piece of white cardstock embossed with the Lisa Horton Botanical Fern 3-D embossing folder, a die cut using the Spellbinders Vintage Elegance S4-733 die set (which I believe may have been discontinued) then the Altenew Texture die cut using Spellbinders Portbello Color Cardstock.  

Using the Gardenia die set, three flowers were created.  They were die cut using Susan's Specialty Cardstock.  At the base of the petals a yellow ochre tint  PanPastel was sponged on.  In the center the Copic Marker E34 was used to darken the base of the center petals.  Once they were colored, Susan's Flower Tool Kit was used to shape the petals.  The flowers were assembled using Kids Choice Glue.  The Leaves were die cut using watercolor paper, colored, shaped then brushed with clear crystal glaze to give them the shiny appearance that Gardenia leaves have.  I created two gardenia buds by coloring the second largest, three petal die cut, with the Yellow ochre Tint PanPastel, then a yellow green PanPastel.  The three petals were shaped and rolled to create the buds.  

The Forget-me-not die set was used to die cut the little ladybug.  She was colored, shaped and clear crystal glaze added to her after she was glued to one of the leaves.

As a final embellishment, Spellbinders gold embellishments were added around the arrangement.


LinkWithin

Related Posts with Thumbnails