Monday, September 26, 2022

Faceted Vertical Easel Card


Good Morning Friends.   I have created a Faceted Vertical Easel Card decorated with Susan's Garden Poinsettia.  I found the instructions for this type card on Sam Calcott's YouTube Video.

I created the base card adding green design paper backed with mirror gold metallic cardstock.  On the video she added a piece of acetate for a popup sentiment.  I decided I wanted the faceted opening without this piece so you can see the bird, which is attached on the inside of the card.

The front of the card will open and become 3-D when pushed against the strip on the inside right side of the card.  This piece was decorated with large gold, flat backed embellishements.


This is a picture of the card when it is closed.  

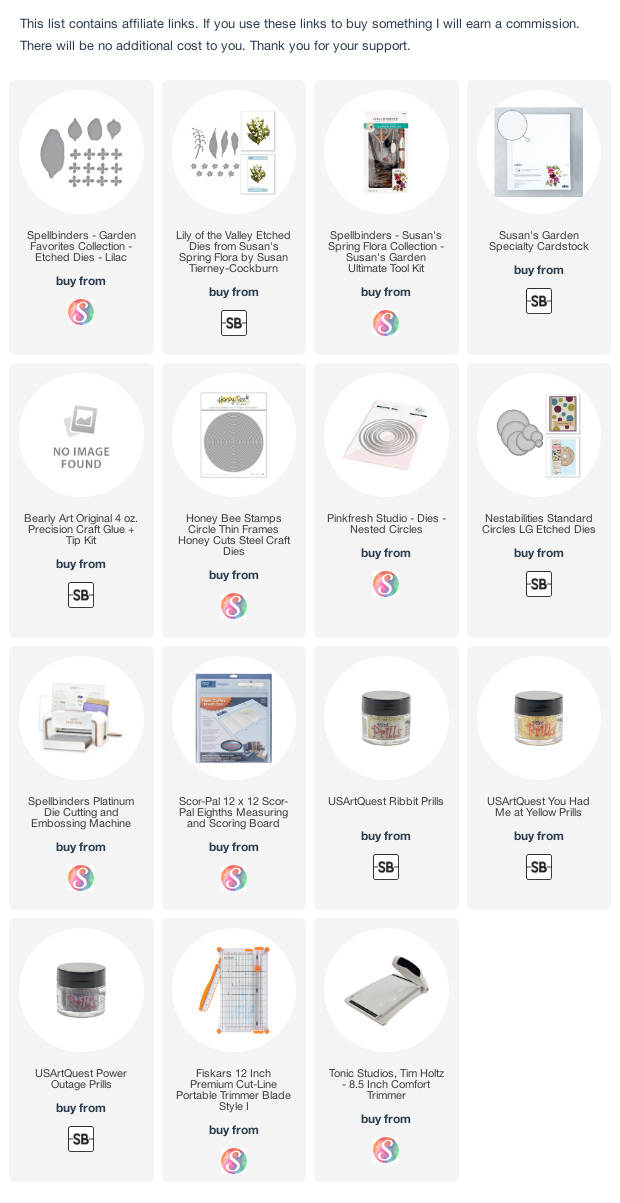
Using Susan's Garden Poinsettia die set, one poinsettia was die cut using Susan's Specialty Cardstock.  The poinsettia was brushed with red ink.  I like to place the die cut pieces on the Waffle Flower Media Mat and brush on the ink.  The mat holds the die cut pieces in place, and makes it easy to quickly add brushed on color.  The poinsettia was shaped using Susan's Flower Tool Kit and assembled using Bearly Art Glue Nuvo Crystal Drops and a tiny bit of yellow Pollen was used for the center (Bracts) of the poinsettia.

The Winter Evergreen Foliage and Ladybug die set was used to die cut the evergreen branch.  The Winter Berry & Mistletoe die set was used to die cut the Winter Berry Branches.  Small styrofoam balls were painted red and used for the berries.  A black fine tip pen was used to press down on the end of each berry.

One of the stamps from Susan's Winter Garden Quotes stamp set was used for the sentiment.  It was gold embossed, cut in a strip, and the corners cut off.  Two small gold embellishments were added to each side.  It was attached with dimensional tap.  A piece of the Winter Berry was attached under the sentiment.  


This is a picture of the card when opened.  

A strip was added to the right side that was attached with dimensional tape.  A piece of the White Pine die cut as added so it shows through the front of the card when the front panel is in the 3D position.  Using the Feathered Friends die set, one cardinal was die cut, colored and attached with a small dimensional dot.


Thursday, September 22, 2022

Z Pop-Out Card

Card Standing Open

Closed Card

Hello Paper Crafters.  Today I watched Susan's Garden Club FaceBook Video and she created a Z Pop-Out Card.  I loved her card and wanted to create this fun card.

For the design paper, I used Stamperia - Lilac Flowers from the 12x12 inch pad.  The pieces for the base card were cut using white card stock.  

Susan used a rectangle die for the opening on her card, but I used two sizes of circle layering dies.  


The design paper has lilacs and Lily of the Valley flowers in the design.  I used Susan's Lilac die set and created two lilacs.  I used half a sheet of Susan's Specialty Cardstock and brushed two shades of purple ink all over both the front and back before die cutting the petals.  The flowers were shaped using Susan's Flower Tool Kit and assembled using Bearly Art Glue

The Lily of the Valley die set was used to die cut enough pieces for three stems of flowers.  If you need instructions on how to create these flowers, you can watch Susan's instructions on her YouTube videos.

The flowers were arranged on the pop-out circle and glued to the fold on the inside of the card.  The flowers have to be within the outside edges of this circle so the card can fold flat.  

Using two circle dies, a purple narrow frame was die cut to fit around the circle on the front of the card.  There was a large butterfly in the design paper that was partially cut apart so I fussy cut another one and glued over it over that butterfly.  I also fussy cut a small butterfly and added it to the upper left corner.

Thanks for visiting my blog today.  I have included links to products used below.


Tuesday, September 20, 2022

Popup Spring Hexagon Box Card


Hello Paper Gardeners.  I design a lot of cards using Susan's Garden die sets so like to create different styles of cards with them.  Today I have a Popup Spring Hexagon Box Card to display an Autumn Bouquet.  For the instructions to create this card, I watched Sam Calcott's YouTube Video.

Using Sam's instructions, I cut and scored all the pieces needed for the base of the card, out of white cardstock.  I used a piece of orange and brown ginham design paper to decorate the hexagon band.

For the popup circle, I diecut three size scallop circles out of white card stock.  For the middle circle, I die cut a piece of the ginham design paper and glued it to the white card stock.  The middle and top circles were attached using dimensional tape.  Before attaching the circles to the popup part of the base, I decorated it.

Using Susan's Winter Bough & Evergreen Shrubs die set, one Winter Bough was die cut and colored.  It was attached at the top of the circle.

Susan's Chrysanthemum Button Daisy die set was used to create three small Chrysanthemums.  They were die cut using Susan's Speciality Cardstock then brushed with ink on the Waffle flower Media Mat.  They were shaped using the tools from Susan's Flower Tool Kit.

The Gaillardia die set was used to die cut two Gaillardia from Susan's Specialty Cardstock.  They were colored using markers.  Yellow Pollen was used on the center of the flowers.

The Woodland Garden Leaves die set was used to die cut the large oak leaves.  They were colored brushing rust, burgundy, and orange ink on them.  They were shaped using tools from Susan's Flower Tool Kit.


This card folds flat for mailing.  The flatened size is 6x6 inches.
I will mail in an acrylic box.


This picture shows how base is created.


Back of card.  Personal message can be added here.

This was a fun card to create.  It was very easy to assemble.


Tuesday, September 13, 2022

Summer Bouquet in Wooden Bucket


I am happy you came to visit my  blog today.  I have completed bouquets in Susan's Wooden Bucket for Spring and Autumn so today I created a Summer bouquet.

For something differrent, I created a frame for this card.  I used Susan's eight inch frame instructions, which are on her Susan's Garden Club FaceBook Video,  to create a frame using P13 Stitched With Love cardstock.  The frame was created using white cardstock and strips from the design cardstock cut and glued to the top of the frame.  Another piece of this cardstock was used for the background inside the frame.

The Geranium & Antique Wooden Bucket die set was used to die cut two buckets.  For this arrangement, I did not use the handle.  The two buckets were glued together.  The bucket was colored and another bucket die cut using a specialty brown cardstock and the metal bands were cut out and glued to the bucket.  The edges were sponged using a dark gray ink.  Two dimensionals were added to the center of the bucket and glue added around the sides and bottom then attached to the background.


Susan's Cactus Dahlia die set was used to create one dahlia.  It was die cut using Susan's Specialty Cardstock, sponged and shaped with tools from her Flower Tool Kit.

The Button Chrysanthum & Daisy die set was used to create the yellow flowers.  Yellow Prills were added to the center of them.

The Oriental Lily die set was used to create the three lilies.  Yellow Pollen was glued to the ends of the stamens.  

The leafy branch from the Winter Foliage die set was used to die cut 10 branches.  They were brushed green on the Waffle Flower Media Mat, then shaped using the tweezers in the Flower Tool Kit.  To match the berries in the design paper, I added pink styrofoam balls that were colored pink.  A fine tip pen was used to press down in the center of each berry, once the glue dried after they were attached to the branch.  

The bird was die cut using Susan's Feathered Friends die set.  It was colored and attached using dimensional tape.  

To complete the frame, I decided to add a berry to the leafy branches on the frame front.  
 
I have one more season - a Winter Bouquet,  to complete in Susan's Antique  Wooden Bucket. 


Tuesday, September 6, 2022

Bouquet in Wooden Bucket


Hello Paper Gardeners.  Today I have a card designed using Susan's Wooden Bucket and a variety of pretty flowers using her flower die sets.  

This is a 5x7 inch card.  For the background I used the Spellbinders Leafy 3-D embossing folder.   I lightly misted a piece of green card stock with water before adding the card stock to the embossing folder.  It was cut down to fit the front of the card.

The Wooden Bucket die set was used to die cut two buckets.  The buckets were glued together.  The bucket was colored and a dark silver mirror card stock used for the bucket bands and handle.  It was attached using dimensional tape in the center of the bucket and glue around the edges.  This gives the bucket a rounded appearance.

Susan's Peony die set was used to create one white peony.  It was die cut using Susan's Specialty Cardstock and shaped using her Flower Tool Kit.

The Hollyhock die set was used to die ut the bright pink hollyhocks.

The Oriental Lily die set was used to create two flowers.  Instructions for creating all of Susan's flowers can be found on YouTube under Spellbinders Susan's Garden.

The Dogwood die set was used to create the three white dogwoods.  Prills was used in the center of the flowers.

The Foliage die set was used to die cut the leafy branches.  They were attached under the bouquet.

Susan's Spring Quotes Stamp Set was used for the quote.


LinkWithin

Related Posts with Thumbnails