Tuesday, September 13, 2022

Summer Bouquet in Wooden Bucket


I am happy you came to visit my  blog today.  I have completed bouquets in Susan's Wooden Bucket for Spring and Autumn so today I created a Summer bouquet.

For something differrent, I created a frame for this card.  I used Susan's eight inch frame instructions, which are on her Susan's Garden Club FaceBook Video,  to create a frame using P13 Stitched With Love cardstock.  The frame was created using white cardstock and strips from the design cardstock cut and glued to the top of the frame.  Another piece of this cardstock was used for the background inside the frame.

The Geranium & Antique Wooden Bucket die set was used to die cut two buckets.  For this arrangement, I did not use the handle.  The two buckets were glued together.  The bucket was colored and another bucket die cut using a specialty brown cardstock and the metal bands were cut out and glued to the bucket.  The edges were sponged using a dark gray ink.  Two dimensionals were added to the center of the bucket and glue added around the sides and bottom then attached to the background.


Susan's Cactus Dahlia die set was used to create one dahlia.  It was die cut using Susan's Specialty Cardstock, sponged and shaped with tools from her Flower Tool Kit.

The Button Chrysanthum & Daisy die set was used to create the yellow flowers.  Yellow Prills were added to the center of them.

The Oriental Lily die set was used to create the three lilies.  Yellow Pollen was glued to the ends of the stamens.  

The leafy branch from the Winter Foliage die set was used to die cut 10 branches.  They were brushed green on the Waffle Flower Media Mat, then shaped using the tweezers in the Flower Tool Kit.  To match the berries in the design paper, I added pink styrofoam balls that were colored pink.  A fine tip pen was used to press down in the center of each berry, once the glue dried after they were attached to the branch.  

The bird was die cut using Susan's Feathered Friends die set.  It was colored and attached using dimensional tape.  

To complete the frame, I decided to add a berry to the leafy branches on the frame front.  
 
I have one more season - a Winter Bouquet,  to complete in Susan's Antique  Wooden Bucket. 


Tuesday, September 6, 2022

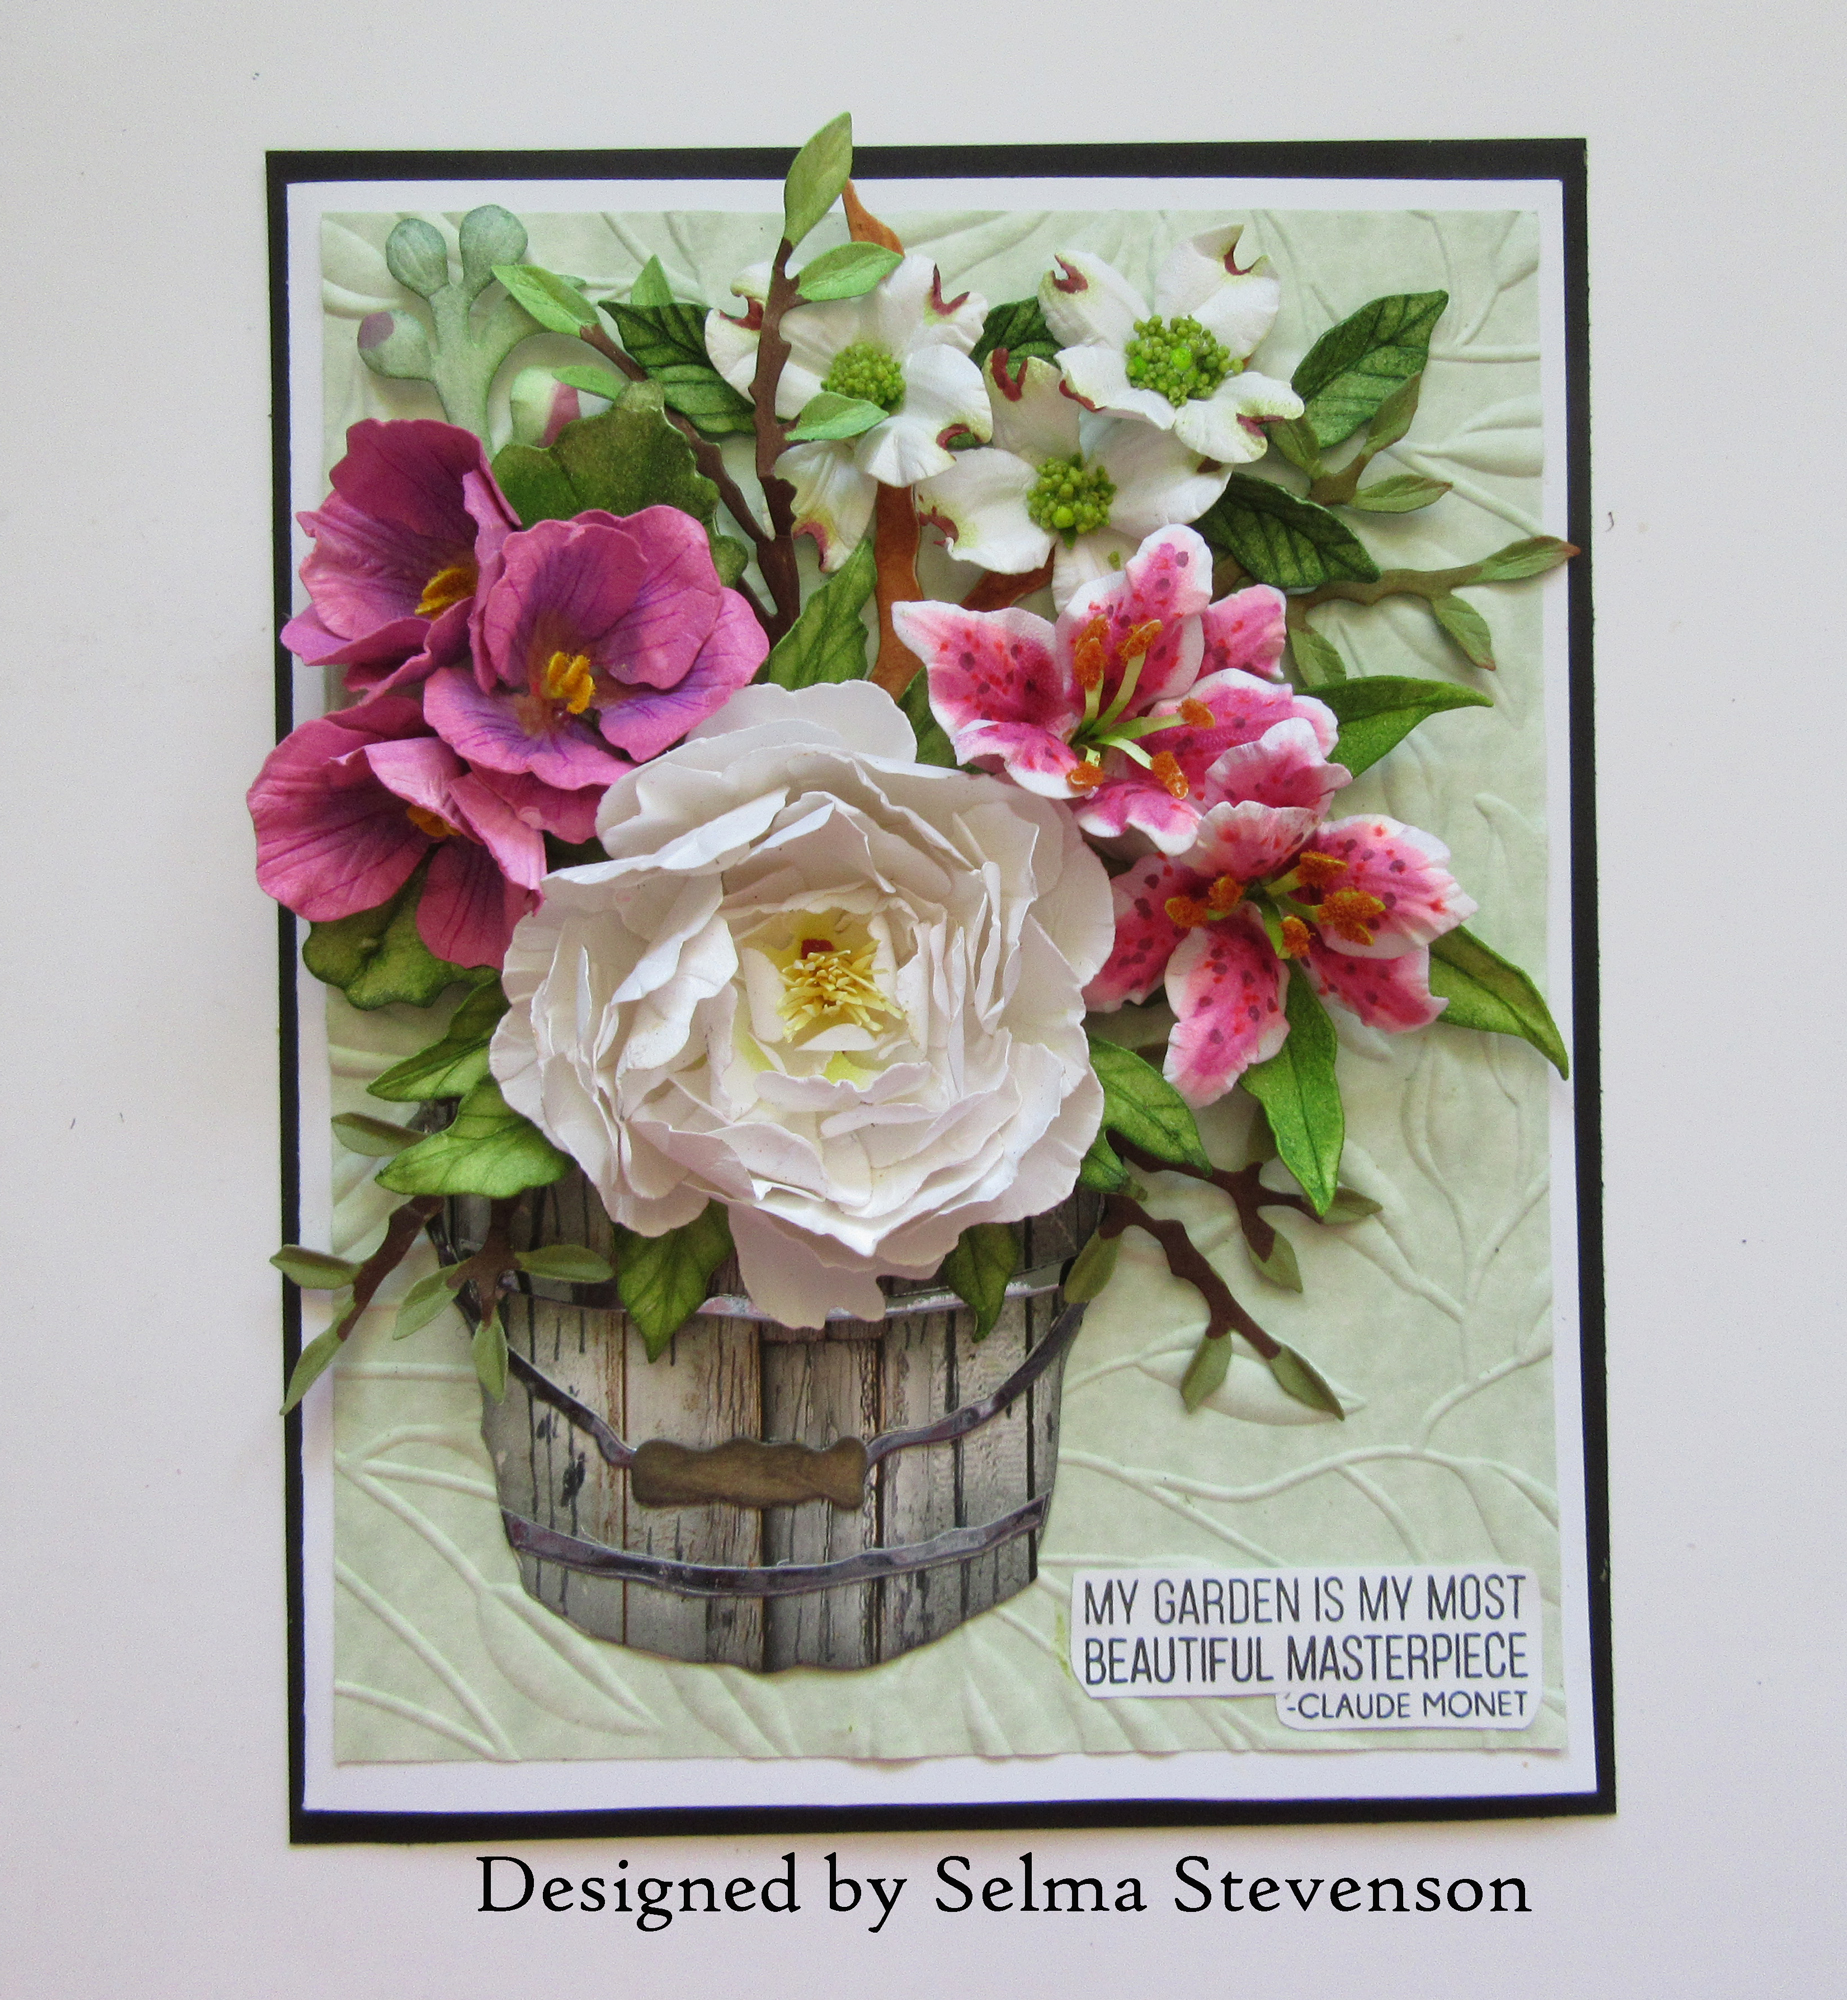
Bouquet in Wooden Bucket


Hello Paper Gardeners.  Today I have a card designed using Susan's Wooden Bucket and a variety of pretty flowers using her flower die sets.  

This is a 5x7 inch card.  For the background I used the Spellbinders Leafy 3-D embossing folder.   I lightly misted a piece of green card stock with water before adding the card stock to the embossing folder.  It was cut down to fit the front of the card.

The Wooden Bucket die set was used to die cut two buckets.  The buckets were glued together.  The bucket was colored and a dark silver mirror card stock used for the bucket bands and handle.  It was attached using dimensional tape in the center of the bucket and glue around the edges.  This gives the bucket a rounded appearance.

Susan's Peony die set was used to create one white peony.  It was die cut using Susan's Specialty Cardstock and shaped using her Flower Tool Kit.

The Hollyhock die set was used to die ut the bright pink hollyhocks.

The Oriental Lily die set was used to create two flowers.  Instructions for creating all of Susan's flowers can be found on YouTube under Spellbinders Susan's Garden.

The Dogwood die set was used to create the three white dogwoods.  Prills was used in the center of the flowers.

The Foliage die set was used to die cut the leafy branches.  They were attached under the bouquet.

Susan's Spring Quotes Stamp Set was used for the quote.


Tuesday, August 30, 2022

Autumn Bouquet in Antique Wooden Bucket


Good Morning Paper Crafters.  Today I have designed a card using Susan's Antique Wooden Bucket and filled it with Autumn Flowers.  At the bottom of this post, I have information about a challenge for you to win a set of OLO markers.

This is a 6 inch square card.  The background design paper is from the Prima Hello Pink Autumn Paper pad.  

The Antique Wooden Bucket die set was used to die cut the bucket and handle.  They were colored and attached to the front of the card.

The Autumn Hydrangea die set was used to create the two Hydrangea.  Susan's Speciality Cardstock was used to die cut the pieces.  Before die cutting,  I used Susan's PanPastels to color the cardstock.   To shape, I used the tools in her Flower Tool Kit.  Susan has direction on how to assemble all her flowers on YouTube.

The Cactus Dahlia die set was used to die cut one Dahlia.  It was also die cut using Susan's Specialty Cardstock then placed on the Waffle Flower Media Mat and brushed with two shades of dark red ink.  

The Sunflower die set was used to create the Sunflower.  Prills and Pollen were used to create the center of the flower.  

The Chrysanthmum, Button Daisy die set was used to create two purple Button Daisies.  

The Ferns & Ivy Die set was used to die cut the ferns and the Woodland Garden Leaves die set used to die cut the autumn leaves.  

If you watch Susan's Garden Club FaceBook Live Video, she has created four seasons of bouquets, all in her Autumn Wooden Bucket.  She has a challenge for you until September 15, to create a seasonal bouquet in the Wooden Bucket, and one lucky winner posting their card in the Susan's Garden Budding Paper Gardeners FaceBook Page will win a set of OLO Markers, worth approximatly $90.  We look forward to seeing your creations!  Good Luck in the drawing.  


Monday, August 22, 2022

Sunflowers with Gilding Flakes Background


Hello Paper Crafters.  I am happy you came to visit my blog today.  

I have everything out to 'play' with Gilding Flakes so decided to do an Autumn card.  It has been around 100 degrees here for weeks and today it is 64 degrees.  Feels like Autumn weather.

This is a 6x6 inch card.  I used a piece of sheet adhesive to attach to a piece of white card stock.  On the top sticky side, I used Cosmic Shimmer Mulled Wine Gilding Flakes to cover all the adhesive, rubbing in it well.  For the embossed design, I used the Lisa Horton 3D Veriegated Leaf Embossing Folder.  The card stock was placed with the foiled side on the raised side of the embossing folder so it would be debossed.  The piece was then cut down to 5 1/2 Inches square.  A black StazOn Pigment Ink Pad was lightly brushed over the raised portion of the embossed folder.  This piece was attached to a brown card stock panel.

I didn't want to cover up much of this beautiful background so for a little embellishment, I used two circle dies that were slightly offset together and die cut a circle frame.  It was attached to the upper right side of the card front.  

Susan's Sunflower die set was used to create three Sunflowers.  They were die cut using her Specialty Card Stock.  The die cut pieces were placed on the Waffle Flower Media Mat and brushed with two shades of yellow ink.  A marker was used to add the redish brown color at the base of the petals.  The center of the flowers was created using Prills and Pollen.

The Winter Bough & Evergreen Shrubs die set was used to die cut the leafy branch.  The leaf tool in the Flower Tool Kit was used to deepen the score lines in the leaves, then shaped using the tweezers.  Tiny Styrofoam balls were colored with a brown Arteza acrylic paint and added for berries.

I had planned to add a sentiment to the front of this card, but didn't want to cover up any more of the foiled design, so I just added some gold embellishments from my stash around the brown circle.


This is such a fun technique to play with.  I don't think the photos captures the real beauty of the Gilding Flakes.  The embossed background is really beautiful!

I have added product links below for the products used for creating this card.


Saturday, August 20, 2022

Poinsettia with Gilding Flakes Embossed Background


What a fun new technique!   Susan's Garden FaceBook Live Video showed how to create this beautiful background and I wanted to give it a try.   It is a very easy technique.  

I created a slimline card.  I used the same products as Susan.  Tonic Gilding Flakes in Gold and Bronze were used to spread over a double sided sheet of adhesive.  Once the flakes were added and smoothed out, it was put in the Spellbinders Poinsettia 3D Embossing Folder with the debossed side on top of the gilding flaked side and run through the die cutting machine.  A black Stazon Pigment Ink Pad was then lightly brushed over the raised embossing.  The poinsettias are debossed and will not get ink on them.  Once that was completed, the piece was cut down and backed with a piece of black card stock then attached to a white slimline card.  

Using Susan's Poinsettia die set, one white poinsettia was created.  It was die cut using Susan's Specialty Cardstock, shaded with PanPastels and shaped with tools in the Flower Tool Kit.  

Behind the Poinsettia I added Susan's White Pine Bough and Winter Berry die cuts.  As an extra embellishment, I used a very old Memory Box die and added Spellbinders Gold Embellishments to to the tips.  White Styrofoam balls were added for the berries.

Susan's Winter Garden Stamp Set was used for the sentiment.  It was gold embossed and mounted to a piece of gold mirror card stock then to a piece of black card stock.  It was added with foam adhesive squares.


The Gold and Bronze Gilding Flakes give this background a very elegant appearance.  I hope you will give this technique a try.  I have linked the products used below.

Thanks for stopping by my blog today.  I hope I have given you inspiration to try this technique.

Sunday, August 14, 2022

Christmas Rose Wreath


I have had a short vacation and am back with a floral wreath card designed using Susan's Christmas Rose, White Pine, and Wreath die sets.  

For the inspiration for this card style, I watched Sam Calcott's YouTube Beautiful Floral Wreath YouTube Video.  

For the card base, I used a piece of 6x6 inch card stock and scored at 3 inches and folded it in half.  I also found a piece of design paper that I wanted to cover the base with, so cut an identical piece of design paper and glued to the white card base.  

I wanted to decorate Susan's Wreath die cut, so I die cut four wreaths using her Holiday Flora Collection Woodland Wreath and Feathered Friends die set.  I then found two circle dies that I could fit behind the die cut wreaths to create a sturdy frame for the base.  Three brown circle frames were die cut.  Two of the circles were glued to the front of the card base, then three die cut wreaths glued to the circle.  On the back of this wreath, (back of card) I glued on one brown circle frame and one die cut wreath so the back of the card looked finished. 


As you can see in this picture, there is a 3 inch base.  Since I used both a piece of white card stock and glued on a piece of design paper, this base is sturdy enough to stand up without spreading out.

Using Susan's Winter Evergreen Foliage die set, several White Pine Boughs were die cut, colored and shaped.  They were cut apart so they could be glued around the wreath, leaving part of the brown wreath showing.

I found a picture of a very pretty Helleborus (Christmas Rose) and tried to duplicate it for this card.  I didn't do a perfect job, but it is similar.  I used the smallest petals in this die set and colored the edges of the petals.  They look more red than they really are.  I used the tweezers in the Flower Tool Kit and rolled each petal.  I used three layers of the small petals.  I probably should have used four for each flower to make it even fuller.  The flowers were die cut using the Helleborus die set and Susan's Specialty Card stock.  PanPastels were used to color the base of the petals yellow green.  One bud was created using three layers of the smallest petals.  


The flowers were attached over the White Pine Boughs and leaves tucked under the flowers.  

Susan's Winter Garden Stamp Set was used to gold emboss the sentiment on white card stock.  It was die cut using a small circle die and a slightly larger circle die used to die cut a slightly larger gold mirror card stock circle.  They were glued together.  The sentiment is floating in the middle of the wreath.  A piece of clear acetate was cut about an inch wide and glued across the middle of the wreath.  The sentiment circle was attached to the acetate with a piece of double sided tape.

To finish the card, snow was added to the branches and crystal Twinklets glitter sprinkled over the wet snow.

This was a very easy card to create and I love how it shows off Susan's pretty die cut wreath.


Thursday, August 4, 2022

Poinsettias and Juniper


Hello Crafters.  Today I have a 5x7 inch card decorated using Susan's Poinsettia, Winter Evergreen Foliage and Juniper die sets.

For the top half of the background, I used the new Spellbinders Glimmer Burst glimmer plate.  I think this is such a beautiful glimmer plate.  You can foil it twice if if you want both the top and the bottom of this background foiled.    I used the Spellbinders Glimmer Hot Foil System and Silver Foil.  To cut the foil, I used the Spellbinders Quick Trimmer for foil and paper.

For the lower half of the background, I used the Tim Holtz Intertwined 3-D Texture Fades embossing folder.  

Three white poinsettias were created using Susan's Poinsettia die set.  They were shaped using Susan's Flower Tool Kit and assembled using Bearly Art Glue.  Small green styrofoam balls were used for the bracts with one yellow Prill added to the top of each.

The Juniper die set was used to die cut all the Juniper.  I used styrofoam balls that were colored blue for the berries.  A black pen was used to press down on the top of each berry.  

The Winter Evergreen Foliage die set was used to to die cut the White Pine Boughs.  

To complete the card, I used some snowflake and corner silver stickers from my stash.  A silver twine bow was added at the bottom.  For a final touch, I added Twinklets glitter to the white pine and poinsettias.

Wednesday, August 3, 2022

Double Interlocking Concertina Card with Skates with Helleborus


Today I have a Double Interlocking Concertina Card decorated with Susan's new Ice Skates, Helleborus and White Pine Boughs. 

The instructions I followed for making this card are on Sam Calcott's YouTube Video.

The design papers used include sheets from the  Paper Heaven White As Snow and Golden Dreams 6x6 inch pads.  I also used a brushed gold and Metallic Gold cardstocks.

To decorate the front, the Ice Skates die set was used to die cut two skates,  Gold Cording was used for the laces and gold metallic cardstock used for the blades.  They were attached using dimensional dots.

Using Susan's new Helleborus die set, three flowers were die cut using her Specialty Card Stock.  They were shaped using her Flower Tool Kit and assembled using Bearly Art Glue.  Susan has instructions on how to assemble these flowers on her FaceBook Susan's Garden Club Video.

The Winter Evergreen Foliage die set was used to die the White Pine Boughs.  For the berries, I used white, small sticky back pearls and colored them with Copic markers.  


To decorate the inside of the card, I used the same design papers as was used on the front.  To give the gold square some dimension, I used the Altenew Garden Harmony 3-D Embossing Folder.  It is best to die cut the squares first, then place them in the embossing folder.  If you emboss them first and then die cut the squares, it will flatten out the pretty 3-D embossing.


For the left side of the card, I used Susan's Flourished Tree Glimmer Plate and used gold foil.  I used Spellbinders Hot Foil Glimmer Machine.  The tree was fussy cut, glued to gold card stock and again fussy cut and attached with dimensional tape.  Small gold rhinestones were added to the tree.

On the right side of the card, I used Spellbinders new Essential Diamonds die set and die a gold diamond and a slightly smaller white diamond.  They were glued together.  For the sentiment, I used Susan's Winter Garden Stamp Set and used Tim Holtz Rustic Wilderness Embossing Glaze for the embossing.  The sentiment was fussy cut and glued to a piece of gold card stock and fussy cut again.  It was glued to the white diamond die cut.  The finished diamond was attached with dimensional tape to the right side of the card.

Saturday, July 30, 2022

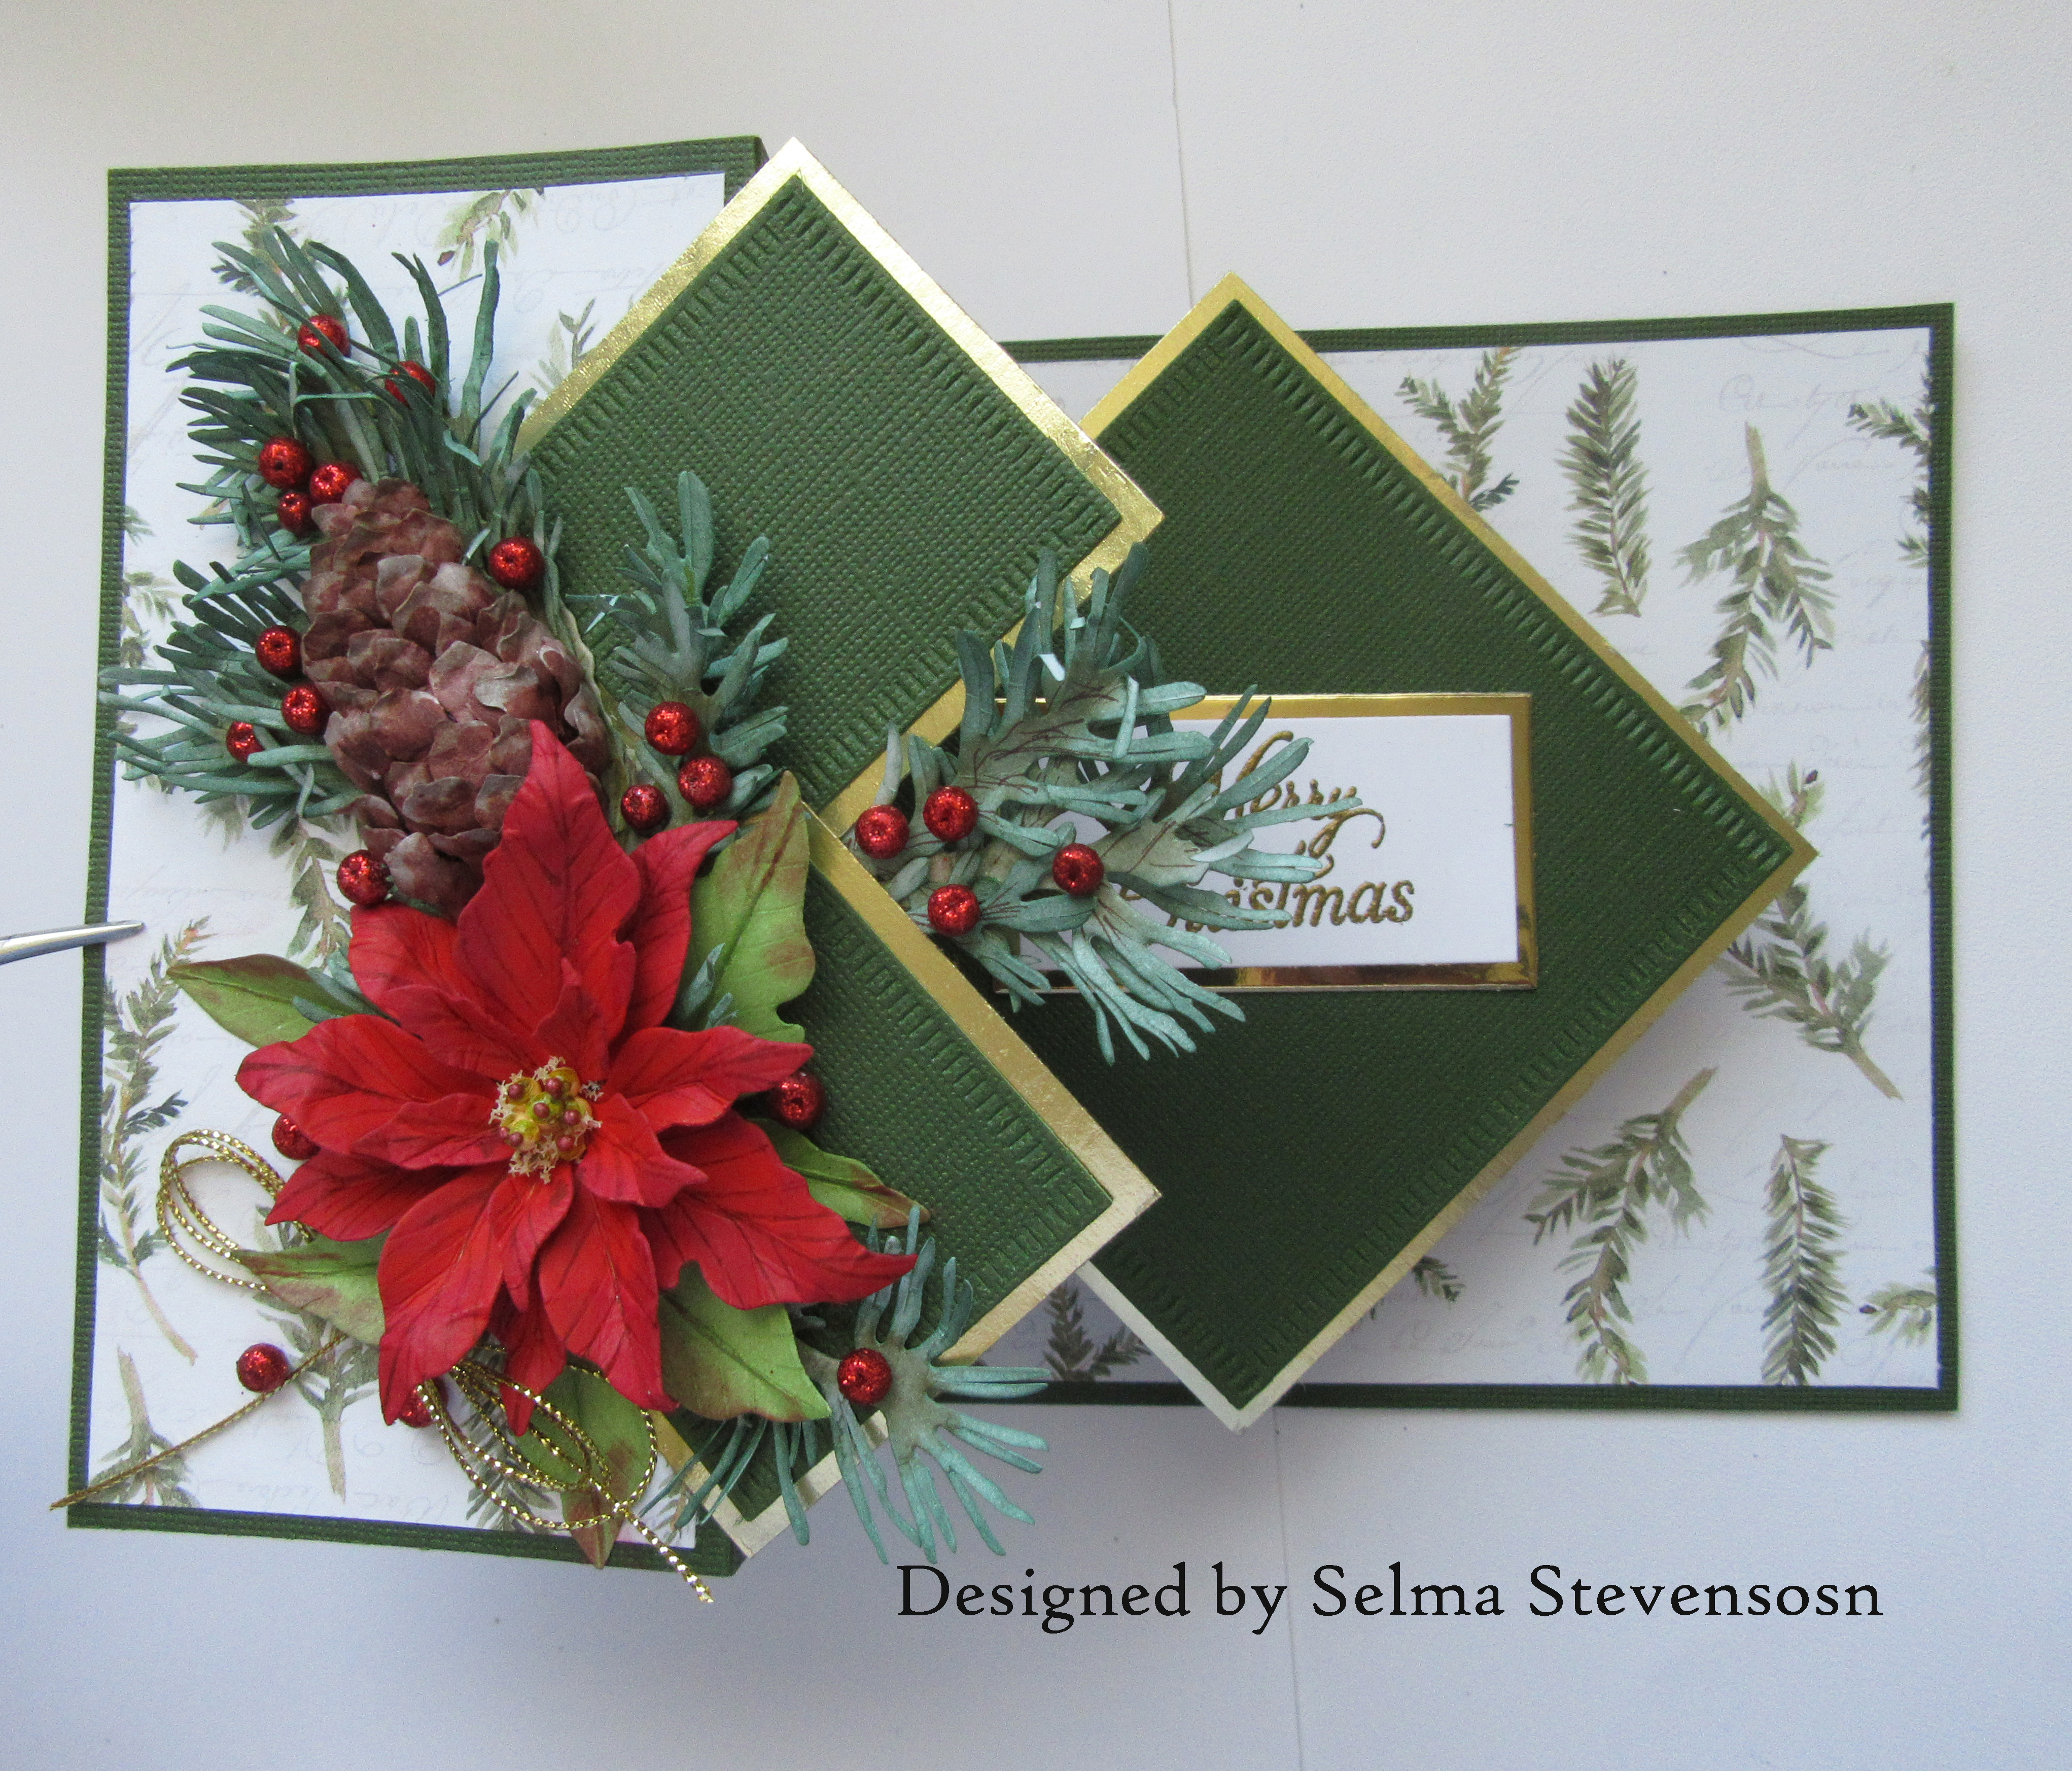
Z-Fold Pop Up Card


Hello Crafty Friends.  I am so happy to came to read my blog post.  Today I have a Z-Fold Pop Up Card.  To create this card shape, I followed the instructions on Susan's Garden Club FaceBook Video.

The design paper is from the P-13 Cosy Winter Paper Pad.  There is a piece of green gingham design paper on the inside fold that is from my stash.


For the diamond shapes, gold Metallic and dark green cardstock were used.  I went through my dies to find the correct size for the squares needed and found the Pink Fresh Blanket Stitched Squares die set worked perfect.  The green squares were layered on gold metallic squares.  Again, the instructions for the size squares and how to attach to the card are shown in Susan's Garden Club Facebook Video.

To decorate the front of the card, Susan's Poinsettia, White Pine  (Winter Evergreen Foliage), and Pinecone die sets were used.  The poinsettia was die cut using Susan's Specialty Cardstock. All die cut pieces were placed on the Waffle Flower Media Mat and colored using Blending Brushes.  On Susan's video, she demonstrates how to create the pinecone and shape the White Pine.

The White Pine was attached to the front of the card with one Pinecone.  The Poinsettia was then attached.  There are White Pine branches glued under the two top diamonds.  


When the card is opened,  you see the large diamond.  In the center, I used Susan's Winter Garden Stamp Set and gold embossed one of the sentiments on white card stock.  It was backed with a piece of gold metallic card stock.


Picture of card fully opened.  
There is a piece of white card stock on the back of the card to write a personal message.

I love creating these different card styles.  I hope you give this one a try.

You can click on the product pictures below if you are interested in products used.

Wednesday, July 27, 2022

Pop & Flip Card


 I love to find a piece of design paper and try to duplicate the design using Susan's die sets.  Today I created a Pop & Flip Card.  I found the instructions on Sam Calcott YouTube-Pop & Flip Card video.  I wanted most of the design paper to be visible so decided the small cut out circle would be perfect to decorate the pop up portion with Susan's Pinecone and Whitepine dies.

This is a 6x6 inch card.  Design paper from the Winter Story 6x6 inch pad (PA1902), was used for the top and inside.  Before attaching to the white card, I scored 1/8 inch around all four sides using the ScorPal.  A circle die was used to die cut the opening on the front of the card, trying not to cut out much of the design.  The circle die and one die larger was used to die cut a narrow frame that was glued around the opening.


The pop up portion of the card was created, using Sam Calcott's instructions.  This circle fits inside the cut out and pops up when you open the card.


The circle die cut piece was glued to another piece of white card stock that was die cut using the same circle die.   This was for stability.  After it was decorated it was attached the the pop-up base.

Susan's Pinecone die set was used to create one pinecone.  

Susan's new Winter Evergreen Foliage die set was used to die the Whitepine.  It was cut apart to fit on the circle.  

The design paper only had pinecones and evergreen boughs, but I decided to add three small white poinsettias.  I didn't want to cover up too much of the background.   Susan's Poinsettia die set was used to die cut the smallest poinsettia leaves.  Susan's Specialty Cardstock was used for the die cuts, and her Flower Tool Kit was used to shape them.  Bearly Art Glue was used to assemble the poinsettias.  
 
Susan's Winter Garden Stamp Set was used for the sentiment.


Monday, July 25, 2022

Peek-A-Boo Slider Card


What a fun card to create!  My friend, Christine Smith Pooler, posted a Peek-A-Boo Slider card yesterday on FaceBook, and I decided to watch the same video she did to create one for myself.  Tina Zinck has a tutorial on YouTube showing how easy it is to create this card.

I used the Beyond The Mist -Paper Heaven 12x12 inch paper pad.  The papers in this pad are all gorgeous but unfortunately I feel like my photos are not showing off the beautiful designs.  In the rectangle there are beautiful lavender roses that I duplicated on the front panel.  I used Susan's Spellbinders, Tea Rose die set to create the rose and rose bud.  The petals were die cut using Susan's Specialty Cardstock.  To color, I used the Waffle Flower Media Mat and Blending Brushes to lightly brush on lavender ink, then brushed on a darker lavender ink on the petals in the center of the rose.  Susan's Flower Tool Kit was used to shape the petals, and Bearly Art Glue used to assemble.
There are small leaves behind the roses in the design paper, so I used Susan's Winter Bough & Evergreen Shrubs die set to die cut the leafy branch.  


There are two slider windows in the card that show through a die cut rectangle.  I used the Spellbinders  Precision Layering A2-A die set to die cut the rectangles.  When the card is closed, you are looking through two die cut windows.  The rose design paper you see through the window, when the card is closed, was die cut from the Beyond The Mist paper pad.  I used a stamp set from my stash for the Happy Birthday sentiment.  


On the inside, more paper from the same pad was used.  When the card opens, a different picture/sentiment appears - It slides over into the die cut window.   


This is a picture looking down from the top of the card.


Saturday, July 23, 2022

Gold Foiled Flourished Tree


Good Morning.  Today I have a card designed using Susan's new Winter Garden Flourished Tree Glimmer Plate.  

For the background, I used a piece of P-13 Cosy Winter design paper.  I used paper from the 12x1 inch pad.  It was backed with a piece of gold mirror cardstock.  For the layers on top, I used the Spellbinders Precision Layering A2-A Rectangle die set.  I love this layering die set because it gives you the perfect mats for layering.  I have layered gold, white, gold, and the top, white card stock with the gold Flourished Tree.  There are foam squares added between the layers, for dimension.

I used the Spellbinders Glimmer Hot Foil System and gold foil the Flourished Tree.  A note - right now Scrapbook.com has the Spellbinders Glimmer Hot Foil System reduced from $150 down to $104.  What a great savings!  

For the sentiment, I used Susan's Winter Garden Stamp set.  I used VersaMark Ink to stamp the sentiment on white card stock then poured over Tim Holtz Rustic Wilderness Glaze.  The green sentiment matches with the green in the design paper  The sentiment was die cut using another die from the Precision Layering dies.  One size larger laying die was used to die cut a gold mirror backing for the sentiment.

Gold Rhinestones were used to embellish the gold foiled Flourished Tree, above the sentiment, and on each corner.  


Instead of making this a card that opened, I decided to add an easel at the bottom of the card.  At the top, above the easel, I added a piece of white card stock that is scored around the edges, for a personal sentiment.


To keep the easel backing from opening too far, a small 'W' shape piece was glued on to help it stand up.

This was a quick and easy card to create.  Once the tree was foiled, it was just die cutting the rectangles.
I love the elegance of this card.

LinkWithin

Related Posts with Thumbnails