Saturday, April 9, 2011

Springtime


It is beautiful outside today even though it is still chilly out.  My tulips are definitely coming up so wanted to design a springtime card today.  I used three different stamps sets.  The bunny and basket are from Heartfelt Creations.  This stamp is "Bunny Bouquet" 778E,  The butterfly is from the "Nature's Note" set  and the sentiment is from "In Flight", both sets from Our Craft Lounge.  In case you can't read it the sentiment says "Just living is not enough said the Butterfly.  One must have sunshine, freedom, and a little Flower" by Hans Christian Anderson.

The lavender pendent was die cut with the new Spellbinders "Parisian Motifs" and the border along the top edge is from the "Parisian Accents" die cut set.  The sentiment was stamped on white card stock and cut out with the Spellbinders "Big Scallop Circles" die.  The Heartfelt bunny and basket were stamped, colored with Copic markers, and cut out with scissors.  The butterfly was white embossed on vellum and colored on the back and cut out.  Lavender Vellum flowers were created with the Martha Stewart "Hydrangea Punches".  All the elements were arranged on the card then four very small vellum flowers were made to put in the basket and one in front of it, to give the card more dimension.

I appreciate you stopping by and hope you are enjoying your weekend. 

All products used on this card can be purchased from Joan's Gardens.

Friday, April 8, 2011

Granny's Truffles


Today I am switching gears; I worked with a new set I just received from Joan's Gardens called "Granny's Truffles" by Our Craft Lounge.   Joan loves this set and I'm hoping she loves the card I created with it.   She recently posted a lot of new stamp sets from Our Craft Lounge I'm sure you will want to see, so be sure to check out her blog
  
Isn't this image cute!   This is exactly what my daughter would say, because she LOVES chocolate so much!    The background was embossed with a Cuttlebug embossing folder.  The new Spellbinders "Fleur De Lis Rectangle" pendant was die cut and attached to the card.  The sentiment was stamped in black ink.  The images were stamped and colored using Copic Markers then cut out and attached with dimensional tape.  Glitter was added to the jewelry and ribbon on the candy box.   A few flowers, made with the small "Blossom Punch", were added to the corner,  along with a Sizzix die cut branch of leaves. 

This was a quick and easy card to create, and I'm sure would be loved by any one loving chocolate.  Hope you like it.

We are having a beautiful day and hopefully it will continue.   I think I can see the tulips peeking out of the ground.  Maybe Spring is just around the corner.   Hope you have a great weekend.
  

Thursday, April 7, 2011

Red Bouquet


Today I am posting another card made with the Heartfelt Creations "Flora Grande" stamp set.  I used a Heartfelt Creations vase to create a bouquet.  All the Heartfelt Creation products used are:  HCPC 3375 Flora Grande 1 PreCut Set; HCPC 3376 Distressed Leaves PreCut Set; 306F Ivy Background; 551E Oval Vase

This is a 5.5” square card. The base is red card stock. The Ivy Background was stamped with green ink and the leaves were colored with the Copic YG67 marker. I used the Ivy background to create fullness in the bouquet.  This piece was embossed with the Cuttlebug Dotted Swiss embossing folder. Two Sizzix corners were added on the top. A Martha Stewart “Deco Shells” border was attached to the bottom. The vase was stamped on glossy cardstock with Brilliance “Platinum Planet” Pigment Ink and embossed with Iridescent Ice embossing powder to give it some sparkle. It was cut out with scissors. Twelve flowers were stamped on red card stock with ColorBox “Warm Red” Chalk Ink and clear embossed. The flowers were cut out with scissors because I do not have the Blossoms 3 Nestabilities yet.  There are matching Nestability dies for both the Flora Grande and the leaves. I cut between each of the petals then shaped them. Two flowers were layered together with liquid glue. A punched stamen was added to the center of each flower, then a few black beads glued in the center of each stamen. The small Distressed Leaves were stamped with green ink and embossed with clear embossing powder and cut out with scissors. The vase was attached with thin dimensional tape and the flowers and leaves arranged above it over the ivy background.

All the products used on this card can be purchased from Joan's Gardens.


Joan's Weekly Challenge


 It time for another Weekly Challenge at Joan's Gardens.  This week the challenge is:

■ a monocromatic card with a splash of color
■ use an embossing folder
■ something die cut
■ something dimensional

This is a 6" square  card.  The embossing folder is from the Sizzix "Birds & Wreath" set.  I really love this embossing folder.  I used the other embossing folder from this set on  my blue tag the other day.   The corners and pretty die cut image in the center of the embossed folder are from the Spellbinder "Parisian Accents" die cut set.  The flourish is from the Sizzix "Elegant Flourishes" die.  The flowers were created with the medium "blossom" punch and the stamens are created with the frilly snowflake punch.   The sentiment is from the new JustRite stamp set "Charmed".  There are 15 stamps in this set.  The pretty butterflies are from the PinkPaislee "Butterfly Garden" Collection.  These are just gorgeous butterflies that look so realistic.  All the pieces were layered as shown.    

 The products used to create this card are all new items in Joan's Gardens store. 

Hope you will join us this week for another fun challenge at Joan's Gardens.

Wednesday, April 6, 2011

Easter Basket


I just received some new JustRite Stamps and created a card today with "From My Kitchen".  This is a 1 5/8" round set with 9 borders and 9 centers.  I thought this sentiment would be perfect on a small Easter Basket. 

I used a box pattern and created my basket out of the bottom.  To create the scalloped edge along the top of the basket I used the Martha Stewart "Scallop 3 Dot" border punch.  This punch was perfect for matching up the small scallops at each corner.  Four panels were cut to fit below the scalloped edge and were embossed with the Cuttlebug "Love Language" embossing folder.  This is a very old Cuttlebug folder that has tiny embossed hearts.  These panels were glued to each side.  The handle was created with one of the new Martha Stewart punches called "Double Link Trim Double Edge Punch".  Long name isn't it.  I punched the border along the 11" side of the card stock.  To decorate it up a bit, I threaded green grosgrain ribbon through the center of the strip.  The same ribbon was attached with ScorTape just under the punched border of the box. 

The JustRite sentiment "From My Kitchen" was stamped and cut out with a circle Nestie.  One of the borders from the same set was stamped and cut out with one of the petite circle Nesties and each scallop pierced to go along with the punched border.   To add a little more color to the front, the sentiment was mounted over one of the pretty elements from the Spellbinders "Parisian Accents" die set.  Flowers were created using the medium "Sakuras" punch and the stamens were created with the small "Sky Flake" punch.  The leaves were created with the "Oak Leaf" punch.  All were shaped with the Flower Tool Kit.  The basket was filled with pink paper grass and chocolate eggs.  I just realized that I didn't pull up some of the grass so it would show in the picture. 

All products used on today's project can be purchased from Joan's Gardens.  Tomorrow will be a new Weekly Card Challenge at Joan's Garden's so come back to see what fun we have planned for you this week,


Tuesday, April 5, 2011

Sunflowers


This is a 5.5 inch square card.  The flowers were created with the Heartfelt Creations Aztec Gold Sunflowers stamp sets.  Here are the Heartfelt Creations products used:    HCPC 2293 Aztec Gold Sunflowers 2 Precut Set; HCPC 2294 Aztec Gold Sunflowers 1 Precut Set; HCPC 3376 Distressed Leaves PreCut Set; HCPC 3377 Sympathy Sentiment PreCut Set; HCD 711 Decorative Dutch Iris Die;  and Blossom 2 Nestabilities

A piece of Basic Grey Designer Paper was embossed with the Cuttlebug Heritage embossing folder. The sentiment in the center of the frame was black embossed. The ivory piece on the right side of the card was embossed with the Cuttlebug Dotted Swiss embossing folder. The pretty brown flourish, cut out with the Decorative Dutch Iris Die, was added along the right side.

Each flower is a layer of three different Aztec Gold Sunflowers. They were stamped on ivory card stock with dark brown ink and cut out with the matching die. Scissors were used to cut between each petal. Using sponge daubers, each flower was sponged with first yellow ink, then pumpkin ink, and then around the edges with rust ink. The flowers were shaped then the layers attached with liquid glue. Gala Glitz Cello Art Glitter was added to the center of each flower. Five small Distressed Leaves were stamped with dark green ink on Ivory card stock then sponged with a lighter green ink. They were cut out, then dark green ink was sponged on the edges. They were shaped to give them a more distressed look. The flowers and leaves were arranged on the left side of the embossed frame.

All products listed in "bold" can be purchased from Joan's Gardens.


Monday, April 4, 2011

Joan's Gardens Tag Challenge


Time for another tag challenge at Joan's Gardens.  This week I have used a new Sizzix embossing folder "Birds & Wreath" set to create my tag.  There are two embossing plates in this package.  A brayer was used to add blue ink to the inside of the embossing folder so the background would be colored and let the embossing stand out.  Oh no -- just remembered I forgot to clean the ink off the embossing folder with a baby wipe.  Will go do that as soon as I get this posted.

The lace along the bottom of the tag was die cut with the Spellbinders "Parisian Accents" die.  The top flourish, and the frame for the sentiment were die cut with the new Spellbinders "Floral Doily Motifs" dies.  The sentiment is from the JustRite "Elegant Frames" stamp set and the little flourish above and under it are from the JustRite "You Inspire Me" set.  The sentiment was attached with a dimensional.  Three small flowers were punched with the small "blossom" flower punch and shaped with the tools from the Flower Tool Kit.  The stamens were punched with the small sun punch.  A small yellow pearl was added to the center of each stamen.  A Martha Stewart Butterfly was added, and a bow at the top, to complete the tag. 

A new Tag Challenge begins every Tuesday.  Hope you will join us this week.  There are no special requirements - create any style tag and enter it at Joan's Gardens.

LaBlanche Iris


Today I have another flower card but it is not made with punches.  I wanted to show you this beautiful "Framed Iris" stamp from LaBlanche stamps.  Joan's Gardens has a great selection of LaBlanche stamps.  This is a 5x7" card.  To start with I used a piece of glossy card stock for the front panel.  I created a background by using a pretty Heartfelt Creations flourish stamp.  It was stamped with Versamark ink around the outside edge and heat set -- no embossing powder added.  Using large sponge daubers I sponged on three colors of dye based ink:  light yellow, light blue and light green.  The colors were sponged and blended all over the card.  The LaBlanche Iris was stamped using Momento black ink and heat set so the ink wouldn't smear on the glossy card stock.  As soon as I knew the ink was dry, the image was colored using Copic markers.  You can see part of the flourish even under the Iris.  It makes such a pretty background. 

A piece of pretty ivory lace was added below the stamped image.  The sentiment is from the JustRite "You're So Sweet" stamp set.  It was stamped with VersaMark ink and embossed with "Vanilla" embossing powder then cut out with a Nestability "Lacy Circle" die.  Three Martha Stewart Butterflies were punched out of yellow card stock then sponged around the edges with Tea Dye Distress Ink.  I have included a close up of one of the butterflies because I wanted to show you the texture on it.  When you punch a butterfly, as you know, they are pretty plain if punched out of plain card stock.  I used a Tim Holtz stamp set I love to use for textures such as this; it is called "Slight Alterations".  There are three background stamps in this set.  To complete the card I added yellow Flower Soft to the Iris petals. 

I want to remind you to go over to Joan's Gardens to vote for your favorite tag.  The winner this week does receive a nice gift from Joan's Gardens.

Sunday, April 3, 2011

Die Cut Doily Flower


This card was an experiment.  I wanted to see if I could make a flower out of one of the new doily dies from Joan's Gardens and this is my creation.  I die cut three of the Cheery Lynn  "Italian Flourish" doilies and cut between each one of the scallops with scissors to help it shape up like a flower.  I used white card stock and decided to dilute some reinker and spray it on the doilies to tint them pink.  Using the tools from the Flower Tool Kit, I shaped the doilies so they would curl up like a flower.  A black stamen was created with the large "Sparkle" punch.  For leaves I used the Nestabilities Leaf Border.  The green tag and two green corners were die cut using the new Spellbinders "Parisian Accents" die.  Using the same die, I cut out the long border  and placed it in between the embossing on the top of the card and the portion I did not emboss - it is very hard to even see that border now. 

The sentiment is from the JustRite stamp set "You're so Sweet".  It was cut out with a circle Nestability and placed on top of the green Spellbinder tag.  A pink bow was added to complete the card.

This flower is pretty large but it does lay down flat and you can shape it back up.  I think it would be beautiful on a gift package such as a box or a decorated sack. 

Saturday, April 2, 2011

Best Friends Forever


This week has gone by fast.  Hard to believe it is already Saturday!   Today I decided to post an "elegant" style card.  The design paper used is from the BoBunny "Timepiece Collection".  The beautiful sentiment and frame are from the new JustRite set: "Vintage Oval Labels".  Isn't it beautiful.  The corner pieces were also stamped using one of the corner stamps from this set.  A flower was created using the large "Pear" punch. This is just a flower I made up.   The leaves are from a Sizzix die.   There is a black Nestability "Labels Four" die cut behind the sentiment.  All the pieces were layered then a black silk bow and a Tim Holtz Idea-ology "Chain Tassel" was added under the bow.  Mini Teardrop Gems" were added on the label to complete the card.

Looks like another day of rain for us, so guess I will stay in and do some more stamping this weekend.  I sure wish the weather would warm up!

Have you been over to see the "New Look" at Joan's Gardens?   I'm sure she would love to have you visit to leave a comment and let her know how you like it.  Shopping is going to be much easier now. 

Have a great weekend!

Friday, April 1, 2011

Have A Fabulous Birthday Yellow Posies


Today I have a card created with leftover flowers from yesterday's post and a few other things I had on my desk.  The background paper is from a DCWV paper pad.  There is a lattice border down the middle of the card punched with the Martha Stewart "Garden Trellis" punch.  On top of that is a punched border created with the Martha Stewart Mega "Branch" punch.  The pretty doily is one of the new die cut doilies from Joan's Gardens called "Canadian Kaleidoscope".  I love having the doily dies so I can cut any color doily I need for my projects.  They are so lacy and a great addition to any project.   It was cut out with green card stock.  To give it some added texture, I decided to fold it in fourths and run it through the crimper.  Love how it turned out.  The sentiment is from the JustRite "You Inspire Me" set, and the pretty frame is from the JustRite "Kindness" set.  These were white embossed on turquoise card stock and cut out with scissors. 

The flowers were created using the Martha Stewart "Cosmo" and "Cornflower" punches.  the stamens were created with the sun punch and the tips of each point was colored with an orange marker.   The flowers were arranged around the sentiment and leaves tucked in around them.  A pretty silk green bow and butterfly were added to complete the card. 

I am happy I made a few extra little posies so I could create two very different cards.  This card will fit into a business size envelope.  All the products used can be purchased from Joan's Gardens.


Thursday, March 31, 2011

Joan's Weekly Challenge Window Top Card

Front of card when closed


This photo shows the window in the top of the card.


When you open the card, the doily and flowers are inside.


We have a fun challenge for you this week at Joan's Gardens.  We want you to create a "Window Top Card".   You can get all the information about the challenge on Joan's Blog.

This is a 5.5" square card.  A piece of design paper from the Bo Bunny "Gabrielle Collection" was attached to the front.  Open the card out flat, then tape the Cheery Lynn "Italian Flourish" doily die in the center of the design paper,  Run it through your die cut machine.  Be sure to run it through until all the detail in the doily is cut.  Remove  the cut doily from the center of the card.  I found that the design paper stuck to the white card stock even though they were not glued together so I cut another "white" doily with the same die for the inside.  The edges of the cut area were sponged with green ink to give it a finished look.  A piece of green card stock was placed on the inside of the card.  The doily was attached (have glue on back of it) by closing the front of the card and placing it in the same position through the opening so it fits perfect when the card is closed. 

The flowers were created using two Martha Stewart flower punches: the "Cornflower" and the "Cosmo" punches.   The ends of the petals were sponged using the same color as the flower to darken just the ends.  The flowers were then shaped with the tools from the Flower Tool Kit.  The stamens were created using three medium punched suns.  They were cut as I have explained in earlier posts and layered to create fullness.  The green leaves do not show up very well in the photo because they are the same color as the back ground.  I used the Oak Leaf punch then sponged the edges and shaped them also with the tool kit.  The flowers were first attached to the doily then the leaves and Martha Stewart branches tucked in to give it fullness. 

On the front of the card I attached a sentiment from JustRite.  The sentiment is from the "Birthday Sentiments Set" and the frame from the JustRite "Just A  Note Set".  They were stamped with black VersaFine ink and clear embossed.  It was cut out with scissors then attached to a piece of black card stock.  I cut around it again leaving a small black border.  Two Martha Stewart butterflies and a yellow silk bow were attached to complete the card.

Hope you will join us this week. 

Wednesday, March 30, 2011

Pink and Yellow Flora Grande


Good Morning.  Today I am posting one of the cards I designed for the Heartfelt Creations blog post this week.  You will want to check out their blog today to see lots of gorgeous cards created by the design team and to see a sneak peek of new the Springtime Cardinal Collection. This collection is debuting on April 12. There will be 8 new PreCut Sets. These new sets coordinate with existing exclusive Heartfelt Creations dies manufactured by Spellbinders.

I want to let you know this is my last week on the Heartfelt Creations design team.  With the blessings of Heartfelt Creations, I have decided to resign from the design team but will continue to design cards to promote all the Heartfelt Creation's new releases for Joan's Gardens.  I want to thank Linda and Emma Lou for their continued support.  It has been a pleasure and real honor to serve on the design team.  Starting with the next release April 12, Joan will be posting the cards I design using stamps in the new collections.  I love designing with Heartfelt Creations stamps and Joan is very happy to have samples ready to post when she announces these new releases.

You know how much I love to work with flowers so working with the Flora Grande stamps has been so fun.  Here are the Heartfelt Creations products used to design this card:  HCPC 3375 Flora Grande 1 PreCut Set; HCPC 3374 Flora Grande 2 PreCut Set; HCPC 3376 Distressed Leaves PreCut Set; HCPC 3377 Sympathy Sentiments; HCD 711 Decorative Dutch Iris Die.

This is a 5.5” square card. The designer paper used is Webster’s Pages. The sentiment was stamped with VersaFine black ink and clear embossed directly on the design paper. The flower was created by white embossing three sizes of the Flora Grande flower. Three different colors of card stock were used: light pink; pale yellow; and bright pink. There are three large light pink flowers, three medium size light yellow; one small dark pink and two small light pink flowers. After embossing and cutting the flower out, scissors were used to cut between each of the petals. Each petal was then shaped using a stylus and tweezers. The flowers were layered together using liquid glue. Two leaves were stamped on a bright green card stock and sponged with a darker green after they were cut out. The flourish was die cut and glued to the card, then the flower was attached with a dimensional glue dot. The two leaves were glued under the flower.

Thanks for stopping by.  Tomorrow I will be posting a card for the new Weekly Challenge at Joan's Gardens.  

Tuesday, March 29, 2011

Daisy Explosion Box

Explosion Box

Lid of Explosion Box

Explosion Box Inside


I showed you the lid to this explosion box a couple of weeks ago and promised to show you the inside later.  I forgot to do that, so I am doing it today.  This box was created using the following stamps/dies from Heartfelt Creations:  HCPC 3325 Daisy Patch Bouquet PreCut set; HCPC 33324 Daisy Patch Swirls PreCut Set; HCPC 3318 Daisy Patch Flowers PreCut Set; HCD 703 Daisy Patch Diecuts; HCPC 3363 Inspire Me Sentiments; HCD 702 Decorative Butterfly-Border Die

I designed a Tea Cup explosion box for Joan's Workshop last week and it had a larger base in order to accommodate the tea cup.  This explosion box is 11.25” square when opened out. Start by scoring at 3.75 inches from all 4 sides then cut out all four corners so you have a “t” shape. The lid is 5 7/8” square. Score at 1” from all 4 sides. Cut a 1” slit up toward the middle section on both score lines on one edge. On opposite side, do the same thing. Cut corners diagonally. After decorating, fold on score lines and attach corners with ScorTape to create lid. Use the largest Classic Square Nestability to cut 10 squares. Emboss 5 of these with your favorite embossing folder. Use the second largest Classic Square Nestie to cut 5 more squares and emboss these also. Cut five squares with the Nestability, next to the largest, Lacy Square die using a coordinating color.

The Daisy Patch Swirl was stamped in green on the smallest squares for the inside of the box, using Olive Pastel Chalk Ink. The Daisy Patch Bouquet was stamped in green three times using the same ink. Two of these will be layered for the inside middle of the box and one for the box top. All the leaves were colored with a green chalk pencil. Using the three smallest single daisy stamps, many were stamped using Rose Coral Chalk ink. They were cut out with the matching dies. All the flowers were shaped and layered then placed over the images that were stamped with green ink. Pearls were added. On the lid two Decorative Borders were layered on top square, then the arrangement placed between them. A punched border was added around the bottom of the lid then trim added along the top of it attaching both with ScorTape. For the front of the closed box, embossed squares were added to each side, then the sentiment was stamped and cut out and a Decorative Border placed on top.

Explosion boxes are so fun to create.  Hope you will give it a try.


Monday, March 28, 2011

Joan's Gardens Tag Challenge


It's tag time!  Tomorrow the new tag challenge begins at Joan's Gardens.  Today you can go over and vote for your favorite tag from last week.  Today I have done something completely different from my other tags.  I used white card stock for my tag base.  It is the same size as the manila shipping tags I have been using in the past.  It is covered with design paper from a KaiserCraft design paper I have had for a while called "Lilac Avenue Collection". The corners were rounded using a corner rounder punch.

Don't you love this Iris from Heartfelt Creations Collection!  It is one of my favorite flower stamp sets and Joan has lots of them in stock right now.  I used two sets:  HCPC 3371 Dutch Iris Oval PreCut Set and HCPC 3373 Dutch Iris Medley PreCut Set.  The Iris in the oval was stamped and colored with colored pencils and OMS.  I cut it out with scissors to make it very dimensional.  In order to create layers, I stamped the single Iris, colored it,  and cut it out with the matching Iris die. I then cut out the bottom section and  part of the top portion to create a dimensional look.  These pieces were shaped using the Flower Tool Kit and attached with large dimensional glue dots.  I also shaped the green leaves to help them look dimensional.  It is so easy with the large white flower tool from the kit.

The background is one of those new die Cheery Lynn cut doilies you can now purchase from Joan's Gardens.  Don't you love all these new doily dies!  I used the Cheery Lynn "Canadian Kaleidoscope" doily.  It was a little to wide for my tag so I cut out one of the points to make it slightly smaller.  I pulled it together at the cut seams and pushed it down in the center.  It is attached with a foam dot to the tag.   The cut out area doesn't show because I layered the Iris over the cut portion.  The sentiment and frame are from the JustRite "You Inspire Me" stamp set.  I know - I use this set so much but it is so pretty I can't resist.  I used the new Spellbinder "Parisian Accents" under the JustRite sentiment and another piece from that set up at the top of the tag.  These pieces helped to give a dainty look to the tag.  A pretty lavender silk bow was added at the top.  The butterfly is from a sheet of Martha Stewart butterflies.  Yellow Stickles was added to the stamen of the flower and lavender rhinestones added to the sentiment and at the top.

I want to encourage you to create a tag for this week's challenge.  Tags are so fun to make and can make any gift very special.   Joan is going to have a great surprise for one person who enters the challenge this week.  Please go over to Joan's Gardens to see Joan's beautiful tag and to get all the details about the challenge.

All products used on this tag can be purchased from Joan's Gardens.

Sunday, March 27, 2011

Thinking of You Violets

I thought Spring was on the way but now I'm not sure.  It has been snowing on and off all day long!   Even though it is cold outside, it must be warm enough to melt the snow shortly after it hits the ground.  I am anxiously awaiting the arrival of all the Spring flowers and one that I love are the violets.  I don't have them in my yard yet, so I decided to create violets with punches.  Below are the punches I used:

Name of punches used:  small ovoid petal;  medium ichyou leaf, small snowflake; medium birch leaf; small sparkle or sun

 This is a 5.5" card.  The background is a deep violet card stock.  The  yellow layer was created using the Martha Stewart "Pansy" border punches.  The white layer was embossed with the Cuttlebug "Victoria" embossing folder.  Five violets were created and attached the the card front. The Flower Book from Joan's Gardens has the directions for creating this pretty little flower. The sentiment is from an older JustRite set called "Thinking of You".  I wanted to use this sentiment because  it matched my punched violets so well.  It was cut out with a  large scalloped Nestability die.  A pretty violet silk bow was added to complete the card.

You can purchase the punches and all the other products in "bold" from Joan's Gardens.

Tomorrow I will be working on a tag for the Joan's Gardens Tag Challenge.  I think you will want to create a tag for this week's challenge.  I'm going to tell you a little secret -- Joan is going to have a wonderful surprise for someone who enters a tag in the challenge this week.  I am sure you won't want to miss out.  Remember you can create any type of tag you want using any stamps or embellishments you want.  It is so easy to enter this challenge.  Hope to see your tag this week.  Tomorrow you can go to Joan's blog and vote for your favorite tag.  The new challenge will begin on Tuesday.


Saturday, March 26, 2011

Magnolia Tutorial and Die Cut Doily


Today I was very anxious to create a card using one of the new Doily Dies that Joan's Gardens is now carrying.  Oh my gosh, you are going to love these doily dies.  The Cheery Lynn doily I used for this card is called Italian Flourish (DL103)   Isn't it a dainty doily.  I could not believe how easily it cut out.  I have two others I will be using in the next few days. For this card I used some more new products I just received from Joan's Gardens.  The design paper is from the BoBunny "Timepiece Collection" paper pad.  What a perfect paper for my magnolia.  The corners were die cut from the new Spellbinder "Parisian Accents" die cuts.  I have been looking for some pretty corners and I love these.  There are a lot of other beautiful pieces in this Spellbinder set.   The sentiment is from one of the new JustRite cling stamp sets called "Vintage Oval Labels".  This set has gorgeous frames and flourishes, but the frames were too large for this card so I just used one of the sentiments and cut it out with a Big Scallop Circle Nestability.  The bow was made from silk ribbon.  All these products can be purchased from Joan's Gardens

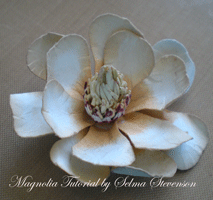
I wasn't planning to get the response I did for the magnolia flower I created yesterday.  You are all asking for a tutorial so since you come here to learn new things, I thought I better teach you how I did it.  I had no instructions so maybe someone else has a better way of doing it.  I just looked at the design paper I used yesterday and tried to figure it out. Here are a few pictures I hope will help you. 

The punches I used were shown yesterday.  To create the stamen, I used one tan medium sun and four light yellow medium suns.  I used the card stock from Joan's Gardens that she carries special for creating flowers.  In this picture, in the first row, you can see I used a dark red marker to color the tips of each point of the sun.  I did this on both sides.  I also created a red circle just below the points. This is what it looked like on the design paper I used yesterday. This sun will be the bottom of the stamen.  In the second row, at the top you can see how I cut each point of the sun in half down toward the enter.  I marked it with a black marker so you can see it. For this stamen I used four suns cut this way. In the third row, I used only one sun and cut between each point. This sun will become the very top of the stamen.

Here you can see how I used the tools from the Flower Tool kit to weaken the fibers in each sun.  You use the large white tool and go around in circles and the sun will start to weaken and curl up.

In this picture I am layering all the suns.  Start with the gray sun first; add a dot of glue to the bottom of one of the yellow suns and push it way down into the black shaping mat, with a small stylus from the flower tool kit, making it curl up.  Keep adding suns and pushing down into the mat with each sun you want to add. Now take the yellow stamen that was cut between the points and push it down until it is a really tightly closed sun.  Add a pool of liquid glue down in the center of that sun and roll it between your fingers shaping it into a cone.  It takes a little time for the glue to stick and hold its shape.  Add some liquid glue down in the center of the other stamens and even a little between each layer and insert the pointed sun down in the middle.  Press all the points in until it has formed like the picture below.

This is what the stamen will look like when you are done pressing in all the points.

I used 13 medium pears to create the magnolia.  For this flower, I sponged ColorBox Yellow Cadmium Chalk ink lightly around the edges of the petals, including the backside.  I used ColorBox Amber  Clay chalk ink to sponge the stem end of each pear. 

To create the flower, you need a base.  I used a 1/2" green circle, large Sky Flake, and a small snowflake.  You need to condition each of these pieces, using your Flower Tools so they will cup.  This will help shape the flower.  To start, glue the Sky Flake to the center of the circle.  This is your starting base.


Start creating your flower by adding a tiny bit of glue on the stem end of the pear.  You are going to add seven pears to the Sky Flake.  Push each petal down for a few seconds, with a stylus, to help set the glue.  Add all seven petals to complete the first row. 

Next, you are going to add a drop of glue to the center of the small snowflake and add it to the center of your flower.  This helps to give stability for adding the next row. You are going to add the other six petals on this row. When adding petals on this row, alternate them so they look like a real flower.

After all the petals are added, add glue to the bottom of the stamen and attach it to the center of your flower.  There you did it.  You now have a magnolia.  I think it is amazing you can use a Pear and Sun punch to create a beautiful flower!

I hope this tutorial was helpful and now you can make some cards or boxes with a beautiful magnolia that you created yourself. 

LinkWithin

Related Posts with Thumbnails