Hello Paper Crafters,
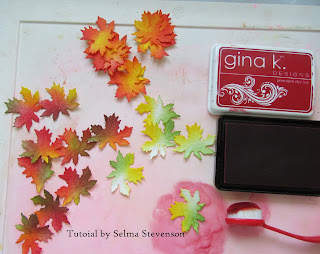
This is the third tutorial for coloring leaves in Susan's new Autumn Foliage die set. This tutorial shows how I color Maple Leaves. My favorite way to color leaves is to using Blending Brushes and dye ink pads to blend a different colors on each leaf.
Die cut the leaves using watercolor paper. Use the Leaf Tool that is in Susan's Flower Tool Kit and trace over all the score lines in the dye cut leaf. For Maple Leaves, I like to start off by coloring the whole leaf using bright yellow ink on the front and back.
Here I brushed on a Crimson Red to blend over some of the orange ink.
To make the edges of the leaves darker, a brown ink was brushed around the edges. and lightly over the whole leaf.
- - - - - - - - - - - -
Here is how I colored the second set of leaves I had die cut.
I used bright yellow ink to just color small portions of each leaf.
Next I brushed on green ink leaving a small portion of the leaf uncolored.
To fill in the rest of the leaf, bright red ink was brushed on. (Half the leaves here have red ink brushed on.)
After the leaves were colored, I used a mechanical pencil and lightly drew over the scored lines.
As with the other leaves, some dark spots were stamp on some of the leaves with brown ink.
The leaves were lightly misted, on the back, with water and shaped using the tweezers from Susan's Flower Tool Kit. Each point on these leaves were shaped. It's a little extra work to shape the leaves, but it really makes them look very realistic. To finish the leaves, Clear Crystal Glaze was brushed over the top of each leaf.
I hope these tutorials give you inspiration for coloring autumn leaves. You don't need to use the exact color ink pads I used or even use as many colors, but I'm sure you will have fun once you start creating your autumn leaves.
I have Susan's new release linked below. If you haven't ordered your dies yet, I would appreciate your support by clicking on the links below. Thank you.


No comments:
Post a Comment