Sunday, May 31, 2009

A PRODUCT I LOVE HAVING IN MY CRAFTROOM

I have not made any tutorials yet but thought I would start something new on my blog reviewing some of the things I feel are important to me in my stamp room. As you know, I have just started my blog, so I am still in the learning process on how to take pictures and get them on my blog the way I want. I'm hoping this is going to be informative information to you. I am starting with something I have not seen talked about on blogs. The product I am going to talk about today is a "Non-Stick" (Teflon) Craft Sheet. I believe it was originally designed by Suze Weinberg (a fabulous instructor/designer/author who now works with Ranger Industries) to be used with a "Melting Pot". I took a class from Suze many years ago and she was using this sheet. I purchased it at that class and have always kept in on my craft table. I would like to tell you about some of the things I use it for.

Before I begin, I would like to show you a picture of my workspace where I actually stamp. There is nothing fancy here but I like to have things organized and close to hand. I am very fortunate to have a large stamp room where I can teach workshops. I have an "L" shaped workspace - one for stamping and one to my left where I use my Big Shot/Cuttlebug and use my large paper cutter. I have developed a great system for myself to store my Nestabilities and my Cuttlebug embossing folders that are kept next to my Big Shot. I will review that in another post.


At this table I have my ink pads, markers, glue dots, some embellishments, some precut card stock for card base, embossing powders/glitters, and heat gun. I use a large Newspaper Print pad on my table and tear off sheets as they get very messy. In this picture I had to close the blinds in order to take the picture but they are usually pulled up to give me plenty of natural light.

One of the other items I keep on my work pad is a Non-stick (Teflon) sheet. This helps keep my work area much cleaner. When I use embossing powders or glitters, any spills can easily be put back in their container. I have a special way to store my embossing powders and glitter that I will cover in another post. The sheet is very thin so bends easily to return powders to their containers. If any remains on the sheet, it easily brushes off into the container. Also, I always lay my cardstock on the Teflon sheet when using my heat tool.


Pouring embossing powder back in container.


Another use for this sheet is to blend watercolors on it. I love to use Peerless Watercolors and can pick up the color and blend it on this sheet before adding to my image. You can use this when you are using reinkers to color. Cleanup is easy since it is non-stick. I just use a baby wipe or you can even clean up with a cloth.

Peerless watercolors. Butterflies embossed and ready to color.


Mixing colors on non stick craft sheet. (I have 2 - one tan, one white.)


Many times I use sponge daubers to color images that I have cut out. I can sponge off the design when working on this sheet and not have a messy work area when I'm done. Also, this little sheet has been a lifesaver when I am using a lot of glue or adhesives. Many times I have ended up with glue on everything if working on paper. If working on this sheet, you just wipe it off as it gets messy and you know you will not be getting glue on anything else.

Flower that is being sponged.


I have two of these sheets and find them a valuable item in my stamp room. If you are interested in purchasing this product, Joan Fricker from Joan's Gardens carries them.

HERE IS THE DESCRIPTION FROM JOAN'S SITE: This Teflon Craft mat is reusable over and over and over again. Absolutely NOTHING sticks to it! Nothing! The paper thin Teflon material withstands high temperatures from your glue gun, melting pot, wax, etc. Nothing penetrates or distorts its smooth, glass-like finish. Clean up is fast and easy, ready to use again and again. Acrylic paints and inks wipe clean even if dried to the surface. Fabulous and superior product for protecting your work surfaces. 9x12 $8.99 plus shipping.

For more info or to order this product, contact Joan here: http://www.atjoansgardens.com/

I hope this info is helpful to you. I would love to have you leave me a comment about this post.

Next Monday I will show you how I store my Nestabilities and embossing folders.

Thanks for stopping by. Now guess I better go make a card with that butterfly I just embossed.

Love You

I have this cute little ATC from my previous post and didn't want to waste it. There is another challenge from Gina's new stamp release on SCS posted by Melissa. There are three challenges and they are open until tomorrow evening. Check this one out here: http://www.splitcoaststampers.com/forums/showthread.php?p=14200459#post14200459.

This challenge is to celebrate children in our lives. You are to make a card for a child and tell them you love them. I have 6 grandchildren and they all have birthdays coming up so this was a great card for me to make for one of them. I am using the ATC from my previous post and added it to some pretty embossed paper I purchased at an art store several years ago. This paper came in a large roll in the store and you had them cut off the amount you want. I thought it matched this little ATC very well. I added some (retired) ribbon from SU. What a quick and easy card and I am sure one of my grandchildren will love it.

(After I posted this, I notice in the picture, the crystal effects doesn't look smooth. I took the picture before it was dry but it does not look that bad on the card.)

ATC

During GinaK's new release party the other night on SCS, three challenges were posted. I love to participate in these challenges because you have a chance to win any GinaK stamp set valued up to $24.95. What a great way to add to your stamp collection.

This challenge was posted by Cathy http://www.splitcoaststampers.com/forums/showthread.php?p=14201684#post14201684 and you have to make an ATC. I don't normally make such small cards but thought I'd participate. This little Giraffe from Rupa's "Whatever Floats Your Boat" set was perfect. This set can be purchased from GinaK Designs. I did this different from the other cards I have made using this set. I first stamped the image on Bashful Blue cardstock then a second time on Barely Banana. I cut out the window on blue, and the Giraffe on the yellow. The sky was sponged in the background to create clouds and Crystal Effects was applied to the window so it looks like glass. I forgot to mention I first went around the window frame with a marker to color it. Colored pencils and OMS were used to color the spots and the mane on the giraffe then a chalk pencil was used to add a little more color definition to the face.

I couldn't find a Nestability that was the perfect size for the ATC so I just cut out a piece of Really Rust card stock to 2.5 x 3.5 then cut a Very Vanilla piece to 1/8 inch smaller. The Vanilla piece was embossed with the Tiny Bubbles Cuttlebug folder. A petite circle nestie was used for the verse. The Prima flower was added and a small self adhesive Kaiser pearl was added to the center then smaller pearls added to each corner to finish it off. I'm afraid I am going to be using lots of pearls and rhinestones because I purchased one of every color from Joan's Gardens. I love adding a little bit of bling to my cards!

Saturday, May 30, 2009

Peach Flowers

This card was completed for another Midnight Madness Sketch Challenge. The flowers are from "A Year of Flowers" available from GinaK Designs. The flowers were watercolored using SU Groovy Guava . I used the aqua brush and reinker in the lid of the stamp pad. A piece of designer paper was used from my scrap box and I don't know manufacturer. Long rectangle and square Nestabilities were used to cut the frames. After mounting everything using dimensionals, black micro beads were added to the centers of the flowers to give a realistic look. I also cut between each of the petals of the flowers to give more dimension. I just purchased a lot of different colors of flat back pearls from Joan Fricker at "Joan's Garden". She has a wide variety of colors. These peach colored pearls match perfectly. The little gold charm is something from my stash and I also added a flat back pearl to the center to coordinate with the rest on the card.

Have a fun weekend.

Friday, May 29, 2009

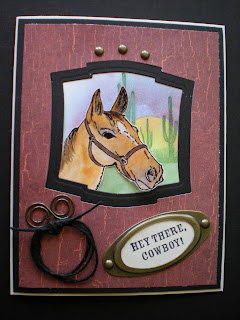
Hey There Cowboy

Theresa Momber posted a SCS challenge, Make It Masculine, during the GinaK party last night. This card is made using Theresa's "Out West" set available from GinaK Designs.

The frame was cut out using two sizes of the Label 2 Nestabilities. The larger frame was cut first then temporarily attached to a piece of Basic Black cardstock. The smaller nesties was then centered and cut. The cactus was stamped (using a retired SU stamp) and then grass, sun and sky were sponged using sponge daubers. The horse was black embossed then watercolored with Peerless watercolors. The hardware is from the retired SU Hodgepodge kit. A piece of black twine was used for the lasso.

Thursday, May 28, 2009

Another Lighthouse

I am loving this set. Up until now, I have not had many stamps to make masculine cards with. This is another card made with "Guiding Light" from GinaK Designs. I wanted to try something different this time. I wanted it to feel like you are seeing the lighthouse from the ocean, rather than looking out at the ocean. I used a piece of Gina's Digi background paper with some of the nautical netting she now carries. It goes so perfect with this set. The lighthouse was black embossed then watercolored with Peerless Watercolors. You can purchase them from GinaK here: http://www.shop.ginakdesigns.com/category.sc?categoryId=50 I love these watercolors because they come on a thin sheet and you can punch out a small square of each color and mount them on a piece of heavy cardstock. All your colors are right in front of you and it makes it so easy to choose colors to blend. You just use the Niji Waterbrush to pick up color.

After coloring the lighthouse, it was masked off and the background was stamped then sponged. The mountains are from a retired SU set. Long rectangle Nestabilities were used to create the frames. Each layer is on dimensionals. The anchor was colored with a Copic Glitter pen. To get the netting and sailor's knot to stick to the background, I ran it through a sticker machine. Three bronze brads were added under the scene.

Wednesday, May 27, 2009

Blooming with Love

This card is made with one of the stamps from SU "Fifth Avenue Floral". The butterfly is from SU "A Touch of Nature". The flower and the butterfly were clear embossed then watercolored using Peerless Watercolors purchased from GinaK Designs. I used a mixture of purple, lavender and blues. I believe the bottom piece of designer paper is from SU but I do not know where I got the top piece - I was using up scraps. Nestabilities long rectangles were used to cut the Bashful Blue and Lavender Lace Frames. The lavender lace border was punched with a Martha Stewart punch. The ribbon was from SU and the pearls are from Kaiser. The Cuttlebug, Love Language, embossing folder was used on one of the rectangles.

Bookmark


I I made this bookmark to send to a little girl who lost the tip of one of her fingers. Her grandmother is Betty Benton and is a friend I met through StampTV.
This is a bookmark that will fit over the page. The long Nesties rectangles were used to cut two green scalloped frames. The giraffe is from Melanie's "Just So Hippy" available from GinaK Designs. She is stamped with Black Memento ink and colored with Koh-i-noor Pencils and OMS then cut out. The grass and leaves were stamped then the sky and ground was sponged on. The giraffe was then attached. The SU slot punch was used to create the slot for the ribbon. This was then attached to the front scalloped piece. I used some paint sample cards and a Martha Stewart punch for the butterflies. I used colors that matched the giraffe. The back piece was scored down on the fourth scallop with the ScorPal and attached to the front piece with ScoreTape. There is a piece at the top and one down by the scoreline.

Tuesday, May 26, 2009

Red Flowers

I am waiting to leave for an appointment, so to pass time starting making a card. This card is made with a flower from Melanie's "A Year of Flowers". I don't use this flower stamp much because I don't know what kind of flower it is. I guess with stamping we can do about anything we want with a stamp, even if it isn't the correct color. I wanted to make a red/black/white card so that is why these flowers are red. Since I don't know the flower, I also didn't know what type of leaf it has so I stamped the poinsettia from that set and colored it green. I then cut it apart and layered it under the flowers. I black embossed the flowers on Real Red cardstock. The leaves were colored with markers. The top background was embossed with the Floral Screen Cuttlebug embossing folder. The bottom was embossed with a Cuttlebug border. I used some red rhinestone stickers by Stampendous in the center of each circle and added one to each corner on the top. The black border was made with a Martha Stewart punch.

With Love

On StampTV, Jessica posted a Sketch Challenge and this is the card I made to participate. I used Gina's "Elegant Flowers" from the Floral Frenzy Kit. I almost always use pinks or purples and so decided to use yellow/orange since there are many yellow iris in bloom right now. I used watercolor pencils and OMS to color. The designer paper is from SU. All the embossing was done using Cuttlebug embossing folders. The embossed piece behind the iris is green but is showing up almost black in the photo. You can check out this challenge here: http://stamptv.ning.com/forum/topics/sketch-challenge-stvsc13. Everyone has a chance to win in a random drawing for any stamp set valued up to $24.95. There are new challenges posted Monday - Friday. You do not have to use a stamp set from GinaK Designs, but if you do, you get two chances to win. These are all fun Challenges, so be sure and check them out.

Wow! I won the Midnight Madness Masterpiece Award


Phyllis Long has been one of my biggest fans on my SCS gallery. She always leaves me the sweetest comments. She started asking me to join in on the Midnight Madness Challenges so one day I decided to do it. Until I had joined StampTV, I never participated in any challenge. Well this morning I woke up to a "Congratulations" on my win so I had to go to check it out. I want to thank everyone who voted for my card. It is always so much fun to know others enjoy your work. You can check out the Midnight Madness Challenge here: http://priscillastyles.blogspot.com/

Thanks Phyllis for being such a big fan! Congratulations to you for winning the "Seasoned Socialite" Award.

Monday, May 25, 2009

Roses

Before I get started planting all my new flowers, I wanted to get a card made to post today. I decided to make another card for the Midnight Madness Challenge.

I used the roses from Melanie's "A Year of Flowers" from GinaK Designs. The flowers were colored with colored pencils and OMS. The background paper is from SU. I used the long rectangle nesties for the frame then ran it through the Cuttlebug Dotted Swiss embossing folder. The black embossed strips are designer paper from SU run through a Cuttlebug embossing border folder. The "fern" type leaves were made with a Martha Stewart Punch.

Hope you have a fun day.

Sunday, May 24, 2009

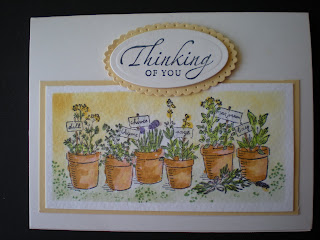
Herb Garden

Today I spent my time going to different garden nurseries looking for flowers, herbs and vegetables. I came home with a van full of things I will need to plant tomorrow.

I decided to post a card today with herbs. The inspiration for this card came from Kitty Caracciolo. Kitty has done so many beautiful watercolor cards. This stamp is from a retired SU set called Sweet Herbs. It was stamped with Memento black ink on watercolor paper then watercolored. The background was sponged with So Saffron and Certainly Celery. The design and verse are mounted on So Saffron Cardstock. I used my Petite Oval Nestabilities for the salutation. The base of the card is Very Vanilla.

Saturday, May 23, 2009

Serene Spring

Hope you are having a nice Memorial Day Weekend. Our weather is so beautiful that it is hard to be in the house. This is a quick and simple card. It is another of the Thinking of You cards I made for an order. I love this bunny from SU. The name of the set is"Serene Spring". The designer paper is from Basic Grey and the top portion was embossed. The image was colored with Copics and the frames cut with the square Nesties. The background frame is Basic Gray to match the gray in the designer paper. There is a Martha Stewart border under the bunny but it doesn't show very much. The salutation was cut with a petite oval nestability.

Friday, May 22, 2009

Textured Sunset


This card is made with Rupa's "Guiding Light" set from GinaK Designs. Actually when I purchased this set I wasn't sure I could come up with many good ideas (after all, it isn't a flower set!!!). However, I just love working with it. I decided for a "different" texture I would do a background using masking tape. I tore tiny pieces of the tape and covered the whole piece of cardstock. I then rubbed my Barely Banana ink pad over the whole thing then repeated with Cameo Coral and then some Old Olive ink. Because the texture of the tape is rough, I then poured clear embossing powder all over it and then heated it up with my heat tool. It gave it a shiny look. That finished off my textured background.

I then black embossed the lighthouse. I cut it out using nestabilities. I left it in the frame while adding color. I masked off the lighthouse. I then used sponge daubers to create the sky to coordinate with my background, sponged on the ocean and the sand. I then used colored pencils to create an "old dirty" looking lighthouse and buildings. I used my Peerless Watercolors to create the faded red on the buildings. I added the birds to give it more dimension. I used Kitty Caracciolo's Cause a Scene beach set for the small birds and the sand. I cut a piece of the nautical webbing I purchased from Gina and ran it through my small adhesive machine so it would stick well to my background. I added a few nautical charms I had to the netting and three brads to the upper right corner. I don't usually get very excited about a card I make but I really like how this one turned out. I am going to save it and send it to my son who lives in San Diego.

Daisies

I have been having so much trouble with my blog. It wants to abort every time I try to open it. I have found that other blogs are doing the same thing. Hope this problem is fixed soon. If I hurry and click on "Post" when it comes up, I am able to post but can't view the finished post without it aborting right away. I have been very busy making cards for someone referred to me. First she ordered 40 cards which I got mailed out. As soon as she recieved the cards, she ordered 50 more get well cards to use when she is visiting sick people, I believe in a senior care center. Before I had that order ready she asked for 20 more thinking of you cards. I love getting orders like this. I only have 3 more cards to go and I will get this order in the mail. The two cards I posted yesterday and this one are part of that order.

This card is made with Asela's "Flowers For Daisy" available from GinaK Designs. This is the first set of stamps I purchased from Gina and it sure has been put to good use. It is no secret that I love to make cards with flowers! I stamped the daisies with black Memento black ink then used sponge daubers to apply Barely Banana and More Mustard ink. The leaves, from "Elegant Flowers" were colored the same way with Certainly Celery. This is a very quick and easy way to color and I think looks real nice. The tag is from Spellbinders. I like to stamp the verse then place the die over it so I can make sure it is centered. I than pop it off the larger piece of cardstock and emboss it with the tan embossing pads. I love the embossing you can do with Nesties. The background is a new embossing folder I purchased from Cut At Home. I added some button brads that I have had in my "stash". They come in black and in white in one package. I believe I purchased them from Craft Warehouse.

Thursday, May 21, 2009

Lavender Orchids

I made this card for the Midnight Madness Sketch Challenge. I used Asela's "Friendship's Garden" stamp set available from GinaK Designs. This is a new release from GinaK and I'm having a lot of fun working with it. The image is colored with Copic markers. The Designer Paper is from Basic Grey -- Porcelain and Sugared paper pads. I mounted the design on Pale Plum, then Perfect Plum cardstock. The borders are Basic Black cardstock. The Pale Plum piece under the orchid was run through the Dotted Swiss Cuttlebug embossing folder. The frames are Long Rectangles and Petite Scalloped Nestabilities. The butterflies were punched with a small punch purchased at Michaels and the Pearls are from Stamper's Dream.

Pink Orchids

This card was made using a new set by Asela Hopkins "Friendship's Garden" available at GinaK Designs. I used Copic markers to color the image. The frames are made with Pink Pirouette and Pretty in Pink cardstock cut out with oval Nesties. I used the SU Horizontal Slot punch to create openings for the ribbon. The ribbon is from Michaels. The designer Paper is from the Basic Grey Wisteria Paper Pad. I added some flat backed pearls to dress up the design. The verse if from Asela's "Flowers For Daisy", stamped with Memento Black ink.

Tuesday, May 19, 2009

For You

I have made cards with all the stamps in Melanie's "A Year of Flowers" from GinaK Designs, expect this flower. When I was looking through the Basic Grey Wisteria Paper Pad, I saw this paper and thought it would work great with this stamp. The card stock I used is Barely Banana and Baja Breeze. I clear embossed the flowers on Baja Breeze then colored them with a white colored pencil. I stamped the design element from SU Priceless on the Barely Banana frame cut with Nesties. I added a scalloped border and pierced each scallop. The borders are made with a Martha Stewart Punch. I added some yellow flat back pearls to finish it off.

Coloring Cuttlebug Embossed Cards


I am posting these two cards because I have a blog follower, Anne, who asked me how to color embossed Cuttlebug cards. The first card was embossed with the "Stylized Flowers" folder. To color the flowers and stems, I used Peerless Watercolors and an Aqua Painter from GinaK Designs. I like coloring these designs with watercolors because you have lots of control on where the color goes and it turns out very smooth.
The second card was made using the Cuttlebug Happy Birthday folder. In order to get the words to stand out, I used a black rubber brayer and inked up the smooth side of the inside of the folder. (One side of the folder is smooth and the other is raised slightly to create the embossing.) You have to carefully lay your cardstock on the opposite side and carefully close the folder. You then run it through the Cuttlebug. You must wash the ink off immediately. I used a Baby Wipe to do this. Both cards are decorated with retired SU stamps. If you have any questions, please email me. Hope this helps Anne.

Monday, May 18, 2009

Flower Soft Lilacs

I love working with Flower Soft. This lilac stamp is from PSX. I used Black Memento ink to stamp the design then used colored pencils and OMS to color. I then cut the design out. The background frame was cut with oval Nesties. I put the white piece on my ScorPal to create the grid. A white uni-ball Signo Gel Pen was used to put dots on each of the scallops of the nesties frame. The designer paper and Certainly Celery cardstock are from SU. The verse is from "So Hippy" from GinaK Designs. The nesties layers and design are each up on dimensionals. After I completed putting the card together, I added the pastel lavender Flower Soft. I just added small dots of the Flower Soft glue then pressed on the Flower Soft. So easy and so fun! I have received many emails since posting my "Springtime" card below asking about the Pastel Flower Soft kit from Flourishes. I wrote to Flourishes asking if they will be stocking this product again soon and they left a comment on that post. They have the Pastel Flower Soft kit on order so you should be able to purchase it soon from them. If you are in a hurry to get certain colors, you can order individiual colors now. Be sure to also purchase the Flower Soft glue. It is a very thick glue that works perfect with this product. If you have any additional questions about this, please email me.

Sunday, May 17, 2009

Birthday gift for a Ballerina Friend


My daughter needed a box for a necklace she made for a ballerina friend. This friend also loves great chocolate. Her favorite colors are red and black. This is a picture showing the inside of the box with some chocolates and the necklace on top. The template for this box can be found at: http://www.scor-pal.com/dec2_magazine//Origami%20Box.pdf. My daughter also made a card, and covered a gourmet chocolate bar using the same theme. The ballerina is from a retired SU set "Dance". I think she did a very nice job. The cardstock used is Basic Black and Real Red. She used square nestabilities for the frames and a Martha Stewart punch for the fern leaves. The flower was created by using the SU Bigz Dies "Flower, Daisies #2. It was so much fun to help her with this project.

LinkWithin

Related Posts with Thumbnails