Wednesday, February 9, 2022

Lilac and Freesia Bouquet


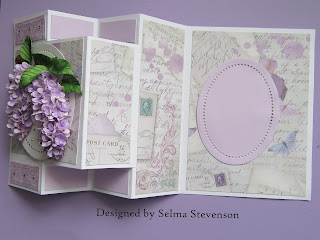
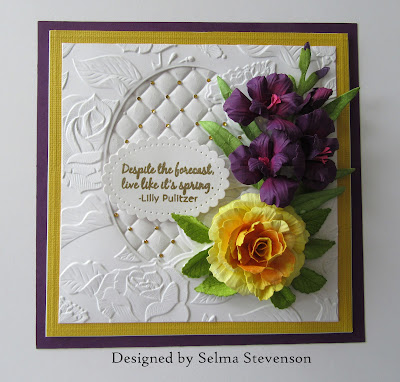
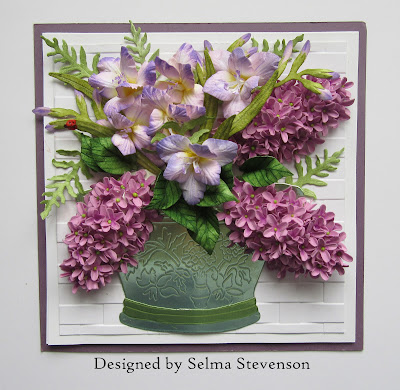
Good Morning.  Today I designed my card using Susan's new Lilac and Freesia die sets from Spellbinders.

For the background, I used the Lisa Horton 3D Weave embossing folder.  

For the vase, I used Susan's Cactus Dahlia/Pottery die set.  It was die cut using mirror cardstock.  For the trim along the bottom, I used a little different color green mirror card stock to die cut the vase, then fussy cut out the two bands along the bottom of the vase and attached with glue.  

Using the Lilac die set, three lilacs were die cut using Susan's Specialty white card stock.  They were colored using purple ink, shaped using Susan's Flower Tool Kit and assembled using Bearly Art Glue.  A green Prill was added to the center of each little flower.

Using the new Freesia die set, six flowers were die cut.  Light purple ink was sponged around the edge of all the petals then a slightly darker purple ink sponged just along the very edge.  Two flower stems were die cut and purple buds added to the top buds on the stems.  

The Ivy & Ferns die set was used to die cut the ferns and the Foliage & Ladybug die set was used to die cut the Ladybug.  She was colored red with a marker, black details added using a microfine marker and crystal clear glaze added.   


Sunday, February 6, 2022

Pink Dogwood


Today I created my card using Susan's new Dogwood die set from her Garden Favorites release from Spellbinders.  

For the background, I used the Spellbinders Slimline Kaleidoscope Hearts die set.  It was die cut 3 times using white card stock and once using light pink card stock.  The die cut pieces were glued together for dimension and attached to a light gray piece of card stock.  Additional layers behind it are light pink and dark pink cardstock.

Using the die cut hearts from the Kaleidoscope Hearts die set, I placed them in the Lisa Horton Padded Quilt embossing folder and embossed all the hearts.  They were glued together, then dimensional tape added to the backs and attached inside the die cut design.  Spellbinders pearls were added for additional embellishment.  These hearts stand higher then the background.

Using Susan's Dogwood Die set, five flowers were die cut using Susan's Specialty Cardstock.  The edges of the petals were sponged using bright pink ink.  A brown marker was used to color the indention on the end of each petal.  The flowers were shaped using Susan's Flower Tool Kit.  The stamens were rolled and green Prills added to the the tips.  The glue used was Bearly Art Glue.

Susan's new Garden Favorites Stamp set was used for the quote.  


Saturday, February 5, 2022

Clematis Vine


Clematis are a beautiful flower that has many varieties and colors.  On the Internet, I found a picture of a Tulpen-Clematis Princess Kate that I thought was very pretty and tried to duplicate it for this card.  In Susan's new Garden Favorites Spellbinders release is a Clematis Die set.  

This is a 5x7 inch card.  The die cut design on the right side of the card is from the Spellbinders Flourish Fleurit - Oct 21 APG Die of the Month die set.  Across the middle, I used one of the stamps from Susan's new Quotes stamp set and die cut it using a label die from my stash.


To show you how I colored all the pieces for this flower, I took a picture of the flower pieces after I had them all colored. I die cut pieces to create three flowers.   Around the edges of the clematis petals, I sponged Altenew Purple Wine ink and also colored the back of the petals with this color. The back of the petals was lightly misted with water and shaped using the Loop Tool from the Flower Tool Kit.  The tips of each petal was pinched and twisted to shape them.   In the center of the petals I sponged on Altenew Limeade Ink.  For the 'wagon wheel' stamen  piece, I sponged the tips with the purple wine ink and limeade ink in the center, sponging both sides the same.  For the center stamens, I color one with the purple wine, and one with the limeade.  When they were rolled, I first rolled the wine colored one then on the outside of this continued to roll the limeade colored stamen.  Before coloring, I used the scissors in the tool kit to cut each point of both type stamens in half to make them very narrow.  Once they were colored, I used the loop tool to curl the ends up on the wagon wheel stamens then pressed down in the center to cup them.  The rolled stamen was glued down in the center.


After the Clematis petals fall off, the stamen stays on the vine.  I created two extra stamens to attach to the vine.  

To attach to the card, I used the Garden Notes Winter Bough Branch from an earlier release.  Two branches were die cut, colored and attached along the left side of the card.   The flowers were assembled on the branches, using Bearly Art Glue.

I always find it so amazing we can create such realistic flowers using Susan's Garden Die Sets.   I hope this tutorial inspires you to create this beautiful flower.  


Wednesday, February 2, 2022

Lilacs on a Tri Fold Card


Good Morning Paper Crafters.  

Today I am posting a card I designed using  one Susan's new Garden Favorites 2022 release die sets from Spellbinders.  The new die sets included in this release include:  Lilac, Freesia, Sunflower, Clematis, Bearded Iris, Dogwood, Trillium, and Peach Blossom.  She also has a new stamp sets in this release.

The style of card I used for this beautiful lilac is called a Tri Fold Card.  You can get instructions on how to create this style of card on Susan's Garden Club Tri Fold Card & Hershey Kiss Gift Card Box Video on Facebook.  


The design paper I used to cover the different panels is from a Stamperia Lilac Flowers paper pad.  The die cut ovals are dies from the Spellbinders Essential Ovals die set.


The lilac was created using Susan's new Lilac die set.  The flower petals were die cut using Susan's Specialty Cardstock from Spellbinders.  Before die cutting, I brushed light purple ink all over the card stock, then die cut all the petals.  The petals were lightly misted before shaping with Susan's Flower Tool Kit.  They were glued to the flower branch using Bearly Art Glue.  The leaves were die cut using watercolor paper.  To color I placed them on the Waffle Flower Media Mat and brushed them with green ink.  They were shaped using the Leaf Tool and small ball stylus from the Flower Tool Kit.

The Foliage and Ladybug die set was used to die cut the ladybug.   She was colored, attached with glue, and then a drop of Crystal Glaze added to give her a shiny effect.  

A few tiny rhinestones were added to complete the card.

I appreciate you visiting my blog.  Below are links to all the new die sets in Susan's new Spellbinders release.

Sunday, January 30, 2022

Hybrid Tea Rose & Gladiolus


Today I have another birthday card for a friend.    This card was designed using Susan's Hybrid Tea Rose and Gladiolus die sets from her Spellbinders Summer Flora release.
The flower petals were die cut using Susan's Specialty White Cardstock from  Spellbinders.  The petals were colored by using a Waffle Flower Media Mat, blending brushes, and inks from Altenew.  Once colored they were lightly misted with water and shaped using tools from Susan's Flower Tool Kit.  They were assembled using Bearly Art Glue.

For the background, I used two different Lisa Horton embossing folders.  The top embossed piece I used the Shower of Roses embossing folder and for the embossed piece in the die cut opening of the top piece, I used the Padded Quilt embossing folder.  For embellishment on the quilt embossing, I used tiny yellow rhinestones.  

For the quote, I used one of the stamps from Susan's Spring Flora Quotes.  It was stamped using VersaMark Ink and gold embossed.  The quote was die cut using Spellbinders Nestabilities Fancy Ovals Etched Dies. 


Friday, January 28, 2022

Hybird Tea Roses


I designed this card for  dear friend's birthday.  

Susan's Hybird Tea Rose die set was used to create the pink and lavender roses.  
The Lily of the Valley die set was used to create three stems of Lily of the Valley.  They were all die cut using Susan's Specialty cardstock.  Susan's Flower Tool Kit was used to shape all the flowers and they were assembled using Bearly Art Glue.  

Behind the flowers the Ivy and Fern die set was used to die cut four ferns.  The same set was used to die cut the ivy.  The Foliage & Ladybug die set was used for the little lady bug.  After she was glued to the ivy leaf, a dot of clear crystal glaze was added to her.  

The embossed background was created with the Lisa Horton Quilted Embossing Folder.  The Butterfly was created with the Pinkfresh Small Butterfly Foil plate, stencils and dies.  I used the Spellbinders Glimmer Machine for the foiling.

The three hearts were die cut using the Spellbinders Slimline Kaleidoscope Hearts die set.


Friday, November 26, 2021

Winter Wishes


Good Morning.   Today I have a card I created a few months past, photographed but have not posted. I am not able to climb stairs to go up to my craft room to look up product names. 

 Several of you have messaged me telling me you miss seeing my posts, so will explain what has been going on.   Unfortunately I have not felt very well since my knee replacement.  My knee surgery went fine, but I have had difficulty breathing, feeling exhausted, plus having kind of blackout spells since that surgery.  It took a lot of activity in physical therapy and that is where I noticed how bad these symptoms were.  I was tested several times for blood clots, which I was happy to not have.   This condition seemed to keep getting worse, so was sent to my heart doctor who suspected I might need heart surgery.  I was sent to the Heart Institute and have been going through a series of tests to determine condition of my heart. It was determined that I will need heart surgery.   I will be going to hospital December 29 for surgery to replace my aortic valve.  This happens to be the day after my 80th birthday!  All this has been a big concern to me but then another problem.  My "good" knee and leg started hurting a lot.  My knee gave out on me and I had excruciating pain.  I was unable to put pressure on my foot or bend my knee, and still feel like my knee might give out on me.  I have a fluid build up in my knee. I went to my knee surgeon and he gave me shots to help relieve the pain but I am not taking the risk of going up the stairs, yet, in my house to go up to my craft room.  Therefore I don't have product info for you for this card.   I am really looking forward to feeling great in 2022!

Now, info on the card.  The deer design was die cut in the center of a piece of white cardstock, twice. I don't remember the name of the die set.   On one of the die cut pieces, the deer were cut out of the design and glued on top of the solid die cut piece, for dimension.  Snow paste was added along the bottom edge and a little on the trees.

Susan's Poinsettia die set was used to create the red poinsettia.  It was die cut using her Specialty Card Stock, colored, shaped using her Flower Tool Kit and assembled using Bearly Art Glue.

A few Spellbinder gold embellishments were added to the design.

I believe the sentiment is a Spellbinder die.  It was die cut using gold mirror card stock.


Saturday, November 6, 2021

Cactus Dahlia and Garden Lantern


Good Morning Paper Crafters.  I have a card that is much prettier in real life than I can get in a photo.  I wasn't going to post it, but decided to go ahead.

I started with a piece of white card stock and swiped brown, tan, and black inks over it going in both directions to try and create a woodgrain effect.  It was then embossed with the Lisa Horton Weave embossing folder.  

The Garden Lantern was die cut using a textured gold metallic card stock.  It was die cut again using a smooth gold metallic card stock and the detail for the lantern was fussy cut and glued to the lantern.  For the inside of the lantern I used a metallic designed card stock that matches the trim, but it colors do not look the same in the photo.  The lantern was attached to the left side of the card.

Susan's Cactus Dahlia die set was used to create a pretty yellow dahlia. Susan's Specialty white card stock was used, then yellow inks brushed on to color it.   It was shaped using the tweezers from the Flower Tool Kit, to bend back (shape) the petals.  It was assembled using Bearly Art Glue.  

The Winterberry & Mistletoe die set was used to die cut the Winterberry.  After coloring and shaping the leaves, Crystal Clear Glaze was brushed over the leaves to give them a waxy appearance.

The Woodland Garden Leaves die set was used to die cut the autumn leaves.  They were colored, shaped and also glazed.  A few dark red berries, created with colored bean bag Styrofoam balls, were a dded to the arrangement.

Black Glossy card stock die cut letters were added in the upper right corner.


Sunday, October 10, 2021

Autumn Triple-Diamond Point Card


Good Morning Crafty Friends.  Autumn is definitely here!  It has been very cool and all the trees have changed colors and porches and yards all decorated with beautiful Fall flowers and pumpkins.

This is a 6-inch card. On the front panel, two inches was cut off the bottom.   I used Susan's  Button & Daisy Chrysanthemum, Foliage & Ladybug, and Woodland Garden Leaves die sets to decorate this card.

I found several YouTube videos showing how to create a Triple Diamond Point card shape.  On the top panel I used a piece of tan card stock and embossed it using the Spellbinders  Falling Leaves embossing folder.  It was scored around the edges using a Score Board and attached to a piece of black card stock.

One of the stamps from Susan's Autumn Quotes stamp set was stamped using black VersaFine Ink and die cut using the Spellbinders Picot Petite Ovals die set.  It was attached using dimensional dots.  

The three diamond squares were cut and attached at the bottom of the front panel keeping them within the sides and bottom of the front of the card.    I used white, black and tan card stock for these diamonds.  A black pen was used to draw the stitching around the edge of the tan diamonds.

The Button & Daisy Chrysanthemum die set was used to create a green, tan, burgundy and orange flower.  Three were attached to the left of the Oval and one attached to the center diamond on the bottom of the card.

The Foliage & Ladybugs die set was used for the berry branches.  For the berries, I colored sticky back pearls and colored them with Copic Markers.

The Woodland Garden Leaves die set was used to die cut the Maple leaves.  They were colored, shaped and crystal clear glaze added to give them a shine.  A tiny twine bow was added below the maple leaves on the bottom of the card.  

On the inside of the card, a piece of 6-inch square, copper embossed card stock was added.  Under the top 4-inch panel, a piece of white card stock was added to be able to write a personal message. 


Thursday, October 7, 2021

Purple Hibiscus


Susan's newest release is the Tropical collection which includes Hibiscus and Plumeria die sets.  

This is a 6-inch square card.  A piece of white embossed card stock was cut 5 3/4 inches square and scored around the edges using a Score Board.

A piece of watercolor card stock was colored using Mica Powders (purple, pink, blue).  It was die cut using a oval scallop die. A slightly larger purple oval was die cut to go under the Mica colored oval.  The two ovals were attached using dimensional tape.

The Hibiscus  die set was used to create three purple hibiscus.  They were die cut using Susan's Specialty Cardstock.  Purple ink was brushed on the  petals and bright pink at the base of each petal, then they were were shaped using Susan's Flower Tool Kit.  The stamens were colored, red nuvo drops added to the tops and yellow Prills added below the red tips.

The Foliage & Ladybug die set was used to die cut the rosemary branches.  They were brushed with green ink, using the Waffle Flower Media Mat and brushes.  Each point was cut in half using scissors to make the branch appear fuller.  

Trying to think of a tropical type flower for a filler, I used the  Lily of the Valley die set and die cut white flowers.  They were not shaped like the Lily of the Valley but were shaped on the back to create an open type flower.

The Woodland Wreath & Feathered Friends die set was used to die cut the bird.  Color was sponged on the bird and detailed with a fine tip black pen.  It was attached with a dimensional dot.

I was unable to link Susan's newest Tropical release, but will link these die sets as soon as they are available in the US.

Monday, October 4, 2021

Yellow Gladiolus


I love gladiolus and now Susan has included a die set in her new release for these beautiful flowers.   Below I have included information about a great savings for all the dies in this release.

The background on this tall card is covered with a piece of P13 Stitched with Love design paper. 

Susan's Daffodil/Narcissus die set was used for the vase.  It was colored using VersaMark, Extra Thick Embossing Powder and Distress Speckled Egg Glaze.  It was attached with dimensional tape.

The Gladiolus & Berry Picking Basket die set was used to die cut pieces for seven flowers plus extra petals for buds.  The flower petals were brushed with yellow ink on the Waffle Flower Media Mat then orange ink brushed on at the base of the petals.  They were shaped using Susan's Flower Tool Kit and assembled using Bearly Art GlueYellow Pollen was added to the stamens.  The leaves were die cut using watercolor paper, brushed with green ink and shaped.  The gladiolus stems were attached to the card, then the flowers attached.  The extra petals were used to create buds on the ends of the gladiolus stems.  

I have The Paper Boutique Paper pad and decided to fussy cut some of the bees from one of the design paper sheets and add them to this card.

Right now, Spellbinders has a greatly reduced price on Susan's newest release. You can save over $30 when you purchase the Want it All Bundle  which includes 
The Want it All Bundle is linked below.

Sunday, October 3, 2021

Cactus Dahlias & Button Chrysanthemums


Fall is such a colorful time of year.  I always have fun creating flowers with Susan's Dahlia die sets.  This is the Cactus Dahlia along with a Button Chrysanthemums.  I used the vase from her  Daffodil/Narcissus & Antique Vase, Cactus Dahlia & Ornamental Garden Pottery, Button & Daisy Chrysanthemum, Foliage & Ladybug,  and Woodland Garden Leaves die sets.

For the background I used a piece of textured card stock and added three narrow strips of gold mirror card stock along the bottom to ground the vase.  Spellbinders Lattice Petal Foldover die set was used to die cut the corners from gold mirror card stock.   

On one of Susan's Garden Club Live videos (Gladiolus and Inspiration), she showed us how to create the technique I used on the vase.  It is a technique using Ultra Thick Embossing Powder and Distress Ink/Glaze to create a realistic pottery look.  The Cactus Dahlia die set comes with a Ornamental Garden Pottery die for the container, but I used the Antique Vase from the Daffodil/Narcissus die set.

The Cactus Dahlia die set was used to create three dahlias, and the Button & Daisy Chrysanthemum die set was used for the three button chrysanthemums.  These flowers were die cut using Susan's Specialty Cardstock then using the Waffle Flower Media Mat and brushes, Distress Inks were used to add Fall colors to the petals.  Light colored ink was first brushed on then darker ink brushed on the base of each petal.  The flowers were shaped using Susan's Flower Tool Kit and assembled using Bearly Art Glue.  

The Foliage & Ladybug die set was used for the small leaf branches and berry branches.  For the berries, I used small white sticky back pearls that were colored with Copic markers.  

The Woodland Garden Leaves die set was used to die cut the oak and maple leaves.  They were sponged using Distress Inks, shaped using the Flower Tool Kit then glazed for the shiny appearance.  

I always feel so happy to take cardstock, use Susan's die sets and be able to create flowers that are so realistic.  Until you feel these flowers, you would think that are real.   This is a card I think I will frame.

Below I have linked to products used.  I want to draw your attention to the Garden Club I Want it All Bundle which is a great savings to you.

I want to thank all of you who link to the products below to make your purchases.  It is greatly appreciated.  


Saturday, October 2, 2021

Christmas Cactus


This is a card I created for World Card Day. Susan has designed floral die sets for every season and the design team will be posting cards from each of these releases today.   I used Susan's Christmas Cactus, Gathering Basket, Poinsettia, Foliage & Ladybug, and Winter Bough and Evergreen Shrubs die sets to design this Christmas card.

This is a 5x7 inch card.  I cut a extra piece of white card stock to fit on the front and used a Scor-Pal Board to score around the edges.  This was attached to the front of the card.

On the left side of the card, I used the Spellbinder Splendor Slimline die set and die cut it using white card stock.  It was backed with a piece of hot pink card stock.  

The Spellbinders Elegant Twist Circle die set was used for the circle in the upper right corner.  Before attaching with dimensional tape, Susan's Holiday Quotes stamp set was used for the quote.  It was stamped using black VersaFine ink.

The Gathering Basket was die cut using white card stock and brushed with several shades of brown ink, then I used a brown fine line dark brown pen to help bring out the embossed design in the basket.  

The Christmas Cactus die set was used to die cut the pieces for the Christmas Cactus.  The flowers were shaped using the Flower Tool Kit and glued together using Bearly Art Glue.  I think this Christmas Cactus is so pretty!  

The Poinsettia die set was used to create the white Poinsettia.  The bracts were created using green Nuvo drops with a little yellow pollen glued to the very tops.  

Under the poinsettia, The Foliage & Ladybug die set was used for the foliage.  To add some Christmas glimmer to the card, I used the Winter Bough & Evergreen Shrubs die set to die cut the Winter Bough out of gold metallic card stock.  In doesn't show very well, but the gold winter bough is under both sides of the poinsettia.

For additional gold embellishment, I used Spellbinders Fashion Gold Embellishments  to tie in with the gold bough under the poinsettia.   


Pulmeria


This card is designed with Susan's new Plumeria die set.

The background on this card is multicolor - orange, yellow, peach, pink and hot pink. On top is a piece of design paper from my stash that I thought looked tropical.  It was attached using dimensional tape.

Spellbinders Elegant Twist die set was used to die cut the pretty oval.  It was attached with dimensional tape.

Using the Plumeria die set, nine flowers were die cut using Susan's Specialty Cardstock.  Yellow and Orange Distress inks were sponged on the petals.  The petals and leaves were shaped using Susan's Flower Tool Kit and assembled using Bearly Art Glue.  A small Prill was added the the center.  To make the Plumeria flower realistic, you need to twist the petals so the left side of each petal over laps the petal next to it - all the way around.  

A Spellbinders alphabet die set was used to die cut the letters for ALOHA.  Orange and Yellow inks were brushed on the letters.   White Pearls were stained using an orange Copic Marker.


Pink Hibiscus


Today is World Card Day.  Susan's Design Team will be posting cards throughout the day using a new Tropical die set release, which includes a Hibiscus and Plumeria, plus cards from each of her earlier Spellbinder releases.

This card is 6 inches square.  I used a piece of design paper from Marta Piekarczyk - Awakening Paper Pad, for the background. 

Using the Spellbinders Essential Ovals, a small and medium oval was die cut.  In the smaller oval, one of the Quotes from Susan's Spring Quotes stamp set was stamped using VersaFine black ink.  It was attached using dimensional tape.

The larger oval was attached on the lower portion of the card.  It was also attached using dimensional tape.  

Susan's new Hibiscus die set was used to create three pink flowers.  The flowers were die cut using Susan's Specialty Cardstock.  They were sponged using light pink ink then bright pink ink was sponged at the base of each petal.  For the stamen, red Nuvo drops was used on the tips and yellow pollen glued just below the Nuvo drops.  

The Foliage & Ladybug die set was used to die cut leafy branches.  In the design paper, there are pink berries on the leaves, so I added them to the leafy branches.

I hope you are inspired by seeing all the cards Susan's Design Team will be sharing with you today.


LinkWithin

Related Posts with Thumbnails