Monday, March 28, 2022

Gardenia & Forget-Me-Nots


I am having so much fun working with the new dies in Susan's Through The Garden Gate release from Spellbinders.  Today I have a card created with the Forget-Me-Not & Ladybug and Gardenia die sets.  

This is a 6x6 inch card.  I used an old Spellbinders die set called Lisette Oval Shadowbox Frame.  Two of the ovals were glued to the front of the card.  The corners are also from this die set.  

The Forget-Me-Not die set was used to die cut the flowers.   They were die cut using Susan's Specialty Cardstock.  In the center of each flower a Prill was added.

The Gardenia die set was used to die cut one flower.  It was shaped using the tools in Susan's Flower Tool Kit.  Light yellow PanPastel was added to the base of each petal and on the tips of a few petals.  In the very center petals,  I used a yellow/brown marker at the base of the petals.   The leaves were die cut using watercolor paper, colored, and shaped.  Crystal Clear Glaze was then brushed on the leaves.  

The Forget-Me-Not & Ladybugs die set was used to die cut one ladybug.  It was colored, shaped and glued to one of the Gardenia Leaves.  Once dry, Crystal Clear Glaze was added to her.  

To finish the card, white pearl embellishments and a blue ribbon were added.  


Sunday, March 27, 2022

Bee Blossoms


I am happy you came to visit my blog today.   This was such a fun card to create.  I used Susan's Bee Blossom die set from her new Through The Garden Gate release.  This is a very pretty flower and very easy to create.  

This is a 6 inch card.  A piece of design paper from my stash was used for the background.  

Using Susan's Geranium & Antique Wooden Bucket die set, I die cut the bucket using a piece of woodgrain design paper.  I used a fine line black pen to add additional vertical lines and colored the band with a marker.  It was attached with a piece of dimensional tape in the middle and glued around the sides and bottom.

The Bee Blossom die set was used to die cut 13 flowers using Susan's Specialty White Cardstock.  Bright pink ink was sponged at the base of each petal then a fine line pen used to add lines from the base of each petal up about half way.    The branches were sponged using bright pink ink then a dark red marker used to go over portions of the stem.  The dark red marker was also used to color the 'V' shape piece that shows at the base of each flower.  The stamens were colored bright pink about half way up then each stamen was cut in half to make them narrow and appear fuller.  The very tips of the stamens were dipped in glue then into yellow Pollen.  The Tweezers from Susan's Flower Tool Kit were used to roll the stamens.  They were glued to the center of the flower using Bearly Art Glue.  The leaves were die cut and brushed with light green ink then at the base a blue/green ink was sponged on.  They were shaped and glued all around the flowers.

One of the sentiments from Susan's new Through The Garden Gate Stamp Set was stamped on white card stock, die cut, and sponged with light brown ink around the edges.  It was attached with dimensional tape.

For final touches, one of Susan's Ladybugs was die cut, colored and added to one of the leaves.  A small butterfly from my stash was added with dimensional tape.

This is such a fun flower to create.  I hope I have inspired you create your bouquet.  The dies for Susan's release are now available and linked below.


Friday, March 25, 2022

Vase filled with Hollyhocks


Today I worked with Susan's Hollyhock die set to create a pretty bouquet.  This is one of the new die sets in her Through The Garden Gate Release which is now available.  

This is a 5x7 inch card.  For the background, I used a quatrefoil die that does not die cut the design out unless you tape the frame die around it.   I taped the die toward the top of a 5x7 piece of cardstock and ran it through the die cutting machine.  It was glued to the front of the card.  

Using Susan's Daffodil/Narcissus & Antique Vase die set, I die cut the vase using a burgundy mirror cardstock.  It was attach at the bottom of the card.  

The Hollyhock die set was used to die cut six hollyhock stems.  Two of the stems were glued together to make the stems longer.  These stems were die cut using watercolor paper and sponged green adding color for the buds. 

Using the holyhock flower dies, the flowers were die cut using Susan's Specialty Cardstock.  They were brushed on the Waffleflower Media Mat, using the Picket Fence Brushes using two different shades of pink ink.  They were shaped using Susan's Flower Tool Kit  and assembled using Bearly Art Glue.   Yellow Pollen was added to the stamens.  The flowers were arranged on the stems.  The leaves were die cut using watercolor paper and sponged with two shades of green ink.  

To finish the card, white pearl embellishments were added to the corners of the quatrefoil die cut.


Thursday, March 24, 2022

Floribunda Rose Easel Hat Card


What a fun project!   On Susan's Facebook Live last week, she showed us how to create a Hat Easel Card.   

I decorated my hat using Susan's Floribunda Rose die set from her new Through The Garden Gate release.  I used Susan's Foliage & Ladybug die set for the leafy branches with the berries.  I have Susan's newest release linked below.

First the hat easel card was assembled following Susan's step by step instructions on her Facebook  Spring Hat Easel Card video.

The Floribunda Rose set was used to die cut the rose petals and leaves.  I used Susan's White Specialty Cardstock and sponged two shades of pink ink around the edges of all petals. The petals were shaped using the loop tool in Susan's Flower Tooll Kit.  The rose was assembled using Bearly Art Glue.  One rose bud was created.  The rose bud was die cut twice - once in green and once in white cardstock.  The white bud was colored with pink ink and the stem cut off.  The green rose bud was trimmed cutting the bud portion off, using scissors.  The pink bud was glued on the back of the green stem.   The Rose leaves were die cut using the same color green cardstock as the leaves in the design paper.  The edges of the leaves was sponged with a darker olive ink.

To match the leaves in the design paper, I used the Foliage & Ladybug die set and die cut 8 leafy branches out of the same cardstock as the rose leaves.  I used a thin line pen to draw the veins in each little leaf.  To highlight the tips of the petals I used light lime green PanPastel on the tips of each leaf. Each leaf was shaped using the tweezers to shape each leaf.   For the pink berries, I used pink styrofoam balls. It is hard to see, but there are pink berries in the design paper.   They were glued onto the branch using Bearly Art Glue.  Once they were dry, I used a fine tip pen to push down on the end of each berry.  


First the rose was attached to the front of the hat. It had to be pushed down well.  I used glue dots and glue, to help make it fit down well.   The rose leaves were attached then the leafy branches.  There are three branches with berries on each side of the rose and one leafy branch with no leaves.  The rose bud was attached above the rose.  A narrow satin ribbon was attached around the base of the top of the hat.  A large bow was made and attached at the back of the card.  


On the inside of the card, I stamped one of the sentiments from Susan's Through The Garden Gate Stamp Set on white cardstock, die cut, and attached to a slightly larger green die cut.  It was attached to the card using dimensional tape.

This project was not hard to create and I am very happy with how it turned out.  

If you would like to create one of these cute hats, be sure to watch Susan's Garden Club Live video for complete instructions.



Monday, March 21, 2022

Floribunda Rose


Today Susan's New Through the Garden Gate Release is available from Scrapbook.com.  I have the links below for this release.  

This is a 6x6 inch card.  The background is a piece of the Spellbinders Silver Fox Cardstock.

The gorgeous Floribunda Rose die set was used to create one open rose, one partially open rose and a small rose bud.  The petals were die cut using Susan's Specialty Cardstock.  Susan's Flower Tool Kit was used to shape the flowers and leaves.  Bearly Art Glue was used to assemble the flowers.

Susan's Spirea die set, from an earlier release, was used to create one branch of Spirea.    The flowers were attached to both the front and back of the die cut spirea base.  The Spirea is such a pretty filler to go with many different floral arrangements.

The Ferns & Ivy die set was used for the leafy foilage behind the arrangement.

One of the stamps in Susan's Garden Gate Sentiment Stamp Set was used for the sentiment.  The sentiment was die cut using one of the Spellbinders Precisioin Layering A2A dies.  The next larger die in this set was used for an extra frame under the sentiment.  The two layers were attached using Foam dots.  

Right now Susan's Through The Garden Gate Release is available from Scrapbook.com and you can be notified from Spellbinders if you prefer to order from them.   The links for both options are shown below.


Saturday, March 19, 2022

Trillium


Good Morning Paper Crafters.  Today I have a card designed using Susan's Trillium die set and frames created using Spellbinders Glimmer Foil Plates.

First I have an announcement.  I want to let you know you can now be notified from Spellbinders when Susan's new Through The Garden Gate release will be available.  These die sets are now shown on the Spellbinders site.   This release includes five new flower die sets which include Beeblossom, Floribunda Rose, Hollybock, Forget-Me-Not, Gardenia  and the Through The Garden Gate Sentiments Stamp Set.  You can click on the links below to be notified as soon as they are available.  I do receive a small commission if you purchase by clicking on the links below.  There is no additional cost to you.  

The card above is a 5x7 inch card.  For the background, I used the Spellbinders Glimmer System to create the Scalloped Rectangles.  The name of the Glimmer Hot Foil Plate is Scalloped Rectangles Glimmer Essentials with Sentiments.  I foiled two of the scalloped frames using gold foil for the larger frames. It was attached with dimensional foam squares.   Then I gold foiled one of the smaller frames and cut it out and framed with a piece of black card stock.  It was attached with dimensional foam squares.

Using Susan's Trillium die set, five flowers were created.  They were die cut using Susan's White Specialty Cardstock.  The base of the flower petals were colored using yellow PanPastel.  The flowers were shaped using the tools in Susan's Flower Tool Kit and assembled using Bearly Art Glue.  Yellow Pollen was added to the stamens.

Susan's Ferns & Ivy die set was used to die cut the ferns.  They were die cut using Susan's Specialty Cardstock and brushed using one of the Picket Fence Brushes, with green ink, on the Waffle Flower Media Mat.  They were shaped by using the tweezers in the Flower Tool Kit.

One of the stamps in Susan's Garden Favorites Sentiments Stamp Set was used for the sentiment at the bottom of the card.  It was stamped using Black VersaFine Ink.  I used the Spellbinders Quick Trimmer to cut out the sentiment.  I love this tool for being able to cut very even strips for both sentiments and for cutting foil. This trimmer includes two cutting blades, one for cardstock and one for foil, plus a cutting mat.   I used scissors to cut the banner tabs on each end of this strip.   A gold marker was used to outline the sentiment strip. 


Tuesday, March 15, 2022

Bearded Iris


Good Morning.  Today I have a card designed using Susan's Bearded Iris die set.  

The background was created with an embossing folder from my stash and fluted rectangle dies, for the blue frames.  The center rectangles were attached using dimensional foam tape.  

The three irises were die cut using the Bearded Iris die set and Susan's Specialty Cardstock.  The bottom petals were brushed with orange ink and only the base of the cupped petals sponged with orange ink.  They were shaped using Susan's Flower Tool Kit. 
I have some orange Flower Soft in my stash I used for the stamens. 

The sentiment is a stamp from Susan's Garden Favorite Stamp Set.

Gold embellishments from Spellbinders was added for a final touch.


Monday, March 14, 2022

Peach Blossoms


Good Morning.   Today I have a card I created with Susan's Peach Blossom die set set and a 3D embossing folder.  

This is a 6x6 inch card.  The blue background is a piece of textured cardstock from Tonic that I have had in my stash for a while. I always like to place the background cardstock on a Score Board and score 1/8 inch around the edges for a finished appearance.   I used one of the Spellbinders Candlewick Oval dies to die cut the oval.  For the design under this die cut oval, I used the Altenew Blossoming Branches 3D embossing folder.  I die cut the blue piece so that the bird would show.  To color the embossed design, I used Susan's PanPastels to give just a hint of color to the design.  The embossing folder works so well with Susan's Peach Blossom die set.  The blue card stock was attach using dimensional foam squares so it would be slightly raised above the embossed design.

I love using Susan's Winter Bough from her Winter Bough & Evergreen Shrubs die set.  I use it for so many of her flowers.  I die cut this branch using brown card stock and lightly brushed green in over it.  It was attached using Bearly Art Glue.


Susan's Peach Blossom die set was used to die cut the blossoms.  Light pink ink was brushed on the petals that were die cut using Susan's Specialty Cardstock.  Both the front and back were colored.  I like to place the die cut on the Waffle Flower Media Mat and brush on colors using the Picket Fences Blending Brushes.  It is such a quick and easy way to apply color.  For the color at the base of each petal, I used a bright pink Copic marker.  The flowers were shaped using the tools in Susan's Flower Tool Kit.  The die cut stamens were cut down the center, using the scissors in the Tool Kit,  to create long thin stamens. This makes them look more realistic.   They were brushed with bright pink ink and a maroon marker used to color just the tips.  No pollen was used on these stamens.  The flowers were glued to the branch, then the stamens glued in the center.  The leaves were also die cut using Susan's Specialty Cardstock and lightly sponged with green ink, shaped and glued around the blossoms.

One of Susan's Garden Favorite Quotes was stamped on white card stock and die cut using a smaller Candlewick Oval.  It was attached using dimensional foam squares.


Saturday, March 5, 2022

Red and White Trillium


Today I have a card with two varieties of Trillium flowers.

The background was created using the Altenew Garden Harmony 3D embossing folder.  To give it just a little color, light green ink was applied to one side of the embossing folder, prior to running through the die cutting machine to help bring out the design.  

Three red flowers and two white flowers were created using Susan's Trillium die set.   They were die cut using Susan's Specialty Cardstock.  The red ones were placed on the Waffleflower Media Mat and brushed with red ink then the base of the petals sponged with black ink.  A fine line black pen was used to draw lines out from the base of each petal.  The flowers were lightly misted with water and shaped using Susan's Tool Kit.  The red flowers do not have pollen on the stamen.  The white Trillium were die cut using the same white cardstock, and the centers lightly colored using light yellow/green PanPastel.  A tiny bit of yellow Pollen was added to the very tips of the stamens.  The leaves were die cut using watercolor paper, colored and shaped.

The Ivy & Ferns die set was used to die cut the maidenhair fern, which matches the design in the embossed background.

One of the stamps from Susan's Quotes stamp set was used and die cut using an old Spellbinders Labels 20 die.  Green ink was sponged around the edges to help it stand out.

As a final finish, the Foliage & Ladybug die set was used to die cut the Ladybug.  


Friday, March 4, 2022

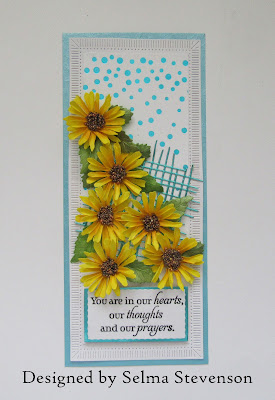
You Are In Our Hearts


Today I have one more card in support for Ukraine.

On Susan's Facebook Live this week, she showed how to create small sunflowers using her Button & Daisy Chrysanthemum die set. She used them to create jewelry but I decided to create them for a slimline card. 

The background was created using the Spellbinders Fluted Classics Slimline die set.  In the center of this die cut I attached another piece of cardstock that was foiled using the Spellbinders Slimline Confetti Background Glimmer Hot Foil Plate.  The Teal Hot Foil was used.  The piece was cut down to fit inside the Fluted die cut.

Next I used the Altenew Burlap Texture die set and die cut it using Teal Mirror Cardstock.   It was glued in the middle of the card.

Six small sunflowers were created using the Button & Daisy Chrysanthemum die set. They were die cut using Susan's Specialty Cardstock and shaped using her Flower Tool Kit.   Taken For Granite Prills were added to the center of each flower.

The sentiment is from a Our Daily Bread - With Heartfelt Sympathy stamp set I have had for a long time.  It was stamped, die cut and mounted on a piece of Teal Mirror Cardstock and attach with dimensionals.  


Monday, February 28, 2022

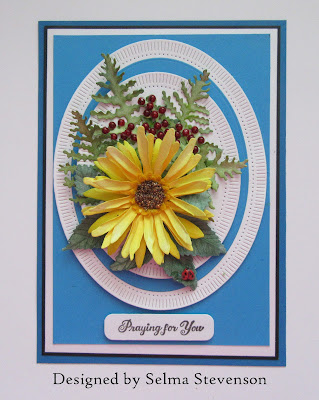
Praying for You


Today I have another Sunflower card in support for Ukraine.

The dies used for the background are the Spellbinders Fluted Classics Ovals.  Each layer was attached with dimensional tape.

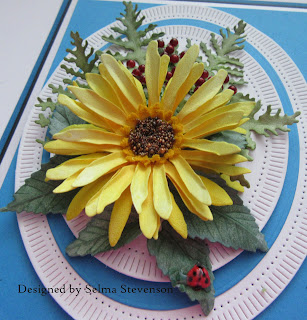
A Sunflower was created using Susan's new Sunflower die set from Spellbinders.  I used Susan's Specialty cardstock.  The petals were brushed with two shades of yellow inks.  For the centers, Yellow Pollen and Taken For Granite Prills were used.

The Ivy & Ferns die set was used to die cut four ferns.  The Winterberry & Mistletoe die set was used to die cut the berry branch and red berries added.  I used white pearls that were colored with a dark red Copic marker.

The Foliage & Ladybug die set was used to die cut the ladybug.  She was colored then Clear Crystal Glaze was added to her.

The sentiment at the bottom of the card is from the Spellbinders All Occasions Stamp Set.  It was attached with dimensional tape.


Sunday, February 27, 2022

Pray for Ukraine


Today I am posting a card in support for Ukraine.  Their national flower is the Sunflower.

Normally I create sunflowers with a dark brown center, but have seen several pictures of sunflowers with a light green/yellow center, so decided to try and duplicate that.  However, after taking a photo, I decided to cover the green/yellow center and pour on the dark Prills.
I like the sunflowers with the dark center better.  Which ones do you like best?

For the background, I used a piece of blue cardstock and used the Spellbinders Christmas Foliage Strip & Borders die set to die cut the design at the bottom of the card.

Using Susan's Garden Favorites Sunflower die set from Spellbinders, I created three Sunflowers.  The petals were die cut using Susan's Specialty Cardstock.  Using the Waffleflower Media Mat, a bright yellow ink was brushed onto the petals, front and back.  A darker golden yellow ink was brushed on at the base of the petals.  They were shaped using Susan's Flower Tool Kit.  For the stamen, Yellow Pollen was used for the outer stamen die cut circle.  For the very center, I first glued in green Prills and let them dry, then added glue around the green Prills and poured on yellow Prills.  Like I said above, I decided I wanted the sunflowers to have the dark center, so I added glue on top the existing Prills and pour on the Taken For Granite Prills.  The leaves were die cut using watercolor paper, veins drawn on and brushed with dark green ink.  Around the edges, I sponged on white PanPastel.  

The sentiment is from the Altenew Sentiment Strips stamp set.  It was stamped with black VersaFine Ink and die cut using the dies from that set.

Pearls and rhinestone were added to complete the card.


Saturday, February 26, 2022

French Lilacs


I always love when the lilacs start blooming in my yard.  The dark purple French Lilac is very fragrant and is so beautiful in bouquets.

This is a slimline card.  I used the Spellbinders Christmas Foliage Strip & Borders (Die of the Month Nov '21) die set to create the bottom border.  It was die cut twice and a small piece of the second die cut border was cut to fit behind the middle of the border along the bottom edge of the card.  A piece of purple cardstock was glued to the inside of the white card.

For the long branch for this lilac, I used Susan's Winter Bough & Evergreen Shrubs die set.  The branch was die cut 4 times using watercolor paper.  Two branches were glued together for thickness.  They were brushed first with green ink then a second time with brown ink.  The two branches were glued down across the top of the card.

Susan's Garden Favorites Lilac die set from  Spellbinders was used to create the lilacs.  I used Susan's Specialty Cardstock.  Before die cutting, I placed the cardstock on the Waffleflower Media Mat and brushed on different shades of purple inks, on both the front and back before die cutting the florets.  This gives a lot of shading on each lilac.  Some of the darker purple florets were shaped so they looked as if they are just opening up.  After shaping the petals on the molding mat using the tools in the Flower Tool Kit, they were glued to the lilac base.  A Prill was added to the center of each floret.  The glue used is Bearly Art Glue.  The leaves were die cut using watercolor paper, colored with two shades of green ink, spritzed with water and shaped using the tools in the Flower Tool Kit.  

To finish the card, the Foliage & Ladybug die set was used to die cut two ladybugs.  They were colored, glued on the leaves, then clear glaze added.

The sentiment is from  Susan's Garden Favorites Quotes Stamp Set.  It was stamped with black VersaFine Ink.  I used a very old Spellbinders Scallop Oval die set to die cut the oval for the sentiment.  It did not have the punched holes in each scallop, so I used a piercer, laid the die cut on the molding mat, and punched holes in each scallop.  It was attached using dimensional tape.


Thursday, February 24, 2022

Clematis


Good Morning.  Today I created another card using Susan's new Garden Favorites Clematis die set from Spellbinders.  

For the background, I used the Penny Black Hello Winter Collection Window Die and an older Spellbinders Candlewick Lace Card Front (S5-402) die for the lacy design behind the window openings.  A piece of light pink card stock was used for the backing.  

Susan's Heirloom Daffodil/Vase die set was used to die cut the vase.  I used a dark maroon pearl cardstock to match the maroon on the Clematis stamens.  I know the vase looks black in the photo, but is very pretty maroon.  It was attached to the lower left of the window.

The Clematis die set was used to die cut three flowers.   They were die cut using Susan's Specialty card stock.  Light pink ink was sponged at the base and up the middle of each petal.  A bright pink colored pencil was used to draw lines up from the base of each petal, to create dimension.  The stamens were die cut and each spoke was cut in half.  They were colored light yellow and a maroon marker was used to color just the tips.  On the center die cut stamen, red pollen was added.  The flowers were shaped using Susan's Flower Tool Kit.  The leaves were die cut using watercolor paper, colored and shaped.  

In the lower right corner, one of the stamps from Susan's Quotes stamp set was stamped using VersaFine black ink.


Friday, February 18, 2022

Peach Blossoms


I am looking forward to the first signs of Spring.  That usually means seeing a lot of flowering trees.  For my card today, I used Susan's Garden Favorites Peach Blossom die set from Spellbinders.  

For the background design, I used one of the dies in the Spellbinders Amazing Paper Grace February Die of the Month.   The long narrow die was die cut three times across the front of a piece of 5 1/2 inch white card stock.  I used a T-Ruler to tape the die down so they would be straight.  A piece of light green cardstock was glued to the front of a 6-inch card front.  Dimensional tape was added to the back of the die cut design and centered on the front of the card.  

Susan's Peach Blossom die set was used to die cut seven blossoms, plus two extra three petal pieces to create the buds.  I used Susan's Specialty Cardstock from  Spellbinders to die cut the blossoms.  Light pink ink was brushed on the petals, trying to leave the very ends white.  At the base of each petal, a bright pink ink was sponged on then a bright pink marker used to create small lines coming up from the base of each petal.  The stamens were die cut using pink card stock, the bottom portion colored with a brighter pink ink, and the very tips of the stamen were colored using a maroon marker.  The flowers were shaped using tools from the Flower Tool Kit and assembled using Bearly Art Glue.  The three petal blossom pieces were colored, shaped and rolled into buds.   The leaves were die cut and sponged using light green ink then a darker green ink sponged along the center and around edges.  

The Winter Bough & Evergreen Shrubs die set was used for the long tree branch for the Peach Blossoms.  There is a shorter branch in the Peach Blossoms die set.  

At the bottom of the card, I stamped one of the quotes from Susan's Garden Favorites Stamp Set using VersaFine Ink, then cut it apart and glued it to the card.  

To finish the card, Spellbinders pearl embellishments were added to the die cut design.


LinkWithin

Related Posts with Thumbnails