Thursday, October 5, 2023

Tutorial for Creating Berries


Hello Paper Crafters,

There have been a lot of questions on how to create berries for our floral arrangements created with Susan's Garden die sets.  Below I have prepared a tutorial for you so you can add these realistic berries to your creations.


The berries are made with small Styrofoam balls.  Above is a picture of the package of balls that Susan and I both use.  These can be purchased from Michael's Craft Store and are $2.99 a package. Michaels has a coupon for 20% off.  All the balls in this package are of uniform size and perfect for creating berries.  There are many other packages of Styrofoam balls from different craft stores and Amazon, however they seldom are a uniform size.


To color the balls, place them in a medium size zip lock bag.  Use any alcohol ink to color them.  Squirt in some ink, close bag and roll the balls around in the ink until they are all colored.  If you want them darker, open the bag and add more ink and roll them around again.  Sometimes to get the color you want, you might need to mix colors of ink.  When you roll them around inside the bag, be sure to try and get all the 'puddles' of ink that might be stuck to the inside of the bag rolled onto the balls.  You don't want to waste any ink coloring the bag.  The inside of the bag will be colored - just don't leave any puddles of ink on the bag.  The alcohol inks I have on hand are Copic Refills and Ranger Alcohol inks.


Once the balls are all covered in ink, scrape them out onto a coated paper plate.  Try to spread them out so they can dry.  If some stick together, they will come apart when dry.


To store your berries, you can put them in small zip lock bags, or in small plastic jars.  You can get cheap jars and bags from the Dollar Store.  


Use one of the Berry Branches from Susan's Foliage die sets to glue the berries on.  I like to add a drop of glue on the branch and place the ball into the glue.  You can also hold the ball with tweezers and dip the bottom in glue then place on the branch.  If you want a cluster of berries, let the bottom row dry then dip a ball in glue and place on top of the dry berries to create a cluster.  I use a black, gray or brown fine tip pen to press down on the end of the berries, once they are all dry.    I die cut the branch out of watercolor paper and color them either green or brown, depending on the arrangement it will be added to.


For my card above, I used Susan's new Birds & Bees Autumn Foliage Die set.  All the leaves were die cut using water color paper and colored using a variety of  inks to color.  They were shaped using her Flower Tool Kit.  The design on the background is the Spellbinders Diamonetta Background Glimmer Plate.  I used red foil.  The sentiment is one of the Spellbinders BetterPress Sentiments.  


Wednesday, October 4, 2023

Birds & Bees Garden Release


Good Morning,

Today I have a card designed using dies from Susan's new Birds & Bees Garden release from Spellbinders.  This collection includes flower die sets for Asters, Pom Pom Dahlias, Black-Eyed Susans, and Autumn Foliage.  It also includes a die for a Parasol and a Basket of Sunflowers 3-D embossing folder.  These dies will soon be available and I have them linked below.

For the background on this 5x7 inch card, I used a Spellbinders 'Knock On Wood' 3-D embossing folder.  

For the basket, I used Susan's older Cactus Dahlia & Ornamental Garden Pottery die set.  After it was die cut, I used an older basket weave 3-D embossing folder to add the weave on the basket.  I then die cut the basket a second time using gold metallic cardstock and fussy cut the band that goes around the base of the basket.  It was attached to the card with a piece of dimensional tape placed in the center of basket and glue around the outside edges.

Using the new Autumn Foliage die set, ten branches were die cut, colored, shaped with Susan's Flower Tool Kit and attached using Bearly Art Glue.

The five asters were created by using the new Aster die set and die cutting them using Susan's Specialty Cardstock.  They were colored using OLO markers.  In the center, pollen was added to the larger piece, the small yellow pieces glued in then, yellow Prills added to make them look realistic.

The Pom Pom Dahlia die set was used to create the two dahlias.  You can watch Susan's YouTube video for instructions on how to roll the petals and assemble.  These are one of my favorite flowers to create.

For the final touch, purple styrofoam ball were colored with alcohol ink and added for the berries.

Be sure to check out the bundle price for this beautiful Birds & Bees Garden release.

Thank you for stopping by today.  Have fun creating your autumn arrangements.


Monday, October 2, 2023

Winter Bough Foiling


Good Morning,

Today I have created a beautiful card using Susan's Snow Garden Winter Bough Hot Foil Plate and her new Hot Foil Sentiments.  Creating masculine cards is sometimes hard to come up with, but I think this would be perfect for that.  

This is a 6x6 inch card.  I used a piece of Tim Holtz Bronze Metallic Cardstock and used Gold Foil in the Spellbinders Glimmer Machine.  In real life, the gold foiling shows up better than in this photo.  I trimmed the metallic cardstock down from 6 to 5 3/4 inches, and used the cut off strips to decorate the corners.  Gold embellishments were glued on the strips.

One of Susan's Winter Garden Hot Foil Sentiments was gold foiled onto black card stock, die cut with the matching die and attached with dimensional tape.

This was a quick and easy card and would look in beautiful using a variety of colors of metallic cardstock and colors of foil.  

Thank you for visiting my blog.  

Tuesday, September 19, 2023

Winter Bough Glimmer Plate


Good Morning,

Today I have another card designed using Susan's Snow Garden Winter Bough Glimmer Plate.  The design was gold foiled onto green mirror card stock.  It was die cut and attached to a 3D Brick embossed gold metallic background.

The Snow Garden, Hemlock, Cone & Chickadee die set was used to die cut the Hemlock, Cones and Chickadee. I used Susan's Specialty Cardstock and Flower Tool Kit.  OLO markers were used to color all the die cuts.  The American Holly die set was used to die cut the Holly.  The Holly was die cut colored and clear crystal glaze brushed on.  Red styrofoam  berries were added.

Susan's Snow Garden Sentiments Hot Foil Plate and die set was used for the sentiment.  It was gold foiled onto black cardstock, die cut and attached with dimensional tape.


Monday, September 11, 2023

Hemlock, Pinecones, and Chickadee


Good Morning,

Today I have a slimline card using Susan's Snow Garden Release. 

For the background, I used Spellbinders Holiday Floral  Swag 3-D embossing folder.  The folder is actually suppose to be turned the other way, but I wanted the ribbon at the top.  It was embossed on a piece of light green glitter cardstock.

The Hemlock, Cones, & Chickadee die set was used to die cut the Hemlock branches.  Each point was split in half using the scissors in Susan's Flower Tool Kit.  The little pinecones were also die cut from this die set.  Susan has a YouTube Video showing how to create these cute little pine cones.  The other die in this set is the Chickadee.  It was die cut, colored and attached with dimensional tape.

Using Susan's Poinsettia die set, one red poinsettia was created. I used Susan's Specialty Cardstock and OLO markers to color it.   For additional greenery, Susan's new American Holly die set was used for the Holly Leaves.  After they were die cut using watercolor paper, they were colored, shaped and crystal clear glaze added for the shine.

To complete the arrangement, Susan's Berry Branch was die cut and red Styrofoam balls added for the berries.  The balls were colored using Copic reinkers.  

Susan's new Snow Garden Sentiments Hot Foil plate set was used for the greeting.  It was gold foiled onto black cardstock and die cut using the matching die.  The Spellbinders Glimmer Hot Foil System was used for the foiling.

Saturday, August 26, 2023

Glory of Snow and Hemlock


Good Morning,

Today I have a card I created using the quilted background technique showed us how to do on her FaceBook Susan's Garden Club 2 Video.  I followed her instructions except I used a light grey PanPastel to color the shadows along the sides of the quilting.

For the background for the arrangement, I used the Spellbinders Elegant Twist Oval die set.  It was attached with dimensional tape.

First of all I want to say that this card is much prettier in real life.  It looks dark in the photo.  
For the background foliage, I used Susan's new Hemlock die set.  Six branches were die cut using Susan's Specialty Cardstock.  Each needle on the branch was cut in half using the small scissors that are in her Flower Tool Kit.  
 
Using the same die set, the little pine cones were created and the little chickadee die cut, colored and attached with dimensional tape.

Five flowers were die cut using the new Glory Of Snow die set.  They were colored using OLO markers, shaped and placed in Susan's Molding Tray to dry.  The stamen was rolled, glued and Yellow Pollen added to the tips.    Dark Purple berries were added to the arrangement.

Susan's new Snow Garden Sentiments Hot Foil Plate was used for the gold foiled sentiment.  It was attached with dimensional tape.

It was fun to create this quilted background following Susan's instructions.  I hope you give it a try!
For the snowy effect, I used Tonic's Snow Glitter.   


Monday, August 21, 2023

Snow Garden Winter Bough Glimmer Plate and Chickadee


Good Morning,

Things have been scary for us with all the fires currently burning around Spokane.  One of the three big fires is very close to us.  It is devastating to see all the homes that have been burned to the ground.  We are expecting a little rain today, so hope it helps put the fires out and clears the hazardous pollution.  

Today I have another card I designed using products in Susan's Snow Garden Release.

This is a 6x6 inch card.  I used a piece of embossed cardstock from my stash for the background. 
 
Using Susan's Winter Bough Hot Foil Plate from the Snow Garden Release was used for the gold foiled design on the green metallic card stock.  It was die cut using Spellbinders Essential Arches Etched Die set.  

The little Chickadee is one of the dies in the Hemlock, Cones & Chickadee die set.  It was colored and attached with dimensional tape.

The Snow Garden Sentiments Hot Foil Plate set was used for the sentiment.  It was foiled using red foil and die cut using the matching die.

To complete the card, Spellbinders Gold Embellishments were added around the arch. 


Tuesday, August 15, 2023

Glory Of Snow, Poinsettia, Hemlock, Cones & Chickadee


Good Morning.  Today I have a 6x6 inch card.  The background is a piece of silver metallic cardstock that was embossed using the Lisa Horton Padded Quilted 3-D embossing Folder.

For the container for this arrangement I used Susan's Geranium and Antique Wooden Bucket die set.  The bucket was die cut from watercolor paper, colored then attached with a large dimensional dot in the center, on the back, and glued around the edges.  The dimensional dot gives the bucket a rounded shape.

Susan's Poinsettia die set was used for the white Poinsettia  It was die cut using Susan's Specialty Cardstock and shaped using tools in her Flower Tool Kit.  

The Glory Of Snow die set was used for the three blue flowers.  They were die cut using Susan's Specialty  Cardstock, colored with OLO markers and Yellow Pollen added to the stamen.  Susan's YouTube Video has complete instructions on how to create these pretty little flowers.  

The American Holly die set was used to die cut the holly.  After coloring and shaping, Clear Crystal Glaze was brushed on the leaves.

The Helmlock, Cones, & Chickadee die set was used to die cut all the pieces in this set.  The Helmlock was added behind the arrangement. A few Pinecones were added.   Bright red berries were added.  Two little Chickadees were added.

Susan's Snow Garden Sentiment set was used to gold foil the sentiment and it was die  cut using the matching outline die.


Saturday, August 12, 2023

Snow Garden Crocus


Good Morning.  Today I have a card designed using Susan's new Crocus die set from the Snow Garden Release.  

For the background, I embossed a piece of white cardstock with the Spellbinders Beautiful Butters 3-D embossing folder.  It was cut down to fit a 5x7 inch card.

For the container, I used Susan's Daffodil/Narcissus & Antique Vase die set.  It was die cut using a piece of embossed design paper from my stash.  A piece of dimensional tape was added to the back of the vase and glue around the edges and attached to the bottom of the card.  

Using the Crocus & Ladybug die set, five yellow crocus were created.  I followed Susan's instructions on her Crocus YouTube Video to get the perfect coloring and shaping.  They were die cut using Susan's Specialty Cardstock, colored with OLO Markers and shaped with her Flower ToolsOrange Pollen was added to the stamens.  They were placed in Susan's Molding Tray to hold the cupped shape.  

The Mason Jar & Lavender die set was used to create the Lavender.  Two of the branches with lots of little flowers and four of the leafy branch were die cut.  Purple and hot pink inks were brushed on a piece of Susan's Specialty Cardstock before die cutting the flowers.  

Oops -- I forgot to add the cute little lady bug before taking the photo!

I know you are going to love working with this new Snow Garden Release.  I have added links for all the products below.   Thank you for visiting my blog.  


Friday, August 11, 2023

Ornamental Kale, Pansies, Ivy ,and Chickadee


Good Morning,

Susan's new Snow Garden release is now available.  This is a great addition for Winter/Christmas cards.  

The new Ornamental Cabbage & Kale die set is so fun to work with.  This set comes with stamps.  There are a lot of varieties of Ornamental Cabbage and Kale.  For instructions on how to create this, you can click and this LINK and watch Susan's instructions on YouTube.

I used Susan's Pansy die set to create the Pansies.  They were die cut using Susan's Specialty Cardstock, shaped using her Flower Tool Kit and assembled using Beacon Kids Choice Glue.  They were placed in Susan's new Garden Flower Mold.  

Susan's Foliage die set was used to die cut the Ivy.  The bucket was die cut and brown inks sponged on it.  

The Hemlock, Cones & Chickadee die set was used to die cut the bird. It was die cut, colored using OLO Markers and attached using dimensional tape. 

As an added embellishment, green berries were added to the berry branch that comes in the American Holly die set.  The berries were created using small styrofoam balls that were colored using alcohol ink from Copic Ink refills.  

Below are links to the Snow Garden Bundle and individual die sets and Glimmer Plates in this new release.


Thursday, August 10, 2023

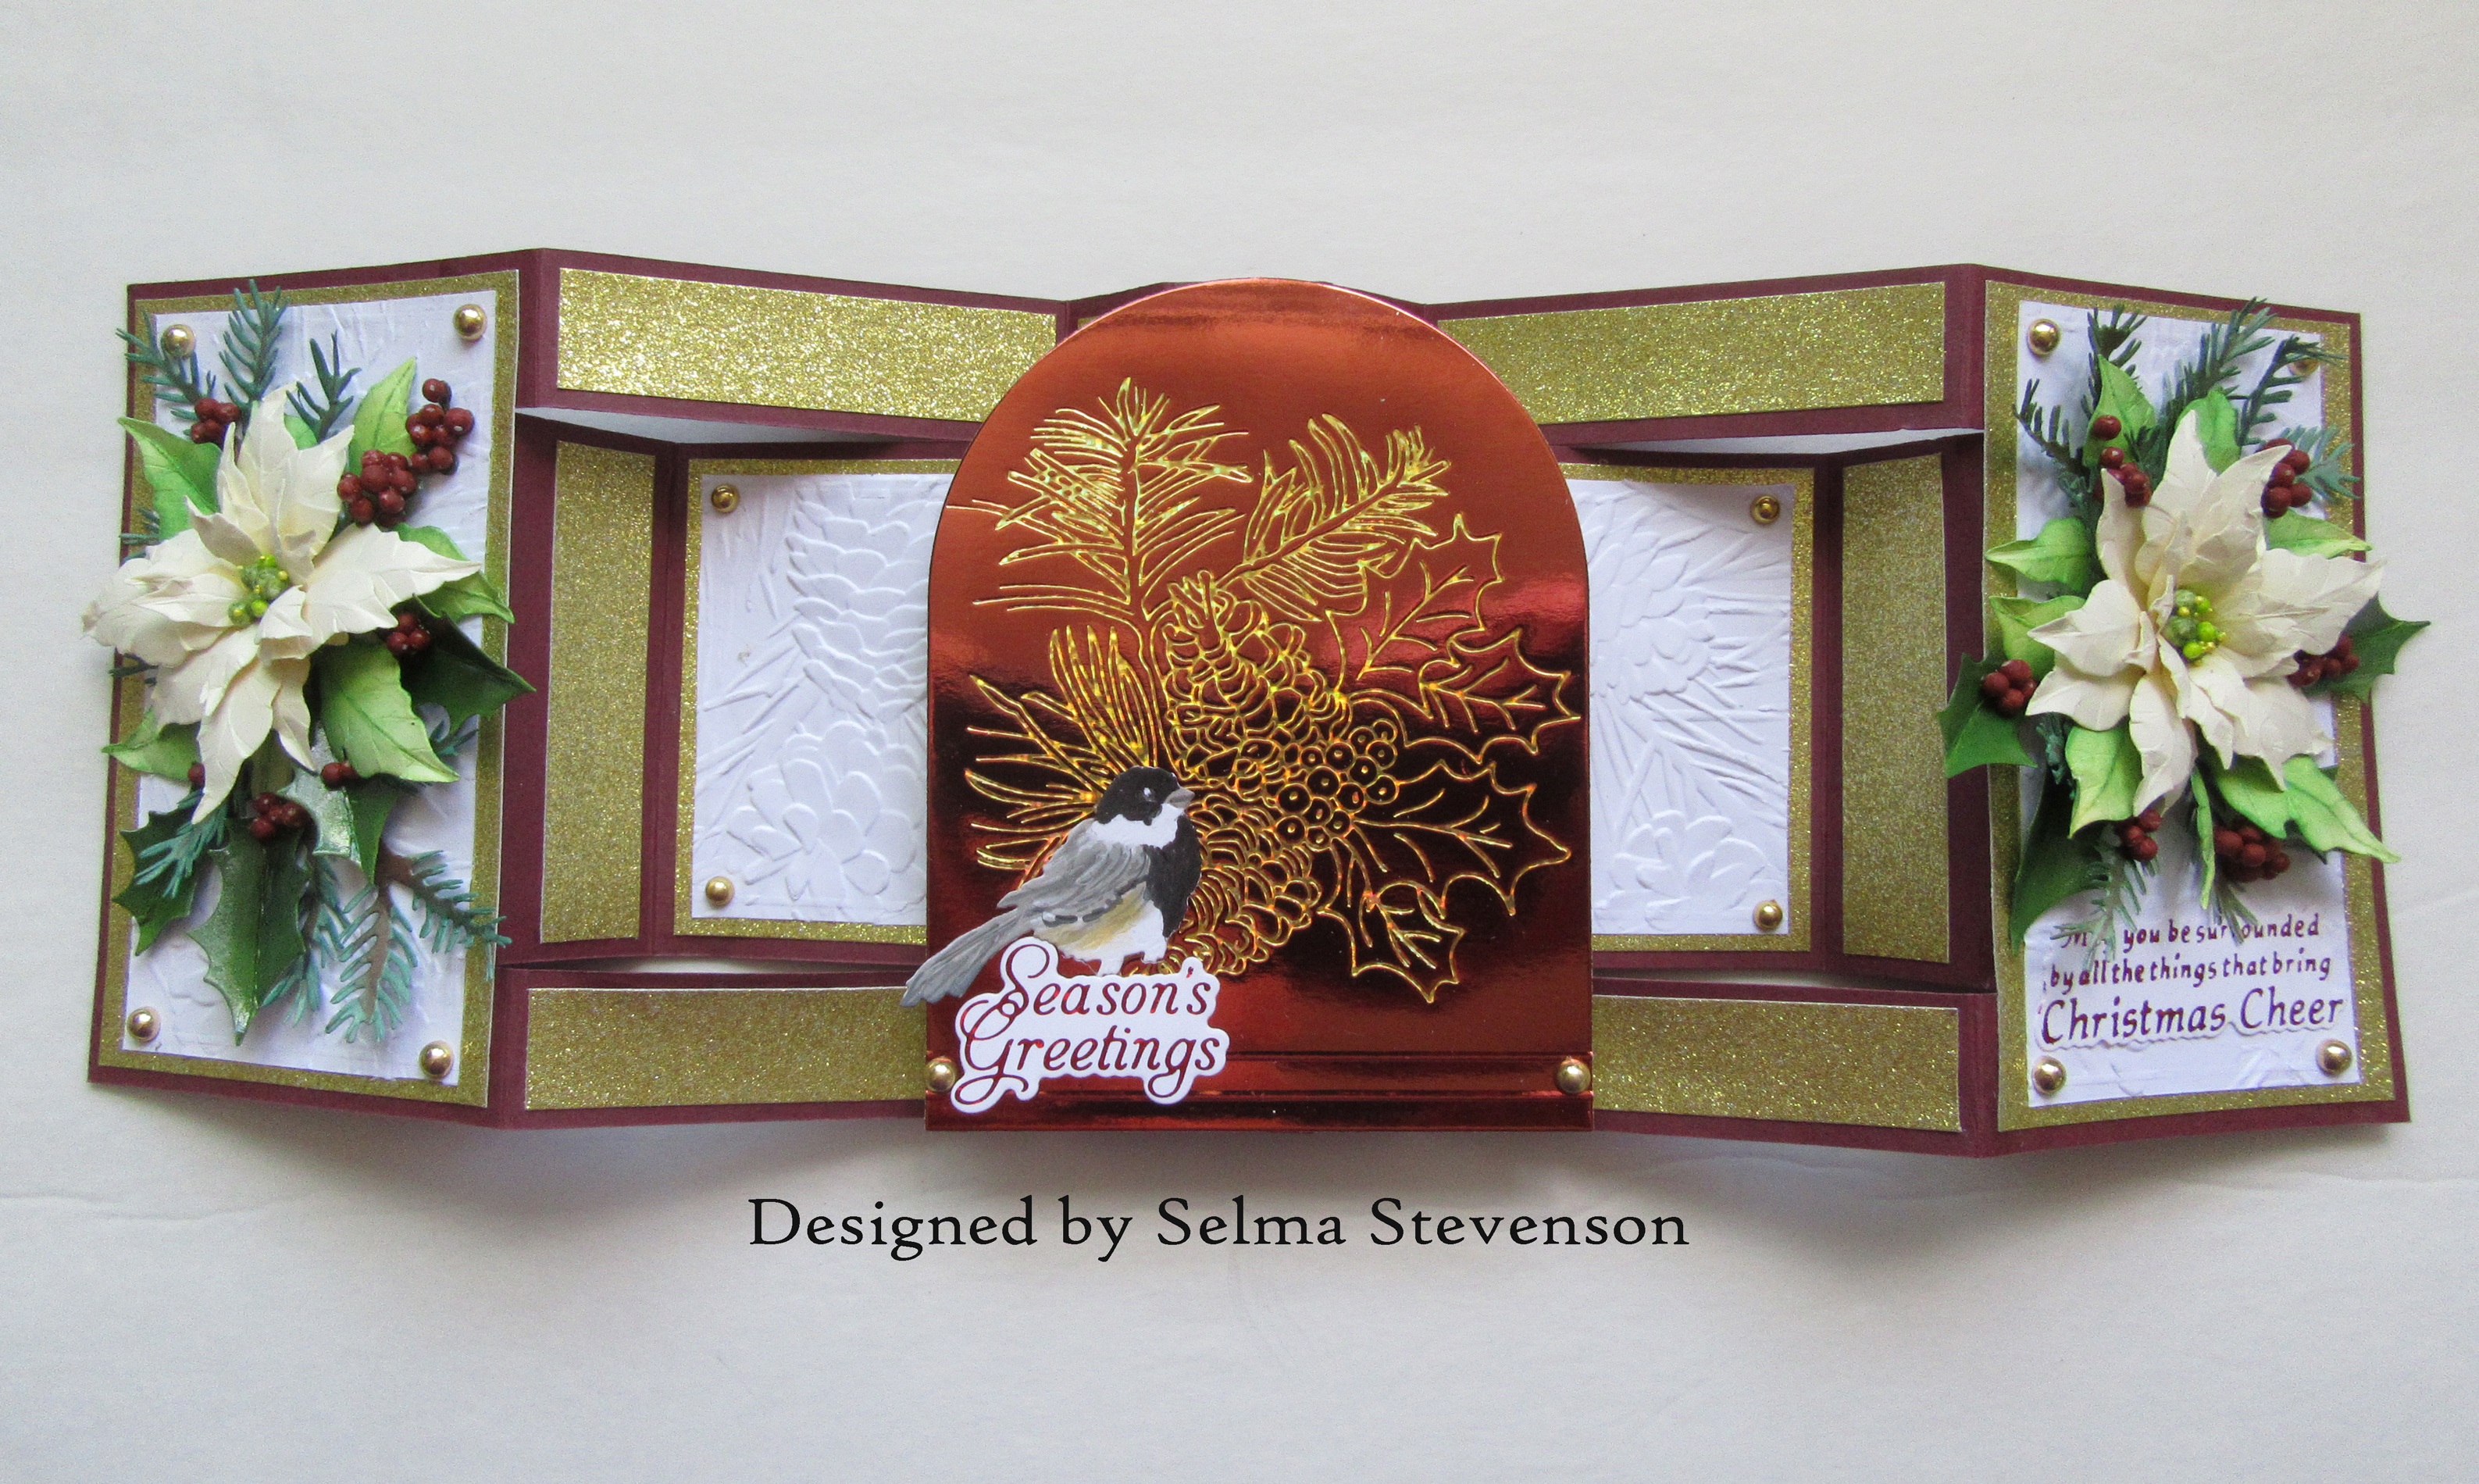
Inside-Out Stepper Card


Good Morning.  It is time for a new release from Susan's Garden.  This release, Snow Garden, is now available from Spellbinders, Scrapbook.com and ScrapbookPal. ( I have links below for this new release.)  Spellbinders has a bundle price for the dies in this release which is a savings for you.  

In this release she included a beautiful glimmer plate (Winter Bough)  and glimmer Snow Garden Sentiments.  
In one of Susan's Facebook Live, she created an Inside-Out  StepperCard.  I used her instructions for creating this card. Susan added a floral arrangement on the center panel.   I wanted to used her new Winter Bough Glimmer Plate in the center of this card so added the floral arrangements to the end panels.

I love to add a foiled design to metallic/mirror card stock.  To foil the Winter Bough,  I used gold foil on bronze mirror cardstock.  I used Spellbinders Glimmer machine and gold foil.  The design was die cut using Spellbinders Essential Arches Etched die set.  On the white embossed panels, I used the Altenew Slimline Classic Pinecone 3-D embossing folder.

I was so happy Susan added a Chickadee die in the Snow Garden collection  It was die cut and colored using OLO markers.  It is sitting on one of the sentiments from Susan's new Glimmer Snow Garden Sentiment  set.  The Sentiment was foiled using red foil and die cut using the matching outline die.  Both the Chickadee and sentiment were attached using dimensional tape.


On the side panels, I used Susan's Poinsettia die set to create the white poinsettias.  They were die cut using Susan's Specialty Cardstock, shaped using her Flower Tool Kit and assembled using Beacon Kids Choice Glue.  For the center I used small Styrofoam balls that were colored with Copic refill ink, for the berries.  I have a link below for Copic inks that are great for coloring berries.  A Yellow Prill was added to the top of a few of the Styrofoam balls.

The pine branches were die cut using the new Hemlock, Cones and Chickadee die set.  

The American Holly die set, from the Snow Garden Release, was used to die cut the holly. The berries were added to the berry branch and glued around the arrangement.  

The Snow Garden Sentiment Hot Foil Plate set was used for the sentiment on the far left panel. I used red foil for this sentiment.  

To finish the card, Spellbinders Gold embellishments were added to the side panels.


Wednesday, August 9, 2023

Winter Bough Glimmer


Good Morning,

I want to let you know that Susan's new Snow Garden Release will be available tomorrow at Spellbinders.  I have links below for this release and other products I use.  I will receive a small commission if you use the links below.  I want to thank you in advance for your support.  

This morning, Susan created a snow globe shaker card on her Susan's Garden Live Video.  I used that idea for this card.  To be truthful, I actually created a snow globe just like her instructions and was not happy with it so started over and created a snow globe that is not a shaker card.

Using her new Winter Bough Glimmer plate, I sliver foiled it on a light green mirror cardstock.  A piece of silver mirror card stock was used to die cut the circle to go around the outside of the foiled design.  These pieces were glued to a piece of Anna Griffin design paper.  A base was created out of gold mirror cardstock following Susan's instructions.  (I can't figure out why that base doesn't look straight in the picture.  It is straight on the real card.)

Susan's American Holly die set was used to create the holly leaves.  They were colored green, shaped and then glazed for the shiny appearance that holly leaves have.  This holly looks so realistic.

The Hemlock, Cones, and Chickadee die set was used to die cut the hemlock.  To make it realistic, each needle was cut in half.  The same die set was used to create the cute little pine cones.  If you need help in creating these, you can watch Susan's Spellbinders, YouTube video.  The little Chickadee was die cut, colored and added with dimensional tape.  

Susan's Poinsettia die set, from her Holiday Flora release last year, was used to create a red poinsettia.  It was die cut using Susan's Specialty Cardstock, shaped using her Flower Tool Kit and assembled using Beacon Kids Choice Glue.  Styrofoam balls were colored using Copic Refill Ink and added to the center of the poinsettia.  

For some reason I could not download the link for her video today, but you can go to Face book and search for Susan's Garden Club 2.   

Thank you for visiting my blog.  

Saturday, August 5, 2023

Decorative Kale, Hemlock, Holly and Chickadee


It is time for a new release from Susan's Garden.  This release is called 'Snow Garden'.  

For my first card, I have used the Decorative Kale die set for the main attraction in this bouquet.  

For the background, I used  Susan's 3-D Bamboo Trellis embossing folder.  It was embossed on glossy black card stock then gold metallic rub was used over the embossed design.

Susan has posted videos on YouTube on how to create all the flowers in her new release.  You can also watch her weekly videos on Susan's  Garden Club Budding Paper Garden FaceBook page.  

If you Google Decorative Kale, you will find a great variety of colors of kale.  Following Susan's instructions, I have completed a green/pink variety.  Susan has included a stamp set to go with the Kale dies so we can get that raised design that all kale has on the leaves.  The leaves were die cut using Susan's Specialty Cardstock.  I found that you can use either white or clear embossing powder - the white does show up a little more.  The leaves were shaped using Susan's Flower Tool Kit and assembled using Beacon Kids Choice Glue.  

Susan's Pansy die set was used to create the two pansies.  I chose a variety that coordinates with the kale.  

Susan's Chrysanthemum die set was used to create three purple flowers.  

Susan's new Hemlock die was used to fill in around the arrangement.  It is important to snip each of the needles on the branch to help make it fuller looking.  I didn't add the little pine cones that come with the Hemlock die set.  

Susan's new Holly die set was used to create the Holly.  They were colored using OLO markers then a clear glaze added to give them the shine that the holly leaves have.  

At my request, Susan added a little Chickadee bird to the collection.  It is in the Hemlock and Pine cone die set.   I added one to the top of this arrangement.

To make the arrangement a little more festive, I added purple berry clusters.

Susan has added a sentiment glimmer set to this release.  I gold foiled one of the sentiments on black card stock and added it with dimensional tape to the top of the card.

This arrangement was added to Susan's Berry Basket that is from an earlier release  It was die cut using white card stock and the edges sponged with grey ink. 
 

Tuesday, August 1, 2023

Camellia, Lavender, Pansies


Good Morning.  Today I have a card designed with Susan's Garden Camellia.  

This is a 6x6 inch card.  I used  Lisa Horton Padded Quilt 3-D embossing folder for the background.  

Susan's Camellia die set was used to create the pink flower.  I always use Susan's Specialty Cardstock for die cutting Susan's Flowers.    It was shaped using Susan's Flower Tool Kit and assembled using Beacon Kids Choice Glue.  The assembled flowers are put in Susan's new Flower Molding Tray to help hold the dimensional shape.

The Lavender die set was used to create the lovely lavender stems.  You can watch Susan's YouTube videos for instructions on how to create all her flowers.

The Pansy die set was used to create three pansies.  


Wednesday, June 7, 2023

Concertina Pop Out Card


Hello Paper Crafters,

This morning on Susan's Garden Club Facebook video, she gave instructions on how to create a concertina pop out card.  I loved the card she created and decided to create this style card.  You can get her instructions here.   Lhttps://www.facebook.com/SusansGardenClub/videos/1939242373126662INK.  

To decorate my card, I used the Spellbinders Four Petal Floral 3-D embossing folder for the background on the front of the card.  This is a gorgeous embossing folder.

To try and duplicate the flower in the embossing, I used Susan's Camellia die set.  It was die cut using Susan's Specialty Card stock.  Susan's tool kit was used to shape the flower.  This die set did not come with a stamen so I used one from  her Celmatis die setYellow Pollen was added to the tips of the stamen.  I found a picture on the Internet of a pink camellia that I duplicated.  

Susan's Bee Blossom die set was used to create four stems of flowers.  Behind the Bee Blossom I used Susan's Lemon Verbena die (Victorian Garden Foliage)  to die cut 5 branches.  OLO markers were used to color them.


On the inside, I used a piece of design paper I found in my stash.  The pieces were cut as per Susan's instruction and glued onto the card.  A Spellbinders sentiment was used.  It was die cut using gold metallic card stock and backed with black cardstock.


LinkWithin

Related Posts with Thumbnails