Saturday, August 14, 2010

Heartfelt Creations Diecut

I want to thank all of you who left such nice comments about the card I posted yesterday.  This card was also posted in my SCS gallery.   This morning I woke up to a lot of questions about the die cut I used on it.  This die comes in the Heartfelt Creations package with the "Perfect Petals" dies.  Here is the description:

HCD 704 Perfect Petals Diecut is a custom Heartfelt Creations Diecut manufactured by Spellbinders. This set of dies coordinates with our Perfect Petals Collection. There are 7 Diecuts in this set.

 You can purchase this set, and many other Heartfelt Creations sets, from Joan's GardensThere are also a lot of samples of beautiful cards using this die cut on Joan's blog.  Isn't it beautiful.  Joan also has a preview on her blog of some of the new Heartfelt Creations stamps that will be released later this month.

Thanks again for all the nice comments about the card I made using Heartfelt Creations stamps and dies.

Friday, August 13, 2010

Joan's Garden Challenge 10


It's time for a new challenge over at Joan's Gardens.  This week the challenge is to make a purple and green card, using a strip of patterned paper. Some kind of butterfly embellishment is required too.

The card I made above was made using some of my new Heartfelt Creations stamps and dies. All these can be seen on Joan's Blog here.  I decided to try something different this time.  Instead of stamping my flowers on card stock, I stamped them on design paper.  I wanted to see if I could get them to shape a little easier, and they do.  I think I got carried away stamping and cutting out flowers but it is amazing how quick and easy you can do it with these wonderful stamps and dies.  For those of you who tell me you hate to cut out images, these are perfect for you.  Well they are perfect for everyone because literally in seconds you can cut out each flower. You know how I love to make dimensional flowers so cutting out many layers is so quick and easy.   You place the die on top of the stamped flower and place the Spellbinder die over it and run it through your die cutting machine.  On an earlier post I showed you how to make a template to do this.

I cut out two of the lacy background dies from the Heartfelt Creations  "Perfect Petals" die cuts and attached them together (you can see that in the middle on each side).  This die cut makes the most beautiful background for just about anything.  I then cut out an oval Nestability and embossed it and placed over the center so I would have a solid background for the flowers.  I stamped the smallest flower, from the "Daisy Patch Flowers PreCut set", on purple dp and cut them all out with the matching Daisy Patch die cut set.  I have layered them four deep and added a black rhinestone in the center of each flower. The smallest leaf, from the "Elegant Single Leaves PreCut set", was stamped on green card stock and also cut out with matching dies.  These were tucked (and glued) around the flowers.

For the background, a piece of Basic Grey design paper was used on the left side.  A piece of lavender card stock was embossed with a new embossing folder I just received from Joan's Garden's called "Heritage".  This is another set that has four embossing folders in it.  It has an empty oval space in the center where I placed my Heartfelt Creations design.  A Martha Stewart punched border was placed between the design paper and the embossed cs.  To finish off the card a yellow butterfly and bow were added.

This is another very easy challenge so hope you will participate. 

Wednesday, August 11, 2010

Rose Tutorial


I finally got this tutorial completed.  I have had lots of you asking for a tutorial on how I made the roses out of card stock so I have tried to take a lot of pictures to show you how I did it.  First I will give you information about how I made the card above. I used the JustRite stamp set "Baroque Nested Frames" for the greeting.  This stamp set is so beautiful.  I placed both the large and small Baroque Frames in the clear stamp block and white embossed them.  The greeting was stamped separately and cut out then attached with dimensionals.  The beautiful background is from a brand new set of Cuttlebug embossing folders I just received from Joan's Gardens.  It is a set of 4 embossing plates -- two large and two regular size, all different.  It is called "Sentimentals".  The roses I made were placed on the top of the card and a pretty piece of lace on the bottom.


Before I start the tutorial, I want to show you a picture of a card stock rose and a vellum rose.  The card stock rose is a lot more time consuming to make.  My favorite is the vellum rose because it is really quick and easy to make and I personally think much more delicate - like a real rose.

I used three size punched flowers for this rose.  You can use any punches you may have that are varied in size.  The smallest flower really isn't necessary but I have included it in this tutorial in case you have a tiny flower punch and want to use it.

This is the smallest punched flower.  In order to be able to work with the card stock, you must make the paper more pliable so you can shape it.  I used a stylus to "scribble" all over it to weaken the fibers. 

This is the medium size flower.  You have to weaken the fibers again and since this flower does not have separate petals, you need to cut down, between each petal, towards the center to make it easier to shape.

This is the largest flower and the fibers were also weakened on it.

This shows me forming the smallest flower by pressing it all the way down into the soft rubber mat (just like you do the vellum flowers). 

This is shaping the middle size flower.  You notice it doesn't go down into the mat as far but it does form its shape by doing this.  You can use your fingers to help press the petals close to the stylus.

This is the largest flower being shaped.

In this picture I have placed some liquid glue down in the medium size flower and I'm placing the smallest flower into the center.

With each layer you add glue to the flower you are adding and press it down into the foam mat to shape the flower.  You can add two or three flowers from the medium size flower.

Here I am adding several layers of the largest flower.  You add glue to the center of each new flower and place the shaped flower down in it and press it firmly into the soft rubber mat.  After you have added all your layers, you can take you fingers and slightly curl the bottom petals down to resemble a rose. 

Hope this tutorial helps.  If you make the flowers, please link back to my blog so I can see your beautiful flowers. 

I also want to answer lots of questions that I get about the vellum I use for the vellum flowers.  I purchase this from Joan's Gardens.  It comes in a pad and has 10 different colors of high quality vellum.  Once you get started making the vellum flowers, you are going to love having all the colors that come in this pad.  I also have had disappointed people tell me they try to color white vellum and it doesn't look as pretty as my flowers.  I tried doing this at first, but coloring on vellum does not give you the bright, beautiful colors as when you purchase it already colored.  Hope this answers your questions about the vellum.

In case you haven't seen it, the link to my vellum flower tutorial is listed on my sidebar.

Have fun making your flowers!

Monday, August 9, 2010

Enjoy


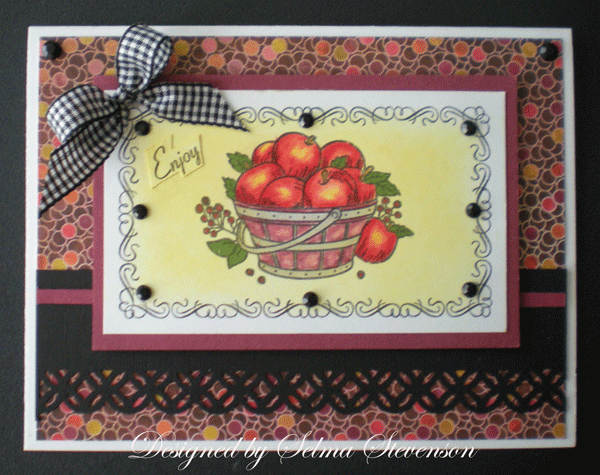
This card is for the Annabelle Bling Sketch Challenge.  My friend Sue Walsh is on the design team and has asked for more people to participate in this challenge.  I need a card to go with an apple cake I am giving to someone, so I used the pretty apple stamp from the JustRite "Autumn Blessings" stamp set.  To create the frame I used a stamp from the JustRite "Victorian Nested Frames & Borders" set.  The apple stamp comes in an oval set, but I like to trim around my stamps so it fit perfectly in the Nested Frame.  The design was colored with colored pencils and OMS.  It was matted with burgundy card stock and placed on the Basic Grey design paper.  A black border was created with a Martha Stewart punch.

I  used just one of the words from another one of the stamps in the JustRite "Autumn Blessings".  The stamp says "Enjoy the Days of Autumn" but I only wanted the "Enjoy" so cut it out and attached it to my design.  I hope they enjoy the apple cake. 

For the bling on my card I used black rhinestones.  A bow was added to complete the card.  All the products used for this card can be purchased from Joan's Gardens.

Hope you will go over and participate in the AnnaBelle Bling Sketch Challenge.

I want to wish Sue's husband a speedy recovery.  Sue left a note on her blog that he had an accident and is in the hospital. 


Miss You


Isn't this a beautiful teapot and cup!  This is one of the Heartfelt Creations stamps available from Joan's Gardens.  The name of it is "Teacup/Border".  There is also a cute little border to put on the inside of your card.  Joan used this stamp for one of her challenge cards and you can see her beautiful card here

The  lavender card stock was embossed with a new Cuttlebug embossing folder I received recently from Joan's Gardens.  It is called "Scrollwork".  I think I must have chosen this embossing folder because maybe it reminds me of steam when used with this stamp but it will make a beautiful border for so many things.  It was attached to a piece of MS design paper. 

The teapot was stamped with Memento black ink and colored with colored pencils and OMS.  I outlined the teapot and cup with blue to give it some depth.  It was cut out and attached with dimensionals. 

The greeting is from the JustRite stamp set "Just A Note".  It was cut out with a petite circle Nestability and sponged prior to taking it out of the die.  Each scallop was pierced.  A flower and some pearls were added to the top to complete the card.

All the products used on this card were purchased from Joan's Gardens.  Have you checked out all the new Heartfelt Creations stamps and dies that Joan is taking preorders for?  I can hardly wait for these to come in so I can start working on cards with an Autumn theme.  


Sunday, August 8, 2010

JustRite Inspiration Challenge


This is the JustRite Inspiration Photo


It is time for another JustRite Friday Challenge. You may use the photo above for inspiration of a color theme or combo, general overall feeling or even as layout inspiration.  When I first saw this picture I immediately thought about using the colors in the burgundy pillow with the yellow flower.  These are not colors I normally use but this was a challenge and thought would be fun. 

I found a piece of Basic Grey design paper that I thought would make a great background. The red is a little deeper tone but everything else matches well.   There is a big yellow mum in the design so chose the mum from the JustRite "Beautiful Blossoms" stamp set.  The border I chose from this set has flourishes on it to go with the dp.  The image was stamped three times and colored with Copic markers.  I found a great video called "Karen's Spellbinders die and JustRite Stamps alignment tips" on the JustRite Stampers blog on how to line up your Spellbinder dies to get a perfect cut and I had to try it on this card.  If you haven't checked out these videos you should because there is so much great info. 

One of the images I stamped was cut out with the technique shown on the JustRite video.  The second image I cut around the entire flower design, and on the third one I just cut out the largest flower.  I wanted to create layers with this flower to make it my focal point.  A Nestabilities Label Ten die was used for the yellow background.  I sponged around the cut out design to help blend it into the yellow cs.  Some Martha Stewart punched ferns were glued down behind the flowers.  I didn't have pearls to match my dp so I used a Copic Marker to color white pearls. 

I have a lot of dimension with the floral piece so decided to take a strip of the design paper and pleat it. There is a ruffle around that pillow so this is what gave me this inspiration.   I used the ScorPal to score lines every fourth inch then did an according fold.  A took a piece of yellow card stock and scored long lines on it (sadly they don't show up now) then placed a piece of ScorTape down the middle.  I placed the pleated dp on top and used a scoring tool to press down between each pleat so it would stick.  A silk bow was added with some additional leaves. 
 
My DH just washed all the windows on the house and I need to go put some things back in place that have been pulled out.  We had such a wet and windy Spring and the windows sure got dirty.  Nice to have them clean again!  Hope you are having a great weekend.

Saturday, August 7, 2010

Christmas Tag


This week the Caardvarks Challenge is to Create a NEW Holiday gift tag or mini card that incorporates stamping! 

The body of my tag is a  manila shipping tag.  I covered it with a piece of design paper from the Basic Grey`"Eskimo Kisses" paper pad.  I had a piece of mesh that I cut to the same size as the tag.  It was run through a sticker machine then placed on top of the design paper.  I like the texture it gives the tag.  I cut a piece of burgundy card stock to attached to the back of the tag to give it a more completed finish. 

The Cardinal is one of the stamps in the JustRite "Christmas Treasures" stamp set.  I stamped it twice and colored both with Copic markers.  The bird and the two sections of holly were cut out of one of the images so they could be attached with dimensionals over the design.  The birdhouse was cut out with an oval Nestability and sponged with yellow ink prior to taking it out of the die.  Holes were punched in each scallop.  The design was then attached with dimensionals onto the tag.  A narrow strip of burgundy card stock was placed at the top of the design paper then a narrow piece of lace attached with ScorTape along the bottom edge.  The poinsettia was attached with dimensionals then yellow rhinestones placed in the center.   The tag had a hole in the top of it but I had covered it up with the mesh and the burgundy card stock placed on the back.  It was punch out again with a 1/4" punch so I could attach ribbon through it.  I still needed to have my "To and From" so used a tag from the JustRite "From Our House" set.  It was colored, cut out around the design, and also backed with burgundy card stock.  A small hole was punched in one corner and it was attached with ribbon.  There is a glue dot dimensional under the left side of it to hold it in place.

I always make my Christmas tags so this is the first one compelted.  I love all the dimensional on it. 

Thanks again for stopping by.  Have a great weekend.


Friday, August 6, 2010

Get Well Soon


This is a card I made to send to my friend that just had surgery.  It almost qualifies for the Joan's Gardens challenge this week.  Have you been over to check it out?  Here is all you have to do:  Make a pink and white card this week, and be sure you have 4 corners punched preferably with a Martha Stewart Punch.  This is an easy one so hope you create a card and enter the challenge so you have a chance to win a nice prize.

My card does not qualify for the challenge because I didn't punch the 4 corners with a Martha Stewart Punch.  I used one of the Heartfelt Creations stamps called "Posy Patch Swirls" for my base design.  I love the flourishes that are on so many of their stamps.  Instead of using the HFC die cut flowers on this one I attached some of my vellum flowers.  I love the flourish behind the flowers.  The stamp (which includes flowers that are below my vellum flowers) was stamped using VersaMark ink and then was white embossed.  The vellum flowers and leaves were attached with glue dots.

The background piece was embossed with the Cuttlebug dotted Swiss embossing folder.  A Martha Stewart punched border was added down each side.  To cover the seam I added a narrow strip of darker pink card stock and added pearls.  The greeting is from MTME.

Have you seen all the new Heartfelt Creations stamps and dies Joan has added to her blog today?  Oh my gosh, I want them all.  It was hard to make a decision on which ones to order right away,  but I placed my order with Joan, and as soon as they arrive I will start making samples for you to see.  I will be posting a tutorial on how to color the leaves with multiple colors so they look realistic.  You can see all these new Heartfelt Creations stamps here.  Joan is taking pre-orders now and the stamps will be in later this month.

All products used on this card were purchased from Joan's Gardens except the greeting stamp which is from My Time Made Easy.

Thursday, August 5, 2010

Inking JustRite Stamps Tutorial


I am going to give you a little info about this card then give you a tutorial below.  The stamp set used is the JustRite "Baroque Nested Frames & Occasions"  set.  The design paper is from the Making Memories "Wedding" paper pad. The roses were made out of card stock the same way I make my vellum flowers.  Have to tell you that making them out of vellum is much easier.  The layers of the JustRite stamps were each attached on dimensionals.

I have had a few questions about inking up JustRite stamps.  Here is an email I received yesterday and I thought I would do a tutorial to answer these questions. 

"I noticed you use JustRite stamps at times, and not always with the frames around them. I bought several myself and just got the Groovy Snowmen. But I am having all kinds of problems trying to use any of the sentiments alone without the frames, and even sometimes with the frames! I have tried inking putting the stamp on the pads and using the pads on the stamps! But I seem to get ink on the stamps AND the writing both. So then I CANNOT get a clear, crisp image! Can you give me any hints?"

There is a wealth of information on the JustRite Stampers blog but I will attempt to answer this question with the way I do it.  After reading my tutorial, I encourage to go over and check out all the info on the JustRite blog.

Here are some pictures of how I ink my stamps:

First, here is a picture of the supplies I am using for the card above.  I am using the new clear stamping blocks and stamps from the "Baroque Nested Frames & Occasions" stamp set.  The ink I prefer to use when inking my JustRite stamps is the "Memento Dew Drop" ink pads.  I like these little pads because it is easier to ink smaller areas without getting ink everywhere. 

This shows how I tap the ink pad around the frame.

When it comes to stamping the sentiment, you can see that the ink has smeared on the outside edges.  You can take a baby wipe and clean around the edges for a clean edge but there is an easier way.

I like to trim around my JustRite stamps just like you do with many different stamps you purchase to use on acrylic blocks.  The rubber is thin and very easy to cut.  What I love about the JustRite stamps is they fit in the grooves of the stamper and you always can get the stamp aligned perfectly straight on the block.  With these new clear stampers, it also makes it so easy to line it up within the frame because you can see right where you are placing it.  This is also important when you want to mix and match your stamps with different JustRite borders, which I do a lot.

 In the email above,  she was having problems with getting ink on the snowman set.  Here you can see how I trimmed around the image. 

Here are the three stamped pieces I used on my card.

I hope this tutorial helps those of you having a problem inking up your stamps.  I really encourage you to visit the JustRite Blog for lots of tips, videos, challenges and inspiration.  I have had several people comment that they think I work for JustRite -- I don't work for them but I am a huge fan of all their products.

Well I am off to make jam today.  Have a wonderful day and please let me know if this tutorial helps.  I love to read your comments.  This card is a Thank You to all of you who read my blog.

Tuesday, August 3, 2010

Get Well Wishes


Today I made a card for someone special.  I have severe back problems and have to go in for treatment once a week.  One of the ladies that works on me is going in for surgery tomorrow. We have developed a very special friendship.   I have made a little card to go with some flowers I am going to take to her.  I used one of the stamps in the JustRite "Autumn Blessings" set.

To create the embossed frame on this card I used the new Cuttlebug "Grace's Frame".  After embossing it, I cut the center out with a Nestabilities "Label Ten" die and backed the opening with a piece of design paper from "My Minds's Eye.  The JustRite image was stamped and colored using Koh-i-noor pencils and OMS.  It was cut out with an oval Nestie and each scallop pierced.  A glitter pen was used to color the center of the daisies and clear glitter was added to the petals of the flowers.  I stamped get well wishes then added green pearls to complete the outside.  I have included a picture of the inside as well.  

Wishing you a speedy recovery Laura.

All the products used for this card were purchased from Joan's Gardens.

Monday, August 2, 2010

Let It Snow


Click to enlarge


This week's JustRite Friday Challenge #029 is to work with this square sketch:


The JustRite blog states that this sketch will be perfect for their 2-inch square stamps, including some of their new Christmas collection stamps or monograms. But remember, you can always cut any shape of our stamps into a square to use with this sketch!
I love working on JustRite Challenges.  My first thought was to use one of the new 2-inch square stamps for this card but then decided to create my square using one of the new circle stamps.   I have been wanting to use this snowman from the JustRite "Groovy Snowman" set and decided he would be perfect for this sketch. You wouldn't know he really came from a round stamp set, would you!  He was stamped without the round border and colored with Copic markers, then cut out with a square Nestability. The band on his hat is "blue" but sure doesn't show up well in the photo!  The colors used on his scarf are Certain Celery, Not Quite Navy and More Mustard.   I cut a 3.25 inch piece of square card stock and punched around it with the Martha Stewart snowflake border punch to create my frame and matted it onto a piece of Not Quite Navy card stock.   This really made the snowflakes "pop".   Rhinestones were added in the center of each snowflake.

A strip of Not Quite Navy cs was embossed with the Cuttlebug and backed with a piece of More Mustard.  To create the border across the bottom, five Martha Stewart snowflakes were punched and lined up from one edge to the other. 

I needed to create my own greeting for the snowflake border.  I used the new JustRite clear stamp block and added the letters I wanted from the JustRite "15pt Times New Roman" font set.   I wanted to stamp "Let It Snow" on a very narrow piece of card stock to go across the top of my snowflakes.  It was so easy to stamp on the narrow strip with the clear stamp block, because you can see exactly where to line it up.  As you can see in the picture above,  I placed a little design, included in this font set, at each end of the greeting to separate the repeated saying.   I was thrilled at how easy it was to create the greeting I wanted on this narrow strip of card stock. 

I used very non-traditional colors on my card, because I get tired of always using red and green.  I am sure someone will love receiving this card next Christmas - how could you not LOVE that adorable snowman!

Sunday, August 1, 2010

STV Blog Hop for Melanie


Tonight Melanie Muenchinger has several designing friends sharing samples they created using some of their favorite sets from Melanie.  I have been a guest designer for Melanie several times and was happy to participate. My two favorite sets are "A Year of Flowers" and "A Year of Leaves".  I have created two projects so I could use both these stamp sets.

The card was created using "A Year of Flowers".  The card was inspired by all the  beautiful lilies I have growing in my yard right now.  The Apple Green card stock is from GKD.  It was embossed with the "Victoria"  Cuttlebug embossing folder.  The lace background was created with a Martha Stewart corner punch and then the center scored on the ScorBuddy.  Large green rhinestones were added to each corner.  The flowers were colored with Copic markers and cut out and arranged adding green leaves to fill in.  An embossed tag was added.  The greeting is from the same stamp set.

The Gable Box was created following a tutorial on SCS.  The card stock used is GKD "Pumpkin Spice".  Sorry this box did not photograph the rich colors on this box.    The leaves and acorns  are from Melanie's "A Year of Leaves" stamp set and were stamped on glossy card stock.  The color was added to the leaves by sponging on different colors.  The acorns were colored with Copic markers.  The verse is also from the same set.  The background paper is from "Me & My Big Ideas" paper pack and has metallic copper in it so I added some copper cording above the handle.  A Velcro dot holds the box closed.   
 
Be sure to check out the links below to see other cards and projects  created with Melanie's stamp sets:

Brenda Turner
Carla Suto
Carolina Buchting
Geri Utterback
Karen Knegten
Libby Hickson
Linda Payne
Melissa Shultz
Selma Stevenson (you are here)
Sharri Seffens
Sue Van DeVusse
Tina Gilliland


Sending Sunshine


Doesn't this look like a beautiful place to sit and relax!  This card was created using Theresa Momber's "Sending Sunshine" stamp set, available from Gina K Designs.  I decided to create a scene using four stamps in this set.  First the tree was stamped on white card stock then the sky was sponged on.  The tree was colored with Copic markers.  I wanted to make the tree dimensional so l used purple Flower Soft on the flowers.  I love how this looks.

Next I cut a piece of Basic Grey design paper layered onto white card stock and cut the opening using an oval Nestability.  This was attached over the tree using dimensionals to give the card depth.  The bench, bird bath and butterflies were stamped and cut out then added with dimensionals.  The water in the bird bath has diamond glaze added to it.

The bench and bird bath looked like they were just "floating" on the front of the card so I used  scissors to create layered grass.  This seemed to ground these items.

This is a beautiful set by Theresa.  There are eleven images and five greetings so there are lots of possibilities for creating pretty scenes or to just use the stamps individually.
 

Heartfelt Creations Daisy


This card was made using the Heartfelt Creations Daisy Patch Background stamp and the Daisy Patch Bouquet set.  These stamps were purchased from Joan's Gardens.

To create the background, I used VersaMark ink and stamped on the pink card stock then embossed with clear embossing powder. . This made a beautiful background for my main image.  The Nestability Lotus pendant was placed on the background then the layered flowers from the heartfelt Creations Daisy Patch Bouquet stamp set placed on top. I stamped the image three times -- twice with pink ink on pink card stock and once on green using green ink.  There are dies to cut these flowers out.   Each image was cut out to layer. My card is 5.5 inches square.  The daisy background stamp fits a 4.25 x 5.5 inch area.  On the bottom of the daisy background, I placed a piece of white card stock that was embossed with the Dotted Swiss embossing folder.  A Martha Stewart punched border was placed across the seam.  Pink pearls and a dotted Swiss bow were added to complete the card.

If you haven't seen all the great Heartfelt Creations stamps and dies yet, be sure to check them out on Joan's Gardens.
 

LinkWithin

Related Posts with Thumbnails