Monday, January 31, 2011

Punched Flower Tutorial

This is a card I created with flower punches.  I thought I would give you a little tutorial on how I create these flowers because they are so much fun to make.   All the supplies used for this card can be purchased from Joan's Gardens.   The design paper is from my "stash".  The flowers are attached to a Nestability Labels Ten die cut.  The greeting is from the new JustRite "Fancy Tags" stamp set.  A few lavender "Dew Drops" were added to complete the card. 

Closeup of flowers

The flowers are easy to create with the instructions from the "Paper Bouquet" book.  It shows step by instructions.  This book has complete instructions on how to make 40 different flowers.  You can purchase any of the many punches listed from Joan's Gardens.

Here is a picture of the power punch available from Joan's Gardens.  It makes it really easy to use any punch.  Of course you don't need to use this tool, but it makes punching so much easier.   

The flower I created is the "Petunia" and this shows the punched out petals using the "Super Giant Begonia Petal" Punch.  You can make so many flowers with this one punch, including large and small sizes.  I only needed the largest petal for this flower, but save all the other petals for other types of flowers I will be making later.  Some of the other flowers you can make with this punch are:  Begonia, Carnation, Gardenia, Rose, and Pansy.

With the Flower Tool Kit, you can easily shape each petal for a very realistic flower.  You can see the flat petal in the lower right side.  What a difference when you shape the flowers.

This shows one of the tools, from the kit,  for shaping the petals.  You just roll it around on the petal and it "cups" it into a pretty petal shape.  You use the tweezers to do further shaping.  All the details are in the Flower Book.

Here are the two punches I used for these flowers.

Another picture to show the Flower Tool Kit, the two punches used, the two pieces used to create the flowers and the finished flower.  Isn't it amazing you can take a piece of paper and turn it into a beautiful flower that is so realistic.  I just love it.

Joan and I will be creating lots of different flowers from this book.  I have been putting my flowers on cards, but can you imagine all the beautiful boxes you can create with these flowers.  Remember the pine cones I created at Christmas time -- those are in this book too. 

Did this tutorial help explain how easy it is to create these dimensional flowers?  I hope it did.  I no longer purchase flowers for my projects, because I can make my own in any style, size, or color.  Hope you will give it a try.

Sunday, January 30, 2011

Another JustRite Flower


Today I am posting another card using one of the new JustRite stamp sets.  I used this set to make my vellum lily card about a week ago.  The name of the set is "Mother Nature's Gifts".   There are three flowers, one greeting, and four pretty borders in this set.  This set fits the 3 1/4" wooden handle. 

My card is 5.5 inches square.  This is my favorite size card to work with because I have more room for all the elements I want to work with. I decided to use some colors that I seldom use.  Are you surprised not to see pink or purple!!!  I started with  a slightly smaller piece of white card stock and stamped the flower all over it using marigold ink. Can you see it in the background? Then using one of the large sponge daubers, I sponged all around the edges and then applied less color in the center.  The same flower was stamped again seven times, on bright yellow card stock,  with Memento "Cantaloupe" ink and each flower cut out to create all the layers.  You don't have to be real precise in doing this, but need to try and cut each consecutive flower (layer) smaller.  I cut between many of the petals on each flower so it would shape like a real flower.  The edges were sponged with the marigold ink.  I used the "Flower Tool Kit" from Joan's Gardens to shape my flower. I sure use this tool kit a lot! All the layers were glued together using a liquid glue.  A small yellow pearl was added to the center.

The beautiful verse is from the same JustRite set.  It was stamped using Versafine "Onyx Black" ink and cut out with a circle Nestability.  The border from this set was black embossed on Papertrey "Spring Moss" card stock and cut out with a scallop Nestability.  A bow was made using matching ribbon. The flourish was cut with the Tim Holtz "Elegant Flourishes" die.  It is the smaller of the two on this die.  Three  leaves were punched.  All the element were attached as shown.

You can purchase all the new JustRite stamps sets, and all the products listed above in "bold", from Joan's Gardens.  Joan's shipping is only actual shipping cost. 


Saturday, January 29, 2011

Something a little different


Here is a different look working with flowers.  Joan sent me some new stamps by Studio 490, Wendy Vecchi and I used stamps from two different sets to create this card; "She Created Art" and "Botanical Art".  We are having a very cloudy day so I am disappointed the photo does not show the pretty colors on the flowers and butterfly.  I stamped two each of the flowers in the "She Created Art" set, using brown ink.  The writing is on the flower stamp and I really like that look. Two different Distress inks were sponged on them.  The butterfly is from the "Botanical Art" set and matches the flowers so well.  It was also sponged with the same inks.  Using tools from the Flower Tool Kit Joan sells, I shaped all the petals.  They were layered.  It is very dimensional but because I took the card looking straight down you can't see that.  Small beads were added to the center of the flowers.  The foliage was cut using the Sizzix "Decorative Accent w/Flower" die.  I over lapped the two flower stems cut from this die.  I also shaped them with the tools from the  Flower Tool Kit.

The background was created using a piece of textured card stock and embossing it with the Tim Holtz "Bricked" embossing folder.  I used a brown ink to sponge over the bricks then lightly used some black over it.  The greeting is from the same set as the flowers.  I love  what it says.  Three buttons from my stash were added to complete my card.

My DD has invited us over for dinner tonight and right now my DH is waiting for me to go watch a movie with him.  I'm having a great weekend and hope you are too. 

All products listed in "bold" can be purchased from Joan's Gardens.

Friday, January 28, 2011

You Inspire Me


Have you seen all the new JustRite stamp sets that Joan's Gardens now has in stock?   I have used three of them on the card above.  I started by stamping the beautiful frame from the JustRite "Kindness" set, two times.  It was white embossed on lavender card stock.  On one of the frames, I stamped the greeting from the "You Inspire Me" set.  These stamps are red rubber, mounted on static cling foam, so you can use them on any acrylic stamping block.  The flowers from "The Greatest Joy" set was stamped, colored with Copic markers, and cut out so they could be mounted inside the other embossed frame. (The flowers are not showing up very well in the photo, but are beautiful on the card.) This set is used with one of the oval wooden handles. The flowers were attached with dimensionals. 

This is a 5.5 inch card.  A piece of plaid design paper, from my stash,  was attached to the card.  A piece of white card stock was cut and embossed using the ScorPal.  The two frames were attached with dimensional tape.  A lavender gingham bow and some pearls were added to complete the card.

I'm sure you are going to love all the new JustRite sets just released.  You can see all of them on Joan's Blog here.

Have a great weekend. 

Thursday, January 27, 2011

Joan's Garden Weekly Challenge #4


It is time for  Joan's Gardens Weekly Challenge #4.  Joan and I have both used the Heartfelt Creations "Daffy Daffodils Precut Set".  You can see her pretty card on her blog.  She used the large daffodil and I have used the group of three, which are medium sized.  If you would like to purchase this pretty daffodil set, as well as the matching Nestability die, Joan has them in stock.  

Here is what you need to do for Joan's Challenge this week: 
1. Use Yellow and Green for your colors
2. a piece of trim
3. include a window
4.  some embossing

I stamped the daffodil border and cut out each one with scissors.  I then stamped three of the individual flower heads and cut them out with the matching Springtime Medley Die.  They were all colored using colored pencils and oms.  The Nestability "Fleur De Lis" pendant was cut out using white card stock.  The center of it was cut out with a square Nestie, slightly smaller than the center of the pendant, to create a window.  The edges were sponged with yellow ink to highlight the edges.  A slightly larger square was cut with a Nestie and embossed with the Cuttlebug Dotted Swiss embossing folder.  Dimensional tape was placed around the edge of the window in the pendant and attached over the embossed square.  The daffodils were arrange and attached with dimensionals.  A piece of Webster's Pages trim was added along the bottom and a few pearls placed on the pendant to complete the card.

I hope you will join us this week in this fun challenge.  Remember, you have a chance to win a nice prize and then be included in the random drawing for the $100 prize package from Joan's Gardens, that will be awarded at the end of the year.  A little secret -- when Joan has special events, such blog hops, the participants are selected from those that have entered cards in the past weekly Joan's Gardens challenges. There is always an extra "Perk" for helping us out.   You never know, you may be asked to participate.

I am so happy you stopped by for a visit. 

Wednesday, January 26, 2011

Valerie's Gift Blog Hop

Shadow Box


Sentiment on Card

This is a special blog hop for Colleen Dickinson.  A new stamp was released by Whimsy Stamps and was named after Colleen's daughter, Valerie who passed away in a fatal car accident.  The name of this stamp is "Valerie's Gift".

Fourteen of Colleen's blogging friends are participating in a "surprise" blog hop using this cute stamp named in honor of her daughter.  I am so happy I was asked to participate.  I will be sending this card to you Colleen.   I created a shadow box to frame this cute stamp.  The front of the box was created using the Cuttlebug "Brocade Window" Cut and Emboss folder.  The image was stamped twice so one could be cut apart to make her dimensional.  Three pieces are dimensional:  The head and collar; the gift; and her boots.  She was colored with colored pencils and oms.  The bottom of the shadow box has a piece of lavender design paper attached to it.  Valerie was attached with two, double thick, clear glue pop dots, to lift her high from the bottom of the box.  Two rows of grass were cut with a Martha Stewart "grass punch" and added. There is a lot of dimension to this image.

The greeting is from the JustRite "Thinking of You" set.  It was cut out using scissors, sponged around the edges, and attached with pop dots.  I made some purple vellum flowers and added them to the greeting and around the frame.  Small pearls were added to the center of each flower.  Martha Stewart butterfiles were added to complete the card.  A piece of card stock was punched on two sides with the Martha Stewart "Swirling Lace" punch and attached to the back of the shadow box.

Here are all the bloggers participating in this blog hop for Colleen:

Mary Anne
Patti J.
Shirley    
Linda Payne
Dee Marie
Betty Benton
Patti Sue Nelson
Theresa Pollock 
Cheri Weston
Geri U. 
Rebekka Reed
Selma S.     (you are here)
Patti Painter
Olga

Have fun checking out all these beautiful cards.

All products listed in bold are available from Joan's Gardens.

A box created "With Love"


It is Wednesday and a lot of new projects are posted on the Heartfelt Creations Blog.  There is also a sneak peak of the fabulous "New Life Collection" that is scheduled to make it's debut on February 8, at 12 Midnight EST. There will be 7 new PreCut Stamp Sets and 1 coordinating, exclusive, die made for Heartfelt Creations by Spellbinders.


Above is a fun project I created using some of the beautiful Heartfelt Creations rose stamps.  It is a little  box I decorated with the beautiful "Grandiflora Rose" stamp sets.  (The products used are listed at bottom of this post.)   Stamping a variety of sizes of the rose, with rose colored ink, on pink card stock, each flower was cut out with the matching Nestability die. On all but the bottom layer, I cut between each of the petals in order to shape them. I misted the flower with water and shaped each petal. The pretty rose bud was stamped twice on green card stock, then three times on pink card stock. I wanted to layer the pieces to give it dimension. Each layer is attached with a thin piece of dimensional tape. The rose and bud both look so realistic. I used some die cut Cuttlebug rose leaves under the flower. To create a realistic look, I stamped each leaf with a texture stamp using green ink and shaped it before adding them under the rose. The  Heartfelt Creations sentiment was stamped with VersaMark Ink and gold embossed on ivory card stock.  I love the font used in this sentiment set.   It was cut out with one of the JustRite label Nestabilities. A few pink pearls were added to complete the box.

It is so easy to create realistic flowers with the beautiful Heartfelt Creations stamps and matching Nestability dies.  Hope you will give it a try.

Heartfelt Creations Products used:  HCPC 2261 Grandiflora Rose 1 PreCut Set; HCPC 2262 Grandifloral Rose 2 PreCut Set; HCPC 3363 Inspire Me Sentiments PreCut Set;
Blossom Nestabilities

Tuesday, January 25, 2011

Have a Wonderful Birthday


This is a 5.5 inch card and is created with stamps from Heartfelt Creations. The design paper is from the Basic Grey “Olivia Paper Pad”. The Martha Stewart “Rings” punch was used to create a border on a 5” square and the center was lined with more of the design paper. Two of the largest Nestabilities “Lacy Circles” were cut out and the kitty image (Kitty Can, item # 774F-EZ)   was stamped in the center of one. The image was colored with Copic markers and the watering can was paper pieced. An extra little kitty paw was stamped and colored then attached with dimensional tape. The inside edge of the Lacy Circle was sponged with blue ink. The two Lacy circles were attached together with dimensional tape, offsetting the scallops. The verse from the "Inspire Me Sentiment PreCut Set" (Item # HCPC 3363),  was black embossed, cut out with a smaller Nestie “Lacy Circle” and attached using 3 large glue dots. Three blue pearls were added to complete the card.


Monday, January 24, 2011

Joan's Tag Challenge #4


It is time for another Tag Challenge at Joan's Gardens.  It is such a fun challenge because you can make any type of tag you may need now or in the future.  I'm sure my family and friends are going to love the pretty tags I have created for these challenges.  I usually don't create tags with so many details but I am having so much fun doing them.

The tag created for this week's challenge is created on a tan shipping tag.  The edges were sponged with Tim Holtz Tea Dye ink.  A piece of design paper from the Graphic 45 "Once Upon a Springtime" pad was added. I embossed this piece with the Tim Holtz "Bricked" embossing folder then forgot to sponge it to bring out the embossing, but I think you can see it.   A narrow brown strip of card stock was added at the top and the bottom. 

To create the bird and branch, I used the Sizzix "Birds & Branches" die. This die has both branches with leaves and two different birds.   I cut out one of the branches five times, using different colors of card stock.  The leaves were cut off the piece cut in green, and were attached to the branch.  They were lightly sponged with green ink.  The beak for the bird was cut off the bird cut out on tan card stock and attached to the blue bird.  The bird was cut out in dark blue and light blue.  The wing was cut off the light blue bird and attached to the dark blue bird.  I used a white pen to kind of draw feathers on the wing and tail then sponged the bird with blue ink.  The eye of the bird was colored with a marker.  A pink vellum flower was made and attached on the branch.  Yellow stamens were glued to the center of the flower then light green Flower Soft was added in the very center.  

The pretty flowers are from a package of K&Company die cut pieces.  Using a rectangle Nestability, I cut a rectangle just slightly larger than the image to frame it.  A piece of vintage lace was added to the bottom of the card and blue pearls added to each scallop.  I was trying to balance out the blue on the tag.  

I have had a drawer of "fibers" that I have almost gotten rid of so many times, but find they work great to insert in the hole in the top of tags.  To complete the tag, I stamped the "To" and From" at the top.  

Did you remember to vote for your favorite tag from the last challenge?  Remember, every Monday the voting is open.  The person receiving the most votes will receive a "winners" badge from Joan to place on their blog.  In June one of these winners will be selected for a prize package from Joan's Gardens. 

All products in bold print can be ordered from Joan's Gardens.


Sunday, January 23, 2011

One stamp, Two looks


Front of Gold and Black Card
(It's funny, I have to lean back from my computer to see the black.  For some reason it looks gray when I am close to computer screen.)

Inside Gold and Black Card

This card completed in Pastel

First, I want to thank all you for the wonderful comments on my post yesterday.  I have really enjoyed reading all of them.  It makes me feel good to know you enjoy my work. 

Joan and I both have been wanting a beautiful heart stamp to work with.  She found the two beautiful stamps used on these cards (the heart and verse) from Penny Black stamps.  The name of the heart stamp is "Love is the Message".  The name of the greeting, used inside, is "Dreams Come True". Joan has both these stamps in stock.  

Today I wanted to show you how different one stamp can look.  The first card was created using black and gold.   The card stock used for the card is ivory cut 5.5 inches square.   The border was created using gold card stock and the new Martha Stewart "Double Arches" punches.  Isn't it a beautiful frame.  The image was stamped, on black card stock,  with VersaMark ink and gold embossed.  The punched frame was backed with black card stock.  I wanted the design to be the focal point so did not add  a lot of embellishment -- only a black rhinestone on each corner. The image on the inside of the card is from the Studio 490, Wendy Vecchi,  "Botanical Art" set.  Both the design and the pretty greeting were black embossed.  I used the same punch as used on the front for just a border along the bottom.

The second card is very pastel.  I used a piece of ColorBok "Pearlescent Paper" for the background.  Using my ScorPal, I scored two lines around all the edges.  The heart image was stamped twice on white card stock.  One was cut out with the largest Nestability "Lacey Square" die.  It was embossed with the Dotted Swiss embossing folder.  The heart was cut out of the second image so it could be attached with dimensionals to give the card some dimension.   The ink used was ColorBox "Wisteria" Chalk ink.  

To add one more color to this pastel card, I made two small sizes of pink vellum flowers.  I used the Martha Stewart flower punch that has three flowers on it.  I am sure you are all familiar with this punch and know you can purchase it from Joan's Gardens.  The flowers were attached to the design on the card with a tiny dot of glue.  I pushed down in the center of each one with a stylus to be sure it attached to the card.  To complete the card, I added a bow and a few lavender pearls.  

Which card do you like the best? 

All products used on my cards can be purchased from Joan's Gardens


Saturday, January 22, 2011

Vellum Lillies


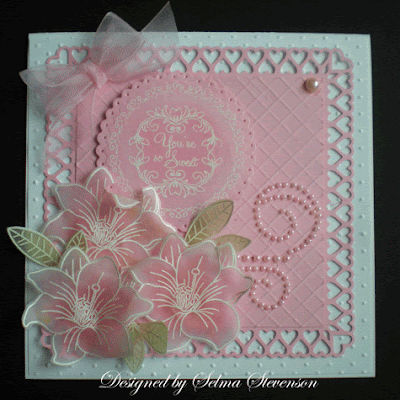
Today was a happy day for me; I received a big box of new products from Joan's Gardens.  In that box are some of the new JustRite stamps Joan now has in stock.  I LOVE these new sets: "Mother Nature's Gifts" and "You're So Sweet".  Aren't they beautiful.  I had no idea what I was going to do when I started creating this card.  I thought the flowers, from "Mother Nature's Gifts",  would be beautiful white embossed on vellum paper and they are.  I decided to try something new -- well any way something I have never seen or done before.  I normally use markers to color on the back of vellum.  I wanted my flowers to be dainty so decided to try watercoloring on the back.  I used a pink reinker and a water brush to color on the back.  To my surprise, it curled the petals of the flowers and I was so excited the dimension it gave to the flowers.  The petals were all curling under (toward the backside) and I wanted part of them to curl forward.  I used a clean water brush to apply water to the front and happily found out the vellum would curl up.  Have you ever tried water coloring on vellum?   I'm sure you will have fun with this technique.  Wonder if I invented a new technique???

The back layer on the card was embossed with the Cuttlebug Dotted Swiss embossing folder.  The pink square was created with the Martha Stewart "Loops Heart" border punches.  Another piece of pink card stock was cut that would fit inside the one with the punched border and I scored 1/4" lines, using the new ScorPal,  going two directions to give the background texture. 

The beautiful greeting and border are from the "You're So Sweet" JustRite set.  It is so perfect for this card.  It was white embossed and cut out with a petite circle Nestability.  The center was sponged with some pink ink to help bring out the white embossing.  Doesn't it go beautiful with those vellum flowers - so dainty.  The flowers were arranged down in the corner and the greeting tucked in.  I had a piece of  a pink pearl flourish in my drawer and decided to add it.  I better tell you about the leaves.  They were white embossed with a stamp I have had for a long time and a marker used to color them on the back.  A pink bow and a single pearl were added to complete the card.  

What do you think about these new JustRite stamps.  You can order them now from Joan's Gardens. I know you will love them.  While you are ordering them, be sure to see all the other new JustRite stamps shown on Joan's blog.  

Thanks for coming by to visit.  Have a great weekend.  


Thursday, January 20, 2011

With Love


Have you been over to the Heartfelt Creations Blog to see all the new cards created by the design team.  They are all created with the new Springtime Medley Collection.  This is one of the new bear stamps I received from Heartfelt Creations.  It is called "For Your Mother" (662D-EZ).   
The size of this card is 4.25” x 5.5 “.  A scrap piece of design paper from my stash, was layered on blue card stock and attached  to a white card. The bear was stamped with black Memento ink, colored and cut out with scissors. A fence was cut out using the Tim Holtz Alterations “On the Fence” die. It was sponged with several colors of brown ink. The grass was created with the Martha Stewart “grass” punch. Both the grass and fence were embossed in the Cuttlebug “Forest Branches” embossing folder to give them texture. Using a Nestabilitie scallop oval and plain oval, I created a frame and a white center for the frame. The greeting from the "Inspire Me Sentiment PreCut Set" (HCPC 3363) was stamped and run through the Cuttlebug Dotted Swiss embossing folder. The scalloped frame was sponged blue. All the pieces were arranged and attached with adhesive. Using the Martha Stewart “Loops Heart” border punch, I collected the punched out hearts and added them around the greeting. Another Martha Stewart punched heart was added to complete the card.


Wednesday, January 19, 2011

Explosion Box

This is the Explosion Box when lid is on

This is a close up of the lid.  The lid holds the box together.


When you take the lid off, the sides "explode" out and lay flat.

This week on Joan's Gardens Challenge #3, she is asking us to make a box.  The box is to include flowers, a flourish, and a butterfly.  I decided to make a style of box I have not made before.  The box is made out of a sheet of 12x12 inch card stock.   I am not going to go into a lot of detail at this time.  I am sure everyone will want a tutorial and will do that later.

Nestabilities dies were used for the three layers on each square for all the sides (inside and out) and for the lid.  Nesties sure made it easy.  The white card stock was embossed with a Cuttlebug embossing folder.  To decorate the box I decided to make vellum flowers.  I made twelve small vellum flowers.  For the larger flowers on the lid and the center of the inside, I used the Tim Holtz Tattered Flowers die.  For Christmas I received one of the new Ranger "Vegabond" die cutting machines.  Gosh do I love it!   I cut long strips of vellum and folded the strips the width of the flowers I wanted to use (I used the two smallest flowers).  I think I cut 5 or 6  of each at one time.  They went right through the Vegabond with no trouble.  The machine is electric so is so easy to use.  I used a Cuttlebug die to cut the large leaves (also on the Vegabond).  They were all cut at one time too. The flourish was cut using the Tim Holtz Flourish die and the branches, as you know, are punched with a Martha Stewart punch.  All the flowers were made as I explained on my vellum flower tutorial here, then everything arranged and attached to the box.  

The greeting, on the inside, is part of a Heartfelt Creations Inspire Me Sentiments stamp.  I only wanted the word "Love"  from the sentiment  It was cut out with a Nestie heart die, sponged with pink ink, and each scallop pierced before attaching with a dimensional.  Two bows were made - one for the inside and one for the lid. 

On the outside of the box, a Martha Stewart punched heart was added to all four sides.  A Martha Stewart punched border was added around the lid.  The last thing added was a Martha Stewart "Monarch" butterfly.

I didn't have any written instructions for creating this box so I must admit, it took me a good part of my day to create it.  I am very please with the way it turned out.  I am sure the next one will go together much quicker. 

I want to let you know that Joan has all the supplies for making the vellum flowers in stock - the small Martha Stewart punches, the Tim Holtz Tattered Flowers die, and the colored vellum.

I hope you will join us in the challenge at Joan's Gardens.  Please go to her blog to read all the details about the challenge.


Tuesday, January 18, 2011

Exotic Fuchsia


Tomorrow  Heartfelt Creations will post a new set of projects created by the design team using the new Springtime Medley Collection.  I have not posted a card yet I created for last week's post using the new set,  "Exotic Fuchsia",  so thought I would post it tonight.  

This is a 5.5 inch square card. The background was embossed using the Cuttlebug Birds and Swirls embossing folder. The group of fuchsia was stamped and colored with colored pencils and OMS. The top portion of the design was cut out with scissors then a Nestability Oval was place behind that portion so the flowers could hang over the top of the oval. A Nestability scallop oval was cut and placed behind the design. Each scallop was pierced. The verse was stamped below the design. Two single fuchsias were stamped and cut out with the matching die. They were colored and placed over the center flower. The stamens on the top flower were cut off. The center flower has three layers, each on a dimensional. Cuttlebug corners were placed on each corner and a pretty bow added to complete the card.

Hope you will check out the Heartfelt Creations blog tomorrow for some new inspiration using these great stamps.

Heartfelt Creations products used on the card above:  HCPC 3360 Exotic Fuchsia PreCut Set; HCD 709 Springtime Medley Die; HCPC 3363 Inspire Me Sentiments PreCut Set

Monday, January 17, 2011

Joan's Gardens Tag Challenge #3


I am having so much fun creating a tag each week for Joan's Garden's Tag Challenge.  I created my tag this afternoon and since I know tomorrow starts a new tag challenge, I am posting it tonight.    I started a manila shipping tag and covered it with designer paper from the new Graphic 45 "Once Upon a Springtime" paper pad.  What beautiful papers!   I first decided which piece of paper I wanted to use, then created my tag around the design in it.  This pretty piece has some little flowers in it that I love so decided that should become my focal point.  I used some of the flower punches from Joan's Gardens.  The flowers are created with petals from the "Super Giant Begonia Petals" punch.  I punched them out using ivory card stock.  Using a sponge dauber, I first sponged on ColorBox "Peach Pastel" chalk ink on the lower portion of each petal, then sponged on ColorBox "Rose Coral" chalk ink around the outside of each petal.  The flowers were assembled using the instructions in the "Paper Bouquet"  instruction book, also available from Joan.  I was very pleased with how close they look to the flowers in the design paper.   All three flowers are a little different in size.  Using punches, leaves and branches were added behind the flowers.  Each time I create my own flowers, it makes me feel happy.  I always think they are much prettier than the ones I used to purchase,  and they are so easy to make.  When you make your own flowers, you can make them exactly the size and color you want.  I posted a close up and wonder if you think my flowers match pretty closely to the ones in the design paper.

The greeting is from the JustRite "Just A Note" stamp set.  It was black embossed and cut out with a Nestabilities Labels Six die.  It was sponged with the two inks used on the flowers prior to taking it out of the die and was attached with dimensionals.  To complete my tag I added two different sizes peach and rose ribbons.  

All products used to create this tag can be purchased from Joan's Gardens.

Did you see the gorgeous tags in last weeks Joan's Gardens Tag Challenge?  I really had a hard time deciding which one to vote for.  I hope you will join us in this fun challenge and start building your own collection of tags you will need for this year.  The challenge is so easy, because you can make a tag for any occasion and use any thing you want on it.  The requirement is just to create a tag and link it to Joan's blog.  Your vote helps determine the winner.  The voting is open for one day only (Monday) and the winner will receive a badge showing they won and will then be eligible for a drawing for a prize later in the year.  How easy is that!  Won't you join in on the fun!


Sunday, January 16, 2011

Happy Birthday


Tonight I am posting a card I made earlier today but before I could take a photo, I had company arrive and they didn't leave until it started getting dark.  It was impossible to get a picture showing the true bright pink color of this card.  I don't know the name of this style card.  I remember seeing cards similar to this and just made some cuts and scores to come up with it. 

Joan's Gardens is now carrying the Studio 490, Wendy Vecchi, stamps and I have combined two different sets here.  The flower is from the "Botanical Art" set.  The stamp is solid rubber so I used a bright pink and a purple marker to color right on the rubber and two different colors of green for the stem and leaves.  It was misted with water before stamping on glossy card stock.  A second flower was stamped and just the flower was cut out so I could make it dimensional.  The design was cut out with a Nestabilities Labels Seventeen.  I attached it to black card stock and cut a mat around it with scissors. 

The flourishes and number border along the bottom are from the Studio 490 "Art Parts" set.  They were black embossed on the card.    The verse is from the JustRite "Just A Note" set.  It was embossed in black an cut out with the Nestabilities Lacy Circles die.  Both the flower and the greeting were attached with dimensionals.  In order to add some more black to the card I cut four small pieces of black/white dotted design paper and added them to each side.  A black/white dotted Swiss bow was added to complete the card. 

All the products used to create this card can be purchased from Joan's Gardens.


Saturday, January 15, 2011

Have A Special Day


Angel Trumpet Flower PreCut Set


Heartfelt Creations Products used: HCPC 3362 Angel Trumpet Flower PreCut Set;
HCD 709 Springtime Medley Die; HCD 708 FancyWindow/Frame Die; HCPC 3363 Inspire Me Sentiments PreCut Set

 This is a 5.5 inch card.  It was created with another set from the new Heartfelt Creations release "Springtime Medley Collection". The name of this set is "Angel Trumpet Flower PreCut Set".   A piece of green textured card stock was placed on the front.  The Fancy Window/Frame was cut out of white card stock and attached with adhesive.  The greeting was white embossed inside the frame.  The trumpet flowers were stamped twice and cut out with scissors.  Only the flowers were cut out of the second stamped piece so they could be attached with dimensional tape.  The images were colored using colored pencils.  The hummingbird (also from the Angel Trumpet Flower" set was stamped, colored and cut out with the matching die.  He was attached with dimensional tape.  A purple bow was added to complete the card.
 
Have a great weekend.

LinkWithin

Related Posts with Thumbnails