Friday, June 11, 2010

Stationery Box


Today I decided to work on a tutorial I saw on SCS.  It is for a stationery box.  Click here for the link.  I changed a few things to dress it up. 

I started out using some Martha Stewart two sided design paper.  I also used a solid aqua card stock.  I trimmed the lower edges of the lid with a Martha Stewart punch and embossed the top and sides of the lid with the Cuttlebug dotted Swiss embossing folder.  A piece of lace trim was wrapped around the top edge.  A beautiful rose was added to the top of the lid.  A few pearls and punched leaves were also added.  On the front of the box I used a Nestie die and used a SU stamp.  A mulberry rose, MS punched leaves and some pearls were added to the label.  It was attached with dimensional tape.

For the box I cut the pieces out the same as in the tutorial.  Two changes I made was I used a corner rounder for the edges of the front and a scalloped piece was added along the inside pocket, which is not done in the tutorial.  Six greeting cards were made, six thank you notes and three gift tags were made for the pockets.  JustRite stamps were used for these projects.  You can see the thank you notes and tags in the bottom picture.  A tablet that pulls down from the top was covered only going partially up the bottom to the tear line on the tablet.  I used my JustRite stamps and the new clear stamping block to stamp the word "Stamps" on the little stamp envelope.  I love the new clear stamping blocks because you can see exactly where you want to place your inked image.  A small mulberry rose was added on that envelope.  A JustRite greeting  for the inside was stamped and sponged prior to removing it from the Nestie die. 

I purchase my JustRite stamps, Martha Stewart punches, mulberry flowers and pearls from Joan's Gardens.

This was a fun, easy little stationery box to make.  I plan to send this off to a friend for her birthday.
  

Thursday, June 10, 2010

A card for Joan's Gardens Challenge

Card closed


I told you yesterday about an exciting new event happening over at Joan's Gardens.  She has started a new event called "Joan's Gardens Thursday Create a Card  Challenge".  This week her challenge is to use a JustRite Floral stamp and use the colors pink, yellow and green.  Be sure to go over and read all about the challenge and see what you can win. I hope you will  support Joan by participating in this exciting event.

Today my card is made using three JustRite flower sets:  "Beautiful Blossoms",  "Breath of Spring" and "Plant a Little Love".  The verse on the inside of the card is from the JustRite "Joyful Hearts" set.  This card fits into a business size envelope.

To create this card I started with a piece of card stock 8.5" x 10.5".  It was scored along the long side at 1.75", 3.5", 7", and 8.75".  A strip of green card stock was cut 1.75" wide for each outside strip.  Another green piece of cs cut 3" wide for the center of the card then two narrow strips to go on the edge . 

Two strips of white card stock were cut 8.5" by 1.75" for each side panel.  I used a square Nestie to cut "windows" in these pieces.  For the right side I started in the middle and centered the Nestie to cut an opening.  Two more were cut to create three windows on this panel.  On the other side four "windows" were cut.  The windows were cut offsetting the windows on the right.  You can see this in the first picture above.  These panels were embossed using the new Cuttlebug "Kassie's Brocade".  I just received this embossing from Joan and love it.  Two green Martha Stewart borders were cut.  They were attached behind the embossed white panel. The white panels were attached to the green panels and then they were attached to the sides of the card using Glue Glider. 

The green 3" wide green card stock was attached to the center of the inside of the card.  The JustRite verse was stamped and cut out with a Nestie. Isn't it perfect for this card.   Below the verse is a white panel to write on.  The bottom edges were embossed with a Martha Stewart corner punch. 

The flowers were stamped and colored with Copics then cut out.  They were tucked into the windows on the front panels and the flower from the "Plant A Little Love" set was placed on the inside of the card. To complete the card a few punched butterflies were added on the inside and some some Dew Drops added to the outside right panel.  

 I hope you will go over and participate in Joan's challenge. If you read about this challenge on my blog, I'd love for you to let her know in her comment section.

When you go to Joan's blog,  sure to check out all the new JustRite Stamps  that will be released soon.  They are fabulous.  You can preorder them now from Joan.   

 Have fun creating.  

Wednesday, June 9, 2010

Best Wishes


I have been gone all day so I am late in posting a card today.  This card is made using the new JustRite "Victorian Nested Frames" stamp set.  There are three frames and verses in this set.  They fit onto the new clear stamping block.  I stamped the largest frame then on a separate piece of card stock stamped the smaller frame with the pretty greeting inside.  You can order this stamp set from Joan's Gardens

The designer paper is from the Basic Grey "Porcelain" paper pad.  The corner flourishes were cut with a Bosskut die.  The flowers on each corner were made using vellum.  A narrow trim was added to the bottom. 

In case you haven't heard, Joan Fricker is going to start a "Joan's Garden Thursday Challenge".  You will want to be sure and check it out tomorrow. You will have an opportunity to submit your work and win a gift.    Here is the link for the announcement. 

I'll be back in the morning with another card.  See  you then. 

Tuesday, June 8, 2010

With Love


Have you seen the GORGEOUS bridal collection that Jerri Kay Jimenez has been posting on her blog.  You can check out the collection here.  Everything is beautiful beyond words.  She has details on her blog about how she created the roses and since I love flowers, wanted to give it a try.  My rose is not nearly as pretty but thought I would post it.  Jerri stated that she will do a video which I will definitely want to see. 

I made my rose and decided to put it on a card.  This is not a card that can go in a regular envelope.  I created the rose following her directions. You will find all the supplies needed on her blog and a link to her store if you need to purchase anything.   She tinted the middle of her roses with green Tinta ink and I did the same except I didn't add enough to give it as much color.  It got lighter when it dried.  I will be making more of these beautiful roses. 

The designer paper on my card is from the Making Memories Wedding paper pack.  A Labels Four Nestie was cut out and embossed.  I used a black maker to outline the edge.  The rose was attached with a pop dot and leaves tucked under it.  Some pink ribbon was also added.  The flourishes were cut with a BossKut die.  The greeting is from MTME and inserted into the silver tag.  A piece of lace was tucked under the edge of the embossed label.  Pretty pink rhinestones were added to complete the card.

I hope you will go over to Jerri's blog to see all the gorgeous items in her bridal collection.  Here is the link for today's post.  Be sure to click on all the links within this post to see each of the items she has created.  You will be so amazed with her talent.

Monday, June 7, 2010

By The Sea


JustRite Stamps is having a challenge called "Let's hear it for the Boys".  The challenge is to make a card or other project using the "By the Sea" stamp set or any other masculine JustRite stamp set.    You can read about it on the JustRite blog here

The background paper on my card is from the Basic Grey "Max & Whiskers" paper pad I received from Joan's Gardens.  It was framed with a piece of brown card stock.  The mesh trim was purchased from Gina K Designs.  It was attached to the back of the dp with ScorTape. 

I just recently received the "By the Sea" stamp set from JustRite and have been anxious to use it.  There are four great scenes in this set as well as four borders.  I stamped the lighthouse using black Memento ink then used sponge daubers to color the sky with yellow and apricot inks.    The lighthouse and water were colored using Copic markers.  I cut around the design using scissors then used a brown marker to color the cut edge.  The border was stamped using Vivid brown ink and was cut out using a Nestie.  A sponge dauber was used to add brown ink around the edges.  The design was attached with dimensional tape to the border. 

I had some light pink and blue button sea shells.  I wanted to add them to the mesh so colored them with a Copic marker to make them look more realistic.  They turned out exactly the way I wanted.  I added some Stickles glitter to the light rays from the lighthouse.  When it dried I scraped off most of it so it just left a shine.  I also added some diamond Stickles to the waves.  Two Cuttlebug corner borders were added to complete  the card. 

This is going to be my husband's Father's Day card. 

Sunday, June 6, 2010

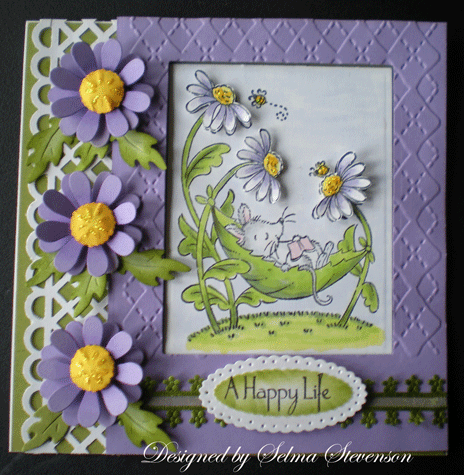
A Happy Life


Oh what fun I had creating this cute card.  The image is Tina Wenke's "Mouse in a Hammock" by Stampavie.  I just couldn't resist buying this one from Joan's Gardens.  I will have to admit there is a lot of different steps in completing this card.  I must have been trying to see how many different things I could do on one card, LOL. 

I started by stamping the image with black Memento ink and coloring it with Copic markers.  It was cut out with a rectangle Nestie.  I used the same Nestie to cut an opening in a 5.5"x4.25"  piece of lavender card stock then embossed it with the Argyle Cuttlebug embossing folder.  The reason I did this was to raise the frame up from the design a little bit.  The base card is 5.5" square white card stock.  A piece of olive cs was attached to the front then a Martha Stewart punched border added to the left side.  

The flowers are die cut, sponged in the center with a darker purple ink, and layered with dimensional tape.  The yellow centers were cut out with one of the small dies from the Spellbinder's "Classic Frame".  They worked out just perfect for the center of the daisies.  I was trying to make them look like the ones in the image. The centers were sponged with a darker yellow to give them highlights.  In order to give the centers some dimension I used  a flower shaper tool to indent the center then put a clear glue pop dot under it so it would hold the rounded shape.   The leaves were cut with a Bosskut "daisy leaves" die and sponged with a darker ink.

I wanted to bring in the green, below the framed design, so I used a piece of lace purchased from a craft store.  It was too "bright" green so I used a sponge dauber and sponged on olive ink.  Turned out perfect.  The verse is from MTME and is so perfect for this image.  It was cut out with a Nestie and sponged prior to taking it out of the die. 

Now when I looked at the image  with the dimension around it, I needed to stamp the image again and cut out just the flowers and attach them with dimensional tape. This balanced out the dimension.   I added some Stickles to the center of all the flowers to add a little bling.  This card is so cute I just don't think I can give it away.  I don't say that often. 

Hope you enjoy this creation.   Hope you will leave a comment and let me know.   Thanks for stopping by.

Saturday, June 5, 2010

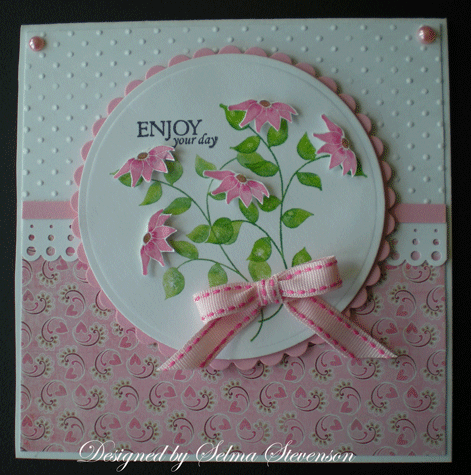
Enjoy Your Day


My friend Brenda is the  hostess for the StampTV  Wednesday Inspiration Challenge.  I made this card to participate. 

The stamp set used for this card is "Hope Grows" available from Gina K Designs.  I love this new set illustrated by Theresa Momber.    The larger group of leaves in this set  was stamped twice.  This is a solid stamp so I used markers to color directly on the rubber.  First I used a light green marker then used a darker marker to add some contrast.  I used a fine water mist to blend the colors prior to stamping.   Next the verse, also from  this set, was stamped using a stamp positioner.  Five flowers were stamped and cut out and placed among the leaves using dimensional tape.  Circle Nestabilities were used for the circles.  The stamped image was cut out prior to attaching the flowers. 

A piece of Basic Grey design paper was attached to the bottom of the card with another piece of white card stock, that was embossed, attached to the top portion.  A Martha Stewart punched border was added across the middle with a narrow strip of pink cs attached along the top of it.  A piece of pink ribbon from Gina K was used for the bow.  Two pearls were added to the top to complete the card.

Hope you will participate in this challenge.  You could win a Gina K Designs stamp set of your choice valued up to $24.95.
 

Friday, June 4, 2010

Zoe Gazing at the Butterfly


We are having lots more rain so it is another good day to stay indoors.  They are expecting flooding in a lot of areas near us.  It just doesn't seem like we are ever going to have nice weather.

When I was out at Joan's Gardens I couldn't resist purchasing some more Stampavie stamps. She has all the new Sarah Kay stamps in stock.   The one on the card above is called Sarah Kay's  "Zoe Gazing at the Butterfly".  Isn't she cute!   I decided to create a scene for her.  I have a brass stencil by Lynell Harlow that I have had for years.  I decided to try and create a stone wall behind Zoe with it.  First I stamped the image then placed it on a light box over the stencil.  It was easy to be able to do the dry embossing around the stamped image.  I used sponge daubers to add colors (brown, gray and white) to the wall.  How do you think it turned out?

The image was colored using a combination of Copic markers, Koh-i-noor pencils and oms, and colored pencils without oms.  For the grass I used stamps from Kitty Caracciolo's "Cause A Scene" stamp set.   Kitty has great stamp sets for creating scenes.  Next to the wall I stamped some longer grass and added some tiny punched daisies to match the flowers in the basket.  I love the butterfly on Zoe's toe and punched some additional butterflies to add to the scene.  The Martha Stewart "Floral Lace" edger punch was used for the border across the center of the card.

The designer paper is from the Basic Grey "Green at Heart" paper pad.  It is so perfect with this card.  The verse is from the new JustRite "Birthday Sentiments" set.  This is a perfect set for birthday greetings.  It comes with nine sentiments and is used with the new clear circle stamper. 

Have you created scenes for some of your stamped images?  It is so much fun.

Hope you are having a nice sunny day.  Thanks for stopping by.

Thursday, June 3, 2010

Pretty Box with Feet

Top of box


View of side showing feet


Inside box

Today I wanted to let you know that Joan from Joan's Gardens has in all the punches and vellum used for my flower tutorial.  Also, she has a supply of the black 6x6 boxes with the window, and the Tim Holtz feet used on the box above. 

To cover this box I used paper from the "Mariposa" 8x8" stack.  I cut a piece from one corner, 6x6",  for the top of this box then placed it on the table and centered the lid over it so I could trace the opening.  Instead of cutting all of the opening just as it is on the box, I decided to cut around the top portion of the bird and the cage. A gold maker was used to outline the opening.  Strips from this same paper were cut for the side of the box.  Another piece of this same design paper was cut 6x6 to be placed inside the box, exactly matching the top.  When you look through the acetate covered opening, you can see the design on the lower right side.  When I attached the acetate, I cut a rectangle larger than the opening and attached it with ScorTape to the top of the box then attached the design paper over it.  When you open the lid you don't see taped on acetate.  

To decorate the top of the box I made some blue flowers out of vellum.  I used blue to match the blue butterfly in the patterned paper.  A Martha Stewart punch was used for the lacy design under the flowers.  Vellum leaves and MS fern were added around the larger flowers.  Small vellum flowers, in both blue and white, where scattered around the large flowers, on each side of the verse and down in the right hand corner.  

I used the pretty verse and border from the JustRite set "Joyful Hearts".   The verse was stamped with black ink on a piece of the designer paper.  The border was stamped on white cs.  Both pieces were cut out with Nestabilities and layered with dimensional tape.

A Spellbinder tag was cut out using black card stock.  It was cut in half and both ends layered together to make a sturdy "handle" to open the box.  A piece of pretty lace was added along the top edge of the sides with ScorTape.  One small circle from the lace was attached to the "handle".  To complete the box the Tim Holtz "Idea-Ology Foundations Box Feet Set Of 4" were added. 

All supplies (except the lace) can be purchased from Joan's Gardens.

These boxes are so easy to decorate and make a beautiful container for cards that you want to give as a gift.  Of course there are many other great things you could use it for.


Tuesday, June 1, 2010

Box for cards


Yesterday I told you I was going to make a box for a variety of greeting cards I am sending my sister for her birthday.  This is what I came up with. 

This is a 6x6" box.  I used one of the 6x6 Webster's Pages for the top. Strips from a larger piece of Webster's Pages dp were cut to decorate the sides of the bottom of the box.  Mulberry flowers were arranged on top of a Martha Stewart punched design.  I really love working with these flowers. Some vellum leaves I made, and a few green sprigs from a MS punch, were added under the flowers.  Yellow vellum butterflies, from a MS punch, were added.  Pink pearls from Kaiser Crafts were added.  All these supplies are from Joan's Gardens.

A birthday greeting from one of the new JustRite stamp sets "Birthday Centers" and a border from the "10 Designer Centers and Borders" was stamped using black ink on yellow card stock.  It was cut out with a Nestability.  The edge of the lid has lace I received from a great friend (Thanks Eileen).  A piece of narrow yellow twine was added to the top of the lace with ScorTape to bring out the yellow to the sides. 

The box is filled with a variety of 5.5" square cards.  I know she will love this gift so now I'm off to get it in the mail.

Thanks for visiting again today.

Monday, May 31, 2010

Friends


Today is another cloudy, rainy day so can't get out and plant my flowers.  Good day to stay indoors and what else -- stamp!  I have been thinking about all the friends I made while on my trip so have made a "friend" card.  The stamp sets used are the "My Garden Set" and "Plant a Little Love" from JustRite.  I purchased these sets from Joan's Gardens.

The background paper is from a MS paper pad.  A white square was embossed with a Sizzix embossing folder and attached to a slightly larger piece of pink card stock. The corners were rounded with a corner rounder punch.  I used a white pen to add stitch marks around the edge.  The border with the verse, from the "My Garden Set", was white embossed on pink card stock and cut out with a petite circle Nestie.  Another smaller white scalloped circle was cut out to add the flower to.  The scallops in both pieces were pierced. 

The flower from "Plant a Little Love Set" was stamped three times and colored with Copic markers. I did this so I could layer the flower for dimension.  You can see this in the second photo above.  Each layer is attached with dimensional tape.  Four Cuttlebug corner flourishes were cut out and placed on each corner of the embossed piece.  A white dotted Swiss bow was made with the Bow Easy and attached to the top of the design.  Pink pearls were added to complete the card.

This was a very fun card to create.  As you know, I love lots of layers and dimension.  It always makes me feel good when I spend time to "create" my own little piece of art.  This will be one of a set of cards I am giving my sister for her birthday.  I have to get busy and create a box for her cards now. 

Sunday, May 30, 2010

JustRite Challenge


This week the JustRite Friday Challenge is sponsored by Copic and the challenge is to use your JustRite ROUND stamps with this inspiration sketch shown here.

One of the newer JustRite stamp sets is the Kaleidoscope Set.  This set has six beautiful borders and centers.  For my card I used Versamark ink and clear embossed one of the designs on glossy card stock.  It was colored with sponge daubers using two different shades of lavender then cut out with a circle Nestability.  The border used from this set was white embossed on lavender card stock and cut out with a petite scalloped Nestie. 

The background was embossed with the Cuttlebug dotted Swiss embossing folder and a Martha Stewart punch used along the bottom.  Another lavender border was punched out then a pretty lace attached on top with ScorTape.  Each layer of the Center was attached with dimensional glue dots.  I wanted to add a mulberry rose to the center of the design but only had pink and white.  I decided to add some lavender reinker with some water in a spray bottle so I color one of the white roses  lavender.  It was attached in the center of the Kaleidoscope design with a glue dot.  Two pearls were added to the top corners. 

Mariposa Thank You Card


Today I made a card using beautiful paper from the "Mariposa" paper stack that I purchased from Joan's Gardens.  OMG, this has the most beautiful papers in it. Have you seen this paper?   I am sure you would love every page in this pad. They are so pretty I actually didn't want to use them but I can always buy more -- right!  These papers are so beautiful by themselves that you really don't need to add much stamping. 

I cut off the design from one of the corners from this page and attached it to ivory card stock.  My card is 5.5" square and the paper is 8x8".   I wanted to add some dimension to the card so cut out the butterflies and one of the flowers from another piece and attached them with dimensional tape.  After I cut them out I inked around the edges of each cut out piece with matching Chalk Ink so the cut white edges didn't show.  I used a verse from the JustRite "Just A Note" stamp set in the upper right corner.  It was stamped with black Memento ink and cut out with a circle Nestie.  The border was stamped on another piece of cs and cut out a scallop edge circle Nestie.  There is dimensional tape between each layer.  Four black rhinestones were add to the design to complete the card. With the rest of the paper from this page I decorated the inside of the card but failed to take a picture.

I apologize for the poor quality of pictures.  We have very cloudy weather and just can't seem to get a nice sharp picture showing the beautiful color.  If I knew more about PhotoShop I'm sure I could probably sharpen the color, but I don't know how to do that.  

I hope you are having a wonderful weekend.  I went out to lunch with my daughter today and now I plan to get in some more stamping this afternoon.

Saturday, May 29, 2010

Friendship and Happiness


I made this card for a friend and decided to enter it in the JUGS challenge.  Alicia is the hostess this week and her challenge is to include dry embossing on your card.   You can do this however you choose....with an embossing folder, light table.....only requirement is that your project has dry embossing on it somewhere.

The background on my card was embossed using the Sizzix Finial Press embossing folder.   For the center design, the bottom aqua piece was cut with the Nestie's Label One.  For the next level up I stamped one of the borders from the JustRite "Friendship Set" and cut it out with a Nestie's Petite scalloped circle.  Another Nestie circle was layered on top.  Each layer is attached with dimensional tape.  A Prima flower was added in the center. 

A ribbon was taped along the left side of the card.  Flowers that I purchased from Joan's Gardens were added along the ribbon with glue dots.  I curled the wire stem that was on each rose for added dimension.  The verse is from PTI and was cut out with a Nestie and each scallop pierced.  Pearls were added to complete the card.

This was not a hard card for me to complete because I love to add dry embossing to most every card I make.  Hope you like it.

Thanks for stopping by.  Have a wonderful weekend.


Thursday, May 27, 2010

JustRite Christmas card


I made this card to enter into the JustRite  Friday Challenge 019: Christmas in May Challenge but didn't think about the time difference so missed entering in time.  I had so much fun with this card I am posting it anyway.

I used three JustRite stamp sets:  "Something Sweet", "A Merry Little Christmas Set", and "Decorative Frames".  I started by embossing the outside of the blue card stock with the Cuttlebug Dotted Swiss embossing folder.  I only embossed around the edges of the frame.  I have had the cute little acrylic snowflake frame for a long time and wanted to use it to frame the greeting.  This greeting is from the "A Merry Little Christmas Set".  It is actually a round stamp but I did not use the frame. These stamps are so versatile you can use them many ways.   It was cut out with a square Nestability and attached to the back of this frame.  Next I stamped the little frame from the "Decorative Frames Set" using VersaMark and white embossing powder then used the same Nestability to cut out the center because I wanted to attach it to the top to frame the opening.  I used scissors to cut around the outside of the design.  I used ProGlider High Tac adhesive.  The little snowman from the "Something Sweet Set" was stamped with black Memento ink and colored with Copic markers.  He was attached to the frame with a glue dot. Along the bottom of the card I added some pretty trim I found while in Chicago.  It kind of reminds me of snowflakes on this card.   Three Martha Stewart snowflakes were punched.and I added one of the small circles with the pearl, from the lace,  in the center of each snowflake.  Glitter was added to the snowflakes and on the snowman.  

It is never to early to start making your Christmas card.  I am very happy with my first one for this year.  Have you started yours yet? 

Well I will pay more attention to deadlines next time.  Hope you enjoy this card.


Wednesday, May 26, 2010

JustRite -- A Perfect Day


It was "A Perfect Day".  I want to tell you about my exciting visit to JustRite Stamps with my friend Pam. 

As you all know I have been away to do a workshop for Joan Fricker at Joan's Gardens. I have developed a great friendship with one of my StampTV buddies, Pam Imholz.  We were on the same Center Stage Design Team for Gina K Designs.  Pam was able to take some time off to attend the workshop and then she drove me back to spend some time with her at her home.  When I met Pam I felt like we had been friends forever.  She is such a sweet, fun person to be with.  We shared an amazing afternoon together at JustRite stamps.

After my visit with Pam I had plans to visit  a long time friend who lives in Elk Grove Village in Chicago. Some time ago, I noticed on the JustRite site, that they are also in Elk Grove Village so  I wanted to stop by to see if they had a retail store.  I have been a big fan of JustRite stamps from the very beginning.  I started out with the large monogram stamper and have been adding JustRite stamps to my collection ever since.   Pam was driving me down to see my friend, so we decided to see if we could find JustRite on the way.  As it turned out they are located just a couple of miles  from my friend.  We had the address but there was not a sign for JustRite.  We walked in and told them we were looking for JustRite Stamps.  The person we were talking to was the President of JustRite.    We told him we had just returned from a workshop at Joan's Gardens in Indiana and I had featured some of their stamps in the projects.  In fact, I had the sample cards  used for the workshop plus all the other JustRite cards I had made and used for display at the workshop with me.  What a warm welcome we had.  He invited us to sit down in his office to visit with him and several others from his staff.  Our meeting lasted about two and a half hours and was so interesting.  We learned about the history of the company, a little about the process of making the stamps, were shown some of the new products and the new catalog, discussed different marketing strategies and answered questions about things we look forward to in the stamping world.  It was very exciting to be able to discuss these things with them. 

 Pam and I were so excited to see the new products. We were each given a couple of the new sets and the new stamp blocks.   Up until now all the handles were wood blocks.  You are going to love the new clear stamp blocks with grooves, which is going to allow you to position the stamp perfectly.  Isn't that exciting!  Lots of new things coming.

We were shown the new 2010 JustRite Catalog and Idea Book.  This catalog has 84 pages and includes all their current stamp sets as well as the new stamps that will be released during the next four months. It is filled with beautiful cards/projects completed by their design team.  You can read about the new products and preorder this catalog from the JustRite site  here.

JustRite will be releasing over 37 new products which includes nine new Christmas/holiday stamp sets that Pam and I instantly fell in love with.  One of the new sets has snowmen stamps -- if you are a follower of my blog, you know how much I love snowmen!  This set is definitely on the top of my wish list.

 I want to thank Craig, Randy and Kim for a most enjoyable afternoon and their generosity.  I am excited to start working with my new stamps.  It was exciting to hear about the company, see new products, and have you take an interest in what we stampers have on our minds .  I have loved JustRite stamps from day one and I am so excited about all the new things to come. I feel very honored you gave us the opportunity to visit with you.  Thanks again for everything.

Our visit to JustRite was "A Perfect Day" as my card above says.

This card was made with one of the new JR stamp sets. I don't know the name of the stamp set (it was not in packaging) but I love every stamp in it.   I also love the new clear stamp block and I am sure you will too. I chose this stamp because it describes my fun day at JustRite. The greeting and border were stamped with brown ink twice. I used a scalloped rectangle Nestability to cut the greeting out of one of them so I could attach it with pop dots to give the card some dimension. The design paper is from Basic Grey. The flower was made using a crepe paper streamer. Carolyn (Cammie) King has a tutorial here. I wanted my flower to be tan to coordinate with the background paper so I  used the heat gun to slightly scorch it. I love how it turned out. (The paper starts to scorch very fast so you need to quickly run the heat gun over the flower so it doesn't catch fire.) The brown flourishes were cut using the Cricut. A brown silk ribbon and pearls were added to complete this card.

You still have time to check out the JustRite May Super Sale and save up to 25% off some products .  If are not familiar with JustRite,  you will find a great variety of stamps for any occasion and also so many sentiments that stampers love to add to their stamp collection.  You will love these stamps.

Thanks for stopping by.  Have a great day.


Tuesday, May 25, 2010

Punched Daisy


Punch and dies used for flower

 I have two requests to explain how I made the punched daisy card I posted here.  I thought I would just post a similar card and answer questions from my readers.  One of the questions was what did I use for the small white squares.  It is a Cuttlebug die that I bought when the Cuttlebug first came out.  I don't know if they still sell it.  After cutting out the squares I embossed them with the Cuttlebug Dotted Swiss embossing folder. 

The second person asked which punch I used for the petals of the flower.  It is the smallest of the SU oval punches. I would have used a Nestie but they are not small enough for the size flower I wanted.    I cut out a small "v" shape in the end of each petal and sponged the petals with a darker ink using sponge daubers.  The petals are layered onto the center of the flower.  The center of the flower was cut with a small scalloped oval die from Nestabilities.  In order to make the center look like it had seeds, I used a stylist to emboss a lot of dots on one end. The flower is attached with a glue dot and the leaves tucked under using a little adhesive. 

I hope this info helps.  Thanks for stopping by.
 

Monday, May 24, 2010

JustRite Purple Daisies


This morning I bought a few flowers for my flower boxes so thought I would use one of my favorite JustRite stamp sets to make a flower card today.  These daisies are from the "Beautiful Blossoms" stamp set.  They were stamped with Memento black ink, colored with Copic markers and cut out. A black rhinestone was added to the middle of each flower. The flowers were layered on a Nestability Labels Six die then on the Spellbinders Lotus Pendant.  These were attached to the middle of the dp. 

For the flower in the upper left hand corner, I used a prima flower and added some punched flowers to the center, then a black rhinestone.  Stamped leaves were tucked below the flower.  A SU butterfly was stamped on vellum and attached with a dimensional.  The greeting was stamped onto the dp and two additional rhinestones added to complete the card.

It is a beautiful day here in Washington so I plan to go out and get a little sun this afternoon.  Thanks for stopping by.
 

Saturday, May 22, 2010

Update on Indiana Workshop

Before I start my post today I want to thank all of you who have sent cards to my niece.  She has received cards from all around the world and they have certainly cheered her up.  She is very excited to open every card.  She is amazed at all your talent and is adding the cards to a scrapbook album.  I really appreciate all the love you have sent.

I have just returned from a very fun filled "vacation".  I flew into South Bend, IN to do a workshop for Joan Fricker at Joan's Gardens.  What  wonderful people Joan and Jon are.  Jon is Joan's husband. I really enjoyed my stay with them.   I have some pictures of Joan, myself, my friend Pam and the workshop projects I prepared.  I met many stampers who follow my blog and have made many new friends.  Joan's workshops are just fabulous and I highly recommend you attend if you get a chance.  The next one will be in August.

My challenge was to create and teach some new techniques for Joan and the participants.  Below are pictures of the items I created for the workshop.  You can see additional pictures on Joan's blog and Pam's blog.


Joan and Selma


Pam  (Stampin' Pam) and Selma

Pam drove down from upper Chicago to attend the workshop.  On Sunday Pam and I drove back to her house and had so much fun.  Pam, her husband and I went to a restaurant called "The Shanty" and had a delicious dinner that evening. Pam had never heard of this restaurant but it was featured on the Food Network and I really wanted to go.  What fabulous food!   

Monday afternoon I was to go stay with another friend who lives in Elk Grove Village.  I have been using JustRite stamps for a long time and noticed on their site they are located in Elk Grove Village. As you can see below, I used three JustRite stamp sets in my workshop projects.   I wanted to stop by and see if they had a retail store.  Pam and I went before she dropped me off at my friend's house.  I will tell you all about this exciting visit in a later post.

As you probably know, I posted a tutorial on how I make my vellum flowers.  I have had so much response  to that tutorial I decided to show everyone at the workshop how to do it and let them make some.  Below is one of the pictures from the tutorial.  You can purchase the punches and vellum needed to create these flowers from Joan's Gardens.


The first project for the group was to make a shadow box card.  I had many details incorporated so they all learned a lot of techniques.   The tulips, which were colored with Koh-i-noor Pencils and OMS, is from the JustRite stamp set "Breath of Spring".  The verse is from the JustRite stamp set "Autumn Blessings".  All the JustRite stamp sets are also available from Joan's Gardens.  The card below is the one Joan made in the workshop.


Joan had never used Koh-i-noor pencils and OMS.  One of my demonstrations included this technique.  Also on this card I wanted to show how to use many layers without a lot of bulk.  They were taught how to cut out frames for each layer.  Also I am always asked about how to cut out flowers so I did a demonstration and showed them how to create a dimensional flower by layering  several flowers.  The flowers used on this card are from the JustRite stamp set "Plant A Little Love".  The little girl is  the Stampavie "Cherry Pickin' stamp. 


The following picture shows the cut out frames for layering.  This was done using a Fiskar's paper cutter.


For this last project I had everyone create a 6x6x3 inch box.  It was covered using 2 different 12x12"  pieces of Webster's Pages and decorated using mulberry flowers which Joan had to get from England.  Aren't they beautiful.  She now carries these in her store.   Flourishes were cut out with the Cricut and a MS punch was used for the leaves. 


Below is a picture of the side of the box showing the paper and pretty lace used for the edge of the lid.  This lace was attached with ScorTape.


The inside of the bottom of the box.


I had them cut out a portion of the design from the Webster's Pages paper to add a sentiment to the inside of the lid.


I want to thank Joan for the opportunity to go out and present this workshop.  It was wonderful to meet her, her family  and all the other stampers. 

Thanks for stopping by.  Have a wonderful weekend.


(Some project pictures were borrowed from Joan Fricker.)

LinkWithin

Related Posts with Thumbnails