Friday, June 18, 2010

For Someone So Special


Have you been over to see the new Thursday Challenge from Joan's Gardens?   You can see Joan's beautiful card and read all about the challenge here.

The challenge for this week is to create a card or project with a Vintage theme and use at least one Spellbinder Nestibility.  For my card I used a piece of design paper from Webster Pages.  I stamped a greeting from the JustRite Birthday Sentiments stamp set and cut it out with a Labels I Nestability.  It was sponged prior to taking it out of the Nestie.  Some brown trim was wrapped around one side and vellum flowers created to look like the ones in the dp were added. I added Flower Soft and a black rhinestone to the center.   A few brown pearls from Kaiser Crafts were added to complete the card.

I hope you will go over and join in on Joan's Thursday Challenge.  The prize this week is a Grapic 45 12x12 Boardwalk Paper Pad valued at $19.99.  You will have until next Thursday (June 24) morning 6:00 AM EST to link your card/project. 

Tuesday, June 15, 2010

I've Been Thinking About You


Below is the Sketch Challenge


This card was made for the Tuesday StampTV Sketch Challenge.  

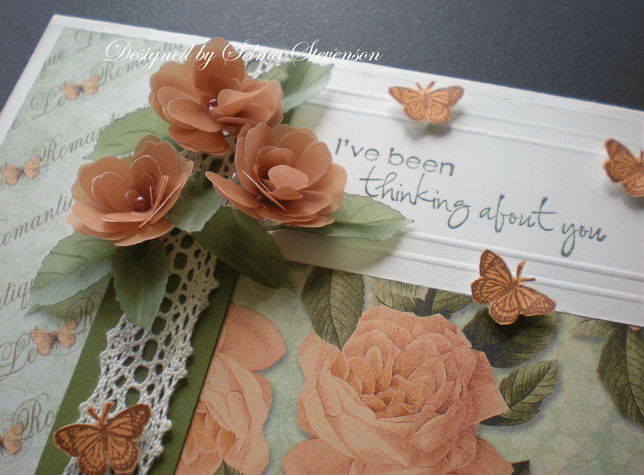
It was so fun working on this card because I LOVE the design paper I used.    I followed Melissa's sketch challenge using design paper from the Graphic 45 "Le'Romantique Collection".  The stamp used for the verse is from Gina K's "Enjoy the Sunshine" StampTV kit.  I love the script and it is beautiful with the dp.  It was stamped on ivory card stock.  To frame the sentiment, I used the ScorPal to draw  double lines around it.  Two pieces of the design paper were cut to complete the sketch challenge.  A piece of lace was placed over a strip of "Always Artichoke" card stock and placed over the seam.  I created three roses out of the dusty peach vellum and punched leaves from green vellum.  I wanted to create roses to match the images in the design paper.  The little butterflies are from Theresa's "Sending Sunshine" stamp set, also available from Gina K..  They were stamped on peach paper with brown ink and cut out to "flitter" around the flowers.  

The Graphic 45 Design Paper Pad, vellum, and lace were purchased from Joan's Gardens.  

Thanks for stopping by.  Hope I have given you some inspiration for your creative day.

Monday, June 14, 2010

Just For You


I have already posted a couple of cards today but couldn't resist stamping again.  I made this card this morning and like it so much thought I would do another post. 

This card is made with two of the new JustRite Nested Frames sets:  "Victorian Nested Frames and "All Occasion Nested Sentiments".  These sets are used with the new JustRite clear stamping blocks.  You can order these stamps and all supplies I used on this card from Joan's Gardens.

To start off I used the peach dotted paper from the Webster's Pages "Lullaby Lane and Life's Portrait" paper pack.  I paired it up with the butterfly design paper from the Mariposa stack. Both these pads have such beautiful paper!   A piece of lace trim was attached with ScorTape across the seam. 

I made the flowers from Vellum. They are made just like the smaller flowers in my tutorial except I used a larger flower punch for the outside petals and used the smaller Martha Stewart punch for the petals in the middle.  The leaves are also punch from vellum.  Joan's Gardens does carry the vellum paper pad that I use to make all my vellum flowers. 

The JustRite Victorian Nested Frames were stamped on ivory card stock.  I used a craft knife to cut out the center of the largest frame and attached it to a piece of Sarah Sand card stock.  I did this because it gives a little contrast with the ivory and Sarah Sand cs.  Scissors were used to cut around the design on both frames. The verse is from the JustRite All Occasion Nested Sentiments set.   The inside frame was attached with dimensionals.  Sarah Sand ink was used to sponge around the edges of the greeting and also the edge of the design paper.  Three butterflies were cut out from the Mariposa butterfly paper and attached with dimensionals.  Small peach pearls were added to complete the card. 

A Cookie for You plus another challenge card

HAVE A COOKIE


Isn't this the cutest card!  Melanie Muenchinger designed this card using her stamp set called "Have a Cookie" available from Gina K Designs.  I recently purchased a book by Annie's Attic called "Interactive Cards" which features many cards by Melanie.  She also has a tutorial on her blog for this card here.  The card was very easy to make using Nestabilities, a Cuttlebug embossing folder and Melanie's stamp set. 


This next card is for Giovana's Friday Christmas Challenge over at StampTV.  This week the challenge is to make a card making the Sentiment the "star or focus" of your card. This card is white and silver but for some reason looks kind of gray or blue; not sure why.  I used Melanie's Munchinger's "Festive Frame" set for my sentiment.  I decided to make my background embossed rather than using design paper.  This card is 5x7".  Two different Cuttlebug Christmas embossing folders were used.  I embossed the center with the "Season's Greetings" folder then each side with the "Snowflake" folder.  I like the way this turned out.    A narrow piece of silver trim was added framing the "Season's Greetings" embossing.  The sentiment was embossed with silver embossing powder and cut out with a Nestie.  Two silver scalloped frames and one white frame were cut out with Nesties and layered under the sentiment using dimensionals.  To complete the card, clear rhinestones were added to some of the snowflakes and a silver sticker snowflake added under the sentiment.  This was a very quick and easy card to make.  It  is nice to get started on all my Christmas cards.

You still have time to participate in this challenge.  You can check it out here.

Sunday, June 13, 2010

Birthday card


There are three cards posted today .


Tonight is the deadline for Carla's  Monday Color Challenge over on StampTV so I have another post today.  The colors to be used are pink, orange and green.  I would never think of this combination on a card but orange and pink are my granddaughter Shannon's favorite colors.  Everything in her room is orange and pink. 

I started by using a design paper from the Mariposa stack.  I purchased this pad from Joan's Gardens.  The orange paper with the butterfly design was my inspiration to use the butterfly from Gina's new StampTV kit "Enjoy the Sunshine".  The butterfly and flowers were colored using Copic markers.  The corners were die cut with a Cuttlebug corner die and the greeting was sponged prior to taking it out of the die.  A strip of grass was cut with a Martha Stewart punch and added to ground the flowers.  This ended up being a fun challenge and I love how it turned out.  Shannon's birthday is just a few weeks away so this will be her birthday card.  I'm sure she will love it. 

Now I'm off to submit this card for the challenge.  Have a great day.

More Vellum flowers and a Challenge


Good Morning. It is bright and early and I have two cards to post today. The first one was made when I was in Chicago at Pam's house (Stampin' Pam). She was working on a school project so I had a chance to see and "play" in her very organized and well equipped stamping studio.  She has a wonderful display of the gorgeous projects she has posted on her blog -- what an amazing designer!   Now to the card; I had so many choices and decided to work with this beautiful vine image.  I believe it is from PTI.  I had just punched a bunch of vellum flowers to leave with Pam, and ended up using some of them to make the tiny flowers for this design.  I did not have time to finish the card because it was time to head down to see if we could find JustRite stamps before Pam dropped me off to visit another friend, not far from there.  Pam completed the card.  She also posted this card and you can read her post here.  I love the tiny little flowers on the vine.


Last night Pam sent me the picture of the finished card I had started at her house after I finished making this card for Linda's Blast From the Past challenge on StampTV.  I had to laugh  because it was also made using had some yellow vellum flowers.   This card was made using a  stamp from Gina K's "Spring Mix" StampTV kit.  I thought it would be fun to give the flowers a dimensional look.  A Fiskars border punch was used at the top and the vellum flowers added where the holes of the punched out flowers.  These tiny vellum flowers also fit perfectly on the post of the mailbox.  To make these flowers I used the smallest flowers from the MS punch and added a tiny pearl to the middle. 

Linda's  Blast From the Past Challenge is to use colored pencils and oms.  That is how the mailbox was colored.  The leaves in the border punch really match the leaves on the mailbox don't they; and the vellum flowers are exactly the same size as the stamped flowers.  It really seemed to all go together.   The top of the mailbox was stamped twice and attached with dimensionals.  Isn't that squirrel cute!  The verse is also from the same stamp set.  It was sponged prior to taking it out of the Nestie.  The card stock and ribbon are from the StampTV kit.  The left side of the "fresh asparagus" card stock was embossed with the argyle Cuttlebug embossing folder.  A piece of Gina's yellow gingham ribbon was added along the side then I tried something new.  I placed a piece of ScorTape down the center and puckered up the grosgrain ribbon to give it some dimension.  I'm not sure if I like the look or not.  What do you think? 

Vellum Flower tutorial here.

Saturday, June 12, 2010

Plant a Little Sunshine


We finally have a beautiful sunny day.  I have some flowers and vegetables that I need to get planted and think today is a perfect day to do it.

This card is made using  more of my vellum flowers.  I think these look more like roses -- I used a different punch. For these flowers I used the Martha Stewart Four Leaf Clover punch and cut off the stem.  Do you think they look more like roses?   The designer paper is from the Basic Grey "Kioshi" paper pad.  The vellum flowers and leaves were attached over the design in the paper.  A matching green Martha Stewart ribbon and bow were added to the right side.  The verse and border are from the JustRite, "Seeds of Kindness" set.  They were cut out with circle Nesties and attached with dimensionals. 

Wow, that was a very quick and easy card. I like how it turned out even though it didn't take long to make. 

Wishing you a fun weekend.  I'll be back tomorrow with something different.

Edit -- I have had a couple of request on how to make these flowers.  Here is my tutorial.  

Friday, June 11, 2010

Stationery Box


Today I decided to work on a tutorial I saw on SCS.  It is for a stationery box.  Click here for the link.  I changed a few things to dress it up. 

I started out using some Martha Stewart two sided design paper.  I also used a solid aqua card stock.  I trimmed the lower edges of the lid with a Martha Stewart punch and embossed the top and sides of the lid with the Cuttlebug dotted Swiss embossing folder.  A piece of lace trim was wrapped around the top edge.  A beautiful rose was added to the top of the lid.  A few pearls and punched leaves were also added.  On the front of the box I used a Nestie die and used a SU stamp.  A mulberry rose, MS punched leaves and some pearls were added to the label.  It was attached with dimensional tape.

For the box I cut the pieces out the same as in the tutorial.  Two changes I made was I used a corner rounder for the edges of the front and a scalloped piece was added along the inside pocket, which is not done in the tutorial.  Six greeting cards were made, six thank you notes and three gift tags were made for the pockets.  JustRite stamps were used for these projects.  You can see the thank you notes and tags in the bottom picture.  A tablet that pulls down from the top was covered only going partially up the bottom to the tear line on the tablet.  I used my JustRite stamps and the new clear stamping block to stamp the word "Stamps" on the little stamp envelope.  I love the new clear stamping blocks because you can see exactly where you want to place your inked image.  A small mulberry rose was added on that envelope.  A JustRite greeting  for the inside was stamped and sponged prior to removing it from the Nestie die. 

I purchase my JustRite stamps, Martha Stewart punches, mulberry flowers and pearls from Joan's Gardens.

This was a fun, easy little stationery box to make.  I plan to send this off to a friend for her birthday.
  

Thursday, June 10, 2010

A card for Joan's Gardens Challenge

Card closed


I told you yesterday about an exciting new event happening over at Joan's Gardens.  She has started a new event called "Joan's Gardens Thursday Create a Card  Challenge".  This week her challenge is to use a JustRite Floral stamp and use the colors pink, yellow and green.  Be sure to go over and read all about the challenge and see what you can win. I hope you will  support Joan by participating in this exciting event.

Today my card is made using three JustRite flower sets:  "Beautiful Blossoms",  "Breath of Spring" and "Plant a Little Love".  The verse on the inside of the card is from the JustRite "Joyful Hearts" set.  This card fits into a business size envelope.

To create this card I started with a piece of card stock 8.5" x 10.5".  It was scored along the long side at 1.75", 3.5", 7", and 8.75".  A strip of green card stock was cut 1.75" wide for each outside strip.  Another green piece of cs cut 3" wide for the center of the card then two narrow strips to go on the edge . 

Two strips of white card stock were cut 8.5" by 1.75" for each side panel.  I used a square Nestie to cut "windows" in these pieces.  For the right side I started in the middle and centered the Nestie to cut an opening.  Two more were cut to create three windows on this panel.  On the other side four "windows" were cut.  The windows were cut offsetting the windows on the right.  You can see this in the first picture above.  These panels were embossed using the new Cuttlebug "Kassie's Brocade".  I just received this embossing from Joan and love it.  Two green Martha Stewart borders were cut.  They were attached behind the embossed white panel. The white panels were attached to the green panels and then they were attached to the sides of the card using Glue Glider. 

The green 3" wide green card stock was attached to the center of the inside of the card.  The JustRite verse was stamped and cut out with a Nestie. Isn't it perfect for this card.   Below the verse is a white panel to write on.  The bottom edges were embossed with a Martha Stewart corner punch. 

The flowers were stamped and colored with Copics then cut out.  They were tucked into the windows on the front panels and the flower from the "Plant A Little Love" set was placed on the inside of the card. To complete the card a few punched butterflies were added on the inside and some some Dew Drops added to the outside right panel.  

 I hope you will go over and participate in Joan's challenge. If you read about this challenge on my blog, I'd love for you to let her know in her comment section.

When you go to Joan's blog,  sure to check out all the new JustRite Stamps  that will be released soon.  They are fabulous.  You can preorder them now from Joan.   

 Have fun creating.  

Wednesday, June 9, 2010

Best Wishes


I have been gone all day so I am late in posting a card today.  This card is made using the new JustRite "Victorian Nested Frames" stamp set.  There are three frames and verses in this set.  They fit onto the new clear stamping block.  I stamped the largest frame then on a separate piece of card stock stamped the smaller frame with the pretty greeting inside.  You can order this stamp set from Joan's Gardens

The designer paper is from the Basic Grey "Porcelain" paper pad.  The corner flourishes were cut with a Bosskut die.  The flowers on each corner were made using vellum.  A narrow trim was added to the bottom. 

In case you haven't heard, Joan Fricker is going to start a "Joan's Garden Thursday Challenge".  You will want to be sure and check it out tomorrow. You will have an opportunity to submit your work and win a gift.    Here is the link for the announcement. 

I'll be back in the morning with another card.  See  you then. 

Tuesday, June 8, 2010

With Love


Have you seen the GORGEOUS bridal collection that Jerri Kay Jimenez has been posting on her blog.  You can check out the collection here.  Everything is beautiful beyond words.  She has details on her blog about how she created the roses and since I love flowers, wanted to give it a try.  My rose is not nearly as pretty but thought I would post it.  Jerri stated that she will do a video which I will definitely want to see. 

I made my rose and decided to put it on a card.  This is not a card that can go in a regular envelope.  I created the rose following her directions. You will find all the supplies needed on her blog and a link to her store if you need to purchase anything.   She tinted the middle of her roses with green Tinta ink and I did the same except I didn't add enough to give it as much color.  It got lighter when it dried.  I will be making more of these beautiful roses. 

The designer paper on my card is from the Making Memories Wedding paper pack.  A Labels Four Nestie was cut out and embossed.  I used a black maker to outline the edge.  The rose was attached with a pop dot and leaves tucked under it.  Some pink ribbon was also added.  The flourishes were cut with a BossKut die.  The greeting is from MTME and inserted into the silver tag.  A piece of lace was tucked under the edge of the embossed label.  Pretty pink rhinestones were added to complete the card.

I hope you will go over to Jerri's blog to see all the gorgeous items in her bridal collection.  Here is the link for today's post.  Be sure to click on all the links within this post to see each of the items she has created.  You will be so amazed with her talent.

Monday, June 7, 2010

By The Sea


JustRite Stamps is having a challenge called "Let's hear it for the Boys".  The challenge is to make a card or other project using the "By the Sea" stamp set or any other masculine JustRite stamp set.    You can read about it on the JustRite blog here

The background paper on my card is from the Basic Grey "Max & Whiskers" paper pad I received from Joan's Gardens.  It was framed with a piece of brown card stock.  The mesh trim was purchased from Gina K Designs.  It was attached to the back of the dp with ScorTape. 

I just recently received the "By the Sea" stamp set from JustRite and have been anxious to use it.  There are four great scenes in this set as well as four borders.  I stamped the lighthouse using black Memento ink then used sponge daubers to color the sky with yellow and apricot inks.    The lighthouse and water were colored using Copic markers.  I cut around the design using scissors then used a brown marker to color the cut edge.  The border was stamped using Vivid brown ink and was cut out using a Nestie.  A sponge dauber was used to add brown ink around the edges.  The design was attached with dimensional tape to the border. 

I had some light pink and blue button sea shells.  I wanted to add them to the mesh so colored them with a Copic marker to make them look more realistic.  They turned out exactly the way I wanted.  I added some Stickles glitter to the light rays from the lighthouse.  When it dried I scraped off most of it so it just left a shine.  I also added some diamond Stickles to the waves.  Two Cuttlebug corner borders were added to complete  the card. 

This is going to be my husband's Father's Day card. 

Sunday, June 6, 2010

A Happy Life


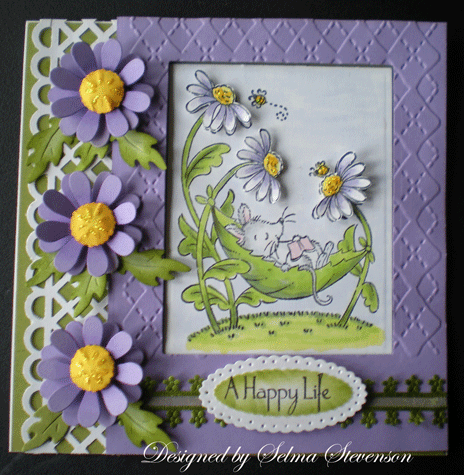
Oh what fun I had creating this cute card.  The image is Tina Wenke's "Mouse in a Hammock" by Stampavie.  I just couldn't resist buying this one from Joan's Gardens.  I will have to admit there is a lot of different steps in completing this card.  I must have been trying to see how many different things I could do on one card, LOL. 

I started by stamping the image with black Memento ink and coloring it with Copic markers.  It was cut out with a rectangle Nestie.  I used the same Nestie to cut an opening in a 5.5"x4.25"  piece of lavender card stock then embossed it with the Argyle Cuttlebug embossing folder.  The reason I did this was to raise the frame up from the design a little bit.  The base card is 5.5" square white card stock.  A piece of olive cs was attached to the front then a Martha Stewart punched border added to the left side.  

The flowers are die cut, sponged in the center with a darker purple ink, and layered with dimensional tape.  The yellow centers were cut out with one of the small dies from the Spellbinder's "Classic Frame".  They worked out just perfect for the center of the daisies.  I was trying to make them look like the ones in the image. The centers were sponged with a darker yellow to give them highlights.  In order to give the centers some dimension I used  a flower shaper tool to indent the center then put a clear glue pop dot under it so it would hold the rounded shape.   The leaves were cut with a Bosskut "daisy leaves" die and sponged with a darker ink.

I wanted to bring in the green, below the framed design, so I used a piece of lace purchased from a craft store.  It was too "bright" green so I used a sponge dauber and sponged on olive ink.  Turned out perfect.  The verse is from MTME and is so perfect for this image.  It was cut out with a Nestie and sponged prior to taking it out of the die. 

Now when I looked at the image  with the dimension around it, I needed to stamp the image again and cut out just the flowers and attach them with dimensional tape. This balanced out the dimension.   I added some Stickles to the center of all the flowers to add a little bling.  This card is so cute I just don't think I can give it away.  I don't say that often. 

Hope you enjoy this creation.   Hope you will leave a comment and let me know.   Thanks for stopping by.

Saturday, June 5, 2010

Enjoy Your Day


My friend Brenda is the  hostess for the StampTV  Wednesday Inspiration Challenge.  I made this card to participate. 

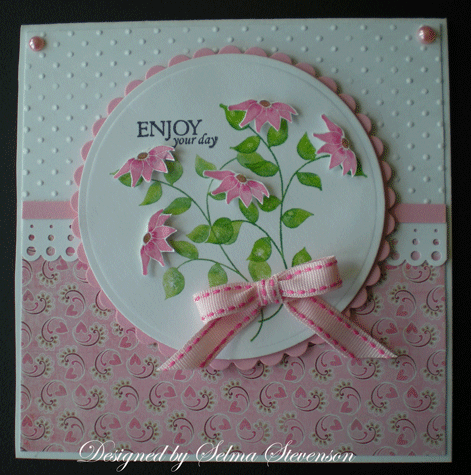
The stamp set used for this card is "Hope Grows" available from Gina K Designs.  I love this new set illustrated by Theresa Momber.    The larger group of leaves in this set  was stamped twice.  This is a solid stamp so I used markers to color directly on the rubber.  First I used a light green marker then used a darker marker to add some contrast.  I used a fine water mist to blend the colors prior to stamping.   Next the verse, also from  this set, was stamped using a stamp positioner.  Five flowers were stamped and cut out and placed among the leaves using dimensional tape.  Circle Nestabilities were used for the circles.  The stamped image was cut out prior to attaching the flowers. 

A piece of Basic Grey design paper was attached to the bottom of the card with another piece of white card stock, that was embossed, attached to the top portion.  A Martha Stewart punched border was added across the middle with a narrow strip of pink cs attached along the top of it.  A piece of pink ribbon from Gina K was used for the bow.  Two pearls were added to the top to complete the card.

Hope you will participate in this challenge.  You could win a Gina K Designs stamp set of your choice valued up to $24.95.
 

Friday, June 4, 2010

Zoe Gazing at the Butterfly


We are having lots more rain so it is another good day to stay indoors.  They are expecting flooding in a lot of areas near us.  It just doesn't seem like we are ever going to have nice weather.

When I was out at Joan's Gardens I couldn't resist purchasing some more Stampavie stamps. She has all the new Sarah Kay stamps in stock.   The one on the card above is called Sarah Kay's  "Zoe Gazing at the Butterfly".  Isn't she cute!   I decided to create a scene for her.  I have a brass stencil by Lynell Harlow that I have had for years.  I decided to try and create a stone wall behind Zoe with it.  First I stamped the image then placed it on a light box over the stencil.  It was easy to be able to do the dry embossing around the stamped image.  I used sponge daubers to add colors (brown, gray and white) to the wall.  How do you think it turned out?

The image was colored using a combination of Copic markers, Koh-i-noor pencils and oms, and colored pencils without oms.  For the grass I used stamps from Kitty Caracciolo's "Cause A Scene" stamp set.   Kitty has great stamp sets for creating scenes.  Next to the wall I stamped some longer grass and added some tiny punched daisies to match the flowers in the basket.  I love the butterfly on Zoe's toe and punched some additional butterflies to add to the scene.  The Martha Stewart "Floral Lace" edger punch was used for the border across the center of the card.

The designer paper is from the Basic Grey "Green at Heart" paper pad.  It is so perfect with this card.  The verse is from the new JustRite "Birthday Sentiments" set.  This is a perfect set for birthday greetings.  It comes with nine sentiments and is used with the new clear circle stamper. 

Have you created scenes for some of your stamped images?  It is so much fun.

Hope you are having a nice sunny day.  Thanks for stopping by.

Thursday, June 3, 2010

Pretty Box with Feet

Top of box


View of side showing feet


Inside box

Today I wanted to let you know that Joan from Joan's Gardens has in all the punches and vellum used for my flower tutorial.  Also, she has a supply of the black 6x6 boxes with the window, and the Tim Holtz feet used on the box above. 

To cover this box I used paper from the "Mariposa" 8x8" stack.  I cut a piece from one corner, 6x6",  for the top of this box then placed it on the table and centered the lid over it so I could trace the opening.  Instead of cutting all of the opening just as it is on the box, I decided to cut around the top portion of the bird and the cage. A gold maker was used to outline the opening.  Strips from this same paper were cut for the side of the box.  Another piece of this same design paper was cut 6x6 to be placed inside the box, exactly matching the top.  When you look through the acetate covered opening, you can see the design on the lower right side.  When I attached the acetate, I cut a rectangle larger than the opening and attached it with ScorTape to the top of the box then attached the design paper over it.  When you open the lid you don't see taped on acetate.  

To decorate the top of the box I made some blue flowers out of vellum.  I used blue to match the blue butterfly in the patterned paper.  A Martha Stewart punch was used for the lacy design under the flowers.  Vellum leaves and MS fern were added around the larger flowers.  Small vellum flowers, in both blue and white, where scattered around the large flowers, on each side of the verse and down in the right hand corner.  

I used the pretty verse and border from the JustRite set "Joyful Hearts".   The verse was stamped with black ink on a piece of the designer paper.  The border was stamped on white cs.  Both pieces were cut out with Nestabilities and layered with dimensional tape.

A Spellbinder tag was cut out using black card stock.  It was cut in half and both ends layered together to make a sturdy "handle" to open the box.  A piece of pretty lace was added along the top edge of the sides with ScorTape.  One small circle from the lace was attached to the "handle".  To complete the box the Tim Holtz "Idea-Ology Foundations Box Feet Set Of 4" were added. 

All supplies (except the lace) can be purchased from Joan's Gardens.

These boxes are so easy to decorate and make a beautiful container for cards that you want to give as a gift.  Of course there are many other great things you could use it for.


Tuesday, June 1, 2010

Box for cards


Yesterday I told you I was going to make a box for a variety of greeting cards I am sending my sister for her birthday.  This is what I came up with. 

This is a 6x6" box.  I used one of the 6x6 Webster's Pages for the top. Strips from a larger piece of Webster's Pages dp were cut to decorate the sides of the bottom of the box.  Mulberry flowers were arranged on top of a Martha Stewart punched design.  I really love working with these flowers. Some vellum leaves I made, and a few green sprigs from a MS punch, were added under the flowers.  Yellow vellum butterflies, from a MS punch, were added.  Pink pearls from Kaiser Crafts were added.  All these supplies are from Joan's Gardens.

A birthday greeting from one of the new JustRite stamp sets "Birthday Centers" and a border from the "10 Designer Centers and Borders" was stamped using black ink on yellow card stock.  It was cut out with a Nestability.  The edge of the lid has lace I received from a great friend (Thanks Eileen).  A piece of narrow yellow twine was added to the top of the lace with ScorTape to bring out the yellow to the sides. 

The box is filled with a variety of 5.5" square cards.  I know she will love this gift so now I'm off to get it in the mail.

Thanks for visiting again today.

LinkWithin

Related Posts with Thumbnails