As I promised you yesterday, I am posting my tutorial for creating pine cones using the
Susan's Gardens "Mini Petals". Before I begin my tutorial, I will tell you about the products used on this card. The pretty frame is a new
Marianne Design Frame die (LR0276) and the candles are a new
Memory Box die "Glowing Candles". I used pearlized card stock to cut out the candles then colored the leaves with
Inka Gold Metallic Rub (Green/Yellow). The frame was die cut using white card stock then sponged with
Tea Dye Distress Ink.
The pine cones were created using the
Susan's Garden Mini Petals" die. These little petals can be used for so many things, and I was very excited to be able to create realistic pine cones for my holiday cards/projects. Behind the pine cones I added some ferns from
Susan's Garden "Fern and Ivy Leaves" dies (which are a little hard to see in this picture), then
Cheery Lynn "Holly Leaves" and
"Wreath Strip" greenery.
MY TUTORIAL FOR CREATING PINE CONES WITH SUSAN'S GARDEN DIES
As I stated in my post yesterday, I learned to create pine cones by using the instructions in the
"Paper Bouquet Book" by Susan Tierney-Cockburn. I am using different petals but the steps are the same. You start out by using
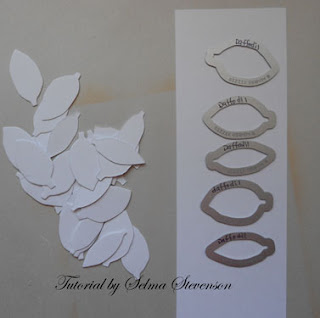
"YES" glue. This is a very thick glue that you are able to some what shape. I used a chop stick to get a small amount to shape in a cone shape. The glue is very sticky so you will probably need to keep the baby wipes close by to clean you hands from time to time. Since the glue is very sticky, I find it best to start this project by getting the glue pieces ready before I get to work on the petals so that it dries out a little and is easier to handle. I don't know how many times I cut out the mini petals because I was making a lot of pine cones, but you will probably need to die cut the mini petals die 4 to 6 times for one pine cone. You can probably run two pieces of card stock through for each cut and have enough by running it through 3 times. You will only be using the
largest of the mini petals for this size pine cone. If you want, you can make very small pine cones with the smallest petals. I wanted to give the tips of the pine cone petals some definition, so I used a brown marker and colored the top edge of each petal on both sides. You don't need to do this, but it makes each petals show up better.
After I get all the petal tops colored, I use the
small loop tool from the
Susan's Garden Tool Kit. Just run it from base to top. You probably only need to do this once but possibly twice to get it curled a little. Now you are ready to create your pine cone.
Be sure you are working on the
Teflon Craft Mat because this is a little messy. If you create the pine cone on the
Craft Mat in the Flower Tool Kit, it is very easy to turn the pine cone as you add petals - just twist the mat around as you go. Begin by pushing the petals in at the base of the glue, overlapping each petal. Go all the way around the base.
I worked around going in a spiral all the way to the top. Don't worry if you have gaps between petals, as you can see in this picture because you can go back and add more petals if needed. I do try to get them very close, but sometimes you don't see the gaps until you are about finished.
Work your way around the glue up to the top.
You will be using petals that are very curled as you get to the top because you want to create a point on the pine cone. You might need to shape them around the tweezers a little.
To get the very center petal for the point, use your tweezers and roll the petal around the point and press it tightly around the tweezers so it will stay. You don't need glue on the petal like you do with the rose. You now have a pine cone made out of mini petals.
As you can see in this photo, every pine cone will be a little different. The pine cone on the lower left is very spread out. You can still go back and add more petals in the center to make it more closed. You can press the petals together after they are all added to make a very closed pine cone. You can use the tweezers to slightly bend some of the petals back if you want an open pine cone. If you want to go a step further, you can add Flower Soft or other products to create snow on them. You will have so much fun playing with different ways to create the pine cone that you love.
My next post will be a
tutorial on how to create a ladybug with the Susan's Garden Kit. This is another easy and fun project.
I hope you have time for some fun crafting this weekend. I going out this morning to pick blackberries, raspberries, and cherries -- Yum.
Products used for this card:
Marianne Design Frame (LR0276)
Memory Box "Glowing Candles" (98661)
Cheery Lynn "Wreath Strip" (B216)
Cheery Lynn "Holly Leaves" (B183)
Susan's Gardens "Mini Petals" (658409)
Susan's Gardens "Fern and Ivy Leaves" (658 412)
Susan's Gardens Flower Tool Kit (658437)
Paper Bouquet Book by Susan Tierney-Cockburn LB-59059
YES Glue
Viva Inka Gold Metallic Rub (Green/Yellow) 30095
Kaiser Craft Pearls
985626


