Sunday, June 30, 2013

Heartfelt Creations Fall Scene


Before I tell you about my card today, I want to let you know that if you are receiving my updates through Google Reader, this reader will be discontinued as of tomorrow, July 1.  I have changed to  Bloglovin' for my reader.  If you want to continue receiving my updates in Bloglovin' you can sign up at this link.   Once you sign up with Bloglovin', all the blogs you follow in Google Reader will transfer over to Bloglovin'.  Just follow the direction on this site.   If you are not following in a reader, you can click on the "Follow This Blog on Bloglovin" button on the top right column on my blog.  I love having all my 1101 followers and don't want to lose any of you.

For my card today, I used one of the beautiful scenic stamps in the new Heartfelt Creations "Gateway to the Seasons" collection.  I used a variety of products to color this pretty scene;  Distress markers, Pan Pastels, and Distress Inks.  After it was colored, I used the "Delicate Asters PreCut Set" to create the sunflowers. They were die cut using the matching Delicate Asters Dies.  In the center of the flowers I added some multicolored beads.   

You can purchase this new Heartfelt Creations "Gateway to the Seasons" collection from Joan's Gardens.

Products used:
Heartfelt Creations "Fall Season PreCut Set" (HCPC 3542)
Heartfelt Creations "Delicate Asters PreCut Set" (HCPC 3494)
Heartfelt Creations "Delicate Asters Die"
Susan's Garden "Pan Pastels"
Distress Markers
Distress Ink Pads

974490

Friday, June 28, 2013

Susan's Garden Hibiscus - My Tutorial


Don't you love Hibiscus!  They are such a beautiful flower and up until now I had no idea how to create one.   Susan Tierney-Cockburn (Susan's Garden) has developed dies that make very realistic hibiscus and they are so easy to create. She has thought of every little detail in her flower dies and also products needed to create them.   I have a tutorial below giving you my step by step instructions.  Hibiscus come in many different colors; I have created three different colors for this card.  First I will tell you the products used on the card.    The bottom half of the card was embossed using the Marianne Design "DS0907" embossing folder.  On the top half I layered the Joy! Crafts (6002/0147) doily die cut.  The sentiment is from the JustRite "Winged Vintage Labels Two & Three" stamp set.  The flowers were created with the Susan's Garden "Hibiscus" dies.  This set of dies includes all the pieces needed to complete the flowers/leaves, plus you get a bonus with the pretty butterfly die.  I die cut the butterfly using a piece of the Elizabeth Craft Design "Shimmer Sheetz" then ran it through an embossing folder to give it texture.  The folder I used was the Anna Griffin "Poppy" embossing folder but you can use the embossing folder of your choice.  Can you see the little lady bugs on the leaves?  They were created with the Susan's Garden "Viva Decor Ladybug" Kit.  I will show a close up below in my tutorial.  To help you create your flowers, there are always instructions in each package of flowers plus you can view Susan's videos at Joan's Gardens at this link.
 
There is never a right or wrong when creating your flowers, and sometimes we have a little different technique.  I am sharing how I created my hibiscus here and hope it gives you a little additional information that will help you.

Susan's Garden Hibiscus - My Tutorial 


 When I start creating my flowers, I like to cut the card stock in strips, just a little wider than the largest die.  I have found that I can usually cut two or sometimes three sheets of card stock at one time, so I can create more than one flower with one run through my die cutting machine.   In the picture above you can see the dies used for the petals and stamen on the pink; on the green you can see the the leaves and the calyx (base of the flower).
 
 This picture shows the tray of Susan's Garden's Pan Pastels. This set comes with tools.  These Pastels are not like the typical chalks/pastels we are used to using.  They are ultra soft and blend so well.  You can easily use your Copic Markers to add details over the applied Pan Pastels.    You only use a small amount so they are going to last you a very long time. 

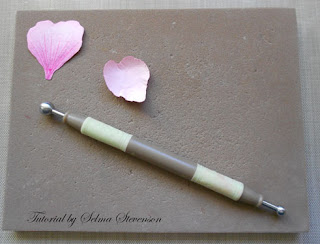
 This picture shows blending a bright pink Pan Pastel on the base of each petal. The petal on the bottom of this picture shows how I used the tool to start blending at the very base then on the side.  Next I blended up the middle of the petal.  The color will be thicker on your tool right after you touch it to the pan pastel to pick it up, so that is why I stated with the base and edges, then blended the lighter color up so it blends in well.

 I looked on the Internet to find pictures of hibiscus and colored this stamen according to that picture.  I die cut the stamen the same color as the flower then used a Copic marker to color the long "legs" and bottom.  You need to do this on both sides.
 You need to condition each of the petals.  I used the largest stylus in the Susan's Garden Flower Tool Kit and went around in circles to kind of "cup" each petal.  You can use the smaller stylus around the edges to create more "curling around the edges".

 I thought I would give you this information in case you need it.  If your shading is a little to "rigid" toward the top of the petal, you can use the white Pan Pastel to help blend it together.  The white is opaque.

Here is a picture of the pieces I will be using to create this hibiscus. I used a very fine tip marker to create lines coming up from the base of the petal to help it look more realistic.


You always know how many petals you need for each flower by the points on the calyx (base) provided with each flower.  The hibiscus has five petals so you attach one petal to each point.  I used the Crafter's Pick Ultimate Glue.  


Once the flower petals are on the calyx, I like to take the smallest stylus and press down hard on the tip of the base to "seal" the petals to it.  I just feel it helps the flower to hold together better (and seems it attaches faster). 

 When you shape the leaves, you need to use the lime green pad in the Flower Tool Kit.  Put it on your work table - not on the shaping mat, because you need it on a hard surface.  Use the pointed tool in the Tool Kit to draw lines on each leaf.  You should start on the backside of the leaf;  have the point of this tool up, using the tip of the tool,  draw your line down the back side as shown.  You can see that curved tip in this picture.

 Turn the leaf over and draw lines out from that center line, drawn on the back,  for all the little veins in the leaf.  You can shade the leaf with ink if you want.

 Once your flower has dried just a little, place it on the tan shaping mat and use the smallest stylus in the Flower Tool Kit to press down on the base of each petal causing the flower to "cup" up.   This really shapes the flower.

 Next, place the flower down in the Susan's Gardens "Flower Pot" tray pressing it down so the petals are cupped up.  Let it stay in the cup until it is dry.  If you don't put it in the cup, the petals tend to flatten out and lose their shape as they are drying.

Now we are going to work on the stamen.  Susan doesn't do this, but I like to cut each "stem" down the middle to "double" the number of stems.  I used the scissors that are in the Flower Tool Kit.

 Next I added clear glue to the tip of each "leg"  of the stamen, down to the part that was colored with the Copic Marker.  Be sure the cut portions are pulled apart a little so they don't stick together.  You need to add a dot of glue to both sides.  Next you can push the glued tips down into the Susan's Gardens "Pollen".  This is a very fine pollen and looks very realistic.  This product will start shipping the first of July, so you can pre-order it now from Joan's Gardens.  Place the stamen in the cup along with the flower until the glue that holds the pollen dries.

 Place a little white glue on one side of the bottom of the stamen and use the self-closing tweezers from the Flower Tool Kit to roll it up.

Roll the stamen up tightly, then use your fingers to squeeze it together tightly at the bottom portion.  I tried to make the bottom look like one "stem" with all the cut portions flaring out.  Pull the tweezers out.

Add the stamen to the center of the flower that is still in the Flower Pot.  Use the Ultimate Glue because it is thick and will hold best.  You might need to keep checking to be sure it is sitting up straight while it is drying.

Now you are ready to put your flower on a project.  Once your flower is attached, you can add the leaves.  Susan as come up with the cutest way to add little ladybugs to your projects.  She has developed a kit  called "Susan's Garden "Ladybugs" which is by Viva.  Isn't that the cutest ladybug! These are very, very easy to create; you first add a dot of red, then add a dot of black with the very fine tip on the tube on one side of the red dot.  The tip that comes with the kit has a very, very tiny, and it is very easy to add the tiny little black dots to the back of the ladybug.  I did all this while it was "wet".  I suggest you either put the ladybugs on a long time before creating your flower so they dry, and don't smear in case you touch them, or add them at the very end of assembling your project so you can set it aside and let them dry. 

I could sit all day and create flowers with dies from Susan's Gardens. I am always so thrilled about how realistic they look!  I hope this tutorial has given you a little more information and helps you when you create your flowers.  I'd love your read your comments.

Products used:

Susan's Garden "Hibiscus" 658415  by  Sizzix
Susan's Garden "Pan Pastels"
Susan's Garden "Flower Tool Kit" 658437  by Sizzix
Susan's Garden Plastic Flower Pots (658438)
Susan's Garden "Ladybug" Kit by Viva
Susan's Garden "Pollen"
Bazzill Card Stock
Copic Markers
Crafter's Pick Ultimate Glue
Marianne Design (DS0907) embossing folder
Joy Craft "Doily" (6002/0146)
Anna Griffin "Poppy" embossing folder
JustRite "Winged Vintage Labels Two & Three" (CR-04465)
Elizabeth Craft Design "Shimmer Sheetz"

973570

Wednesday, June 26, 2013

Joan's Gardens Weekly Challenge

 
It is time for a new challenge at Joan's Gardens.   The theme this week is "All About Butterflies".  Please go over to Joan's Gardens to see all the challenge rules and to see what the prize is for this week.

For my card I used a piece of design paper from the Memory Box "Viola" 6x6 pad.  The pretty butterflies are the Memory Box Kaleidoscope and Moonlight Butterflies.  The Kaleidoscope butterflies were die cut using white card stock and were layered over the Moonlight butterflies which were die cut using vellum.  The pretty piece on the bottom of the card is the new "Anja's Vintage Decoration".    I used a new spray adhesive you can get from Joan's Gardens called "E6000 Spray Adhesive".  Wow, what an easy way to attach any detailed die cut.  You just spray it on the back and there is no odor.  This spray is much easier than using glue and gives you complete coverage so little pieces of your die cuts are not pulling away from your card.  The border around the card was punched with the Martha Stewart "Monarch Butterfly Wing Edger".  To complete the card I added Kaiser Craft Clear Rhinestone to the body of the butterflies, over the Vintage Decoration, and on each corner.  

I hope you will join us in our challenge this week.

All the products I use can be purchased from Joan's Gardens.

Memory Box Moonlight Butterfly (98260)
Memory Box Kaleidoscope Butterfly (98261)
Memory Box "Viola" 6x6 Paper Pad
Marianne Design "Anja's Vintage Decoration" (LR0 269)
Martha Stewart "Monarch Butterfly Wing  Edger" punch
E6000 Spray Adhesive
Vellum
Kaiser Craft clear rhinestones

972146
 

Tuesday, June 25, 2013

Heartfelt Creations Alumni Design Team Blog Hop


This month has gone by very fast.  It is time for the June Heartfelt Creations Alumni Design Team Blog Hop.  This month there are eight designers participating in the blog hop.  You will have a chance to win a $25 gift certificate to Heartfelt Creations by leaving a comment on each designers blog.  There will be a random drawing from one of the blogs and the winner will be announced at noon on Saturday June 29th. You have until midnight Friday June 28th to leave your comments. 

Here is a link to the seven designers participating:
Selma Stevenson  (You are here)

If you are going in this order, your next stop will be to  Emilia's blog to see her beautiful project.

 I love working with the Heartfelt Creations Flower stamps, dies and matching design papers.  It is almost time for the hydrangeas to start blooming, so I used  my favorite hydrangea stamp which is from the Heartfelt Creations "Hydrangea/Posy Branch PreCut Set" and the small flower from the "Posy Patch Flowers PreCut Set" and matching Posy Patch Dies.  To create a variety of shades, some of the flowers were stamps on light purple card stock and some on darker purple card stock.  I then colored over the flowers with a blue Faber-Castell PITT big brush pen to blend the colors together.  Each of the little posy patch flowers were then shaped and glued over the stamped Hydrangea.

For my background I used a piece of design paper from the Heartfelt Creations "Countryside Evening" collection.  I love how we can use some of the older stamp sets and dies with things from the newest collections.  For the sentiment, I used one of the stamps from the "Heartfelt Expressions PreCut" set.  There were additional words on this stamp I didn't want to use, so I just inked up the "Thank You".  I love the font on the sentiments in this set.  

The flower was attached with dimensional dots.  I stamped the hydrangea twice and cut off the leaves on the second stamped image to add to this flower to add even more dimension.  In the lower left corner I added the pretty corner die cut from the new Heartfelt Creations "Ornate Gateway" dies.  then added a silk bow to finish the card. 

Be sure to leave a comment below then continue on to the other designer's blogs, leaving a comment on each, so you have a chance to win the $25 gift certificate from Heartfelt Creations. 

Products used:
Heartfelt Creations "Hydrangea/Posy Branch PreCut Set" (HCPC 3301)
Heartfelt Creations "Posy Patch Flowers PreCut Set" (HCPC 3303)
Heartfelt Creations "Posy Patch Die Cuts" (HCD 701)
Heartfelt Creations "Countryside Evening Collection" (HCDP1 229)
Heartfelt Creations "Heartfelt Expressions PreCut Set" (HCPC 3474)
Heartfelt Creations "Ornate Gateway Die" (HCD 737)
     

Monday, June 24, 2013

3-D Butterfly Window Card

I had planned to go pick strawberries this morning, but since we have had so much rain this past week, the strawberry farm is closed for a few days. This just gives me more time designing cards!   I have been anxious to work with the new Sizzix, Butterfly Window 3-D Popup die so that is what I worked with to create this fun card.

A couple of days ago, Joan posted a beautiful  birthday card she designed with these dies,  and you can see it and a video on how to use these dies, at this link.

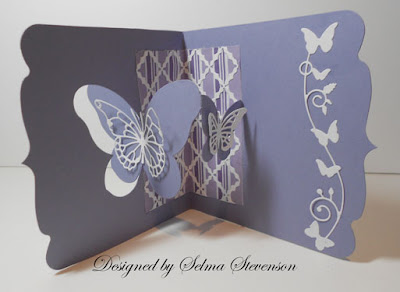
I used the Sizzix "Square w/Ornate Edge Card Pop-up Die to create the pretty shaped card.  In the center of this die I used the Sizzix "Butterfly Window 3-D Pop die"  I love how you can see the butterfly on the front when the card is closed then you see the same butterfly inside, when you open it,  along with a smaller 3-D butterfly.   On top of the large butterfly pop-up, I added the Memory Box "Vivienne Butterfly" die cut.  The butterfly was only attached at the body to give it a lot of dimension.  On the smaller pop-up butterfly, I added one of the Cheery Lynn "Mini Butterflies" die cut.  


This die creates an opening behind the pop-ups and I decided to add a piece of design paper, on the inside, and covered it with the Cheery Lynn "French Lattice Sm Frame".  I added the same design paper on the outside to cover that same opening and used just one strip cut from the "French Lattice Sm Frame" as a border along each side.  

On the front I used a stamp from the new JustRite "Winged Vintage Labels Two & Three for the sentiment.  The sentiment reads:  "Love is like a butterfly:  It goes where it Pleases and it pleases wherever it goes."   Perfect sentiment for this card, isn't it!   For a border on the inside, I added the Memory Box "Butterfly Vine Border".

You can purchase all these products from Joan's Gardens:
Sizzix, Butterfly Window, 3-D Pop-up" die (658369)
Sizzix, Square w/Ornate Edge Card Pop-up" die (658378)
Cheery Lynn "French Lattice Sm Frame" (FRM 132)
Cheery Lynn " Mini Butterfly" (DL 112)
Memory Box "Vivienne Butterfly" (98265)
Memory Box "Butterfly Vine Border" (98458)
JustRite "Winged Vintage Labels Two & Three" (CR-04465)

 My friend Pat came over and designed this card using the Butterfly Window 3-D Pop-up dies.  Hope this gives you some ideas for creating your butterfly pop-up card!


970704

Sunday, June 23, 2013

Susan's Garden Crepe Paper Rose

 
Today I used a beautiful Anna Griffin embossing folder called Poppy.   I tried not to put very much on the card so you can see the beautiful embossing.   I used my favorite rose dies to create a red rose.  I used red crepe paper and the "Susan's Garden" dies to create the rose.  The leaves were die cut from card stock.  The Susan's Garden Flower Tool Kit was used to shape them.

The pretty black doily at the top was die cut using the Marianne Design LR0 272 dies.  To complete the card, a black silk bow and some white Kaiser Craft pearls were added.

I only have this one Anna Griffin embossing folder, which I think is beautiful with my rose,  but you should go over to see all the beautiful embossing folders with roses plus many other styles by Anna Griffin. I know you are going to love them all!   You can see them at this link.

Products used:

Sizzix Susan's Garden "Rose" dies (658411)
Susan's Garden Flower Tool Kit
Anna Griffin "Poppy" embossing folder (2001947)
Martha Stewart "Rain Drop" corner/border punches
Marianne Design "Doily"  (LR0 272)
Silk Ribbon
Kaiser Craft Pearls

969975

Saturday, June 22, 2013

Holiday card


 This is a card I created using the stamps and design paper from the new Heartfelt Creations "Gateway to the Seasons" collection.  Heartfelt Creations has thought ahead and given us stamps in this new collection so we can start creating our holiday cards early.  The new stamps and holiday design papers are gorgeous.

I am really disappointed in my picture of this card.  I used a corner from a pretty piece of the design paper in this collection for the background.  The paper has the design in the upper corner and you can see small snowflakes in the background.  The paper is actually green but I could not get the color to show up in a photo.  The dark green design paper will be especially pretty for a masculine card. 

I used one of the stamps in the "Winter Season PreCut Set" and stamped it using VersaMark Ink then embossed it using Vanilla embossing powder in the lower right side.  In this collection there is a large stamp with many, many little words on it that you can cut apart and create any sentiment or verse you want.   

This is a picture of the "All Sseasons Sentiments PreCut" stamp and even though you probably can't read all the words in this photo, you can see how many words you have to work with- there are words for any occasions.   Each word has a black border around it.   You just cut out whatever sentiment you want and glue them down individually.  I love the serenity of the Winter  Scene,  so chose to add the words "Celebrate the Peace and Beauty" rather than choosing the words Merry Christmas or Happy Holidays.  I love this Winter scene and I'm sure will create many Christmas cards with it this year.  It will be a fun stamped image to color too.  Did you see the little snowman in front of the pine tree?

You can purchase this Heartfelt Creations "Gateway to the Seasons" collection from Joan's Gardens.

Products used:
Heartfelt Creations "Winter Season PreCut Set" (HCPC 3543)
Heartfelt Creations "All Seasons Sentiments PreCut Set" (HCPC 3544)
Heartfelt Creations "Gateway to the Seasons" Design Paper Pack
VersaMark Ink
Vanilla Embossing Powder

968088

Thursday, June 20, 2013

Susan's Garden Sunflower


 It is time for a new challenge at Joan's Gardens.  Here are the items we want you to use on your card this week:
  • Use a plaid background
  • Create a birthday card for a friend
  • Use dry embossing
  • Have something dimensional

For my card I used some new Sizzix dies.  For the shaped card, I used the Square w/Ornate Edge (pop-up) die - notice the pretty shaped end.  This die cuts the long card that you fold in half.

To decorate the front I used the Susan's Garden Sunflower dies for the flower and behind it placed the Heartfelt Creations "Bella Rose" flourish die.  It was cut apart and tucked in behind the flower.  The sentiment on top is a stamp out of the JustRite "Botanical Medallions & Banners" stamp set.  


 For the inside I used the Sizzix Card, Square w/Ornate Edge (Pop-up) die again for the card shape and in the center of this die placed the Sizzix Phrase, Friend 3-D (Pop-up) die.  When you open this card "Friend" pops up.  To get the different color for the pop-up "friend", I placed a piece of navy blue card stock over the words and a piece of red card stock over the little heart and die cut them again.  They were cut off at the ends and glued over the light blue die cut created in the center of the shaped card.  On the Square w/Ornate Edge die, you also get the pretty flourish that I glued to the end of the inside of the card.  On the left side of the card I used the cute  Susan's Garden Wheelbarrow & Watering Can Set, embossing folder to give texture to that side of the card.  There are sunflowers growing up behind the wheelbarrow so that is why I created a Susan's Garden sunflower for the front.


Products used:

Sizzix Card, Square w/Ornate Edge (Pop-up) (658378)
Sizzix Phrase, Friend 3-D (Pop-up) (658376)
Sizzix Susan's Garden Sunflower dies (658417)
Heartfelt Creations "Bella Rose" die (HCD 712) (Flourish)
Sizzix, Susan's Garden Wheelbarrow & Watering Can Set, embossing folder (658431)
JustRite "Botanical Medallions & Banners" stamp set (CR-03710)


Wednesday, June 19, 2013

A Thank You Gift for Susan Tierney-Cockburn


Today I am sharing with you a gift created for Susan Tierney-Cockburn.   I posted earlier that my friend Pat and I drove over to Seattle and had a wonderful day with Susan.  We wanted to create something for her, as a small token of our appreciation.  As I have stated many times before, I first learned how to create beautiful flowers using Susan's instruction book and her Punch Bunch punches, so it was a real honor to be able to meet her.   Thanks again Susan.

The above picture, on the left is the  thank you card created using her "Susan's Garden "Bird & Wreath" embossing folder and her "Mini Petals Flower dies.  On the right is the  piece that was placed in a deep black framed shadow box.  We used the Susan's Garden Rose Flower dies to create the pretty rose and rose buds.   

This is a picture of the framed piece.  It was very hard to get a good picture because of the reflection in the glass.

 This is a picture of the piece before it was placed inside the frame.


 Here you can see the dimension of the Rose.

I have created many flowers, but there are no punches or dies that create more realistic flowers than those in the new  Sizzix "Susan's Garden" flower collection dies.  Susan has thought of everything to create the most beautiful,  realistic flowers in each set of flower dies, plus the new Flower Tool Kit, the Pan Pastels for coloring, and new "Pollen" to create realistic stamens.  

Products used:
 Susan's Garden Products used:
Sizzix, Susan's Gardens products used:
Susan's Garden's "Rose"  (658411)
Susan's Garden's "Mini Petals" (658409)
Susan's Garden Flower Tool Kit
Susan's Garden "Bird & Wreath" embossing folder (658428)

967440

Tuesday, June 18, 2013

Susan's Garden Sunflower Dies


Today I want to show you that you can create a completely different look with your flower dies.  I used the Susan's Garden Sunflower dies to create this flower.   I used off white card stock to die cut the flower petals and brushed gold card stock for the leaves.  The base of each of the petals was sponged with  the Adirondack Gold Acrylic Paint Dabber then I used the Adirondack Pearl Acrylic Paint Dabber over the rest of each petal to give it an antique look.  The little pieces for the center of the flower were die cut using brushed gold card stock then the gold acrylic paint dabbed on each one.  Tiny bronze beds were glued in the center of each little center piece. Gold Acrylic paint was sponged on each of the leaves after shaping. The flowers were shaped with the Susan's Gardens Flower Tool Kit.  

The background for this card was created using all the dies from the Spellbinders  "Marvelous Squares" die set.  The corners are from Joy! Crafts.  A few Kaiser Craft pearls were added to complete the card.

I hope you will try different things with your flower dies.  It is amazing the different varieties of flowers you can come up with.

Products used:

Sizzix, Susan's Garden "Sunflower" dies   (658417)
Susan's Gardens "Flower Tool Kit" (658437)
Bazzil Card Stock
Joy! Crafts Corner (6002/0135)
Spellbinders "Marvelous Squares" (S4-383)
Adirondack Gold Acrylic Paint Dabber
Adirondack Pearl Acrylic Paint Dabber
Kaiser Craft Pearls

966624

Saturday, June 15, 2013

Susan's Garden Dogwoods


I always look forward to seeing the new Marianne Design dies. They always add a lot of "elegance" to a card!   I just received these beautiful dies and was anxious to show them to you. My background is a piece of design paper from the new Jessica Swift "Blomma" paper pad.  The design paper was embossed with the Crafters Companion "Regency Swirls 8x8 embossing folder.   I die cut the Marianne LR0272 and LR0273 dies and layered them.  I only used one of the three dies in the LR0273 set, right in the center of the layered LR0272 die cuts.  They were all attached with dimensional tape.    On the bottom of the card I added one of the dies from the Marianne Design LR0270 set.  

The pretty dogwoods were created with the Susan's Gardens Dogwood dies.  A few Kaiser Craft pearls were added to complete the card. 

Have a great weekend.
 
Products used:

Jessica Swift "Blooma" Paper Pad
Crafters Companion "Regency Swirls 8x8 Embossing Folder (EF8-RG Swirl)
Marianne Design LR0272 dies
Marianne Design LR0273 dies
Marianne Design LR0270 dies
Sizzix, Susan's Garden "Dogwood" dies 658405"
Kaiser Craft Pink Pearls 

965009

Wednesday, June 12, 2013

Heartfelt Creations June Release


Today Heartfelt Creations has released their new June Collection called "Gateway to the Seasons".  This is a beautiful collection of stamps for cards/projects for every season.  This collection includes: lace, gazebos, birdhouses, gardens, backyards, a fall scene, a winter home and sentiment stamps.    I used the beautiful  Gazebo stamp to create this window card.  The scene was stamped on a piece of card stock slightly smaller than my card front which is 5.5" x 6".  The scene was colored using Copic Markers. 

On the front I used a piece of design paper from the "Gateway to the Seasons" Daphne  paper pack.  A Spellbinders Square Nestability was used to cut an opening in the center of the front of the card plus in the design paper.   In between the design paper and card front, I added a piece of clear card stock so there would not be an "open" area, but you could see the stamped design on the inside of the card.
The beautiful ornate gate die cuts are also available in the "Gateway to the Seasons" collection.  I used double sided tape to attach the gate pieces over the clear card stock.  To add additional dimension, I used the stamps and matching dies from the Heartfelt Creations "Delicate Asters PreCut Set" to add a cluster of flowers.

In this picture I think you can see the clear card stock under the open gate.


 This picture gives you a better view of the stamped image on the inside of the card.

You can order the individual stamp sets, design paper, and/or dies in this new Heartfelt Creations "Gateway to the Seasons" collection from Joan's Gardens.  Joan also has a great discount if you order the entire collection.

Products used are:
Heartfelt Creations "All Seasons Gazebo PreCut Set" (HCPC 3539)
Heartfelt Creations "Gateway to the Seasons"  Daphne Paper Pack
Heartfelt Creations "Gateway to the Seasons" dies
Heartfelt Creations "Delicate Asters PreCut Set" (HCPC 3494)
Heartfelt Creations "Delicate Asters" die (HCD 726)

962857

LinkWithin

Related Posts with Thumbnails