Saturday, July 31, 2010

Enjoy Your Day

Well I guess I was really ambitious today. I have three posts for you so be sure to scroll down to see all three.


I told you I had one more card to make for the StampTV CHA Envy challenges.  This one was for Theresa Momber's challenge --  Stamp an image sideways, upside down, or at a different angle than normal. 

The background paper is from the Basic Grey "Lime Rickey" paper pad.  The stamp set used was from Theresa's "Hope Grows" set available from Gina K Designs.  The branch was stamped then cut out with a rectangle Nestability, then sponged with yellow prior to taking it out of the die.  The bird was stamped onto a piece of card stock that I did the "Shaving Cream" technique on.  I only used one color of reinker in the shaving cream and that was Not Quite Navy.  When I stamped the image I mostly wanted to get the blue on the tail feathers.  I really like the way it turned out. The bird was attached with a dimensional. 

Something on the card had to be at a different angle so I stamped the greeting from the same stamp set and cut it out with a round Nestability.  A green scallop was added around the edge.  The main image was also matted onto a scalloped green background.  All the scallops were pierced.  Think the bird is reading the greeting?

To give the card dimension I made five small yellow flowers out of vellum and placed on the stamped branch.  Small green pearls were added in the center.  Three additional large vellum flowers and some vellum leaves were made for the upper left corner.  To complete the card, large pearls were added to the corners.

Tomorrow Melanie Munchinger has asked  her guest designers to participate in a blog hop  featuring new projects created with  her stamp sets.  I will be participating in this blog hop so be sure to check back tomorrow evening to see several new projects I have created for her.

Joan's Gardens - Challenge #8


Have you seen the fun challenge on Joan's Garden this week?   It is to do a fall theme card using pumpkins or fall leaves with either embossing or glitter.  The winner of the week #8 challenge will receive  a Heartfelt Creation Stamp.  Joan will soon be getting in a lot of new Heartfelt Creations stamps.  You can see the picture she posted of some of the new items here.

The stamp set I used for this card is the JustRite "Autumn Blessings" set.  The image and border were stamped using Memento black ink then Koh-I-Noor pencils and OMS were used to color.  The design was cut out with oval Nestabilities.  The background paper is embossed.  A silk ribbon was added and a bow added to the top.  To complete the card I punched out a bunch of small leaves and a few acorns.  They were sponged and the centers embossed with a stylus to give them more dimension.  They were glued down to look like falling leaves. 

Hope you will go over to Joan's Gardens and join in on the fun. 

Thanks for stopping by.  Have a wonderful weekend.


StampTV CHA Envy Challenge #3


Here is another card for the StampTV CHA Envy Challenges.  For this Challenge Melanie asked us to use Navy, Olive and Ivory OR use DP and try to recreate or match the pattern with your stamping.  I decided to go for the first choice.  I used a piece of Basic Grey design paper for my olive background and lined it with navy card stock.  The daisies,  are from Asela's "Flowers For Daisy" stamp set available from Gina K Designs.  I used a navy colored pencil and oms to color.  They don't look very "navy" do they!  Pale Yellow Flower Soft was added to the center of each flower.   Leaves were cut with a BossKut die and sponged then layered under the flowers.  They are mounted on a Nestability Label Ten die cut that was sponged with olive green.  The  verse is from Melanie's "Arranged With Love" set, also available from GKD.  Two different sizes of GKD ribbon was added for the border across the bottom.  To finish the card three navy butterflies and some ivory pearls were added.

The deadline for this challenge is this evening and I have one more card to make for Theresa's challenge. 


Friday, July 30, 2010

StampTV CHA Envy Challenge #2


There are three StampTV CHA Envy Challenges and today I am posting a card I made for Lee's   CHA Envy Challenge #2.   She  challenged  us to use Yellow and Black as the main colors. 

The card opens from the top.  I used a square Nestability to create the flap on the top.  A flourish from Heartfelt Creations was used for the decoration along with a bow made with ribbon from GKD.  The black design paper is from the Making Memories "Wedding" paper pack.  The flowers are from the StampTV Showtime Stamp kit "Picture It".   The inside of the card was lined with yellow dotted paper.  The verse is from Melanie's "Say It With Flowers" stamp set available from Gina K Designs.  It was stamped on a Nesties Label Ten die and sponged prior to taking it out.  The butterfly is from the Picture It stamp set.  The card is held closed with a round Velcro dot.


Wednesday, July 28, 2010

Thank You Melissa


Today is going to be a busy day away from home so I am posting a thank you card I am sending to one of my blogging friends, Melissa Cash.  She is also one of the CSS design team alumni for StampTV and has a beautiful blog.  You can check it out here.  Yesterday I received a package from her with lots of wonderful things.  I created this card with some of these items. 

The package of ten blank cards and envelopes are from "Soiree".  What a beautiful light green pearl card stock.  It is so pretty I didn't want to cover much of it up.  The butterfly stamp was in the package but does not have a name on it but it is beautiful.  I used my JustRite stamp set "Just A Note" for the Thank You.  It was cut out with Nesties and attached with dimensional tape.  I decided to add some of my vellum flowers because they just seem to go with that butterfly.  In the center and on the salutation, I included some of the pretty pink crystal rhinestones she sent.  Along the bottom edge is a piece of trim I purchased from Hobby Lobby when I was in Chicago. 

Thank you Melissa for all the beautiful stamping things and this card will be in the mail to you.

Well off to take my dog in for grooming and to get new cell phones.  Have a great day.

Tuesday, July 27, 2010

Christmas Notes


Have you ever seen these cute little note books at Michael's in the $1.00 bin?  Usually they come in bright colors but are very easy to cover.    I decided to cover one for Christmas notes.  It is always nice to have note paper handy during the holiday season to jot down things you want to remember.  These little books are perfect because they even include a pen.  It is very easy to create a pattern to cover them and that is what I did.  I needed a small image so chose a stamp from the JustRite "Hearts Come Home" set.  The border used is from the JustRite "From Our House" set.  I thought the two images fit together very well and would look nice with the SU designer paper.   The poinsettia was stamped and colored with Koh-i-noor pencils and oms.  I wanted to be able to blend out the "scroll" background using several different colors and this was very easy with colored pencils. I think I put four colors on there and blended them all out. The image was popped up on dimensionals.  This was a quick and easy project and will make a great little gift for someone closer to the holiday season.

Well I'm off to spend time with my husband and daughter today.  Hope you have a great day.  Thanks for stopping by.

Monday, July 26, 2010

A Picture is Worth a Thousand Words Challenge

This card won the JustRite Challenge


Today I made a card for a challenge I didn't think I could make.  This week's JustRite Friday ChallengeA Picture is Worth a Thousand Words, sponsored by Copic, is to use a photo on your card combined with JustRite stamps, to make a one-of-a-kind greeting card!   I have never made this type of card.  I love to participate in the JustRite challenges, but I really thought I would need to skip this one.  This afternoon I was looking at this picture of my granddaughter and it always makes me smile.  Her hat has a big yellow flower on it and I realized I have a JustRite stamp flower set with a a similar flower stamp, so maybe I should give this challenge a try after all.   I have to say I really enjoyed working on it.

The two JustRite stamps sets used are:  "My Garden" and "Seeds of Kindness".  The flowers were colored with sponge daubers and cut out with scissors.  Copic markers were used to add a little extra color in the center.  Leaves were cut out with a BossKut  "Daisy Leaves" die.  The background paper is from the Basic Grey "LilyKate" paper pad.  Alexandra's picture was  matted with red card stock.  When this picture was taken, we were out in my garden admiring all the flowers and a butterfly flew by.  I love the expression on her face.

When I had the front of the card completed, I did not have room for the salutation I wanted to add "You make me Smile".  The only thing I could think of doing was to convert it to an easel card.  This worked out perfect.  The salutation is from the JustRite "Seeds of Kindness" set.  It says exactly my feelings every time I look at this picture.  The border was added along the bottom and three butterflies added.  Flower soft was added to the center of all the flowers.  Pearls were added to the bodies of the butterflies and up in the corners to complete the card.

Aren't challenges fun; sometimes they push you to try new things and can give you a real feeling of satisfaction.  I am so happy that I gave this challenge a try.  I will always cherish this card and also have a chance to win  a great prize I would love to have.

Plant Smiles plus Mini Tutorial


Today I am working with some more of the Heartfelt Creations Daisies that I purchased from Joan's Gardens.   The sets I used are "Daisy Patch Bouquet", "Daisy Patch Flowers", and the Daisy Patch Diecuts.  Below I have posted some pictures below to show you how you use the Spellbinder dies you can purchase for this stamp set. 

I just received a new Basic Grey Paper pad called "Olivia" also available from  Joan's Gardens.  It has beautiful papers in it.  This is what I used on the lower half of my card.  For the flowers, I stamped one of the "Daisy Patch Bouquets"  using olive green chalk ink.  I wanted to make it all dimensional so cut this image out.  Next I stamped the three sizes of daisies using the stamps in the "Daisy Patch Flowers Precut set".  I cut out two of each size so I could layer them.  Did you notice I didn't even color them and I think they look beautiful.   Dimensional tape was used between each layer and Pop Dots were used under the leaves to attach to the Cuttlebug embossed panel.  Colors from the design paper were layered under this panel.  

A Martha Stewart border was attached across the middle of the card and Cuttlebug corners added to the top.  Also a small Martha Stewart butterfly, that was embossed, was added.  

The greeting and border is from the JustRite "Seeds of Kindness" stamp set. It was cut out with a petite circle Nestability. 

MINI TUTORIAL ON HOW TO USE THE DIES FOR THESE FLOWERS.

First you cut out a template on a small piece of card stock.  You need to use tape, on only one side,  to hold it in place.

With the tape just on one side, you can lift the die.  Discard the the die cut flower.  You now have a template with the die attached.

Place this template over the stamped image.  Sometimes you have to move it around to be sure and line up the petals correctly.

Place the die down and run through your die cut machine.  Fast and easy way to cut out all these flowers!  You can see how nice the cut out flowers look on the card.

Joan has many different Heartfelt Creations stamp sets and dies.  She is away at CHA this week but you can email her and let her know what you would like to order and your order will be shipped as soon as she returns home.  These have been very popular stamps and dies to work with so she constantly is getting new shipments in.  Here is her link to the Heartfelt stamps and dies.

I always appreciate you stopping by and hope to see you tomorrow.

Sunday, July 25, 2010

Cherish the Simple Pleasures


Last night I was sitting out on the deck watching the birds play around the bird bath  so that is what influenced my card today.  The stamp set used is "Spring has Spring" from Gina K Designs.  I also used Kitty Caracciolo's "Cause A Scene" set for the background. 

The bird bath from GKD was stamped first then I started creating the background.  I started with the tree using stamps from Kittie's kit.  Grass was stamped  then I sponged on the sky and filled in the grass background.  Small flowers and butterflies were punched out and added to complete the card.

I love to go out and watch all the birds.  Each year we have quail that have a nest on the ground on the other side of our wood fence.  The papa always sits on the fence and chatters to the mom and babies.  As soon as the babies get big enough, they learn how to fly from our fence.  How cute they are.   We have lots of other birds too and they are all fun to watch.

Saturday, July 24, 2010

Best Friends & Embossing Tutorial


I have created this card for a "newbie" stamper who is one of my followers.  Donna asked me to explain how I used Iridescent  embossing powder on one of the cards I posted a few days ago.  I decided to do a tutorial for her.   Below you will find the pictures and tutorial.

The stamp set used for this card is from the JustRite "Old Fashioned Christmas".  It was stamped then colored with Copic markers. The whole thing is embossed with Iridescent  embossing powder.  Did you notice the Polar White Flower Soft around the bottom of the snowmen?  This was added after it was embossed.  The border is also from that set and was stamped on blue card stock then cut out with Nesties.  Two additional layers of scalloped circle are under the design.  White dots were added to each scallop of the green circle, and each scallop was pierced on the blue circle.  The background paper is from SU.  Three Martha Stewart snowflakes were punch and embossed and a small button added to the center.

Donna asked me how to emboss the main image plus show her how to emboss the snowflakes.  Below are pictures. You can click on each picture to enlarge them.

Use VersaMark and Irediscent Embossing Powder.

Lay piece to be embossed on a Teflon work sheet.  Cover entire front with VersaMark ink.

Using Tweezers, cover front with embossing powder.  I store my embossing powders in small drawers you can purchase at WalMart.

Can you see the shine?

Punch out your snowflakes and pat on VersaMark ink .

With Tweezers turn over snowflake and cover with embossing powder.  Note:  do not over heat this embossing powder or it will disappear.

Now you have sparkly snowflakes.

Hope this is helpful to anyone not familar with this technique.

You can purchase the embossing powder, Martha Stewart Punch, JustRite Stamps, Flower Soft, and Nestabilities from Joan's Gardens.  She is going to CHA but you can email her from her blog and leave an order.  She will ship as soon as she returns home.

Have a great weekend.

Friday, July 23, 2010

You are the Flower in my Garden


Well it would help if I knew how to read, LOL.  I was going to do a card for Joan's Thursday challenge but I didn't follow the rules!!!!!   All you have to do is make
 a birthday card using something bright and happy adding some kind of flower.  Somehow I didn't remember the "birthday card" part.  Oh well I can do it later.  This is a really easy challenge though, and I hope you will go over and join in on the fun.  Here is the link for the 7th challenge.

I have had a very busy day and started working on a tutorial that someone asked me for, but my box of stamping "goodies" arrived from Joan's Gardens this afternoon and I just couldn't resist making a card with these new Heartfelt Creations Daisy Patch stamps.  I ordered both the stamps and the die cuts.  The stamps are precut so you can start stamping immediately. They go on your acrylic blocks. The best part is the Daisy Patch Diecuts match the flowers exactly so you don't have to cut them out.  These are made by Spellbinders.  The only thing you need to do after cutting your die cut pattern, as shown in the "Heartfelt Creations" blog, is to twist the die cut around until it matches your stamped daisy.  It will fit perfectly.  Run it through your die cutting machine and you have a beautiful flower to place over the stamped images.  I love it!!  Using these stamps gives you a beautiful darker outline so you don't even have to sponge around each petal.  What a time saver.

This card will fit into a regular business size envelope.  I thought this size was perfect for this big beautiful design.  I embossed a piece of purple card stock for the background.  I then stamped the "Daisy Patch Swirls Precut stamp onto white card stock and colored the flowers and leaves with Copic markers.  I think daisies look pretty on a dotted Swiss background so used my Cuttlebug embossing folder for this.  The flowers from the Daisy Patch set were stamped with purple ink on purple card stock and cut out with the matching dies.  This went together very quickly.  

A Martha Stewart punch was used for the top corners and a bow added.  The verse in the Daisy Patch Swirls set was stamped and placed down in the corner.  Rhinestones were added to complete the card.

Remember you can order these beautiful stamps from Joan's Gardens.  Go over and see all the different stamps and also see some beautiful cards.  Joan is going to CHA and will be gone for a while, but you can always email her and she will get your order out as soon as she returns.  


Thursday, July 22, 2010

Snowflakes Are Winter's Butterflies


I had to play one more time with my new Groovy Snowman stamp set from JustRite.  I love these guys so much; I'm glad I have a long time to work with them before I send out my Christmas cards.

The background paper is from the DCWV "Latte" stack.  Instead of a aqua line in the dp, it was green so I used an aqua marker and ruler to color over the green to match the colors I used on the snowman.  The snowman was stamped with black Memento ink and colored with Copic markers then cut out with a circle Nestie. The flower on his hat is colored "hot" pink.   I inked the whole image with VersaMark Ink then embossed it using Iridescent Ice embossing powder to give it a frosty look.  The border is also from the Groovy Snowman set.  It was white embossed on aqua card stock then cut out with both a scallop and plain circle Nestie to create a frame to go over the snowman image.  It was attached to a circle of purple card stock.  Did you notice the snowman is holding a large snowflake?

A Cuttlebug snowflake embossing border was used for the side border.  After it was embossed I embossed it using VersaMark and Iridescent Ice embossing power and lined each side with a strip of purple card stock.  

The greeting is from the JustRite "A Merry Little Christmas" set.  The border and the snowflake were white embossed on purple then a small scalloped Nestie border placed underneath.  Three Martha Stewart snowflakes were punched and also embossed with Iridescent Ice embossing power. Clear rhinestones were added to the center of all the larger snowflakes.  This is a very sparkly card but I'm not sure it shows up much in the photo. 

I am getting a great start on my Christmas cards.  This will be a real time saver when it gets closer to the holidays.


Wednesday, July 21, 2010

JustRite Christmas Challenge


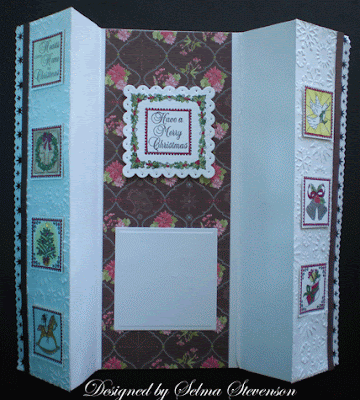
A few weeks ago I won two Christmas JustRite stamps sets in the JustRite Friday Challenge. I LOVE everyone of the JustRite stamps sets so was very excited to win two sets just for submitting a card to the challenge.  I am using both stamps sets on this card.  The two sets used are "Hearts Come Home" and "From Our House".  There are six images and six borders in each set that are interchangeable with each other!  Both have postage stamp borders around each image.

This card was hard to photograph.  The first picture of it partially open and then  one opened up so you could see the inside.  This card fits into a business size envelope.

I previously posted another (flower) card made with this style card.  to create  this card,  eight  images from the two new Christmas sets were stamped with Memento ink.  Seven of  for the front of the card and one for the inside.  A combination of Copic markers and colored pencils/OMS were used to color. The bells were colored with a silver metallic pen. The part that took the most time was coloring the little postage stamp frame that is around each image, but it was worth the work because it really made each one stand out.  Each image was punched out with a 1 1/4" square punch. 

The front panels were embossed with the Cuttlebug snowflake embossing folder.  Each stamped  image is attached with dimensional glue dots.  A Martha Stewart punch was used for the border on each side and a brown strip of card stock placed by the border. 

The inside of the card is lined with a piece of SU Christmas design paper.  The verse and border are from the "Hearts Come Home" JustRite set.  It was colored and cut out with a scallop square Nestability (perfect fit!).  Each scallop was pierced.  Another small white square was cut with Nestabilities to write a personal greeting on. 

If you haven't seen all the new JustRite Christmas stamps, they now have a beautiful catalog that shows all current stamp sets and even sets that will be released in the near future.

Would you like to win some JustRite stamps?  Check out the JustRite Friday Challenge.  Each week the prizes awarded are different, so you have a chance to really build up your stamp collection.

Happy Stamping!

Tuesday, July 20, 2010

JustRite Groovy Snowman Box

This project won the JustRite challenge


Yesterday I felt like it was Christmas.  I received my new JustRite "Groovy Snowman" Set.  I couldn't wait to work on this box.  Did you followed the JustRite Christmas in July Blog hop the other day?  If you didn't check out all the blogs, you should because there are so many beautiful Christmas projects.  I loved the work all the designers posted but one really stood out for me.  It was this project post by Sharon Harnist.   I never like to copy what other designers post but I did color my snowman exactly like she did because I love the colors.  My project is totally different. 

I started out with a Cosmo Cricket black box.  The lid slides off the top.  It will be great for adding a small gift or some baked goodies.    It was covered with snowflake design paper.  This box has an opening in the front.  To match the opening on my design paper, I slid the front piece inside the box so I could trace the opening then cut it out with scissors.  On the lid I used a Martha Stewart Punch for the border along the edge of the lid and attached a double silk bow made with a Bow Easy. 

I knew what I wanted for my greeting on the front but there was not a stamp that worked so I made up my own label.  I used two JustRite sets:  "A Merry Little  Christmas Set" and "Thinking of you".  I wanted an oval label on the front of the box and wanted the design to match the punched border on the lid so chose the oval border from "Thinking of You".  I also wanted a snowflake on the label along with the greeting.  I found out that two of my small round JustRite stamps would fit inside the oval.  Wow!  I could stamp exactly what I wanted.  The grooves on the back of all the stamps are the same so the smaller stamps  fit perfectly in the oval wooden block so my greeting was perfectly straight.  You can see this in the picture above.  This greeting was stamped with VersaMark ink and embossed with Vanilla EP then cut out with an Oval Nestability. 

I LOVE this stamp set so I know I will be making many cards using this set. 

If you want to order this JustRite Groovy stamp set, Joan's Gardens has them in stock.

 Hope you have a wonderful day.  Thanks for visiting my blog.  I always look forward to reading your comments.

Monday, July 19, 2010

Joan's Garden Challenge 6


I went over to Joan's Gardens weekly challenge and saw that there are only two entries so far.  A great prize is being given away this week in the random drawing and with just a few entries, your chances of winning are really great.  For the challenge you need to create a card using some kind of kitchen theme and a JustRite stamp.  If you don't have a JustRite stamp you can still enter using something else.  This winner of the week #6 challenge will receive a new Heartfelt Creation stamp set.   This is a prize I would love to win!  You can go over and get all the details here.

The only kitchen themed stamps I have are from JustRite.  I used the "Just A Little Caffeine" set.   The image and border were stamped twice and I cut out the coffee cup on the second one so I could put it on dimensionals.  The image was cut out with a scalloped circle Nestie then a second scallop was cut out to frame it.  The yellow piece under it was embossed with the  Cuttlebug "Kassies Brocade" embossing folder.  The design paper is from the Basic Grey Cappella paper pad.  The pretty rose trim is from Webster's Pages.  All products used for this card were purchased from Joan's Gardens.


I appreciate you stopping by.  Have a great day.

Sunday, July 18, 2010

My granddaughter discovered JustRite


This afternoon my plan was to work on a card for Joan's Gardens Challenge #6, but did not get it completed.  I will be posting my card tomorrow.  Have you checked out the challenge?  It will be a fun card to make.  The challenge is to make a card using some kind of kitchen theme and a sentiment from JustRite.  This winner of week #6 challenge will receive a new Heartfelt Creation stamp set.  These are the new stamps everyone is buying to make those beautiful dimensional flowers.  Be sure to check out Joan's blog to get all the details.

You may have noticed my name is not on the card above.  My granddaughter Shannon, who is 13, will be leaving next week to go visit her best friend in Vancouver for a week and she wanted to make a thank you card for her friend's mother.  Shannon has been stamping with me since she was about 4 years old.  Today, she wanted to learn how to make the vellum flowers so I spent time with her showing her how to make them.  Before she came over, she had designed her card in her head so this card is totally her design.

The main thing she wanted on her card was a quilted background and the flowers.  She tried several things and decided to use the polka dot background paper and score it on the ScorBuddy. Doesn't that look great!   She used one of my new Martha Stewart border punches on the mat under the quilted piece.  She wanted purple flowers so she attached the punched background to lavender lace card stock to match.  To create the stems for her flowers, she used a SU stamp and only colored the stems with a marker and stamped directly over the quilted design paper.  She made her purple vellum flowers and attached them over the ends of the stems with glue dots.  She went through my bead box and found some black beads to add to the center of the flowers.

Shannon has never stamped with JustRite stamps.  She fell in love with them because you insert the center in the grooves then can choose from many borders and they always stamp straight. She also said she loves them because the stamps are so small and are easy to store and you only need one handle for lots of stamps. (All her stamps are mounted on wood blocks.)  For the outside of her card she wanted a very plain "thank you" and a polka dot border to match the dp.  She used a border from the JustRite "Just A Note" set and a non JustRite "thank you" stamp for the front of her card.  These were white embossed on lavender lace card stock.  To complete the front of her card, she used three pearls.

For the inside of her card she used a border and center from the JustRite "Joyful Hearts" set.  I wish you could see how excited she was to  use these stamps.  She stamped this twice and cut one out with a scallop oval Nestie and the second one with a  plain Nestie.  She sponged around the Nestie before removing it.  She added a small strip of the design paper used on the front to the inside.  She wanted to leave plenty of room to write a note to thank her friend's mom for planning lots of fun things to do during her visit.  

I am always so proud of the work Shannon does.  She comes up with beautiful designs every time.  I love to have her come over to work on cards.  What do you think of her card? 

Be sure to check back tomorrow to see the card I make for the Joan's Gardens challenge.

LinkWithin

Related Posts with Thumbnails