Friday, December 2, 2011

Christmas Tag #6


Today I have another tag for the challenge at Joan's Gardens.  This one was created with the Marianne Design (DS0911) embossing folder for the embossed background.  The tag was die cut using the Tim Holtz Sizzix Tag die.  The embossed designed was backed with shiny silver paper.  The poinsettia was created with the Spellbinders Poinsettia dies.  Behind the poinsettia I have layered the Memory Box Bianca Snowflake which was die cut using silver card stock. On top of that, a black Memory Box "LaRue Flourish" was added. In the center of the poinsettia, I added a silver punched stamen which was punched with the Punch Bunch "Sky Snowflake".  Up on the left hand corner I added a  Marianne Designs Leafy Flourish (LR0192) and stamped "Noel" at the base of it.  Up on the right hand corner I added a small piece of the "Poppy Stamps, "Pine Tree Border" that was die cut using white card stock.  A large silver and black button from my stash was added below the poinsettia.  The border around the tag was punched using the Martha Stewart "Swirling Lace" punches.  To complete my white, black and silver tag, I added black ribbon and silver cord for the hanger.

Have you joined us yet in the challenge at Joan's Gardens?  The challenge this week is to create a Christmas Tag and anything goes.  You can read all the information about the challenge at Joan's Gardens.  Joan and I love seeing your entries in our challenges.  Someone will win a prize, plus the winner will be entered into the drawing for the $100 Gift Certificate to Joan's Gardens that will be given away later this month.  

 Memory Box Bianca Snowflake Die.  I have die cut one and placed it on the right side of this picture.  It is a very delicate snow and it does pop right out of the die.

 This is the Poppy Stamps Pine Tree Border.  I have included a punched tree border  at the bottom of this picture.  These are really cute little trees that make a great border.  I cut off just a few trees to add to my tag.

The products I use can can be purchased from Joan's Gardens.  I want to let you know that Joan has had many orders for Memory Box products and due to the volume, these products are kind of slow being shipped out to her.  She will be filling your orders and shipping them out just as soon as the product arrives.

Also - I have had some emails from you asking if these dies release the die cut easily.  I want to let you know that I have not had any problems with them releasing - in fact many times they fall out as soon as they are die cut.  This is really nice when you are working with some of the delicate designs such as the "LaRue Flourish.   I really love working with them.

370527

Thursday, December 1, 2011

Another Tag - #5


l have another tag to show you that I created for the challenge at Joan's Gardens.  This one was also made using the Tim Holtz Tag Die.  The die cut tag was put inside the Marianne Designs Embossing Folder DS0907 to die cut the part of the embossing folder I wanted,  and backed with a piece of pearlized lavender card stock.  Yesterday I received some new dies from Joan's Gardens "Marianne Design Craftables CR1202".  This is a rectangle die with flower dies included.  There are four new Craftables shown on Joan's site.  I did not use the flowers but did die cut the rectangle frame three times and overlapped some of the scallops to create a frame for my tag.  This was really easy to do.  The purple poinsettia was created with the Spellbinder Poinsettia dies.  The different leaves behind the flower were die cut using all three dies in the Marrianne LR0192 die set.  All three were dies were cut twice - one set on light green card stock and one set on polka dot designer paper.  The pretty hearts are from Cheery Lynn "Two of Hearts" (DL 128).  They were attached with dimensionals between layers.  The sentiment is from the JustRite "Deck the Halls" stamp set.  I used purple "Liquid Pearls" by Ranger for the pearls on the heart.  Diamond Glitter was sprinkled over the Liquid Pearls and added to the poinsettia and leaves.    Kaiser Craft White pearls were added on the corners and one in the center of the poinsettia.  White ribbon was added in the hole of the tag.

I hope you will go over to Joan's Gardens and join us in the tag challenge this week.  You can read all the details on Joan's blog.

369494

Joan's Gardens Weekly Challenge - Tags


It is time for a new weekly challenge at Joan's Gardens.  It is only 23 days until Christmas.  This week we are asking that you create any type Christmas tag.  Anything goes so use your imagination.  You may want to use some of the items that maybe you previously stamped or die cut and would like to use up. I have created four different tags to give you some ideas.  

All my tags were created by using this Tim Holtz, Sizzix "Tag and Bookplates"  (656938) die from Joan's Gardens.  With this die you can cut 4 or 5 tags all at one time - what a time saver! And -- they are the perfect size for decorating.

This first tag was created by embossing the tag with the Tim Holtz "Tall Pines" embossing folder.  Distress Inks were used to color the sky and trees.  Snow banks were created by cutting white card stock with scissors.  The village are two die cuts from the Marianne Designs "LR0172" and LR0173" dies.  Yellow card stock was added behind these die cuts to cover the windows and doors.  The sentiment is from JustRite and reads "Tis the Season".  

This tag was also die cut with the Tim Holtz tag die.  The background was embossed with the Sizzix "Holly Swirls (657139) embossing folder.  The poinsettia was stamped with Heartfelt Creations "Petite Poinsettia PreCut Set" (HCPC 3415) using VersaMark Ink on white vellum and gold embossed.  Distress Stains were used to color the poinsettia and leaves on the back of each.  The sentiment is from the JustRite "Hearts  Come Home" stamp set, and the "to/from" tag is from the JustRite "From Our House" stamp set.  They both were gold embossed.

This is a very quick and easy tag.  The Santa image was cut from the Bo Bunny "Father Christmas Collection" design paper pad and glued to the bottom of the tag.  The pretty snowflake flourish is a die cut from the Memory Box "Snowflake Corner" (98238).  The little poinsettia was created with a stamp from JustRite Christmas stamp set.  The sentiment "Believe" is also from a JustRite stamp set.

The background for this tag was embossed with the Sizzix "Holly Swirls" embossing folder.  The sleigh is a die cut from the Marianne Designs "LR0178".  The pretty bell is from the Heartfelt Creations Christmas Collection "Poinsettia Cheer Bells PreCut Set" (HCPC 3422).  The small poinsettia was created with the Marianne Designs "LR0121" dies and the "Holly Flourish" was die cut using the Cheery Lynn "Holly Flourish" (B128). 


I hope you will join us this week for this fun challenge and get a head start on those tags you will need for Christmas gifts.  Remember if your tag is chosen for the weekly drawing, your name will be added to the list of names that will be eligible for the $100 Gift Certificate to Joan's Gardens.  Each time your name is drawn for the weekly challenge, you do get an additional chance to win this fabulous prize.  I know there are lots of new things at Joan's Gardens you would love to have.


Wednesday, November 30, 2011

Winter Scene

Today I have an easy card to create using dies and punches.  The products I used can be purchased from Joan's Gardens.  They are:  Memory Box "Leaf Canopy" (98142); Memory Box "Twiggy Tree" (98143); Memory Box "Deer Trio" (98166); Cheery  Lynn "Border Carnivale" (DL 120); Martha Stewart "Aspen Snowflake" punches.


I started with a piece of sparkly aqua card stock 5 5/8" square and placed the Leaf Canopy near the top and taped it down then ran it through the die cutting machine.  This dies creates a lot of leaf shaped holes in the card stock.  You may remember I used this die in an earlier post to create an autumn scene.


Next, this Twiggy Tree was die cut using white card stock.  It was glued, using liquid glue, in the center of the Leaf Canopy.  Next I die cut two Cheery Lynn Border Carnivale borders and placed them, alternating the scallops, to create the snowy ground. 


The deer were die cut using white card stock.  When you die cut these deer, they do not cut out completely - the feet stay attached so you can use them in a group as shown.  I wanted to spread them across the bottom of my card so cut them off at the feet and attached with liquid glue. 


For the border around the snow scene, I used the Martha Stewart "Aspen Snowflake" punches.  I love these punches to create Christmas cards because you not only get a pretty border but can use the punched out snowflakes on your project.  You can see these snowflakes around the tree.  

The sentiment is from the JustRite "Sparky and Friends" stamp set.  It was cut out with a Spellbinders Tag, and sponged before removing it.  I used a paper piercer to punch holes around the edge then added two of the small snowflakes.  To complete the card I added an aqua silk bow.

All the products I use can be purchased from Joan's Gardens.

Are you checking out Joan's 12 Days of Christmas Sale?  Each day you order from this sale, you will be entered into a drawing for a wonderful prize at the end of the sale.  Be sure to check it all out at Joan's Gardens.

 368662

Monday, November 28, 2011

Heartfelt Creations Alumni Blog Hop


It is time for another Heartfelt Creations Alumni Design Team Blog Hop.  We have a lot of participants this month. We enjoy designing with Heartfelt Creations stamps and dies and hope we give you a lot of inspiration.  If you started at the beginning of the hop, you came from Dina's blog.  You have a chance to win a $25 gift certificate from Heartfelt Creations.  All you have to do is visit each blog in this design team hop and leave a comment; maybe you will be the lucky winner.  This hop ends Friday, December 2nd at midnight and the winner will be announced Saturday at noon. 

My card was created with the Heartfelt Creations "Holiday Poinsettia Candle PreCut Set" (HCPC 3419) and the "Petite Poinsettia Precut Set" (HCPC 3415).   The design paper is from the  Basic Gray "Sweet Threads" paper pack I received from my friends, Dianna and Marsha, that came to visit and stamp.  The wreath was created using the Cheery Lynn Pine Branches (B146). 

The beautiful Heartfelt Creations candle was stamped with VersaMark Ink and gold embossed.  Extra flowers, from the Petite Poinsettia stamp set were also stamped and gold embossed.  These flower match the  Spellbinders Poinsettia dies.  The candle image was cut out using scissors.  The flowers were shaped using tools from the Flower Tool Kit and a gold flat backed bead was added to the center of the flowers.  The pinecones were created by using the Sizzix "Tattered Pinecone" die.  Bright gold glitter was added to some of the poinsettia leaves and the edges of the pinecones.

The wreath was created by die cutting a lot of pine branches and were shaped by gluing them on a round, open center, doily (Cheery Lynn Nautical Wheeler Doily).  The pine branch die comes with two dies in the set,  so it made it faster to die cut them.  Gold round beads were added around the wreath and gold glitter added to some of the branches.  The Candle arrangement was placed on top of the wreath.  A pinecone was added to each side of the flowers and a gold cord bow added.  A piece of gold trim was added along the bottom of the card.`

The next person on this blog hop is Karen Taylor (Creative Yearnings).  

All products I use can be purchased from Joan's Gardens.

367099

Sunday, November 27, 2011

Purple Christmas Shadow Box

I had fun creating this card today.  I love to work with purple and and I also love to work with Heartfelt Creations stamps and matching dies.  This card was created using the Heartfelt Creations "Petite Poinsettia PreCut Set (HCPC 3415) and the "Carnation Florals 2 PreCut Set" (HCPC 3438) that just came out in the new release.  Both these sets have matching Spellbinder dies so they are super easy to cut out and create dimensional flowers.  I'm sure you know about the poinsettia dies by now, so I have taken a picture (below) of the new Heartfelt Creations Carnation Florals and the matching Spellbinder dies.   These new Carnation Florals stamp sets and matching dies are available from Joan's Gardens.


Pictured above are the Heartfelt Creations "Carnation Florals" stamp set, the matching Spellbinder "Carnation Creations" dies, and the Carnation Florals 2 stamp set.

My card today is a shadow box that started off with a white and a purple piece of card stock that measured 6.5" square.  Both pieces were scored down opposite sides at 1/2" to create the shadow box.  For the opening I used the Spellbinders largest "Label 8" Nestability.  The pretty background down in the shadow box was created with the Sizzix "Winter Botanicals" (657261) embossing folder. This is a beautiful embossing folder to create a background. The poinsettias were gold embossed on white vellum and colored with a purple marker.  The Carnation Florals were white embossed and also colored with a purple marker on the back of each flower. All the flowers were lightly spritzed with water so they could be shaped.  In the background, up the side and across the bottom I used the Memory Box "Woodland Branch" (98187).  I know you will love this branch for lots of things. 

Here is a picture of the die in the envelope and below it is the actual die cut.  Isn't is realistic looking.

I know you can't see much of the branch on my card because I ended up adding lots of other elements.  I used it because I wanted to add berries to the branches, it but it is hard to see that in the photo.  The other branches I used on this card are the Cheery Lynn "Olive Branches" (B147) and the "Pine Branches" (B146).   Both these branches were added down in the shadow box and under the flowers along the side and bottom.  For the backing on the shadow box I cut a border with the Martha Stewart "Apen Snowflake" punches.  Purple Stickles was used for berries on some of the branches.

All the products listed in "bold" can be purchased from Joan's Gardens.

I entered this card in this challenge:  http://www.hidinginmycraftroom.com/

366143

Gate Fold Card


This is a Gate Fold card created with the new die collection from Heartfelt Creations; the Layered Elegant Swirl Die (HCD 716).  There is a video on Joan's Gardens blog to show you how to use the dies to create this card.  I kept my card simple on the outside.  The pretty corner flourish is from one of the new  Flourish stamp set called "Rye Grass Flourish PreCut Set" (HCPC 3436).  There are two new Flourish sets that you will love using year round.  I added black pearls to the front of the card then tied a black bow around it to hold it closed.

 Have you checked out the "I Want It All" offer on this new Heartfelt Creations  Collection.  You save $30  at Joan's Gardens.

Today I started working on decorating my Christmas tree and getting the house prettied up for Christmas.  We purchased a new Martha Stewart artificial tree this year that is pre-lit.  It is amazing how much quicker it is to finish with the tree when you don't have to string the lights.  We used to always go out and cut down a fresh tree,  but the last time we did this was when we found out the real tree was full of tiny little spiders. It was horrible to wake up the next day and find these tiny little black spots all over the vaulted ceiling and on the walls.  No more spiders in our house!!!

Don't forget to go over to Joan's Gardens and see what is on sale today in the 12 Days of Christmas Sale.  Remember each day you purchase anything from the sale, you name will be entered into a drawing for a $50 Gift Package from Joan's Gardens.. 


Saturday, November 26, 2011

Flirty Fleurs


You know how much I love top work with flowers and this is another great addition to my flower stamp collection.  The stamps in this new Heartfelt Creations Collection is called "Flirty Fleurs PreCut Set" (HCPC 3439).  It coordinates with the Heartfelt Creations Posy Patch Die.  I used all the stamps in this set to create this card, plus the new Heartfelt Creations Artistic Gatefold dies.  The pink and white backgrounds were created by using the Sizzix "Thank You set" (656983) embossing folder.  The white piece was first die cut using the Heartfelt die.  I used a long piece of card stock 5.5" wide and placed the die at the top leaving room for the embossing.  The embossing folder was then placed under the die cut and cut off to fit this 5.5" x 6" card.  Two sets of the larger flowers were stamped and only one of the other stem of flowers were stamped;  they were colored with Copic markers and fussy cut and arranged.  In order to "ground" the flowers I added die cut grass.  I used the Cheery Lynn Grass Border (B126) to cut three strips of grass and layered them on the bottom of the card.  Two Spellbinder corners were added as well as a few pearls to complete the card.

All the products I use can be purchased from Joan's Gardens.

Friday, November 25, 2011

Vintage Door


THERE ARE TWO POSTS TODAY

This card was created with the new Heartfelt Creations "Vintage Door PreCut Set" (HCPC 3440) and one of the new "Artistic Gatefold Dies".  I wanted to make a front porch scene with one of the doors in this stamp set and used the widest door and created two window panels for each side of it. The door was created by using a brown card stock and using a darker brown ink.  A metallic gold pen was used to color in the door handle. The windows were created with the Cheery Lynn Small Window Frame (FRM 114) die.  It was die cut using brown card stock, trimmed down, and backed with a piece of yellow card stock that was sponged with a darker yellow ink for a little texture.  Since I was using yellow ink, I could actually sponge right over the brown die cut window.  The "Layered Scalloped Posy Die (HCD717) was also die cut using brown card stock.  I was surprised how well this die popped out of the die when using  a double layer of waxed paper between the die and the card stock when you run it through your die cutting machine.  I didn't even need to punch but a couple of small pieces because it die cut so nicely.  This was also backed with yellow card stock and sponged with a darker yellow ink.  

The house "wall" in the background was created by embossing a piece of white card stock with the Sizzix "Bricked" embossing folder.  To create the color of bricks I wanted, I used about four different colors of Distress Inks, then covered it with Distress Stain "Picket Fence" to soften and blend the colors on the bricks.  The pots on the porch were die cut using the Spellbinders "Flower Pot" dies.  The evergreens in the post are the top of the Marianne LR0136 tree.  To create the porch and step, I used a piece of dark gray card stock. I wasn't sure how to create a step but cut a smaller piece of gray card stock, drew a line across it with a pencil, then shaded down on the lower end to try and create a shadow representing a step.  The sentiment is from the Heartfelt Creations "Vintage Door" stamp set.  All the pieces were assembled to create my front porch scene.  

I had a lot of fun creating this card for you.  It was actually very easy to complete -  I just had to figure out how to actually create the scene -- now will be very simple to recreate.  Hope you like it.  I'm sure you will have lots of fun creating your cards with this great stamp set.  There are two different doors to work with -- I can just see the smaller door used for "French" doors on a gate fold card.  

This is only one of six new stamp sets in the November Collection.  Be sure to go over to Joan's Gardens to see the entire collection.

There is another card posted last night created with this new collection.  If you haven't seen it, please scroll down.

364401

Thursday, November 24, 2011

Artistic Gatefold Collection from Heartfelt Creations


The new Heartfelt Creations  "Artistic Gatefold Collection" is being released today.  You are going to love these new stamps and gorgeous dies. You can create decorative gate-fold cards, doilies, borders; the possibilities are endless.   You can see the entire collection at Joan's Gardens. 

This card was created using the gorgeous new "Layered Elegant Swirl Die" in this release and one of the beautiful flower stamp sets "Carnation Florals 2 PreCut Set" (HCPC 3438)  which coordinates with the Spellbinders "Carnation Creation Shapeabilities" dies.  The leaves are the Heartfelt Creations "Filler Leaves" (1359E).  The embossed background was created with the Sizzix "Ornate Swirls"  embossing folder.  Two sizes of flowers were white embossed on white vellum and cut out with the matching Spellbinder dies.  A brad was put in the center to attach 5 flowers together then spritzed with water which causes the vellum to curl and allows you to shape it.  The leaves were also white embossed on white vellum and colored on the back with a pale green marker.  They were fussy cut.  A small strip of green card stock was added below the die "Layered Elegant Swirl Die" die cut.  Pearls were added to the band and also to the upper corners.  

Be sure to go over to see all the stamps and dies in this new Heartfelt Creations release at Joan's Gardens. All products I use can  be purchased from Joan's Gardens.

Tomorrow I will post the card I created with the New Heartfelt Creations Vintage Door stamp set. 

Sneak Peek


 Sneak Peek of card created with new Heartfelt Creations stamps and dies.

I have had emails from some of you wondering if you are missing some of my blog posts.  I want to let you know that you have not.  I have not  posted for a few days because I have been having some back problems and what time I am able to create, I have been working on the new Heartfelt Creations release that comes out tomorrow.  I will start posting the items I have been creating, with instructions,  starting tomorrow.  You will be able to see four of my new cards on Joan's Gardens tomorrow when she posts the new Heartfelt Creations  "Artistic Gatefold Collection".  This is a collection that that has six new stamp sets that coordinate with existing Spellbinders dies and 2 new exclusive dies.  I'll be back with a new post tomorrow.  Hope you are all having a great day.


Wednesday, November 23, 2011


Sunday, November 20, 2011

Friendship


SECOND POST TODAY.  The purple and silver ornament card was posted this morning.

 I have been creating a lot of Christmas cards and today decided to use a couple of other new dies I just received to make a Friendship card.  The design paper I used is from the Webster's Pages "Your Life, Beautiful".  The sentiment is the Penny Black "Friendship" (4176H) wood stamp.  I like to create Rosettes with the Tim Holtz "Paper Rosette" die and used a piece of striped design paper from the Graphic 45 "Christmas Emporium" 12x12" paper pad for this one.  The new Cheery Lynn die that I used to create the pretty little flower is the "Cuties 2" (B150) die.  In the picture below you can see the strip used to create the flower when first punched.  On the video on Joan's Gardens, it shows how to glue two strips together to create a nice full flower.  Doing this really makes a big difference in how the flower turns out. If you haven't already seen this video, you won't want to miss it.   You can glue the two strips together and then cut them in half to create smaller flowers.  The flower on the top of my arrangement was created with a full strip of petals, and the two flowers below that one were created with a half strip.

Here is the picture to show you how you glue two strips together.  The strip on the bottom is a single strip.  The strip on top has two strips glued together, alternating the petals.  You just put a very thin line of glue across the bottom, below the petals, then roll it up.  I punched a small circle to add to the bottom of each flower to hold it's shape.  Then you start pulling each of the petals down to create your pretty little flower.

Below the Rosette I placed this beautiful die cut created with the Memory  Box "LaRue Flourish" (98218).   It is so beautiful I hated to cover it up but I really liked the dainty look it created below my flower arrangement.  I thought I should take a picture of the whole die so you can see how dainty and beautiful it is.  These Memory Box dies just pop right out of the die and are so easy to use.  I know you will love them.

Below the flowers I added one of the die cuts from the Marianne (LR0192) set.  I love all three of the die cuts in this package for little added embellishments behind flower arrangements.  The pretty little leaves, under the flowers, were die cut using the new Cheery Lynn "Olive Branches" (B147).  You get two stems of leaves, each facing a different direction so it easy to use around your flower arrangements.  To complete this card a small ivory bow and some pearls were added.

As you know all these products can be purchased from Joan's Gardens.

Today is the BIG DAY.  The 12 Days of Christmas Sale, at Joan's Gardens, started at noon today.  Remember for each day you make a purchase from this Sale, you will be entered into a drawing for a $50 Gift Package from Joan's Gardens.  Better go over and check out the great savings!

361136

Purple and Silver Ornaments


I love silver and purple together for Christmas.  This card is made with some more Memory Box dies from Joan's Gardens.  Aren't those ornaments beautiful.  Here are the products I used:  Memory Box "Snowflake Ornament" (98231); Memory Box "Crisp Bows" (98197); Memory Box "Frosty Border" (98171); and a Heartfelt Creations background.  The punched border was created with the Martha Stewart "Aspen Snowflake" punches.  

The snowflake border was punched, then a piece of dark purple card stock was cut to fit just inside the  punched border.  The Heartfelt Creations snowflake flourish background was silver embossed on white card stock and attached over the purple cs.  The Memory Box Snowflake Ornaments were die cut using some gorgeous shiny silver card stock that you can now get at Joan's Gardens.  This silver card stock is so perfect for Christmas cards -- bright and shiny.  The Frosty Border was also die cut using this silver card stock and glued to the top of the card.  The ornaments were glued to some purple "velvet" paper that I have had in my stash for a very long time.  I always hated to use this paper but it is beautiful behind these pretty ornaments.   Thin silver cording was attached behind the ornaments so they could hang from the Frosty Border.  I started to add a ribbon to the top of the ornaments and didn't think it was "elegant" enough for these pretty ornaments, so remembered I had the Memory Box "Crisp Bows".  Wow - they were just what I was looking for.  They were also die cut out of the silver card stock.  The ornaments were attached with dimensional dots and a pretty bow was attached at the top of each one.  My corners were a little bare - I had some small silver corner stickers in my stash that I decided to add to the bottom to complete this card. The front was attached to a dark purple card.

All the products in "bold" can be purchased from Joan's Gardens.  Be sure to go over to Joan's Gardens and check out her big "12 Days of Christmas" Sale.


Saturday, November 19, 2011

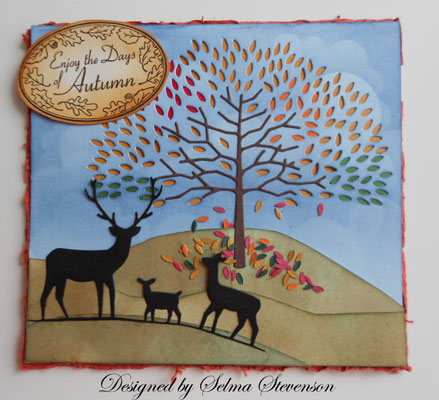
Enjoy the Days of Autumn


Do you ever see something (for stamping) and get an idea of how you would use it before you even receive it?  Well that is what happened to me when I saw these new Memory Box dies from Joan's Gardens.  It  is funny I am making an Autumn card when it has been snowing here for the past two days, but I had to follow through on my idea.

I started out with a piece of light blue card stock for my card base.  The finished size of this card is a 5.5" x 6".  The card stock was folded and the top of the Memory Box "Leaf Canopy" (98142) was placed close to the fold.  This die just cuts little holes in the card stock.  Pretty neat huh!   Then the "Twiggy Tree" (98143) was die cut using brown card stock.  The Memory Box "Deer Trio" (98166) was die cut out of black card stock.  

Once the top of the tree was die cut, I used a dark blue Distress Ink to sponge the sky using a cloud stencil to create clouds behind the tree.  Using scissors, three different levels of "hilly ground" were cut out.  To give the ground an autumn look, I first sponged it with a dark green Distress ink then went over it with a brown Distress Ink to blend it all together.  The hills were then attached below the sky.  Next the "Twiggy Tree" was then glued in place to form the large tree.  Now don't laugh at me, but this was the idea I had to try.  I wanted to create a tree with falling leaves.  I took the "Leaf Canopy" and placed small pieces of fall colored card stock in different places over the die then ran it through the die cutting machine.  I saved all these little "leaves" so I could create a scene with falling leaves.  On the back side of the "Tree Canopy", I glued some of the same colors of card stock over some of the holes then cut a piece of dark yellow card stock to the inside to cover the whole top portion of the inside of the card.  This covered up all the little pieces of different colors of card stock glued to the top of the tree.  Next I added some dots of glue in areas where I wanted the falling leaves then just dumped on all the little leaves I had die cut.  The deer were then glued to one of the bottom hills.  The sentiment is from an old JustRite stamp set.  I wanted an autumn colored border around the card so cut a piece of dark orange card stock, slightly larger than the card, then ran all the edges through the Zutter Paper Distresser. Well, what do you think about my idea to create falling leaves from this pretty Memory Box Tree?

I can now imagine using these same dies to create a winter scene.  It is so much fun, and so easy, to create cards using these great dies.  All these products can be purchased from Joan's Gardens.  Did you see the big announcement on Joan's Gardens??  Joan is having a great "12 Days of Christmas" sale  and everyone making purchases during this sale will be entered into a drawing for a $50 Gift Package from Joan's Gardens.  Each time you make a purchase from one of the 12 Days, your name will be entered into the drawing - that means you could have up to 12 chances to win that $50 gift package.  Be sure to go over to Joan's Gardens to get all the information about this sale that begins Sunday, Nov 20.

360453

Friday, November 18, 2011

My Oh My - more beautiful dies and stamps


I just received some new Memory Box dies and stamps from Joan's Gardens and want to share a card designed with some of these products.  Before I explain how I created this card, I will tell you the Memory Box products I used:"Country Landscape" (98239) die; "Snowflake Corner" (98238) die; "Grand Snow Globe" (98228) die, and "Santa Globe" (D1821) stamp.


My first step was to create the Country Landscape.  This is a die that cuts out the houses and the trees and does not cut along the bottom.  This is great because you can place the die high enough up to leave a snow bank below the Landscape.  Here I am showing you how I place the die on a piece of 5.5" x 6" card stock.  


 You can see in this picture how the landscape is cut leaving the solid piece of card stock in tack.  I cut a piece of design paper wide enough to fit down behind the landscape.

Since the die was centered across the piece of card stock, I have an even border and  now can push the design paper down behind the die cut scene created with the die.  It was aligned up to give an even border and attached with adhesive.  The beautiful "Snowflake Border" was attached to the corner.  The sentiment I used is from a Penny Black stamp set that I have had for many years. 

l
For the Santa scene, I stamped it on white card stock using black VersaFine Ink and clear embossed it.  This ink stays "wet" long enough to emboss.  To get it cut out perfect, I used the "Grand Snow Globe" die, taping it over the scene before running through the die cut machine.  You can break this die apart, but so far I am using it without doing that.  As you can see from this picture, that stamp and die are going to create a beautiful snow globe.  I am in the process of doing that for another card.  After cutting out the scene, I used a Spellbinders Scallop Circle Nestie to frame it. Since this is basically a black and white card, I added that red scalloped background to the Santa scene and used a green card and green silk bow to add the traditional Christmas colors. 
You can order all the products I use from Joan's Gardens. If the item is not pictured on Joan's Blog, just ask her about it and she will order it in for you.  I will have some more cards for you using  the other new Memory Box dies Joan just added to her blog.  Be sure to go over and over to Joan's Gardens and see all the new products she posted today. ALSO -- there is a big event that has just been announced on Joan's blog -- you can see it here.

It has been snowing like crazy at my house for most of the day.  Perfect time to get all my Christmas cards completed, isn't it!  Has it snowed at your house yet?

359678

LinkWithin

Related Posts with Thumbnails