Wednesday, July 14, 2010

Your KindnessTouched My Heart


Today I want to thank Diana Crick for sending me one of her new products, the "Scor-Buddy".  She will be using one of my cards and sent this as a thank you.  I have to say this is the greatest invention.  It is small enough to leave right by your work area for quick and easy score lines when working on cards or small projects.  Of course I still have my large Scor-Pal on my side table.    Below is a picture of the new Scor-Buddy.   Joan, at Joan's Gardens is expecting a shipment any day, so you can order one from her.  I know you will love it.  Thanks again Diana - I LOVE it.


For my card today I used my new Scor-Buddy.  I scored three lines around all four edges of my card.  Between the 4" and 5" the lines are 1/4" apart which made it real easy to do this.  The card stock and ribbon I used are "Grass Green" from Gina K Designs.  Love this color of green.  A Spellbinder "Lotus" Pendant was placed on the card with dimensionals.  The pretty stamped image is from the JustRite "Applique" set.  It was colored with Copic markers and cut out with a square Nestie and also applied with dimensionals. 

The greeting is from the JustRite "Joyful Hearts" set.  I think it matches the Applique design very well.  A large green circle was cut out to frame the greeting.  A piece of Gina's ribbon was attached below the pendant and three yellow  Kaiser pearls added. To finish off the card a small bow was made with the Bow Easy and attached above the applique.  


  • The JustRite stamp sets, Spellbinder dies, Bow Easy, Kaiser pearls, and Scor-Buddy can be purchased from Joan's Gardens.

  • The card stock and ribbon can be purchased from Gina K Designs.
I have an extremely busy day today and for the next three days.  Hopefully I will have time to post to my blog, but if not, I will be back on Sunday.   Have a great day.


Tuesday, July 13, 2010

Heartfelt Happy Birthday


We had such beautiful weather for a few days and yesterday a huge wind storm blew through and sure created a lot of dust.  Not good on allergies!!!

This card did not turn out the way I wanted but decided to post it any way. Seems like something is missing -- perhaps I should have added some leaves.   I have been wanting to create a flower with the Heartfelt Creations "Open Petals PreCut" set but had a hard time deciding which paper to use.   I wanted a design in the petals so used a piece of vellum with a lace design in it.  The petals were stamped using white pigment ink and then clear embossed.  There is a Spellbinder die "Perfect Petals Nestabilities" to cut these petals out.  Prior to cutting the petals out, a sponge dauber and pink ink were used to color them.   The pretty element behind the flower is from the Heartfelt Creations  "Perfect Petals Diecuts".  The sentiment is from the JustRite "Baroque Nested Frames" set.  I used only the smaller frame with the sentiment.  Isn't the script and the frame beautiful.  Love the two new JustRite Nested Frame sets.

Heartfelt Creations has another set called "Perfect Petal Medley PreCut" that has images on the petals. I have ordered this set (plus others) from Joan's Gardens but don't have them yet. These stamps and dies were so popular Joan sold out of them right away but has a new order coming in soon.  She also has ordered some of the new releases, so be sure to watch her blog to see these new items. 

My friend Olga created a card using these same stamps.  You can see her beautiful card here.  I love how she combined regular card stock and vellum to create her flower. 

The Heartfelt Creations products and JustRite stamps used in today's project can be purchased from Joan's Gardens.

Thanks for stopping by.

Monday, July 12, 2010

Watercan with Posies


Today I am playing with some new items I ordered from Joan's Gardens.   First I used a new Cuttlebug embossing folder called "Grace's Frame".  I love the deep embossed frame.   I posted a lily card the other day made with some new stamps I got from Joan.  They are by Heartfelt Creations.  Today my card is made with one of the stamps in the "Posy Patch Garden Delight" set.  The image was stamped and colored using colored pencils and oms.  I cut it out because the sides are a little wider than the frame I wanted to put it in. 

Along the left side I used a piece of Basic Grey Design paper from the "Kioshi" paper pad.  The flowers along that border are from the Heartfelt Creations "Posy Patch Flowers PreCut set".  The leaves are from the "Elegant Single Leaves PreCut set".  These sets each have 6 different sizes which gives you many options for creating cards or other projects.  Both of these stamp sets have Spellbinder die cuts also so you don't have to cut out the flowers or the leaves with scissors.  Really neat for those of you who hate to cut with scissors. It makes cutting them out very quick and easy. 

The greeting is from the JustRite "All Occasion Nested Sentiments and Verse" set.  The butterfly is from a new Martha Stewart punch I just got.  It is the one that has the stamps in the top then you punch it out.  To complete the card I added some black rhinestones to the center of the flowers and on each corner of the frame. 

Joan is having a big "Garage Sale" to get ready for lots of new items she will be getting from CHA.  If you haven't seen it yet, better go check it out.  Great Savings!


Sunday, July 11, 2010

JustRite Nice Notes


This week the JustRite Friday Challenge 026-Nice Notes is sponsored by Spellbinders and the challenge is to create a shaped note card under 4-inches.  Well I have never made a card using Spellbinder dies for the shape of the card.  I have seen many cards made this way and keep saying I'm going to do it and today is the day!  

I first thought about what I wanted to put on the front of this small card to decorate it.  I decided to use my Spellbinder Daisy Petals die to create a flower.  I cut two each of each flower -- a total of six layers.  I used a very light gingham yellow design paper for the flower.  I don't think you can see the design in the photo.    I cut between each petal to give the flower some dimension then stacked each layer alternating the petals.  A brad was put in the middle to hold it together.  

I used the Spellbinder Labels One Nestability for the shape of my card.  If you want a folder card, like I wanted, you fold your card stock in half then leave a small portion of the top of the Nestie above the card stock so it doesn't cut all the way through.  Next I chose my design paper which is from the Basic Grey "Kioshi" paper pad.  I layered it on top of another piece of white card stock and cut them out with the same Labels One Nestie.  They were adhered to the folded card with adhesive.  

The JustRite verse I used is from the "Friendship" Set.  It is black embossed so it would show up well on the design paper.   The Spellbinder flower was attached with a large glue dot and pearls added to each corner. 

On the inside of the card I used another stamp from the JustRite "Friendship" set.  It was stamped with black Memento ink and colored with Copic markers.  

This was a fun little card to make.  I'm sure I will now start making other shaped cards to use instead of tags for gifts.   Have you made shaped cards using Spellbinder dies?

Saturday, July 10, 2010

Joan's Garden Challenge 5


I made this card for Joan's Thursday Challenge.  My StampTV friend Carla Suto won last week.  Congratulations Carla.  This week Joan's challenge is to frame your focal point and somewhere on your card use some Graphic 45 Designer paper.  If you don't have any, you can use something similar or order some from Joan.  This is some of my favorite Designer paper so I do have some. 

My Graphic 45 dp came from the Le' Romantique pad.  I love butterflies and thought it would go perfect with the focal point on my card.  I used a piece of  barely banana card stock and created my frame with the new Cuttlebug Cut & Emboss folder "Perfect Perennials".   Isn't it a beautiful folder.  I love how these new folders cut out a frame and emboss all at the same time.  The piece that is cut out is also embossed and can be used for something else.  I used square Nesties to cut two more squares to create additoinal frames inside the cut and embossed frame. 

For my focal point I used a verse from the JustRite "Hope" stamp set.  In case you can't read it, it says "Our greatest Glory is not in never falling but in Rising every time we fall".    I wanted to use a frame from this set with the verse but they were all too large.  One of the frames had this small frame as part of the inside of a larger frame.  I used a marker to color just the smaller frame so it would outline the verse.  I was so happy this worked so well. 

I wanted to dress up the embossed portion of my card so cut out some butterflies from the design paper used and scattered them around the card.  I decided I needed to add some flowers for the butterflies so used some of my vellum flowers and leaves. 

Hope you go over and submit a card for this challenge.  There is a nice prize for someone whose name will be randomly drawn.  Everyone who wins a prize in the weekly challenges will be put in a drawing for a $100 gift certificate to be given away at the end of the year. 

Friday, July 9, 2010

Sympathy Card


I have some happy news.  This morning I found out the card I submitted for the JUGS (Just Us Girls) Saturday challenge was selected for the "Chic of the Week".  What an honor.  I want to thank them for selecting my card.  I will proudly place the badge in my sidebar.  It was a very fun challenge to participate in. 

Now to my card.  Have you seen the new Heartfelt Creations stamps and dies that Joan now has in her store (Joan's Gardens)?  Well she did have them but they are so popular that she sold out very quickly.  However, she is taking orders because she will be receiving  more.  These are precut stamps which also have Spellbinder dies so you don't even have to cut them out.  How fun!  The stamps I used on my card are called Lily Petals.  There are stamps for both the flower petals and for the leaves plus the Spellbinder dies for each.  

The lily petals were stamped with pink ink and cut out with the die, then sponged around the edges.  There is a video on the Heartfelt Creations blog showing how to form the flowers.  I followed these directions to create my flowers and leaves.  The "Perfect Petals" die cut includes the beautiful scrolled background.  I ran a piece of white card stock through the Cuttlebug using the Dotted Swiss embossing folder then attached two of the scrolled background pieces using Pro Glider adhesive.  The flowers and leaves were arranged on top.  The verse is from the JustRite stamp set "Thinking of You".  It was stamped twice and the center cut out of one and attached with dimensionals.  Some Martha Stewart ferns and twisted paper were  added to complete the card.  

Be sure to go over to Joan's blog and see all the beautiful cards created with stamps and dies from Heartfelt Creations.  I'm sure you will love them all. 

Thursday, July 8, 2010

Elisabeth Bell


Cuttlebug Cut & Emboss Brocade Window

Open Cut and emboss folder


Sorry I have been away for a while.  We had a death in our family plus I haven't been feeling very well.

Today I received an order from Joan's Gardens and one of the new things is this Cuttlebug Cut & Emboss Folder "Brocade Window".  Do you have any of these new folders?  This folder embosses a 5x7 inch piece of card stock and cuts out the center all in one roll through the Cuttlebug .  I used a piece of white card stock for my card but if you go to Joan's Gardens, Joan has posted a beautiful card sample for the next challenge using this folder.  She has added colors to the embossed design.  You can see her card here

The card I made today will be entered in the Color Throwdown  #100 challenge.  There are tons of prizes that will be given away so you should check it out.

The design on my card is the Whiff Of Joy "Elisabeth Bell".  She was colored using the required colors.  The background was sponged with baja breeze ink.  The new Cuttlebug emboss & Cut Folder was used for the frame around her.  Some vellum flowers and leaves were added in the upper corner.  Elisabeth Bell looks like she has her eyes closed and is making a wish so I decided to use this salutation  from the JustRite set "Just A Note".  It was stamped then a small circle Nestie was used to emboss around the words then sponged with baja breeze ink. The entire piece was then cut out with a scallop Nestie and sponged on the edges.  Around the edges of the frame I used pieces of card stock in each of the required colors to create a colorful frame.

The Cuttlebug Cut &  Emboss folder, Whiff Of Joy stamp, Just Rite Stamp and vellum were purchased from Joan's Gardens

Monday, July 5, 2010

BLOOM WHERE YOU ARE PLANTED plus Tutorial


My card today is made using two JustRite stamp sets:  "Seeds of Kindness" and "Hope".  I wanted my greeting to be in a square but the verse I wanted to use come in a set with round centers and borders.  I first stamped  the frame from the "Hope" set, then using the round clear stamping block, stamped the verse from the "Seeds of Kindness" set in the center of the stamped square.  It is so neat that you can mix and match your stamp sets from JustRite.  I also love that JustRite is coming out with clear blocks to make it easier to see right where you want to stamp.  The image was trimmed using a paper trimmer and the corners punched with a corner rounder.

The design paper is from the Basic Grey "Sugared" paper pad.  A white border was created using the Martha Stewart "Gothic Arches" punch and then embossing the rest of it with the Cuttlebug "Kassies Brocade" embossing folder.  This design paper has roses in it so I decided to create some flowers using crepe paper and the dahlia Nestabilities.  There is a tutorial below.  Leaves from a Sizzix die were placed under the paper roses.  A Martha Stewart punched butterfly was added to complete the card.

Below is a tutorial on how I made the crepe paper roses.


I used a roll of pink crepe paper streamers.  Starting at one end measure the width of the die and then fold crepe paper over so you have 12 layers.  Cut it off the roll.

This picture shows the stack of crepe paper after it has been run through the Cuttlebug.  You can also see the cut out flowers once you discard the outer portion.

You need to separate each layer then stack so petals are staggered.

Use a paper piercer to create a hole in the center.

Put a colored brad through the hole to hold the flower together.


Starting with the very top layer, start pulling the petals up to shape into flower.  Do this with each layer.


This is what the finished flower looks like.

All the products I used can be purchased from Joan's Gardens.

Sunday, July 4, 2010

A card for the JUGS Sketch challenge


JUGS Sketch Challenge 


This card was made for the JUGS (Just Us Girls) Saturday challenge.  This week they have a Sketch challenge and it is sponsored by JustRite stamps.  You are asked to use JustRite stamps if you have them.

I always enjoy doing sketch challenges and since I love JustRite stamps thought I should create a card for this challenge.  I started this challenge out by choosing my design paper first.  I seldom do this.  This is from the Basic Grey "Cappella" Paper Pad.  I love the soft colors.  In this design there are mums, so I chose the mum stamp from the JustRite "Beautiful Blossoms" Set.  It was stamped on white card stock and cut out with a Nestie.  The flowers were colored using Copic markers.  I wanted to add a "real" bow over the stamped bow in the image so I stamped the image twice and cut out the largest flower and one set of leaves so I could put them on dimensionals.  This gives a more realistic look since I wanted a "real" bow.   The background was sponged with pearlized chalks.  A Sky Blue scalloped Nestie was cut out and attached behind the design with dimensionals. 

A Martha Stewart border was punched along one edge of Blush Blossom card stock and again using Sky Blue card stock.  A wide piece of sky blue silk ribbon was added across the border then another piece of trim on top of that.  ScorTape was used to attach all layers.  Pearls were added on each punched scallop. 

The sentiment used is from the new JustRite  "Baroque Nested Frames" set.  I love the beautiful font.  Two corduroy brads were added to the upper left corner to complete the sketch. 

This is a beautiful sketch and enjoyed creating this card.

Saturday, July 3, 2010

Inside Out

Front of card when closed


Flower is really on inside of card


JustRite Friday Challenge 025: Inside Out


This week's JustRite Friday Challenge has been turned inside out! They want to see us use some of their sentiment stamps BOTH on the inside of our card as well as the outside of the card.    You should join in on the fun!

As stated above, this JustRite challenge is called "Inside Out".  I decided to make part of the inside of my card pop out on the front when closed.  This is really going to be an "Inside Out" card!!!   Of course I still need to create a card with a JustRite verse on the inside as well as the outside.  I started with a 5.5" pink card.  A piece of Basic Grey design paper was cut to fit the front.  I stamped the sentiment from the JustRite  "My Garden" set on pink card stock and cut it out with a scalloped Nestie. It was attached to the front.  I then took a circle Nestie that fit inside of the border and cut a hole through the stamped border, design paper, and the front of the card.  I wanted a hole to see inside my card.  A pink ribbon was added along the bottom and some punched butterfiles and pearls added.

With the hole cut out of the center of the frame I now had a frame to place my flower from the JustRite  "Plant A Little Love" set.  I stamped the hydrangea using black  ink and colored it with Copic markers and cut it out.  I then punched out some pink vellum flowers using the Martha Stewart punch and glued them to the flower to make it dimensional.  This was attached to that circle I cut out using dimensionals.  Next I cut out the Spellbinder Lotus pendant in brown card stock.  The flower image was attached in the center of the Lotus design.  The circle with the flower design was pushed through the hole so when it was attached to the back of the card it would fit perfectly.  There was Pro Glider adhesive on the back of the lotus design and when I closed the lid it attached in the perfect spot. 

One of the reasons I love JustRite stamps is because they have "tons" of verses and I was looking for something that would fit perfectly with the greeting on the front of the card which reads "Friends are Flowers in the Garden of Life".  I found the perfect JustRite verse I wanted to use, but it was not in a shape I could use on my card.  The verse I wanted to use is from the JustRite  "Stitched With Love" stamp set which fits into the 2 3/8" round stamper.  I couldn't let that stop me so I stamped the verse on pink card stock and just cut out each word I wanted.  I then added these words to a  strip of the design paper and placed it  inside.  So happy; now my card says exactly what I want. 

All the products used to create this card were purchased from Joan's Gardens.

Well my Inside Out card is really Inside Out.  I love the way it turned out.  What do you think?

Hope you are having a wonderful holiday weekend.

Joan's Garden Challenge Four


Did you see Joan's Gardens Challenge this week?  You can click on this link and see the beautiful sample Joan posted and get all the details about this fun challenge.  It is to create a card/project using a red, white and blue theme celebrating America's birthday and do something with an Embossing Folder such as a Cuttlebug.

I still am not feeling real well so all my mojo is not with me but I wanted to participate in this challenge.  I used three stamp sets from JustRite Stampers; "My Garden", "Hope" and the new "Baroque Nested Frames". The embossing folder I used is a new one I had ordered from Joan called "Kassie's Brocade".  

The frame from the Baroque Nested Frames was stamped using blue ink then the verse from the Hope stamp set stamped at the top.  The morning glory was stamped and colored with Copic markers.  A ribbon was tied around the bottom and a looped bow added.  

Hope you will go over and join in on the fun at Joan's Gardens.  I want to congratulate my stamping buddy Olga Jewell.  Her name was drawn for the prize last week and her  name will be entered into the $100.00 drawing at the end of the year.


Happy 4th of July!

Thursday, July 1, 2010

Buttons, Buttons


Well I am back from my trip to Canada and got sick while I was up there.  Glad you are out in blog world and can't catch it from me.  I'm sure it is just a bad cold, but sure makes my head miserable!  Before I left I made this card.  I love the verse around the design.  I have tons of buttons so thought what a great way to use some of them up.  Did I go overboard?????  

The stamp set used is from JustRite Stamps called "Stitched With Love".  It was stamped, colored with Copic markers then mounted on creamy caramel and chocolate chip card stock.  Circle Nesties were used and the scallops on the middle layer were pierced.  Each layer is mounted on dimensionals.

The design paper is from the Basic Grey "Sugared" paper pack.  I sewed it to a piece of creamy caramel card stock then I added the design.  I am not sure where I got the brown trim, but attached it to the bottom of the card with ScorTape.  Then I got started adding buttons with small glue dots and filling up the card with buttons on each flower in the design paper and also to the stamped design.  A few larger buttons were added across the trim.  I thought with this verse it was appropriate to add lots of buttons and to add stitching on the card. 

Have a Happy 4th of July.


Tuesday, June 29, 2010

Vellum Lilac Flowers Mini Tutorial


Last night while I was watching TV I was using my Martha Stewart punches to punch out petals for more vellum flowers.  While I was punching out the smallest petals in purple, I was thinking, I bet these tiny petals could be shaped and attached to a beautiful lilac stamp that I have.  I decided to give it a try.  Above you can see my finished card, a closeup of the punched vellum flowers attached to the stamped design, and then a picture of the supplies used to do this.

The lilac stamp used is one I have had for many years.  It is by PSX (1994).  I have been collecting flower stamps for years.  It was stamped on white card stock and colored with Copic markers.  Yellow chalk was used around the design.  I shaped the tiny petals with the stylus  and using tweezers, added a tiny spot of glue to the bottom then started attaching them to the stamped design.  I had two shades of purple vellum so used both colors to give some depth to the flower. The reason I colored the design with Copic markers first  was because I was sure some of the stamped flowers would show, especially on the tips.  I was right, so it was important to color the image before gluing down the vellum flowers.  Cuttlebug corners were added to complete the front.  The design was then attached to a piece of  card Vibrant Violet card stock from Gina K Designs.  I love this color of purple with the flowers. 

I really like how this turned out.  What do you think?  Does it look pretty realistic?  One more thing I can do with my vellum flowers!

You can purchase the vellum and Martha Stewart punches from Joan's Gardens.

Well we are off to enjoy some time with our kids and grandkids.  Hope you are having a fun summer.

Monday, June 28, 2010

Shopping Willow


I have a quick post for you today.  I just received this stamp from Joan's Gardens. Isn't it cute.  The name of the stamp is "Shopping Willow" by Elisabeth Bell.  Joan has posted a cute card made with this stamp on her blog so be sure and check it out.  She also have a lot of other cute stamps in this line.
The background paper is from the Basic Grey "Green at Heart" paper pad and the flowered design paper is from "My Minds Eye".  The image was stamped and colored with Copic markers.  The bags were paper pieced.  The greeting is from the JustRite stamp set "Just A Note".   I couldn't resist adding some vellum flowers to finish off the design.  I need to tell you that the true colors on this card are not showing up well in the photo but it does all match. 

I have a very busy week but will try to keep up with new posts.  Have a wonderful week.

Saturday, June 26, 2010

Red, White & Blue Sketch Challenge

Front view of card


JustRite Sketch Challenge

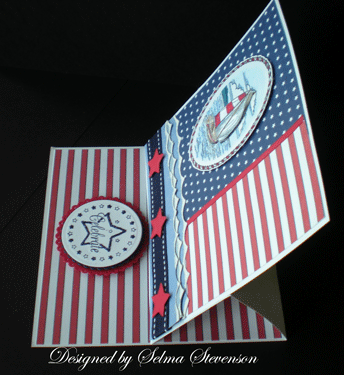
Easel card opened


Side view of easel card


Close up of dimensional sails


For this week's JustRite Friday Challenge #024, you must use the above sketch combined with JustRite stamps and the requirement of a red, white & blue Americana color scheme in honor of the upcoming U.S. Independence Day.  This challenge has a really big incentive for me because this week's challenge winner will receive the two newly-released 2" square Christmas stamp sets (From Our House & Hearts Come Home) debuted earlier this week on the JustRite bog, PLUS a 2" Square Wood Stamper!  I REALLY want these new stamps!!!! 

When I read about this challenge I immediately thought about using the sailboat from the JustRite stamp set "By the Sea".  One of my favorite Fourth of July celebrations was a year when our son took us out on his sailboat in the San Diego bay. 

I did use the JustRight sketch to create the front of my card.  However, I took it one step further because I wanted to make my card resemble an American flag.  In order to do this I made an easel card so I could add the red and white strips below the blue and white piece.  I started off with a 5.5 inch square of white card stock for the front.  Gina K digital papers were used to carry out the red, white and blue theme.  For one of the lower borders in the sketch I decided to create some waves.  I used a Martha Stewart punch  to create layers of waves.  The "caps" of the waves were white embossed.  There are three rows to create depth.  Along the bottom, a piece of Gina K ribbon was added then three red stars cut with Nesties and added on with dimensionals. 

The JustRite sailboat and border are from the "By the Sea" stamp set.  It was colored using colored pencils and oms.  A second image was stamped and the sailboat cut out.  I wanted the sails to have a "billowed" look so attached the boat with adhesive then used dimensionals under the sails to make them bow out for the 3-D look.  I really like how it turned out. 

Next I cut out the base for the easel card.  Another strip of the digital paper was attached to the base.  The salutation is from the JustRight stamp set "Just A Note".  What a perfect stamp for what I was creating.  It was stamped using Navy ink then cut out with a Nestie.  It is attached on a navy and a red scalloped Nestie circle and attached with dimensionals.  To give my card some "glitz" I added glitter to the waves around the boat and on the stars in the salutation. 

My son is coming today for a visit and I will give this card to him.  I think it is one he will really like.

Hope you have a great weekend.


LinkWithin

Related Posts with Thumbnails