Saturday, May 18, 2013

Susan's Garden Rose - My Tutorial


Today I want to continue with my tutorials for creating flowers with the new dies from Sizzix.  This is  a rose created with the  "Susan's Garden" Rose dies.  There are instructions in the package of dies. There is never a wrong way to create a flower because they are all beautiful.  I love all the different techniques and little things you can do with dies to create slightly different looks.   Susan's roses are gorgeous, but I will share my techniques, which are a little different,  with you below.  

TUTORIAL FOR CREATING A ROSE with Susan's Garden Dies


The dies used for this flower were die cut using the Sizzix, Susan's Garden "Rose" dies (#658411).  I start by die cutting a lot of petals.  This picture shows the number I started with for this rose.  I used 80# vanilla card stock for the rose petals.  I wanted a cream colored rose, with some light pink at the base of each petal.  I sponged on "Spun Sugar" Distress Ink to do this.  Then since most roses have yellow at the very base, I added "Squeezed Lemonade" Distress Ink at the very base.   I know this is a little time consuming, but I think it is worth the time to create a very realistic colored rose.

The next important thing is to shape the petals.  I use the Sizzix Tool Kit (658437) which includes all the tools and mats you will need for creating your flowers.  I used the largest ball stylus to soften the fibers in the card stock and "cup" it to resemble a petal.

Once all the petals are shaped, use the self-closing tweezers to pinch at the stem end to give the petal even more shape.  Close the tweezers and pinch the sides of the petal up to the tweezers.  It makes the top portion of the petal bend back.  I learned these techniques from the "Paper Bouquet" book by Susan Tierney Cockburn.

Once all the petals are shaped, start creating the layers for the rose.  I usually create three or four layers to create a "full" bloom rose.  Here you can see three layers, the center of the rose, plus some extra petals to tuck in case I decide I want more fullness.  

Each layer for my roses, usually has a different number of petals. For the lower layer of petals,  condition them on the back so they cup "under".  This picture shows the top (third) layer  and is conditioned on the top of the petals so so it "cups" up to form around the center of the rose.  For this center piece, I added four petals to the base,  then went back and glued in four more petals in between the first petals (alternating petals).

Here you can see what it looks like when you alternate the petals.  By the way, I should mention that I use "Crafter's Pick" white glue because it is a fast drying glue and works really well for creating your flowers.

I create the center for my rose differently than Susan.  I use five of the "center" die cut petals which are shaped very different. I add glue to the inside of one petal and twist it around the tweezers, holding a couple of seconds until it "catches".  Keep adding these same style petals, alternating them around so you create a realistic looking center.   

Here is a picture of all five center petals glued together to form the center of the rose.  You can create your rose buds this same way.

Now all my flower layers are dry and I can start shaping them more.  Put them on the shaping mat and press down in the center with the largest stylus so that it starts "cupping".  Do this to all layers.  You need to do this after the glue has at least almost dried so it will hold its shape.  

Do this with the section that is the top "cupped up" layer too.  It will help pull those petals together to form around the very center of the rose.

Starting with the bottom layer, glue the layers together alternating the petals.  On that top (third) layer, I add a lot of glue around the base so it adheres to the layer below it to help "cup" the petals.  Place it in the center of the bottom layers, then use the largest stylus to press down firmly in the very center to help it adhere well.  Next you will want to add the very center "bud" that you created.  Add plenty of glue to the bottom of the "bud" portion and place it right in the center.  You might need to hold it for a few seconds to get it to attach.  Watch it as it dries and make sure it is sitting real straight in the center so your rose won't look crooked.
  
Your rose will probably look something like this.  I think it needs some more shaping, don't you!   You can glue the tips of some of those left over petals and stick them in around the bottom of the "cupped" area if you want.  That is what I did for a little more fullness.  Sometimes it is helpful to clip off the very bottom of these petals so they nestle down below that center section.  

Here is a tool I discovered some time ago that really helps to shape the edges of the petals.  They are round nosed pliers and do not leave a crease like the tweezers when you roll the edges of the petals.  You can order this tool from Joan's Gardens.  I like to wait until my rose is completely dry before I start shaping it so that the layers don't start twisting.    There is a big difference in the rose above and this one, isn't there. 

In Susan's  Rose dies, there are also leaves and the pieces to create a beautiful rose bud.  I have created a rose bud and shaped the green base that will go around it. 
  
This is a picture of the completed bud.  You can also create larger buds as shown in Susan's video.

The rose I created today would be beautiful on a box or on a frame.  You can also use these dies to create smaller roses by not using that lower (largest) set of petals.  

I would love to hear from you to see if you find these tutorials helpful.  It does take a lot of time to create them, and I will continue to do more tutorials if I know they are helpful to you. If you do like the tutorials, which flower would you like to have a tutorial on next?  Here is the link to my "Lily" tutorial.   Anxious to hear your comments.


Products used:

Sizzix "Susan's Garden" Rose   658411
Sizzix "Tool Kit"   658437
Paper Bouquet book by Susan Tierney Cockburn 
Crafter's Pick Glue
Distress Inks
Round Nose Pliers

944505

Friday, May 17, 2013

Susan's Garden Spring Flowers


Today I wanted to work with the new, beautiful JustRite background stamp called "Grand Damask".   I white embossed the design on white card stock then used Gelatos to color it.  I scribbled on the color in a diagonal direction, spritzed it with water, then brushed the color around to blend. Gelatos are acid-free pigment sticks that glide on creamy vibrant color and blend beautifully with or without water.   I then used a baby wipe to wipe the color off the white embossing.  I love the way it turned it.  Along the edge I added the Spellbinders "Parisian Accents" border and some Kaiser Craft pearls.

To decorate the card, I added some flowers created with the Susan's Garden flower dies;  I created the Lily, Mini Daisy, and Forsythia flowers.  The greenery behind the flowers is the Impression Obsession Leafy Branch.  


Products used:

JustRite "Grand Damask Background Stamp" CL-04500
Gelatos
Spellbinders "Parisian Accents" dies (S5-034)
Kaiser Pearls
Susan's Gardens "Lily" dies (658275)
Susan's Gardens "Mini Daisy" dies (658407)
Susan's Gardens "Forsythia" dies (658406)
Ipression Obsession Leafy Branch (DIE055-N) 

943736

Thursday, May 16, 2013

Joan's Gardens Weekly Challenge


It is time for a new challenge at Joan's Gardens.  This week the theme is "BUTTERFLIES".  Here is what you need to incorporate in your project this week:
  • Have at least two butterflies
  • Use Yellow and White as your color theme
  • Include some type of swirl(s)
  • Use Polka Dots
  • Use at least one product from Joan's Gardens

For my background I used both Swirls and Polka Dots.  The top portion of it was embossed with a portion of the eBosser "Magic Celebration" embossing folder - this is a tri-fold card embossing folder and I used the front right panel.  I love these tiny little embossed polka dots! The lower portion of the background was embossed with the Crafters Companion "Regency Swirls" embossing folder.  

The Frame used is from the Spellbinders "Enchanted Labels 28" die set.  It was backed with yellow card stock.  On the inside around the sentiment, I used the Tim Holtz Punch to punch holes around the embossed line in the label, then sponged on Squeezed Lemonade Distress Ink around the inside of those punched holes.  The sentiments are from the JustRite "Grand Sentiments" stamp set.  If you haven't seen this stamp set, you should check it out here.

For the flowers, I used the Cheery Lynn "Cuties 4" die and cut the petals off the strip and built my own flower.  The pretty Memory Box butterflies were die cut using yellow polka dot design paper from my stash. For the "half" butterfly, I die cut the butterfly twice; folded one in half and cut the other die cut butterfly in half and glued it to the back of the wing which was now in the back.  The edges of the butterfly were sponged with "Wild Honey" Distress Ink.  A yellow silk bow was created with the "Bow Easy".  You always get a perfect bow every time you use the Bow Easy.   

I hope you will join us in our challenge this week.  Please go over to Joan's Gardens for complete information about this challenge and to see what this week's prize will be.  Remember the more times you enter our weekly challenges, the more chance you have a being a randomly selected weekly winner and those winners will be eligible for the $100 Gift Certificate to Joan's Gardens at the end of the year.

Here are the products used you can purchase from Joan's Gardens:
eBosser "Magic Celebration" embossing folder.
Crafters Companion Regency Swirls 8x8 embossing folder (EF8-RG Swirl)
Spellbinders "Enchanted Labels 28" S6-003
JustRite "Grand Sentiments" stamp set CR-03885
Cheery Lynn "Cuties 4" B156
Memory Box "Darla Butterfly" 98264
Wild Honey and Squeezed Lemonade Distress Inks
Bow Easy
Silk Ribbon

942100

Wednesday, May 15, 2013

Susan's Garden Lily - My Tutorial


I have wanted to create very realistic lilies and now we can do that with the new Sizzix "Susan's Garden" flower dies.  There are instructions in each package of flower dies by Susan to help you, but I thought I would show you my way of creating these gorgeous lilies.  Before I do that, I will tell you about the products I used on this card:

The background was embossed with the eBosser "Dotted Elegance" embossing folder.  The oval on top was embossed with the Nellie Snellen  "Oval Frame 1" and cut out with scissors.  The sentiments are from the new JustRite "Grand Sentiments" stamp set.  The tiny leaves behind the lilies were die cut using the Impression Obsession leafy branch die.   

When you purchase one of the Susan's Garden flower die sets, you receive all the pieces needed to complete the entire flower.  I used "Dried Marigold" Distress Ink, the Copic "Dark Red" marker, and Russet Red Flower Soft to create the lilies.  The important item in shaping the flowers is the new Sizzix Flower Tool Kit.  I used 60# card stock to create the flowers.

My tutorial for creating the Susan's Garden Lily.

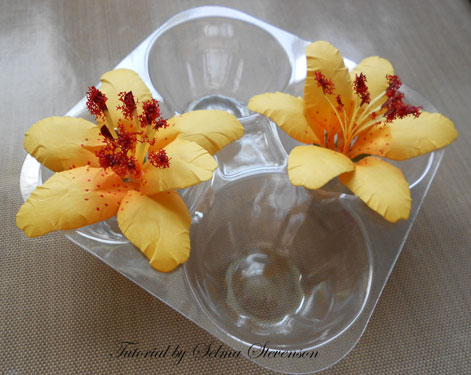
Here is a picture of most the items I used to create two lilies.  

Start by  adding color to the base of each petal, add dots with the Copic marker, then use one of the larger stylus in the Flower tool kit to shape the petals.  Rub the stylus around in circles to loosen the fibers in the card stock and this helps to "cup" the petal for a realistic look.

Next use the self-closing tweezers, that come in the Flower Tool Kit, to pinch the base of each petal.  Place the tweezers right in the center, as shown, then use your fingers to push the edges up to the tweezers.

In this picture, you can see the difference in the petal (on the bottom left) that has not been shaped with the tweezers, and the rest of the petals.  These new tweezers have a very long, fine point and work really great for this step.

To create the stamens, I sponged the Dried Marigold Distress Ink on the bottom of the stamen, then used the Dark Red Copic marker to color the ends of each stamen, on both sides.  Susan doesn't do this in her instructions, but I used the scissors in the Flower Tool Kit and cut down the center of each die cut stamen to create a "thinner" stamen.  I think the stamen looks more realistic and you get double the stamens.  Add a little glue to one end of the stamen, then roll it using the self-closing tweezers.  Hold your fingers on the edge a few seconds to let the glue attach, then pull out the tweezers. Wipe off any glue stuck to the tweezers with a baby wipe.  Susan is coming out with some special Woodland Powders that can be used on stamens, but it will not be out for a while, so I used some Russet Red Flower Soft to create the "fuzzy" ends of each stamen.  Just add a tiny dot of glue to front and back of the tip of each stamen and dip it in the Flower Soft.  The Flower Soft pieces are kind of large, so after the glue was dry, I used the little scissors to snip off some of the extra "fuzz".  Set the stamen aside to dry.

To assemble the flower, use the Teflon Craft Mat that comes in the kit to work on.  Place a small amount of the "Crafter's Pick" glue on one corner, then dip the base of the petal in the glue and attach it to the green (6-point) base.  Glue every other point first, then go back and add the other three petals.  This gives you a nice layered look.  As you glue each petal down, press the end down into the base with the end of the smallest stylus for a couple of second to get it to hold to the base.  This helps prevent those petals from slipping around while working on it.  

This picture shows the flower once all six petals have been attached to the base.

 Once you get all the petals glued to the base, place the flower in the "Plastic Flower Pots" also a Sizzix Accessory created by Susan.  This will help the flowers to stay well shaped (cupped up), until they dry.  Sometimes the flowers tend to flatten out when left to dry without any support.  There are 5 of these trays to a package and are very inexpensive.  Add a lot of glue to the end of the stamen and stick it down in the center of the flower.  You might have to check it a couple of times, while it is drying, to make sure that it stays sitting straight up.  You can pull the stamens further apart (shape them)  once they are dried in the center of the flower.

While the flowers are drying, you can work on the leaves, which are included with this set.  I forgot to take a picture of it, but if you look at the second picture above in the tutorial, you will see the tools from the tool kit.  To shape these leaves, I first used that "loop" tool to draw down the length of the leaf - do not hold the leaf with your fingers. This will shape or slightly cup the leaf. You will do this on the soft shaping mat.  Next place the little green hard mat on the soft mat, then use the tool with the point on it - shown in the above picture.

Working on the backside of the leaf, draw a line down the center of the length of the leaf with the point of this tool facing up, but you are drawing with the very tip.  It leaves a very nice line.  If you were working on leaves that needed veins down the side, you would turn the leaf over and draw those lines on the front coming out from this center line.  The lily leaf does not need the lines on the front.

Once the flower is dry, you can add the leaves to the backside.  In this picture, the Flower Soft has not been trimmed down yet.  

Here is another picture of the finished flowers on the card.

When you have all the needed flower pieces and tools, it is very, very easy to create beautiful flowers.  These flowers are very dimensional and look gorgeous on box tops, frames, and even cards.  You can purchase Plastic Flower Domes, also inspired by Susan Tierney-Cockburn that will cover and protect your shaped flowers.

I hope this tutorial gives you some additional information to help you create your beautiful paper flower garden.  I would love to read your comments to let me know if my tutorials help you.   

Products used:

Susan's Garden "Lily" (658275)
Sizzix, Susan's Garden Flower Tool Kit (658437)
60# card stock
Sizzix Plastic Flower Pots, 5 pack (658435)
Crafter's Pick Glue
eBosser "Dotted Elegance" embossing folder
Nellie Snellen "Oval Frame 1" HSF004
JustRite "Grand Sentiments" stamp set (CR-03885)
Dried Marigold Distress Ink
R89 Dark Red Copic Marker
Impression Obsession "Leafy Branch" (DIE-055-N)

949505

Tuesday, May 14, 2013

Heartfelt Creations Basket


This card was designed using the stamps and dies from the new Heartfelt Creations "Sun Kissed Fleur" Collection.  The background is a piece of the design paper from this collection.  The "Tag" and Basket" are stamps from the "Sun Kissed Tags & Basket PreCut" stamp set.  They were colored with Distress Inks, then sponged with Tea Dye Distress Ink.  The die cut lace background for the basket is the Heartfelt Creations "Decorative Lace Border".  I cut a portion of it off to make it less tall.   Additional flowers from the "Sun Kissed Fleur PreCut" stamp set were stamped and cut out with the matching die.  When I stamped, I used VersaFine black ink and clear embossed.  The sentiment is from the Heartfelt Creations "Classic Message PreCut Set".  On each side of the tag, I inserted the die cut leafy flourish from the "Gift Ensemble Die" set.

You can order all these Heartfelt Creations stamps and dies from Joan's Gardens:

Heartfelt Creations "Sun Kissed Fleur PreCut" stamp set HCPC3533
Heartfelt Creations "Sun Kissed Die" HCD 734
Heartfelt Creations "Decorative Lace Border" die (HCD713)
Heartfelt Creations "Sun Kissed Tags & Basket PreCut set" HCPC3535
Heartfelt Creations "Gift Ensemble" die set HCD 735
Heartfelt Creations" Sun Kissed Decorative Paper HCDP1 233
Heartfelt Creations "Classic Message PreCut" stamp set HCPC 3354

Sunday, May 12, 2013

Susan's Garden Violets


Today I have another card I created with violets created with the Susan's Gardens "Violets".  In case you missed it, I posted a tutorial on how I created these violets at this link.   

The lavender design paper is from the Kaiser Craft "Lil' Primrose" paper pad.  The white embossed piece was created with the Nellie Snellen "Rectangle Frame 1" embossing folder.  

I wanted to create a basket of flowers, so I die cut the Cheery Lynn "Spring Basket 1" in white card stock and lightly sponged it with lavender  Distress Ink.  The tiny leaves behind the violets were die cut with the Impression Obsession leafy branch die.  A small lavender bow was placed at the bottom of the violets and Kaiser Craft lavender pearls added to the top corners. 

I hope all you mothers are having a fabulous day.  I am looking forward to going over to my daughter's house this afternoon where my granddaughter is preparing a fabulous meal for us.  

Products used:

Sizzix "Susan's Gardens Pansy/Violet" dies   658419
Nellie Snellen "Rectangle Frame 1" embossing folder HSF005
Kaiser Craft "Lil' Primrose" design paper pad
Cheery Lynn "Spring Basket 1" DL214
Impression Obsession Leafy Branch die DIE055-N

939308

Saturday, May 11, 2013

Susan's Garden Peony


I am still having fun working with the new Susan's Garden flower dies by Susan Tierney-Cockburn This pretty flower is the Peony.  The background design paper is from the Graphic 45 "Birdsong" Paper Pad.  I used one of the new Memory Box frames called "Victorian Frame" for the sentiment from the JustRite "Grand Sentiments" stamp set.  The frame was sponged with Tea Dye Distress Ink.  The small Cheery Lynn Butterfly was die cut with the angel wing.  The angle wing is light pink and the butterfly was die cut using beige card stock then sponged with Tea Dye Distress Ink.  To complete the card I added a pink silk bow and some Kaiser Craft pearls.  

I want to wish you all a very Happy Mother's Day weekend.

Products used:

Susan's Garden "Peony" by Sizzix 658425
Graphic 45 "Birdsong" paper pad
Memory Box "Victorian Frame" 98535
Cheery Lynn Butterfly DL113
JustRite "Grand Sentiments" CR-03885
Pink Silk Ribbon
Bow Easy
Beige Kaiser Craft Pearls

939166

Friday, May 10, 2013

Susan's Garden Violet Tutorial

 I could sit all day and create pretty flowers with the new Susan's Gardens new flower dies by Sizzix.  Today I created a card with the pretty little "Violets" dies.  You also get the dies for creating a pansy in this set.  Below I have a tutorial to show you how easy it is to create these little flowers, but first I will tell you about this card.

I used the Marianne Design DS0916 embossing folder for the background.  It was lined with purple card stock then placed on a piece of white card stock embossed with the Crafter's Companion "Dots" embossing folder.  The base card is purple.  The Violets were created with the Susan's Gardens "Pansy/Violet" dies.  The violets were arranged over the Memory Box "Amira Flourish" die.  The sentiment is from the new JustRite "Grand Sentiments" stamp set.  A purple silk bow was created with the "Bow Easy".

Tutorial for creating Violets with the Susan Tierney-Cockburn dies and tool kit.

I found you can use two sheets of card stock (60#) at one time to die cut the pieces for these flowers.  

To give the petals a realistic look, I drew some lines up from the bottom end of each petal with a fine point marker then sponged on "Seedless Preserves" Distress Ink over the lines.  All the flower petals were shaped with the largest "loop" tool in the new  Sizzix Flower  Tool Kit.  I placed it on one end, not holding the petal with my fingers, and just pulled it along the length of the petal which caused it to curl, on the shaping mat which is included in the kit. You only need to to this once on the smallest petals, but I did do it twice on the largest petal to get a good shape.

Once all the petals are shaped, glue them to the (5-point) base.  As I have stated before, all the pieces you need to complete the flowers are included the each package of dies.  My favorite glue is the "Crafter's Pick" white glue because it dries quickly.  When I press the end of the petal onto the base, I like to take the end of a small stylus and press it down into the the base point and hold it a couple of seconds.  It stays secure that way.  I also want to mention that the piece of Teflon Craft sheet is included with the Tool Kit.


One of the things we haven't had with the old Tool Kit is great tools for working on the leaves.  The new Tool Kit has a special pad and the tool you can see in this picture, for drawing lines on your petals.  You draw the line down the center (length) of the leaf, then turn it over and draw the little veins out from the center.  You can shape the leaf on the embossing mat before drawing your lines.   Use the tweezers to slightly curl the edges of the leaves to give it them a realistic shape.  

Products used:

Susan's Gardens "Pansy/Violet" dies (658419)
Sizzix Flower Tool Kit by Susan Tierney
Marianne Design Embossing Folder (DS0916)
Crafter's Companion "Dots" Embossing Folder"
JustRite "Grand Sentiments" stamp set (CR-03885)
Memory Box "Amira Flourish" 98183
Silk Ribbon
Bow Easy
Crafter's Pick white glue
Viva Green Paper Pen #703
Seedless Preserves Distress Ink
Dusty Concord Distress Marker

937958 

Thursday, May 9, 2013

Susan's Garden Vellum Poppy


It is time for a new challenge at Joan's Gardens. This week the challenge is to create a card with the following: 
  • Use black, red and white
  • Create a flower out of vellum
  • Include a Sentiment
  • Have a die cut border
  • List something from Joan's Gardens
For my card I created a vellum "Poppy" created with the new Susan's Garden "Poppy" die set by Sizzix. The petals look so real in vellum.  I used the new Sizzix tool kit to shape the flower and leaves.   I'm not sure I like it or not, but I added some Green Flower Soft on the leaves as poppy leaves are "fuzzy".  The design paper is from my "scrap" bin.   The sentiment and label are from the new JustRite "Grand Sentiments" stamp set.  There are 36 stamps in this set;  I love the great variety of sentiments in it.  I used VersaFine Ink to stamp the sentiment and label then clear embossed them.  The center on one of the labels was cut out and raised with dimensional tape.  

On the bottom, under the poppy, I added a Spellbinders "Parisian Accents" border.  The border on the outside of the card was created with the Martha Stewart "Vintage Floral" punches.  A red silk bow was added to complete this card.

  I hope you will join us this week  in our challenge.  Please go over to Joan's Gardens to see all the information about this challenge, to link your card,  and to see what the prize is for this challenge.  

Products used:
Sizzix, Susan's Garden Poppy (658416)
Sizzix Tool Kit 658437
JustRite "Grand Sentiments" stamp set (CR-03885)
Spellbinders "Parisian Accents" (S5-034)
VersaFine black ink
Rangers Detail Clear Embossing Powder
Dimensional Tap
Martha Stewart "Vintage Floral" Punches
Red Silk Ribbon
Green Flower Soft

939747

Wednesday, May 8, 2013

Heartfelt Creations Sun Kissed Fleur Collection


Wow!  when I received the new Heartfelt Creations "Sun Kissed Fleur Collection"  I didn't know where to start because I could see so many gorgeous things I could create.  This is such a fabulous release.  You are going to love the new flowers in this collection; there are two different styles.  What is fantastic about this collection is that there are twelve flowers on one stamp and a matching die so you can die cut all twelve flowers at one time.  What a time saver!  In this collection there is a box die too.  If you go over to Joan's Gardens, you can see the boxes that Emma Lou designed with this new die on her video.  I did something different with it.  My box actually has a lid that comes off.  I used one of the sides for the lid.  Three of the side pieces were taped together with Scor-Tape, then the lid folded down and a narrow strip of card stock taped along the fold on the flap side, to create a lid.  

I am so in love with the gorgeous flowers in the "Sun Kissed Fleur PreCut Set".  I white embossed them on pink vellum then cut them out with the matching die.  So quick and easy.  On the back of the flowers I used a darker pink marker to create a dark pink edge on the lower portion of each petal.  The flowers are so gorgeous I didn't even add anything to the very center.  

The pretty little label on the front of the box is from the "Sun Kissed Tags & Basket Precut Set".  It was also white embossed, cut out then the leaves colored green with a marker.  Two of the little flowers from those stamped and die cut for the top, were used on this label.  You could add a little sentiment in this label if you want.

Please go over to Joan's Gardens to see the all these new Heartfelt Creations stamp sets, beautiful design papers, and dies in this Sun Kissed Fleur Collection.  As in the past Joan will have a great discount on the "I Want It All" package.

Products used on this project are:
Heartfelt Creations "Box Die"
Heartfelt Creations "Sun Kissed Fleur PreCut Set" HCPC 3533
Heartfelt Creations "Sun Kissed Tags & Basket PreCut Set" HCPC 3535
Vellum - Pink and Green
Ranger White embossing powder
Scor-Tape

935839

Tuesday, May 7, 2013

Susan's Garden Peach Roses


First of all I want to thank all of you for your comments  yesterday on the new flowers I created and telling me your favorite.  I love reading your comments.    If you haven't commented yet, you have until tomorrow to comment then go over to Joan's Gardens and leave a comment for a chance to win a set of Susan's Garden flower dies.

Today I have another card created with the new Susan's Gardens "Rose".  The background was embossed with the Crafter's Companion "Floral" 6x6" embossing folder; it was sponged with Tea Dye  and Scattered Straw Distress Ink.  The embossed piece was attached to a lace frame created with the Martha Stewart "String Lace" punches.  I created the rose and the rose bud with the Susan's Gardens "Rose" dies; they were placed over the Heartfelt Creations "Bella Rose" flourish.  The edges of the petals on the rose were brushed with the  Adirondack "Pearl" Metallic Acrylic Paint Dauber, to make it resemble the rose in the attached sentiment.  The pretty sentiment was cut from the Graphic 45 "Secret Garden" 8x8" paper pad. To complete this card I attached a peach silk bow

Products used:

Susan's Gardens "Rose" 658411
Graphic 45 "Secret Garden" 8x8" paper pad
Crafter's Companion Embossalicious "Floral" embossing folder
Heartfelt Creations "Bella Rose" flourish die HCD 712
Martha Stewart "String Lace" Corner/Border punches
Adirondack "Pearl Metallic Acrylic Paint Dauber"
Silk Ribbon
Distress Ink "Tea Dye and Scattered Straw"

935770

Monday, May 6, 2013

What is your favorite Susan's Garden Die


 Look at all these beautiful flowers that I created with the new Sizzix flower dies by Susan Tierney-Cockburn.   These dies are available at Joan's Gardens.  Joan and I are interested in knowing which flower is your favorite, so if you leave both of us a comment, a winner will be chosen, from a random drawing, and announced Wednesday morning.  The winner will receive the "Susan's Gardens" LEAVES set worth $18.99.  You can see this die set in Joan's post.

  All these flowers were very easy to create with Susan's new improved flower petals and tools. As I mentioned in a previous post, Susan Tierney-Cockburn designed the petals on the Punch Bunch punches we started creating flowers with.   All these dies come in a separate little plastic envelope for storage and with instructions. When you get your flower dies, I suggest you write the name of the flower on the back of each die, just in case you have more than one set open and get them mixed up.  There is a diagram of each die in the package on the back of the instruction sheet, but I found it a great help to have each die marked - I used a fine point Sharpie. I do want to mention again that the new Sizzix Flower Tool Kit that Susan designed is much improved over the old tool kit.  It has everything you need.  This kit has a special tool and pad just for adding a realistic look to your leaves and petals, that you did not get in the old kit. I will talk about some of the features of these tools in upcoming posts.

I can't tell you which one of these flowers is my favorite because I loved creating all of them. Which one is your favorite?  I created three different colors of the dogwood so thought I would start showing you my card collection featuring the white dogwood.


The background paper I used is from the Graphic 45 "Secret Garden" paper pad.  The border around the card was created with the Martha Stewart "Vintage Floral" punch set.  In the center of the card I placed the Spellbinders "Medallion One" doily and in the center of it I attached the Spellbinders "Lace Doily Motif".  The pretty dogwoods were created with the Sizzix "Susan's Garden Dogwood" die set.   Don't they look like real flowers!  The sentiment is from the Our Daily Bread "Birthday Blessings" stamp set.

I will be posting more cards this week showing off the beautiful flowers from "Susan's Garden" dies.  If you would like a chance to win the "Garden Leaves" die set, be sure to leave a comment blog on my blog below, and then go over to Joan's Gardens and leave a comment.  

Products used:
Sizzix "Susan's Garden" Dogwood  Flower die set 658405
Sizzix "Flower Tool Kit"
Viva Decor "Paper Pen Green" #703
Graphic 45 "Secret Garden" design paper 8x8 pad
Spellbinders "Medallion One" S2-014
Spellbinders "Lace Doily Motifs" S5-063
Martha Stewart "Vintage Floral corner/border punches
Our Daily Bread "Birthday Blessings" stamp set #D301

934118

Sunday, May 5, 2013

Gorgeous Susan's Garden Roses


I love working with the new "Susan's  Gardens" flower dies by Sizzix.  This is one of the gorgeous roses and rose buds I created with Susan's "Rose" dies. I recycled a box to show off this rose. The doily under the box is the Cheery Lynn "Victorian Garden Doily".    Be sure to come back tomorrow to see all the flowers I created with the new flower dies by Susan Tierney Cockburn, plus a card.

Products used:
 
Sizzix "Susan's Gardens Rose" 658411
Cheery Lynn "Victorian Garden Doily Frame (FRM128)

933797

Thursday, May 2, 2013

Joan's Gardens Weekly Challenge


I had so much fun with this week's challenge at Joan's Gardens.  Joan asked me to create a card using a fan for the challenge. This week your challenge will be to create a card or project that includes:
  • Use some type of Fan -  stamped, die cut, etc
  • Use colors Peach, Cream, and Green
  • Use Lace
  • Use Pearls

Please go over to Joan's Gardens to see the complete rules for  linking your card to the challenge and to see what the prize will be for one lucky, randomly drawn, winner.

The lace border was created with the Martha Stewart "String Lace" corner/border punch.  The background paper is from an older Graphic 45 paper pad; the corners were rounded off and glued to the String Lace piece.

 I love the newer Marianne Design "Vintage Fan" die so created a real fan with it.  Isn't that fan piece gorgeous.  The fan die comes with two pieces - the delicate embossed piece on top and an angle wing if you want to use it on the backside.  I used a piece of peach the Graphic 45 design paper for the angle wing.  The fan pieces were die cut using cream card stock then lightly sponged with Tea Dye Distress Ink.  The embossed fan was glued to the angle wing. The five pieces were attached with a large pearl brad I had in my stash, then fanned out and a piece of dimensional tape added to the back of each one.  The fan was then attached to the design paper.  A bow was added to the bottom of the fan then the Memory Box "Kaleidoscope" butterfly attached in the center of the fan.   Small Kaiser Craft pearls were added on the fan pieces and in the center of the butterfly.

I was so happy with this piece that I decided to attach it to one of the $1.00 wood frames I got at Michael's.  I did not do anything to the finish on the frame but did sponge Tea Dye Distress Ink around the edges.  

There are two styles of the Marianne Design Vintage Fan.  I used the Vintage Fan Two.  The Vintage Fan One is also beautiful and you can see these at this link.

I hope you will join us this week in our challenge.  Joan and I love to see your entries.

The products I use can be purchased from Joan's Gardens:

Marianne Design "Vintage Fan Two" LR0265
Martha Stewart "String Lace" border/corner punch set
Memory Box "Kaleidoscope Butterfly"  98261
Kaiser Craft Pearls
Distress Ink

931382

Wednesday, May 1, 2013

Susan's Garden Mini Daisies


Today I have been creating more flowers with the new Sizzix Susan's Gardens dies.  I made a variety of colors of the "Mini Daisy" and thought I would add all of them to this card to show the variety. Each flower kit comes with everything needed to complete that flower, including the leaves.   Flower Soft was added to the center of each flower.  To create the flower, I followed the directions in the package to complete the flowers.

I used the new Sizzix tool kit to shape these flowers.  This kit contains the Molding Pad, Leaf Pad, Non-Stick Pad, Leaf Tool, Stylus 5mm/8mm, Loop tool 5mm/3mm, scissors and self closing tweezers.  I love all these new tools.  The Leaf Tool and Leaf Pad work really great for shaping your leaves.  The Loop tools are wonderful for very detailed work for creating your flowers.  I just received this new tool kit today, so as I work with it I will show you different things you can do with it.    

The background used is the Spellbinders "Enchanted Labels 28 (5x7) frame.  On top I added the Cheery Lynn "French Lattice Small Frame".  The frame is longer than the lattice, so I had to die cut two of them and piece them together, then trimmed off some of the lattice around the corners.   The pretty window is the die from Heartfelt Creations called "Decorative Chateau Gate".  I added two little pearls on each "shutter" to complete the card.

Products used:
 
Susan's Garden (Sizzix) Mini Daisy 658407
Susan's Garden Tool Kit 658437
Spellbinders "Enchanted Labels 28 (5x7) S6-003
Heartfelt Creations "Decorative Chateau Gate Die" HCD 718
Cheery Lynn "French Lattice Small Frame" FRM 132 
Kaiser Craft Pearls
Paper Card Stock from Joan's Gardens
Crafter's Pick white glue

931240

LinkWithin

Related Posts with Thumbnails