Monday, December 31, 2012

Blessing to You


Today I wanted to end 2012 with the type of card that you liked the most and received the most comments this year; I found white cards with flowers won out.  

To create this card, I used the eBosser "Delicate Dots" embossing folder for this 5.5" x 6" card.  The eBosser embossing folders are large and I was able to emboss the entire front with one time through the machine.  The large heart is from the Cherry Lynn "Heart To Heart Lace Doily Set" hearts.  In the center I used the heart die from the  Heartfelt Creations "Timeless Armour" die set.  In the center of the hearts, I stamped one of the sentiments from the Our Daily Bread "Birthday Blessings" stamp set.  

The pretty flowers were die cut using the Heartfelt Creations "Delicate Asters" dies.  I die cut six each from three of the dies, shaped them and glued the six layers together, alternating the petals to create a full flower.   Under the Asters I added the new Marianne Design "Floral Flourish" and the Joy! Crafts leaves.  There is a flourish on both the left side and across the bottom of the card.  Kaiser Craft pearls were added to the center of the flowers and around the Heartfelt Creations heart.  To give the card some "glimmer" I add Tim Holtz "Distress Stickles Dry Glitter".  

It has been a very exciting year for me.  I love being Joan's designer and working with all the different products from Joan's Gardens, and hope we have given you a lot of inspiration for the products you love to use. I had the opportunity to go out to Indiana and spend some one-on-one time with Joan and then go to CHA with her to view all the new products and give my input on things we thought you would love to work with. I have loved creating for all the weekly challenges and seeing all your beautiful cards each week.   I value all your visits to my blog and truly appreciate all the comments you leave. Thanks to all of you that follow me on my blog and all the friendships we have created from around the world.   I want to wish you much happiness in the new year.  I am looking forward to another year sharing ideas with you.  

eBosser "Delicate Dots" embossing folder
Cheery Lynn "Heart to Heart Lace Doily Set" (DL106)
Heartfelt Creations "Timeless Armour" Heart die (HCD 728)
Heartfelt Creations "Delicate Asters" dis (HCD 726)
Marianne Design "Flourish" (LR0249)
Joy! Crafts "Leaves" (6003/0001)
Tim Holtz "Distress Stickles Dry Glitter" (Clear Rock Candy)
Kaiser Craft White Pearls

832808

Sunday, December 30, 2012

I went out to find a Friend


Hi all my blogging friends.  I hope you had a wonderful Christmas.  We had a very white Christmas and and wonderful time with our family.  I want to thank all of you who sent birthday cards and birthday wishes.  I loved receiving all of them. 

I want to congratulate Sharon, from Huntsville, Arkansas.  Her name was drawn from all the winners from the weekly challenge at Joan's Gardens this year.  Wow!  how fun to win a $100 Gift Certificate to Joan's Gardens.  Joan and I love seeing all your beautiful cards and projects in our weekly challenges.  

 I have not been very busy in my craft room during the holiday but today I decided to use  some new dies I recently received from Joan's Gardens.  I love to create very different cards and some of the Sizzix dies are real help.  For this card I used the Sizzix "Album - Accordion Fold 3-D Frame" for this four panel card. 

 When you close the card, it is only 4 3/4" square so is very easy to mail.  

There are a lot of different ways to use this die.  It die cuts the squares and you can attach as many as you want and be very creative. I used Scor-Tape to connect each frame.


I used two coordinating Sizzix dies to create this card.  I used the Accordion Fold 3-D frame and the Sizzix "Frame & Label, Bracket" die to cover the frame and use the center die cut.  This die cuts four separate pieces that can be used on the 3-D frame.  Above is a picture of the two dies.

To decorate the 3-D frame, I used two different Marianne Design die cut flowers for the outside panels. These are new dies from Joan's Gardens. On the second panel I black embossed one of the sentiments from Our Daily Bread "Faithful Friend" stamp set.  It reads:  I went out to find a Friend, but could not find one there. I went out to be a Friend, and friends were everywhere!"  On the third panel I white embossed one of the stamps from the Our Daily Bread "Bird, Borders & Corners" stamp set.  

Sizzix "Album, Accordian Fold 3-D Frame" (658035)
Sixxix "Frame & Label, Bracket" (658037)
Marianne Design "Flower" (LR0248)
Marianne Design "Flower" (LR0250)
Our Daily Bread "Faithful Friend" stamp set (E329)
Our Daily Bread "Bird Borders & Corners" (D216)
Scor-Tape

831944

Tuesday, December 25, 2012

Merry Christmas


Wishing you a Merry Christmas


Sunday, December 23, 2012

Friends


I want to wish all my blogging friends a very Merry Christmas.  I have received cards from around the world and want to thank you for all your gorgeous creations.  I cherish each and every one of them.  Are you all ready for Christmas Day?  I have been having lots of fun with all my grandkids, my son and daughter.   We have over a foot of snow and the grandkids from San Diego are having so much fun in the snow.  They helped grandpa clean off the driveways then played in the huge piles of snow.  This is my favorite time of the year.  

This is a 5x7 inch card.  I used the new Joy! Crafts Corners in on the top of the card.  In the  center of the card is the new Joy! Crafts Doily.  Within this doily I added one of the My Favorite Things "Decorative Ovals Doily Duo" die cuts.   The sentiment is from the Our Daily Bread "Sentiments Collection"; it was silver embossed.  The sentiment reads "Friends are Kisses Blown to us by Angles".    I had a piece of design paper that has silver embossing on the background, so have coordinated things to match.  The sentiment was attached with dimensional tape.

Below the Joy! Crafts doily, I added the Joy! Crafts "Flourish", which ended up being mostly covered up, but it is a beautiful flourish.  The roses were created with the Spellbinders "Bitty Blossoms" dies; they were sponged with Spun Sugar Distress Ink prior to rolling them.  The pretty leaves behind the roses are the Joy! Crafts Leaves.  I added some Encore silver ink and silver embossed them.  The pretty silver flourish is the Memory Box "Elegant  Scrollwork" flourish; it was die cut using mirror silver card stock.  Two flourishes were die cut, cut a part, then tucked in behind the flowers.  A few Cheery Lynn "Wreath Strip" pieces were also die cut using the silver mirror card stock and tucked in.  To add a little more elegance to the card, I added white Kaiser Craft Pearls.


Joy! Crafts "Corners" (6002.0135)
Joy! Crafts "Doily" (6002/0147)
Joy! Crafts "Flourish" (6002/0149)
Spellbinders "Bitty Blossoms" (S5-086)
Memory Box "Elegant Scrollwork" (98153)
Our Daily Bread "Sentiments Collection" (E334) (not yet on blog at Joan's Gardens)
My Favorite Things "Decorative Ovals Doily Duo"
Mirror Silver Card Stock
Cheery Lynn "Wreath Strip" (B216)
Kaiser Craft Pearls
Ranger Detail Silver Embossing Powder
Spun Sugar Distress Ink

HAVE A VERY MERRY CHRISTMAS!

827192 

Saturday, December 15, 2012

Poinsettia Pop Up Card

 I always love the surprise of opening up a card to find a pop-up.  Joan has a lot of new Sizzix  pop-up dies we can work with.  The one I used today is called the "3-D Flower Pop-Up".  These are all dies we can use year round.  


Here is a picture showing what the pop-up looks like before it is decorated.  I used a piece of music design paper, from  my stash, for the inside of this card.  To give some design above the pop-up, I used the Nellie Snellen "Holly" embossing folder, then used Distress Inks and the Ranger Water Brush to add color to the embossed design. Scissors were used to trim around the top of the embossing.  A bird was die cut using the die from the Heartfelt Creations "Garden Romance Collection", and was colored using Distress Inks.  It was attached with a piece of dimensional tape.

To decorate the pop-up, I used the Tim Holtz "Tattered Poinsettia" die to die cut 6 of the smallest flowers.  Two layers were used for each flower.  I decided to try something different with these petals.  I used the eBosser "Divine Damask" embossing folder to add texture to the petals.  All six flowers fit in the folder which is larger than most embossing folders.  Since my background paper is tan, I decided to use the Tim Holtz "Tarnished Brass Distress Stain" over the red flowers.  It was dabbed on, then spritzed with some water to thin it out and dried with the heat gun.  I used the round nose pliers to shape the edges of the poinsettias.  The green leaves were die cut using the Tattered Poinsettia die, were also embossed, and the Tarnished Brass Distress Stain added.  They were cut apart and glued to the back of the poinsettias.  The banner is from the Spellbinders "Ribbon Banners".  I used a Penny Black stamp for the sentiment.
 
This is the front of my Pop-Up card.

There are six new Spellbinders "Medallion" dies These are the coolest dies to play with.  You can cut the medallion as I did on this card, right in the center of your card front, or use a backing die that comes with them to completely cut them out.  You can use different colors of card stocks for a layered look.    For the corners I used the Memory Box "Macarena Corner and stained them with the "Tarnished Brass Distress Stain".  The snowflake is from the Cheery Lynn "Snow Flowers" set.  I glued on the Twinklets  "Diamond Dust" and let it dry, then sponged on the "Tarnished Brass Distress Stain".  What a pretty outcome.  I know it doesn't show in the picture, but it is beautiful.  A Kaiser Craft rhinestone was added to the center.

Under the Medallion, the sentiment from the PaintBox Poppets "Sleigh Ride" stamp set was gold embossed.  The pretty border is the Memory Box "Tessatina Border".  

Spellbinders "Medallion One" die set (S2-014)
Memory Box "Macarena Corner" (98291)
Tarnished Brass Distress Stain
Cheery Lynn "Snow Flowers" (DL 226)
PaintBox Poppets "Sleigh Ride" stamp set
Memory Box "Tessatina Border" (98302)
Sizzix "3-D Flower Pop-Up" (657796)
Nellie Snellen "Holly" embossing Folder "HSFC004)
Heartfelt Creations "Garden Romance Collection" dies (HCD723)
Tim Holtz "Tattered Poinsettias" (658261)
Spellbinders "Ribbon Banners" S4-324)
e-Bosser "Divine Damask" embossing folder
Twinklets "Diamond Dust
Kaiser Craft Rinestones
 Round Nose Pliers

822847

Thursday, December 13, 2012

Felt Tattered Poinsettias


Today I spent time crafting with my neighbor Pat.  We always have so much fun creating together.   This morning we made a lot of Christmas tags and this afternoon we worked on creating felt poinsettias.  We used the Tim Holtz Sizzix "Tattered Poinsettia"  die and wool felt.  I remember reading that you need to use wool felt when die cutting because the regular craft felt will kind of fray out the edges.  The wool felt gives you a nice clean cut edge.  We were real happy to see how nice they die cut.  Since the challenge, this week at Joan's Garden is to decorate a box, we added three of the flowers on this box to give you another idea for the challenge. 

  
There are three different size petals on the Tattered Poinsettia die to create the flower.  The green leaves were die cut using the largest flower on the dieTo connect the layers together, we used a needle and thread, sewing through all four layers.  When the green largest flower was die cut, a couple of extra smaller petals die cut on the square placed on the die, so they were individually glued in under  the petals, with "Glossy Accents" which gave the flower a little more dimension.  We also used "Glossy Accents" to glue the gold beads in the center of the flower.

I have never tried cutting anything other than card stock with the Tim Holtz dies, but they easily cut through other things such as material or even chip board.  These felt flowers will look beautiful on Christmas packages, or you can even glue them to a barrette or create a label pin. Do you have other ideas you can use them for?

Sizzix "Tattered Poinsettia" (658261)
Glossy Accents (GAC17042)

821715

Wednesday, December 12, 2012

Joan's Gardens Weekly Challenge


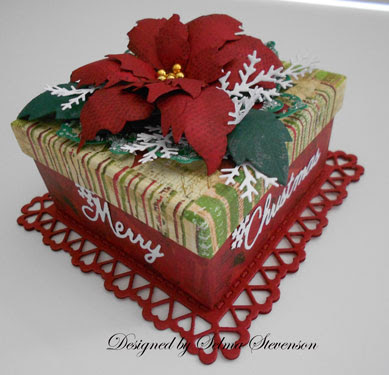
It is time for a new challenge at Joan's Gardens.  This week we would like for you to decorate a box or container that can be used for a Christmas gift.   I have decorated a small box I had in my stash.  The size of this box is 3.5" square.  You can make and decorate your own box or decorate or recycle any type of box or container.   Please go over toJoan's Gardens to see all the rules for this week's challenge.

To decorate the top of the box I used the Tim Holtz Sizzix "Tattered Poinsettia" die.  After die cutting it, I used the Tim Holtz "Slight Alternations" stamp to add texture to to the petals.  Under the flower, I added the doily from the middle of the Cheery Lynn "Scandinavian Hearts" die.  I added Twinklets "Diamond Dust" on this doily.  Leaves from the Cheery Lynn "Rose Leaf Strip" were arranged under the poinsettia.  The white pine branches are from the Cheery Lynn Wreath Strip".  Gold beads were added in the center of the poinsettia.

Under the box I added the pretty Cheery Lynn "Sweetheart Frame".  To give it a lot of stability, I die cut two frames and glued them together before attaching them to the bottom of the box.  On the sides of the box I added the Cheery Lynn "Merry Christmas" sentiment.  All four sides have on part of the sentiment attached.

Joan and I are looking forward to seeing your creative ideas.  

Sizzix "Tattered Poinsettia (658261)
Poppy Stamps "Blooming Poinsettia" 861 (for green leaves)
Cheery Lynn "Sweetheart Frame" FRM 127
Cheery Lynn Merry Christmas Set (B186)
Cheery Lynn "Scandinavian Hearts" (DL155) doily from center of this set
Cheery Lynn "Wreath Strip" (B216)
Cheery Lynn "Rose Leaf Strip" (B241)
Tim Holtz   "Slight Alternations" stamp set (CMS060)  Stampers Anonymous
Twinklets Diamond Dust
Pop up glue dots
Glue N' Seal
ScorTape
Flower Tool Kit and Mat

820737


Tuesday, December 11, 2012

Wishing You A Wonderful Christmas


I have been helping my daughter with a craft project she is sending to one of her friends, but  I managed to squeeze in time for a new card today.  I wanted to use this beautiful Penny Black sentiment stamp for the front of my card.  The pretty poinsettia was created with the Poppy Stamps "Blooming Poinsettia" die.  Before shaping and putting the flower together, I stamped each piece with a retired Heartfelt Creations "Silent Night" background stamp, using Encore Metallic Silver ink.  I love the words stamped on the petals.  Behind the poinsettia I added a few Cheery Lynn "Holly Leaves" and one of the Impression Obsession "Pine Branches".  Below the embossed frame is the Spellbinders "Parisian Accents" border.  Along the top of the card is the Memory Box "Frosty Border".  Red Kaiser Craft pearls were added to complete the front of the card.


On the inside of this card I wanted to have a 3-D scene.  The background was covered with design paper from the "Authentique Wonder" paper pad.  The "Town Scape" was die cut using Tim Holtz  die.  Along the bottom I used the Cheery Lynn "Border Carnivale" border.  The pop up die I used is the Tim Holtz Sizzix "Zig Zag 3-D Pop-Up" die.  On the pop up tabs I added the Marianne Design "Sleigh" and "Reindeer".  I added a small Kaiser Craft red pearl to "Rudolph".   Behind the sleigh are three Marianne Design "Trees".  Polar White Flower Soft was added to create a snowy scene.  

I love creating pop-up cards using the Sizzix pop-up dies.  People are always thrilled to see the "unexpected" pop-up design.


Front of card:
Memory Box "Frosty Border" (98171)
Penny Black "A Wonderful Christmas" (4116H)
Poppy Stamps "Blooming Poinsettia (861)
Encore Metallic Silver Pad
Cheery Lynn "Holly Leaves" (B183)
Impression Obsession "Pine Branch" (DIE021-N)
Spellbinders "Parisian Accents" dies (S5-034)
Kaiser Craft Pearls

Inside:
Tim Holtz Sizzix "Zig Zag 3-D Pop-up" die
Tim Holtz "Town Scape" die
Cherry Lynn "Border Carnivale" (DL129)
Marianne Design "Tree" (LR0176)
Marianne Design "Sleigh" (LR0178)
Marianne Design "Reindeer" (LR0179)
Authentique "Wonder" Design Pad
Flower Soft - Polar White

819879

Thursday, December 6, 2012

Graphic 45 Bird Song Card and Tutorial


EDITED:  I listed an incorrect measurement in this post and it is corrected in "red" below.  I am sorry about this mistake.   Also I have now listed the size of the outside of the card, also in "red".  

Have you ever seen a card at some time, then thought about it later.  Well that is what happened with me today.  I remember seeing a card that was "similar" to this shape but did not have a picture of the card to look at.  I don't know what this type of card is called, but I love the dimension.  It took me hours to figure out a template and I thought I would share it with you.  I will show you the front of this card at the bottom of this post.

The card base is 10"x6".  It has two long cuts, to form a 1" band across the top and the bottom.

I used a Fiskars paper cutter.  This paper cutter made it real easy to make cuts like the ones I needed on this card.  The edge of the card stock is 1" from the cut line and cut down from the 1" mark to the 9" mark on the paper cutter.  This leaves a 1" border.  You need to flip the card stock over and duplicate this same cut on the other side.

There are seven score lines on the card.  You need to score all the way down in the very middle of the card, which is at 5".  Then starting on the left side, score between the cut lines at 1", and again at 1 3/4", just on the center portion - you are scoring from the top cut line down to the bottom cut line.  Then you need to duplicate this on the other end at 8 1/4" and at 9".  These score lines will create the "box" look on each side of the card.  Up on the 1" band, on both the top and bottom, you need to score at 3" and 7", only on the 1" band.

To decorate this card I used the beautiful Graphic 45 "Bird Song" 8"x8" paper pad.   I cut out different sections of the design paper,  sometimes using both of the same sheet of paper.  There are so many different ways you can decorate when using this pad but hope you like what I did.

Once the inside was all decorated, and folded on the score lines,  I added ScorTape to the areas shown to hold it to the outside (front and back piece) of the card.

You need to attach the inside to a slightly larger piece of card stock that has been scored and folded down the center.  My outside piece measures 10 1/2" x 6 1/2".    Attach the inside by placing it right in the center, on the fold; then pressing down on both the front and back pieces, making sure it is going on straight.  

Once it is taped down, this is how it will look from the top view.

Here is another picture show you can see the box look on the inside.  Hopefully this picture will help you with how to fold the score lines.

``
This is the front of the card. I wanted to create a flower similar to the flowers in the Song Bird design paper so I used the Cheery Lynn "Stacker Flower #6".  They were die cut using white card stock and three flowers were glued together.  I needed to have more of an off white flower,  so I spritzed each flower with the Ranger "Cappuccino" Perfect Pearls Mist.  It doesn't show up well in the picture, but it gave the flowers a beautiful beige color.  By misting the flowers, I was able to shape them to resemble the flowers in the paper.  In the very center I added multi-colored small beads for the stamen.  

I used the Spellbinders "Labels Twenty" dies to cut out a piece of black card stock and a smaller label using a piece of the design paper from the Song Bird paper pad.  Cheery Lynn "Lace Corners" were stained with Distress Inks then added to the top of the card.  The background was embossed with the eBosser "Delicate Dots" embossing folder.   The flowers were attached with glue dots then the Cheery Lynn "Rose Leaves" and Marianne Design "Garden Branches" were tucked under them. 


Graphic 45 "Song Bird" 8"x8" paper pad
Spellbinders "Labels Twenty" (S5-026)
Cheery Lynn "Lace Corner" (B164)
Cheery Lynn "Rose Leaves" (B241)
Marianne Design "Garden Branch" (LR0151)
eBosser "Delicate Dots" embossing folder
Distress Inks
Glue Dots
Ranger "Cappuccino" Perfect Pearls Mist
ScorPal
Scor-Tape
Fiskars Paper Cutter

815955

Wednesday, December 5, 2012

Joan's Gardens Weekly Challenge


It is time for a new Weekly Challenge over at Joan's Gardens.  Please go over to her blog to check out all the details.

I used the Sizzix "Snow & Trees" embossing folder for the background on this card.  This is a 5.5" x 6" card so I added the Memory Box "Frosty Border" die cut down the left side of the card.  In the center of the new Marianne Design "Anja Oval", I placed a portion of the new Nellie Snellen "Snowman" embossed design.  I used the largest of the Spellbinders  "Classic Ovals"  Nestabilities to cut out an oval frame then placed it inside the "Snowman" embossing folder to get the snowman image.  These folders are large enough to complete a whole card front with the design but it is fun to be able to use just portions of them too.   I used aqua glitter around the outside edge of the embossed oval.

On the left side of the oval I added the Marianne Design tree that was also covered with aqua glitter.  Under the pretty silk bow I used two of the Memory Box "Tilth Floral" dies, offsetting the loops to make it fuller.  The box was added with a glue dot.  

I hope you will join us in our challenge this week.

All the products can be purchased from Joan's Gardens:
Sizzix "Snow & Trees" embossing folder (658197)  There are two folders in this set.
Spellbinders Oval Nestabilities
Marianne Design "Anja Oval Set" (LR0240)
Marianne Dresign "Tree" (LR0174)
Memory Box "Tilth Floral" (98320)
Memory Box "Frosty Border" (98171)
Nellie Snellen "Snowman" (PiF005) embossing folder
Box Easy
Silk Ribbon

815379 

Tuesday, December 4, 2012

Grand Gothic Window


I love all the window dies available from Joan's Gardens.  I tried something new today.  I used the Cherry Lynn "Wedding Vows" frame to showcase this beautiful Poppy Stamps "Grand Gothic Arch".  It was real easy to use my paper cutter and cut across the bottom to cut out the bride and groom from the Cheery Lynn frame, then insert the Gothic Arch.  I love how it turned out.  I used a piece of older design paper I received from Joan's Gardens for the background.  It has purple roses in it.

To coordinate with the design paper, I used the Spellbinders "Spiral Blossom Four" die to create the roses.  I used the whole die cut for the larger rose and only a portion of it for the smaller roses.  I used a light lavender card stock to die cut the flowers then sponged on "Seedless Preserves" Distress Ink down along the bottom of the petals before rolling the flower.  After sponging on the ink, I lightly misted the die cut with water to help blend out the ink and also to make it easier to roll.  

I always love having lots of little "filler" pieces to place behind my flowers.  It really seems to create the finished look for pretty flowers.  If you are like me, I'm sure you will love having the Marianne Design Anja Leaves.


These are, in order, LR0226, LR0227, LR0228, LR0229.  All these dies are in stock at Joan's Gardens now.

I have used leaves from each of these sets behind the roses on this card.  In addition to these leaves, I tucked in some of the Cheery Lynn "Wreath Strip" branches.  Below the flowers is a seam binding bow created on the Bow Easy.  This is the first time I used the Bow Easy to create a seam binding bow, but think it turned out very pretty.

All these products can be purchased from Joan's Gardens:
Cheery Lynn "Wedding Vows" Frame (FRM138)
Poppy Stamps "Grand Gothic Arch" (854)
Spellbinders Shapeabilities "Spiral Blossom Four" (S4-364)
Marianne Design "Anja Leaves" (LR0226, LR0227, LR0228, LR0229)
Cheery Lynn "Wreath Strip" branches (B216)
Seam Binding
Bow Easy
Ranger "Seedless Preserves" Distress Ink

814430

Saturday, December 1, 2012

Winter Wonderland


I have a new Marianne Design "Chapel" die from Joan's Gardens that I used for today's card.  It is the perfect size to create a scene with.  I die cut it using white card stock then used a piece of multi-colored design paper from the older Basic Grey "Sweet Threads" paper pad for color behind the windows. 

To start the card, I created a 6"x6" frame by using the Martha Stewart "Double Arches" corner/border punches.  After it was punched, it was attached to a 5.5" square card.  A piece of matching green card stock was cut to fit in the center of the punched frame so I could emboss the background.  This piece of card stock is approximately 3.75" square.  I love the new Sizzix "Snow Flurries #2" embossing folder to create a snowy background, so that is the embossed design behind the chapel.  

Two pieces of card stock were torn and glued together to create the snow banks below the church so it look "grounded".  The smallest deer from the Memory Box "Deer Trio" was added with a piece of dimensional tape.  Up in the left hand corner, I added the largest Memory Box "Star of Wonder", also attached with dimensional tape.  Tim Holtz "Distress Stickles Dry Glitter"  Clear Rock Candy was added for sparkle on all the white pieces and over the windows. 

I worked on this card and thought it was finished, but didn't post it right way.  When I came back to it,  I keep feeling like the scene was missing something.  I decided to add the Marianne Design "Christmas Tree".  It was too large for this card so I cut  a large portion off the bottom and tucked it behind the chapel.  Which one do you like better.?  I think I like the addition of the tree.  I love working with dies because it is so easy to "dress up", or add other pieces, to a card with an additional die cut.  

How are you coming with your Christmas cards?  I still have a lot more I need to create.  I also need to make a lot more Christmas Tags.  Have you created some new tags you can add to our weekly challenge at Joan's Gardens this week? There will only be a few more challenges for you to enter before a winner will be selected for the $100 Gift Certificate to Joan's Gardens.  The winners are randomly selected and you have an equal chance to win each week.  Hope you will create a tag and enter our challenge this week over at Joan's Gardens.

All the products I use can be purchased from Joan's Gardens:
Marianne Design "Christmas Tree" (CR1224)
Marianne Design "Chapel" (LR0254)
Memory Box "Deer Trio" (98166)
Memory Box "Star of Wonder" (98167)
Sizzix "Snowflake Flurries #2" embossing folder (658197)
Ranger "Distress Stickles Dry Glitter" Clear Rock Candy
Martha Stewart "Double Arches" Corner/Border punch set
Dimensional Tape

812068

Thursday, November 29, 2012

Joan's Gardens Weekly Challenge


It is time for a new challenge at Joan's Gardens. We all need tags for our Christmas gifts, so this week we want you to create a Christmas Tag for this challenge.  Please go over to Joan's Gardens to see all the information about the challenge and see what the prize will be for the winner this week. 

I used the Tim Holtz "Tag & Bookplates" die to die cut my tag. I love having this die because it makes it so easy to die cut any color tag you need.  There are also two different Bookplates on this die.   To give the tag background texture, I used the eBosser "Delicate Dots" embossing folder.  The poinsettia was die cut using the Tim Holtz "Tattered Poinsettia" die.  I only used the two smallest of the three poinsettia flowers for this tag.  To give the flower some "glitz" I used Glue N' Seal and sprinkled on "Twinklets Diamond Dust".  This is a chunky glitter and I really love it on the flower petals.  In the center of the flowers I added white pearls.  

The beautiful design behind the poinsettia are two of the Spellbinders "Flourish Trim" die cuts.  They were glued to the tag with the straight edges together.  Another "Flourish Trim" was die cut for the top edge.  It was a little longer than I wanted it, so I used scissors to trim part of the flourish off on each end.  A piece of white card stock was attached to the back of the navy blue tag.  Kaiser Craft pearls were added to the corners, on the flourish and in the flower center.  A white organdy bow was made with a "Bow Easy" and attached with a glue dot.

I hope you will join us this week.  Joan and I love seeing all your beautiful entries.

e-bosser Delicate Dots embossing folder
Tim  Holtz  Sizzix "Tattered Poinsettia (658261)
Tim Holtz Sizzix "Tag & Bookplates" die (656938)
Spellbinders "Flourish Trim" S2-005
Twinklets Diamond Dust
Kaiser Craft Pearls
Bow Easy
Glue N' Seal


809319

Wednesday, November 28, 2012

My Die Storage System


Today I thought I would share with you my die cutting area and how I store all my dies.   As you know, Joan's Gardens sells so many different dies that I design with,  and in order to have them in some kind of order, I have filed them in notebooks.  In this picture you can see the blue notebooks which contain all my dies.   I store these notebooks right by my eBosser and all my card stock. These are the Martha Stewart Notebooks you can only purchase at Staples.  She also has three different  styles of insert sheets that I use to store the dies in. Staples does have a whole Center of Martha Stewart organization and office supplies.   

This is a picture of dies in one of the inserts that has two separated pockets.  Each pocket measures 5" x 8".  On the top of each open sleeve is a little flap that closes the opening so any loose dies do not fall out.  These are also in the Martha Stewart Center at Staples.

This picture shows dies in one of the inserts that has four separate pockets. These pockets are 5" x 4".  There is also an insert that does not have any dividers that I use for the long border dies, which would measure 10" x 8".  I did not take a picture of that pocket.

In order for the dies to stay in place in each pocket, I purchased Magnetic Vent Covers from Home Depot that at 8"x15".  These are the perfect size to cut 3 pieces that are 5"x8", then I can cut these in half to make 4" x 4" squares for the smallest pockets. I use my large paper cutter to cut these magnetic sheets.

I have labeled my notebooks according to categories such as: "Flowers", "Leaves & Trees", Dollies; Holidays etc.  I actually purchased a Red Notebook for the holiday dies.  The inserts come in either clear or green and I use the green inserts for the Holiday Notebook.

I like this storage system because the notebooks lay flat for easy viewing and I can easily remove a single die or even an entire section.  By being able to easily see each die, it helps me come up with different ideas too.   

Hope this helps any of you looking for a way to store your dies.   

I'll be back in the morning with my post for the Weekly Challenge At Joan's Gardens

809278

LinkWithin

Related Posts with Thumbnails