Showing posts with label Stampavie. Show all posts

Saturday, February 16, 2013

For Someone Special


Today I designed a card using the new butterfly by Joy! Crafts and the small flowers from the Cheery Lynn "Build A Flower #3 Embellishments". 

The background was created by using the Sizzix "Botanicals" embossing folder and rubbing the Tim Holtz "Bundled Sage" Distress Ink Pad over the smooth side of the folder to add color to the background.  The large flower was created with one of the Spellbinders "Bitty Blossoms" dies.  The small leaves are the Cheery Lynn "Flourish Leaf" and the tiny flowers are from the Cheery Lynn "Build A Flower #3 Embellishments" die.  I always love to have very small flowers to add around larger flowers, or even too use just on a vine.   

The doily used behind the flowers is from the Marianne Design (LR0117) die set.  This doily set also include two very pretty leaves.   The sentiment is from the Stampavie (Tina Wenke) "With Love" stamp set.  The Butterfly was die cut and sponged around the edges with a darker pink and attached only at the body.  Along the bottom of the card I added the Memory Box "Latchette Border".  Kaiser Craft pink pearls were added to complete the card.


Sizzix Botanical embossing folder set (657137)
Bundled Sage Distress Ink
Marianne Design doily set (LR0117)
Cheery Lynn "Flourish Leaf Strip" (B178)
Cheery Lynn "Build A Flower #3" embellishments
Spellbinders "Bitty Blossoms" (S5-086)
Kaiser Craft pink pearls
Stampavie (Tina Wenke) "With Love" stamp set
Memory Box "Latchette Border" (98294)
Joy! Crafts "butterfly" (6003/0006)

870811

Saturday, November 6, 2010

Francesca in the Winter Field


Hope you are having a great weekend.  Today I created a card using a new Stampavie stamp I recently got.   The name of the stamp is Francesca in the Winter Field by Sarah Kay.  I think this little girl is so cute.  I don't believe I have ever colored hair black.  I am always afraid I will totally mess things up when I use that color.  However, I decided to try and color Francesca's hair using a black colored pencil and OMS.  I think it worked pretty well.  Guess I don't need to be so afraid to color with black.  The whole image was colored with colored pencils and cut out with a square Nestie.  I cut out a frame to go under the image using the Nestie Lacy Square.  The tree was cut out with a Sizzix die.  I cut it out twice using textured card stock.  The second one was cut apart so I could sponge the edges and layer it to give it some dimension. 

Wow, that was a quick and easy card.  Joan's Gardens has a lot of the new Sarah Kay stamps.  It is always a hard decision on which ones to purchase, because they are all so darn cute. 

Have you joined in on the Joan's Gardens weekly challenge.  Here is the link for all the info. 


Sunday, October 31, 2010

Snowy Cuddles


Today I am posting a cute Christmas card created with a stamp from Stampavie.  The name of this one is "Snowy Cuddles" by Penny Johnson.  Have you been to Joan's Gardens to see all the new Sarah Kay and Magnolia stamps she just received?   She also has some of the new Martha Stewart Christmas border punches.

The background paper used is from the DCWV "Winter Wonder" stack.  This was a 12x12" paper pack so I used only one corner from the page.  I thought the little bird on the branch would be cute with the stamped image I wanted to add.   The verse is from the JustRite "Christmas Nested Sentiments".  It was black embossed directly onto the design paper.   I also stamped the "snowpeople" image directly onto the design paper then again onto white card stock.  The images on the card stock were colored using Copic markers.  I trimmed closely around the design and attached it over the image stamped on the design paper.   The reason I did this is because I  didn't want to lose some of the little marks  around the snow people after they were cut out.    A purple bow was added to complete the card. 

Here is the link to check out all the new stamps and punches at Joan's Gardens.

It is hard to believe it is already Halloween.  We are wondering if we are going to have many little Trick or Treat goblins coming around this evening because we have been having rainy weather most of the week.  We always love to see all the cute costumes.

 Have a Happy Halloween.

Monday, October 11, 2010

We Wish You A Merry Christmas


I have another cute Sarah Kay stamp I wanted to show you.  This one is called "Angels Rejoice".  Isn't it a cute stamp!   You can purchase it from Joan's Gardens.  The designer paper is from the Kaiser Craft "Tis the Season Collection" paper pad also available from Joan.  The Choir boys were stamped and colored with Copic markers then cut out with one of the Nestability Seventeen Labels.  It was sponged prior to taking it out of the die.  Stickles glitter was added to the candle light and the glow above the candles.  A pretty bow was added as well as a few poinsettias to complete the card. 

Happy you stopped by today.  Have a great week.
 

Monday, September 20, 2010

Christmas Preparations


This cute little girl is getting all ready for Christmas.  This stamp is from the Stampavie collection and is called Sarah Kay "Christmas Preparations".  You can purchase this stamp from Joan's Gardens.

The image was stamped on white card stock and colored with Copic markers.  Copic glitter pens were used on the ornaments.  After coloring her, she was cut out with a Nestie label and sponged with Tim Holtz Destressed ink.   The verse is from the JustRite "Whimsical Christmas" stamp set.  It was also cut out with a Nestie and sponged with the same ink.  A piece of lace was layered across the middle of the card with ScorTape then the design attached with dimensionals over it.  A few aqua pearls were added to complete the card.


Sunday, September 12, 2010

Chic Shopping


Today I worked on getting my front porch decorated for Autumn then I came in and made a Christmas card.  Something about this doesn't seem quite right, does it.  Well, I couldn't resist.  I received some new Stampavie stamps from Joan's Gardens and have been anxious to start working with them.

This is a Penny Johnson stamp called Chic Shopping.  I think it is so cute.  The design was colored with Copic markers.  Glitter and Polar White Flower Soft were added.  The background paper is from the Basic Grey "Eskimo Kisses" paper pad.  A Martha Stewart punched design was added to the left of the design and a snowflake added to the center.  A rhinestone and flower soft was added to the three snowflakes on the card.  A bow was added to the top.   

Today Joan has posted a lot of new Stampavie stamps, new designer paper and some new adhesive on her blog.  Be sure to check it out.  All these stamps are so adorable it is hard to choose which ones you want.  You can see them all here.

Thursday, July 8, 2010

Elisabeth Bell


Cuttlebug Cut & Emboss Brocade Window

Open Cut and emboss folder


Sorry I have been away for a while.  We had a death in our family plus I haven't been feeling very well.

Today I received an order from Joan's Gardens and one of the new things is this Cuttlebug Cut & Emboss Folder "Brocade Window".  Do you have any of these new folders?  This folder embosses a 5x7 inch piece of card stock and cuts out the center all in one roll through the Cuttlebug .  I used a piece of white card stock for my card but if you go to Joan's Gardens, Joan has posted a beautiful card sample for the next challenge using this folder.  She has added colors to the embossed design.  You can see her card here

The card I made today will be entered in the Color Throwdown  #100 challenge.  There are tons of prizes that will be given away so you should check it out.

The design on my card is the Whiff Of Joy "Elisabeth Bell".  She was colored using the required colors.  The background was sponged with baja breeze ink.  The new Cuttlebug emboss & Cut Folder was used for the frame around her.  Some vellum flowers and leaves were added in the upper corner.  Elisabeth Bell looks like she has her eyes closed and is making a wish so I decided to use this salutation  from the JustRite set "Just A Note".  It was stamped then a small circle Nestie was used to emboss around the words then sponged with baja breeze ink. The entire piece was then cut out with a scallop Nestie and sponged on the edges.  Around the edges of the frame I used pieces of card stock in each of the required colors to create a colorful frame.

The Cuttlebug Cut &  Emboss folder, Whiff Of Joy stamp, Just Rite Stamp and vellum were purchased from Joan's Gardens

Monday, June 28, 2010

Shopping Willow


I have a quick post for you today.  I just received this stamp from Joan's Gardens. Isn't it cute.  The name of the stamp is "Shopping Willow" by Elisabeth Bell.  Joan has posted a cute card made with this stamp on her blog so be sure and check it out.  She also have a lot of other cute stamps in this line.

The background paper is from the Basic Grey "Green at Heart" paper pad and the flowered design paper is from "My Minds Eye".  The image was stamped and colored with Copic markers.  The bags were paper pieced.  The greeting is from the JustRite stamp set "Just A Note".   I couldn't resist adding some vellum flowers to finish off the design.  I need to tell you that the true colors on this card are not showing up well in the photo but it does all match. 

I have a very busy week but will try to keep up with new posts.  Have a wonderful week.

Saturday, June 19, 2010

Mouse with Sunflower


Summer time means lots of birthdays for me.  All six of my grandchildren have Summer birthdays.  This card is made for a grandson that loves "rodents".  He doesn't like the real kind but loves them in pictures and stuffed ones.  Guess that is better than snakes!

The stamp used for this card is Tina Wenke's "Mouse with Sunflower" by Stampavie.  As soon as I saw it I knew I had to purchase it for my grandson's birthday card.  The design was stamped three times.  The butterfly and sunflower were cut out from two images so I could add them with dimensionals.  The image was colored with Copic markers.  I used a white Inkessentials marker to draw lines on the shirt.  All kids love glitter so had to add some to the flower and butterfly.

The image was cut out with a Nestability Labels I.  The panel below it was embossed with one of the new Cuttlebug embossing folders called "Scrollwork". It was sponged with orange ink to bring out the scroll design.  Buttons were added to each corner. 

The background paper was in my scrap bin so I don't know which company it is from.  A strip of "scrap" ribbon was added along the bottom and the greeting from MTME was added. 

The Stampavie stamp and Cuttlebug folder were purchased from Joan's Gardens.

Have a great weekend.  Thanks for stopping by.

Sunday, June 6, 2010

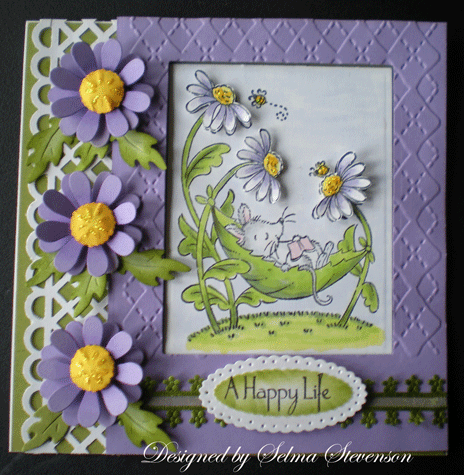
A Happy Life


Oh what fun I had creating this cute card.  The image is Tina Wenke's "Mouse in a Hammock" by Stampavie.  I just couldn't resist buying this one from Joan's Gardens.  I will have to admit there is a lot of different steps in completing this card.  I must have been trying to see how many different things I could do on one card, LOL. 

I started by stamping the image with black Memento ink and coloring it with Copic markers.  It was cut out with a rectangle Nestie.  I used the same Nestie to cut an opening in a 5.5"x4.25"  piece of lavender card stock then embossed it with the Argyle Cuttlebug embossing folder.  The reason I did this was to raise the frame up from the design a little bit.  The base card is 5.5" square white card stock.  A piece of olive cs was attached to the front then a Martha Stewart punched border added to the left side.  

The flowers are die cut, sponged in the center with a darker purple ink, and layered with dimensional tape.  The yellow centers were cut out with one of the small dies from the Spellbinder's "Classic Frame".  They worked out just perfect for the center of the daisies.  I was trying to make them look like the ones in the image. The centers were sponged with a darker yellow to give them highlights.  In order to give the centers some dimension I used  a flower shaper tool to indent the center then put a clear glue pop dot under it so it would hold the rounded shape.   The leaves were cut with a Bosskut "daisy leaves" die and sponged with a darker ink.

I wanted to bring in the green, below the framed design, so I used a piece of lace purchased from a craft store.  It was too "bright" green so I used a sponge dauber and sponged on olive ink.  Turned out perfect.  The verse is from MTME and is so perfect for this image.  It was cut out with a Nestie and sponged prior to taking it out of the die. 

Now when I looked at the image  with the dimension around it, I needed to stamp the image again and cut out just the flowers and attach them with dimensional tape. This balanced out the dimension.   I added some Stickles to the center of all the flowers to add a little bling.  This card is so cute I just don't think I can give it away.  I don't say that often. 

Hope you enjoy this creation.   Hope you will leave a comment and let me know.   Thanks for stopping by.

Friday, June 4, 2010

Zoe Gazing at the Butterfly


We are having lots more rain so it is another good day to stay indoors.  They are expecting flooding in a lot of areas near us.  It just doesn't seem like we are ever going to have nice weather.

When I was out at Joan's Gardens I couldn't resist purchasing some more Stampavie stamps. She has all the new Sarah Kay stamps in stock.   The one on the card above is called Sarah Kay's  "Zoe Gazing at the Butterfly".  Isn't she cute!   I decided to create a scene for her.  I have a brass stencil by Lynell Harlow that I have had for years.  I decided to try and create a stone wall behind Zoe with it.  First I stamped the image then placed it on a light box over the stencil.  It was easy to be able to do the dry embossing around the stamped image.  I used sponge daubers to add colors (brown, gray and white) to the wall.  How do you think it turned out?

The image was colored using a combination of Copic markers, Koh-i-noor pencils and oms, and colored pencils without oms.  For the grass I used stamps from Kitty Caracciolo's "Cause A Scene" stamp set.   Kitty has great stamp sets for creating scenes.  Next to the wall I stamped some longer grass and added some tiny punched daisies to match the flowers in the basket.  I love the butterfly on Zoe's toe and punched some additional butterflies to add to the scene.  The Martha Stewart "Floral Lace" edger punch was used for the border across the center of the card.

The designer paper is from the Basic Grey "Green at Heart" paper pad.  It is so perfect with this card.  The verse is from the new JustRite "Birthday Sentiments" set.  This is a perfect set for birthday greetings.  It comes with nine sentiments and is used with the new clear circle stamper. 

Have you created scenes for some of your stamped images?  It is so much fun.

Hope you are having a nice sunny day.  Thanks for stopping by.

Saturday, May 22, 2010

Update on Indiana Workshop

Before I start my post today I want to thank all of you who have sent cards to my niece.  She has received cards from all around the world and they have certainly cheered her up.  She is very excited to open every card.  She is amazed at all your talent and is adding the cards to a scrapbook album.  I really appreciate all the love you have sent.

I have just returned from a very fun filled "vacation".  I flew into South Bend, IN to do a workshop for Joan Fricker at Joan's Gardens.  What  wonderful people Joan and Jon are.  Jon is Joan's husband. I really enjoyed my stay with them.   I have some pictures of Joan, myself, my friend Pam and the workshop projects I prepared.  I met many stampers who follow my blog and have made many new friends.  Joan's workshops are just fabulous and I highly recommend you attend if you get a chance.  The next one will be in August.

My challenge was to create and teach some new techniques for Joan and the participants.  Below are pictures of the items I created for the workshop.  You can see additional pictures on Joan's blog and Pam's blog.


Joan and Selma


Pam  (Stampin' Pam) and Selma

Pam drove down from upper Chicago to attend the workshop.  On Sunday Pam and I drove back to her house and had so much fun.  Pam, her husband and I went to a restaurant called "The Shanty" and had a delicious dinner that evening. Pam had never heard of this restaurant but it was featured on the Food Network and I really wanted to go.  What fabulous food!   

Monday afternoon I was to go stay with another friend who lives in Elk Grove Village.  I have been using JustRite stamps for a long time and noticed on their site they are located in Elk Grove Village. As you can see below, I used three JustRite stamp sets in my workshop projects.   I wanted to stop by and see if they had a retail store.  Pam and I went before she dropped me off at my friend's house.  I will tell you all about this exciting visit in a later post.

As you probably know, I posted a tutorial on how I make my vellum flowers.  I have had so much response  to that tutorial I decided to show everyone at the workshop how to do it and let them make some.  Below is one of the pictures from the tutorial.  You can purchase the punches and vellum needed to create these flowers from Joan's Gardens.


The first project for the group was to make a shadow box card.  I had many details incorporated so they all learned a lot of techniques.   The tulips, which were colored with Koh-i-noor Pencils and OMS, is from the JustRite stamp set "Breath of Spring".  The verse is from the JustRite stamp set "Autumn Blessings".  All the JustRite stamp sets are also available from Joan's Gardens.  The card below is the one Joan made in the workshop.


Joan had never used Koh-i-noor pencils and OMS.  One of my demonstrations included this technique.  Also on this card I wanted to show how to use many layers without a lot of bulk.  They were taught how to cut out frames for each layer.  Also I am always asked about how to cut out flowers so I did a demonstration and showed them how to create a dimensional flower by layering  several flowers.  The flowers used on this card are from the JustRite stamp set "Plant A Little Love".  The little girl is  the Stampavie "Cherry Pickin' stamp. 


The following picture shows the cut out frames for layering.  This was done using a Fiskar's paper cutter.


For this last project I had everyone create a 6x6x3 inch box.  It was covered using 2 different 12x12"  pieces of Webster's Pages and decorated using mulberry flowers which Joan had to get from England.  Aren't they beautiful.  She now carries these in her store.   Flourishes were cut out with the Cricut and a MS punch was used for the leaves. 


Below is a picture of the side of the box showing the paper and pretty lace used for the edge of the lid.  This lace was attached with ScorTape.


The inside of the bottom of the box.


I had them cut out a portion of the design from the Webster's Pages paper to add a sentiment to the inside of the lid.


I want to thank Joan for the opportunity to go out and present this workshop.  It was wonderful to meet her, her family  and all the other stampers. 

Thanks for stopping by.  Have a wonderful weekend.


(Some project pictures were borrowed from Joan Fricker.)

Monday, May 3, 2010

Olivia


Wow what a day we are having!  The winds are blowing 50 to 60 miles an hour.  We normally can see mountains surrounding us and cannot see past our neighborhood today because of all the dust.   A large pine tree was blown down on the highway and was blocking traffic. Our electricity was off just a short time but there are many areas that have been without power for hours.  Hopefully tomorrow is a much better day.

For my card I used another Sarah Kay stamp that I purchased from Joan's Gardens.  It turned out really bright, didn't it!  The name of this stamp is Olivia with her kittens Kiki and Sugar.  The image was stamped and colored with Copic markers then cut out with a deckle  rectangle Nestability.  A strip of dp was added to the left and some vellum flowers I made added.  Tutorial here. I used wire to create the same design as in the dp and placed these, along with leaves, under the flowers.  The verse was popped up on dimensionals and two pearls added. 

I love coloring these cute Sarah Kay stamps.  I have several cute little boy stamps I will be working with next.  

Thanks again for stopping by.

Thursday, April 29, 2010

Adele


This is another Sarah Kay card.  The name of this stamp is "Adele enjoying fresh apples".   The image was stamped and colored with a combination of colored pencils and Copic markers. It was cut out with a Nestie and the background was added with chalks before taking it out of the die.   The background paper is from a Martha Stewart pad and has glitter on each of the stripes.  Martha Stewart leaves were added under the flowers.  An apple button was added to complete the card.  This was a quick and easy card to complete. 

You can order your Sarah Kay stamps from Joan's Gardens

Wednesday, April 28, 2010

Isabella with Puppy


I have been having lots of computer problems and finally decided it was time to get a new computer.  I love it but boy is it a lot of work trying to figure out how to use it.  Thank goodness for granddaughters.  Amazing how smart they are when it comes to technical things. 

Last week I told you I had ordered a lot of new Sarah Kay stamps from Joan's Gardens and would post some cards using them this week.  This is the first card.  It is called "Isabelle with puppy Coco". The image was colored using Copic markers.  Isn't it cute.  The background paper is from the Basic Grey "Green at Heart" paper pad.  A pretty silk ribbon was used for the bow.  A green QuickKutz flourish was added under the flowers and leaves.  Three rhinestones were added to complete the card.

Items used in this project can be purchased from Joan's Gardens.

I appreciate you visiting my blog.  Tomorrow I will have another card, using a different new Sarah Kay stamp, so hope you stop by again.

Monday, March 29, 2010

Forever Friends


Tonight I am posting a card made with another Stampavie stamp.  This one is called Bobby and Me by Penny Johnson.  This is another stamp set from Joan's Gardens.  Isn't this little boy and his dog the cutest!

The image was stamped and colored with Koh-i-noor colored pencils and OMS.  I paper pieced his sweater.  A Martha Stewart punch was used for the grass, punch available from Joan's Gardens.  I hope I didn't over-embellish this card.  I have had these cute dog embellishments and decided to use them.   For the background, a piece of Basic Grey dp was cut on the diagonal then a piece of embossed Tangerine Tango piece added on the other side.  The greeting was stamped then cut out with a petite oval Nestie and sponged with Tangerine Tango ink.

Hope you like this card. 

LinkWithin

Related Posts with Thumbnails