Showing posts with label Halloween. Show all posts

Wednesday, October 26, 2016

Let's Have Some Halloween Fun


PopUp cards are always so much fun to receive!  Halloween is almost here and I thought I would show you a card I designed using Karen Burniston's Twist Circle Popup die set.  I am having a problem going to YouTube this morning to get a link for you, but you can go to YouTube and Search for Karen Burniston Twist Circle Popup, and watch her video for complete, easy instructions for creating this PopUp card.  The dies I used from Elizabeth Craft Designs to decorate the inside of this card include Karen Burniston's:


This is the front of the PopUp card.  The products used for this include
Karen Burniston's:


and black circles left on the Sticker Sheet, once corners are pulled off; these were placed on the label.

 Happy Halloween!

Tuesday, September 27, 2016

Witches Brew


Pop Up Cards are always so fun.  Today I created a Halloween card using Karen Burniston's Flower Pot Pop Stand die set.


Flower Pot Pop Stand

This Pop Up Flower Pot is so easy to assemble.  You can watch Karen's YouTube Flower Pot Pop Stand Video at this LINK for easy assembly.  If you follow Karen Burniston on FaceBook, you will see a lot of inspiration for using this die set.


Props 9

For my card, I started with a 6x6 inch card.  I covered the inside with design paper.  After creating the box, following Karen's instructions, and attaching it to the inside of my card, I used several of her new die sets to create the Halloween Scene.  

I decided to go "wild" and created a witch falling down into a pot of boiling "something".  I used the dies in the Props 9 die set.  Once the hat was die cut and assembled, I attached it to a strip of clear acetate to attach it to the inside of the box.  Since I wanted it to look like the witch fell in the pot, I attached the shoes to two strips of design paper and glued the "legs" to the shoes.  They were attached on the right side in the Pop Up box.  The broom was put together and attached at the back of the box behind the Witch Hat.   All these pieces were die cut twice and glued together to make them sturdier.


 Now, I had to figure out what to use to make it look like "steam" was coming out around the witch.  I decided to use fluffy white feathers. I'm sorry that the picture does not look as good as the card.  Feathers were attached down in the box and is full of "steam", which does not show well in the pictures. 


Halloween Scene

I used the Graveyard die for the bottom of the card,  I used the Halloween Scene die set, using gray card stock.  A white opaque pen was used to decorate the grave stones.  Four trees from this set were die cut and glittered with Black Silk Microfine Glitter.  (The trees were die cut using Clear Double Sided Adhesive.)  The trees were tucked down behind the grave stones.  Two bats were also die cut, using this die set.  A "moon" was die cut using Els Van de Burgt Studio Fitted Circles.  It has Gold Silk Microfine Glitter added.


Iron Fence Pop-Up

For the Fence, I used Karen's Iron Fence Pop Up die set.


Three fences had to be die cut to fit across the bottom of the card; the bottom of the fence was trimmed off.  Two Crows were die cut and added to the fence.


This is the front of the card.  

Labels & Circles

Karen's Labels and Circles die set was used for the frame on the front of the card.  

 Halloween Clear Stamp

The sentiments used on the card were stamped using Black VersaFine Ink, and stamps from Karen's Halloween Clear Stamp Set.

This card will fold flat and fit into a 6x6 inch envelope.

The following products can be purchased from Elizabeth Craft Designs: 


Saturday, August 6, 2016

Build A Witch


Halloween is not far off!  Susan's new CountryScapes Build A Witch die set is so fun to create cards for this holiday.  I also used Susan's new Shade Trees Stencil for the trees below the witch.  The new products are shown in the Coming Soon Section at Elizabeth Craft Designs.

CountryScapes - Build A Witch


My card base is 6x6 inches.  A piece of Graphic 45 design paper was cut slightly smaller and attached to the card front.  A black frame was cut and glued over the edges.

Using the Els van de Burgt Studio Fitted Circles die set, I die cut an orange moon.  I used the 4th die in from the largest circle die.  

There are so many fun ways to create your Witch.  Choose all black for her dress or your favorite design paper with a design.  I used a piece of Graphic 45 design paper for her dress.  I die cut the hat, the dress sleeves, and the legs using black card stock.  I cut the shoes off the black legs.

The face, hands, and legs were die cut using white card stock.  These pieces were colored using a Copic E95 (Flesh Pink) marker.  On the face die cut, the hair was colored black.  The eyes and lips were drawn in with a fine line marker.  On the legs, a marker was used to create stripped stockings, then the shoes, that were die cut using black card stock, were glued on.  For the hat, I die cut it a second time, using dark gray card stock and cut out the hat band and used a black marker to draw on the strips.  A Silver Marker was used to draw in a buckle on both the hat and on the shoes.

The broom was die cut using white card stock and colored using markers.  The cat from CountryScapes Critters 1 die set was die cut using black card stock and a white marker used for the eyes.  The bats were die cut using the die in the CountryScapes Critters 4 die set.


Shade Trees

To create the scene, I used Susan's new Shade Tree Stencil to color in the trees the witch is flying over, right onto the design paper.  I used a black marker to fill in the stencil opening so I achieved a nice dark black image.  

The die cut pieces were then attached over the background, above the trees.  The sentiment is one of the stamps in Karen Burniston's What's Up Clear Stamp set.  It was stamped on a light yellow card stock and trimmed with scissors.  On the inside of the card you can stamp Happy Halloween or write your own message.

I am sure you will have a lot of fun creating many different Halloween cards using this cute CountryScapes Build A Witch!

The following products available from Elizabeth Craft Designs:

CountryScapes Build A Witch
Shade Tree Stencil
Fitted Circles
CountryScapes Critters 1
CountryScapes Critters 4
What's Up Stamp Set


Monday, July 22, 2013

Boo


I have been showing you a lot of new Christmas dies and stamps from Joan's Gardens, but today I wanted to let you know that Joan also has many very cute dies for Halloween.

This is a 5.5" x 6" card.  I used a piece of the design paper from the Bazzill Basics Paper pad called "All Hallows Eve".  The spooky house is the Memory Box "Manor House".  I had a sheet of Glittery Sticky Back Foam I decided to use to die cut the house.  It cut very easily with this Memory Box die.  The house was backed with a piece of yellow card stock.  The old tree is the Cheery Lynn "Spooky Tree".  In front of the house I added the new Memory Box "Weathered Fence" and placed the MFT "Fresh Cut Grass" along the bottom of it.  The cute little kids are the Memory Box "Trick or Treaters".  They were both die cut out of white card stock and the "witch" colored with markers.  The broom and jack-o-lantern the witch holds are also in this set.  To create a spooky sky, I added the Memory Box "Ghost Trio" and "Swooping Bats".  

I'm sure one of my grandkids will get a kick out of this card!

You can purchase all the products listed below from Joan's Gardens.


987830

Monday, September 17, 2012

Happy Halloween


Hope you had a great weekend.   Today I designed another "Happy Halloween" card. I love how easy it is to create a card using die cuts!   Can you guess what I used for the witch and the sign post?   


I used the Cheery Lynn "Enchanted Flight" die.  I wanted  a witch and the only one I had was in this frame, so I cut it out along with the sign that is also in that die cut.  I love it when I can get additional ideas (uses) out of a die. On the sign I used a white "Inkssentials Opaque Pen" to write "Boo!"  The tree is the Cheery Lynn "Spooky Tree".  To be different, I decided to add some falling leaves.  I die cut the Cheery Lynn Olive Branches in black and glued some of the leaves on the tree and some falling.  I think that witch is creating quite a storm!   

The cute little ghosts are from the Memory Box "Ghost Trio" die.  I used a 1 1/4" circle for the moon and sponged on some orange Distress Ink.  The bat is from the Memory Box "Swooping Bats" die.  The sentiment is a stamp from Memory Box.

All the products I use can be purchased from Joan's Gardens:
Cheery Lynn Enchanted Flight (FRM123)
Cheery Lynn Spooky Tree (B191)
Cheery Lynn Olive Branches (B147)
Memory Box Ghost Trio (98376)
Memory Box Swooping Bats (98409)
Inkssentials Opaque White Pen

747733

Thursday, August 30, 2012

Joan's Gardens Weekly Challenge


This week at Joan's Gardens we have something different for the challenge.  It is about time to start thinking about cards for Halloween so we thought you would have fun creating a cute card for someone special, using a Jack-o-Lantern as the main theme.  Be sure to go over to Joan's Gardens to read all the details about the challenge.  We look forward to seeing your beautiful cards. 

I always have a lot of fun creating a scene with die cuts.  First I will tell you about the products used on this card then I will give you a tutorial below on how I die cut and colored the pumpkin.

I used the Memory Box Great Pumpkin Stamp and die for the Jack-o-Lantern.  The face is also a Memory Box die called "Perky Pumpkin Face".  The other Memory Box dies I used are the:  Swooping Bats; Ghost Trio; and Estate Fence.  I die cut the ghosts and added a small piece of black card stock behind the faces to make the eyes and mouth dark.  They were attached with dimensional dots.  The bats were also attached with dimensional dots.  The tree is the new Cheery Lynn "Spooky Fence".  Perfect for a Halloween card, don't you think!   The design paper I used is from the Graphic 45 "Happy Haunting".  It has little spiders all over it.  I sponged on "Rusty Hinge" Distress Ink around the edges.  To ground the pumpkin, I add two rows of the Cheery Lynn "Grass Border".  I thought this card needed a few little flowers so pulled some completed flowers out of my "flower box".  Okay now for the tutorial. 

TUTORIAL FOR GREAT PUMPKIN
This is a picture of the Memory Box Great Pumpkin stamp and die.

To start, you need to die cut the pumpkin and save the out side piece as a template.  Stamp the pumpkin on card stock.  I used "Rusty Hinge" Distress Ink to stamp the pumpkin on Glossy Card Stock.  I used the LaBlanche Specialty Stamping Paper.  

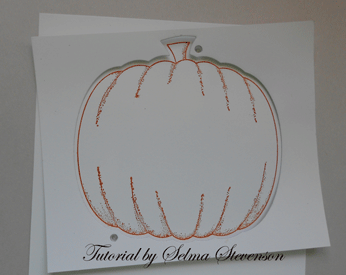
Next you need to line the template up around the stamped image.  There are two little holes, one on top and one on bottom, of the template.  Use a pencil to fill in these little holes once your template is centered around the image.

Now you can place the die over the stamped image and match up the filled in circles with the holes in the die.  This will give you a perfectly cut out image.

This is how your die cut image will look.

I thought I would show you the way I colored my pumpkin.  I stared by sponging on "Squeezed Lemonade" Distress Ink, adding only to the center. 

 Next I sponged on "Wild Honey" Distress Ink, leaving the center yellow.

To add an orange color, I sponged on "Rusty Hinge" Distress Ink, again leaving some of the lighter color in the center.

To give it an even darker pumpkin color, I sponged "Aged Mahogany" Distress Ink around the edges.  You can then go over it again blending in all the colors with the lighter inks.  I wanted to have a speckled look to my pumpkin so I spritzed it with a light spray of water.  You have to let it sit for a couple of minutes to see the "speckles" so don't add too much.  You can always add more water if you need to.  After it dried, I went back over it with the "Rusty Hinge" ink to darken it up.  I like the texture this gave the pumpkin.

All these products can be purchased from Joan's Gardens:
Memory Box "Great Pumpkin" stamp (G1882)
Memory Box "Great Pumpkin" die (98423)
Memory Box "Swooping Bats (set of 3)  (98409)
Memory Box "Ghost Trio" (98376)
Memory Box "Estate Fence (98285)
Cheery Lynn "Spooky Tree" (B191)
Cheery Lynn "Grass Border" (B126)
Graphic 45 "Happy Haunting" Paper Pad
Distress Inks:  Aged Mahogany, Rusty Hinge, Wild Honey, Squeezed Lemonade

7327969

Wednesday, October 5, 2011

Joan's Gardens Challenge - A Decorated Bag Mini Tutorial


It's time for another new challenge at Joan's Gardens.  This week we want you to create a FALL or Trick or Treat BAG with a topper. You can get all the details from Joan's Blog.


I decided to create a Trick or Treat bag using a lot of different products from Joan's Gardens.  I decorated a kraft bag with handles and have a mini tutorial below to show you how I created the topper.

The design paper on the bag is from the Graphic 45 "Halloween in Wonderland"
8 x 8" paper pad. 

To create the "topper", I used Kraft card stock.  First I decided how deep I wanted the topper, then doubled it, and scored across the middle and creased it will with a bone folder.  Using scissors I cut a small opening along the fold line that was just a little longer than the width of the handles.  I wanted to create a design on the front edge, so used the Cheery Lynn "Tiffany Border" (B137) die.  I taped it to the edge of the topper then die cut it.


After it was die cut, it cut the border out along the edge leaving an opening along the bottom edge.  I wanted to add the border back over the opening, plus wanted a color behind it.  

A strip of card stock was added it to the back of the topper over the die cut opening.

 When I added the die cut back into the opening, I placed it slightly higher so it left some of the color below the scalloped edge. The die cut was glued along the very top edge, to the edge on the topper.  A piece of the stripped design paper was added right above the die cut edge to give it a finished look.  I used grungeboard letters from Tim Holtz Idea-ology Mixed Minis alphabet for the "Trick or Treat" letters.  Distress Ink Stain Daubers were used to color the letters, to match the colors in the design paper.  I love how they turned out.


To decorate the top edge of the topper, I used the Sizzix "Autumn Gatherings" (657454) die, which has branches, acorns and different small leaves.  These were all arranged across the top.  All these dies are pictured on my last post.

For the Jack-o-Lantern I used the Sizzix "Pumpkin Jack" (657463) die.  This is the way it looked when cut.


I wanted to give the surface a texture so used the Wendy Vecchi "Funky Flower Art" stamp set.  In this set is a large background stamp that I clear embossed over the pumpkin.  The Jack-o-Lantern face was cut free hand from black card stock and glued to the pumpkin.


The pumpkin die includes the stem.  I die cut it using green card stock then embossed it with the Cuttlebug "Distressed Stripes" embossing folder.  To complete this bag, I die cut a lot of leaves using the Cheery Lynn Leaves dies (D133, D134, D135, and D136).  I used a variety of leaves from each of these sets.  The large acorn on the bottom is from the Sizzix Mini Acorn & Pumpkin Set (657457).  The handles of the topper were pushed up through the opening that was cut in the center of the topper to complete my Trick or Treat bag.

All the products used on this project can be purchased from Joan's Gardens.  Please go over to Joan's Blog to get all the details about this week's challenge. 

327550

Monday, October 3, 2011

Halloween


  It is hard to believe it is already October.  I just received some new products from Joan's Gardens that are so perfect for creating great Halloween or Autumn cards and thought I would share them with you.

I used a piece of design paper from a new line of paper Joan now carries - it is called Lost and Found and this piece of design paper is from the "Sunshine"  6x6" paper pad.  It has the perfect coloring to go with this scene.  I first started by die cutting three pumpkins using Tim Holtz Sizzix "Mini Acorn & Pumpkin Set" (657457).  I cut each one out of a different shade of orange card stock then scored vertical lines to give them more dimension. I also placed a small piece of green card stock over just the stem on the die and cut three out then glued them to the pumpkins.  I wanted to put on a texture so I lightly sprayed the pumpkins with "Goosebumps" clear texture spray.  You have to let it dry completely (I helped it along with my heat gun) then I sponged on different shades of oranges for shading.  I love the way the Goosebumps is clear so you an still see the original card stock through it.  Below is a close up picture so you can see the texture.


 The cute, intricately cut background, is the Cheery Linn "Enchanted Flight (FRM123) frame die.  It was placed on the right side of this 6 x 5 1/2" card.  The pumpkins were attached with dimensional tape.  I didn't want my pumpkins just floating there, so I cut 3 Cheery Lynn "Grass Borders" (B126) and layered them down in front of the pumpkins plus added some between the pumpkins.  I really like this die because the grass is so realistic.  The added grass really pulled the pumpkins together.  To add some additional autumn feel to the card, I die cut the Tim Holtz Sizzix "Autumn Gatherings" (657454).  I die cut it four different times using Core'dinations ColorCore Cardstock "A Collection of Mother Nature's Colors".  The texture in this card stock makes the leaves more realistic. The leaves were shaped using the tools from the Flower Tool Kit. The leaves were tucked in around the base of the pumpkins.

I decided to write the word "BOO" on the little sign in the "Enchanted Flight" die.  I used Inkssentials Opaque White Pen to do that.  This is the perfect pen for writing on dark colors.  Two little Halloween elements were added - a bat and a ghost.  I believe these are from Making Memories embellishments.  I had some of the branches left from the "Autumn Gatherings" die cuts so added them up on the upper left hand corner then added a colored seam binding bow.

This was a very fun card to create.  You can get all the products I used from Joan's Gardens.  I have included pictures of the dies below.


 This is the die I used on my card.  It is the  Tim Holtz "Mini Acorn & Pumpkin Set (657457)

 This is another Sizzix pumpkin that Joan has in stock.  It is larger than the pumpkins I used.  Don't you love that shape!  It is "Pumpkin Jack" (657463).  Wouldn't this make a great Jack-o-Lantern.

This is the "Autumn Gatherings" (657454) die.  You get all the leaves, acorns and branches individually cut. These pieces are really a perfect size for all your cards.
This is the Cheery Linn "Enchanted Flight (FRM123)

326408

LinkWithin

Related Posts with Thumbnails