Showing posts with label Memory Box. Show all posts

Thursday, January 8, 2015

Masculine Birthday Card

 Designing masculine cards is always hard for me.  Today I have a birthday card to show you that I designed for my son.  When he has free time, he loves to get out in nature, so thought this card would appeal to him.  The overall card size is 6" x 6".  The two main items I wanted to use for this card are the Impression Obsession Tree Frame Die (IOB DIE 205YY) and the Penny Black Winter Sky Stamp (4204L).


 I started by using VersaMark Ink to stamp this Penny Black design onto a piece of white card stock.  It was embossed with Ranger's Ultra Fine Black Embossing Powder.  Next I used a 1" circle punch to create a stencil to sponge in the moon with Distress Inks.  I used a small sponge dauber and light yellow ink to create moon light down over the stamped image.  (I was trying to create a night scene but in the photo it looks more like a daytime scene!!)

Along the middle of the stamp image, I placed a piece of card stock, that was cut to resemble a snow bank, across the image and sponged on blue ink.  The round circle I punched out was placed over the sponged on "moon", for a mask, so I could sponge Stormy Sky Distress Ink and a Weathered Wood ink around it.  I used a stamp to create falling snow.  The "dots" were stamped using VersaMark Ink and embossed with Ultra Fine White Embossing Powder.  Be sure to use the anti-static pad over your picture so the embossing powder doesn't stick to some of the sponged on blue ink.  Some glitter was added along the top of the snow bank to help make it stand out.

Next I die cut the Impression Obsession Tree Frame.  Post It Notes were placed around the edge of the frame and the tree was sponged with brown Distress Inks.  I used a pencil to draw in some lines to resemble bark.  Next I used the Ivy Hollow ScrapFusion Needle Point bottle of glue to add some dots of glue on the tree branches and added Polar White Flower Soft to make the tree very dimensional.  The Flower Soft was also added along the very bottom of the frame.  Two of the Memory Box Resting Birds (98527) were added to the die cut tree branches.   


To make the card very dimensional, I added dimensional tape along the outside edge of the frame and some dimensional tape under the wider trunk and branches before attaching it over the stamped image.  The stamped image was trimmed to fit perfectly under the die cut frame.  

For the background on the 6x6 inch card, I embossed a piece of Navy Blue card stock with the Die'sire Embossalicious Happy Birthday Embossing Folder (EF6-Happy).  This piece was layered over light gray card stock.  The Dee's Distinctively "Deer 1" die was die cut using dark brown card stock and attached with a double layer of dimensional tape.

Some of these products can be purchased from Ellen Hutson, LLC at this LINK.

Friday, October 3, 2014

LOVE


I love to create roses with Susan's Garden Rose Dies.  The roses petals were die cut using white card stock and the center petals were sponged with Milled Lavender Distress Ink. Today I combined these lavender and white roses with a new die from Marianne Design called "Love".   The white frame was die cut using the Spellbinders Captivating Squares.  The purple panel behind the white frame was scored on all four sides, three times, using the Martha Stewart Score Board.  Behind the roses I added the Memory Box Bamboo Shoots and the Poppystamps Massa Leaf.  I used the leaf tool and pad from the Susan's Garden Flower Tool Kit to draw veins in each leaf.  Drawing in the veins really makes the leaves look realistic.  For the little flowers in the corner and around the roses, I used the Poppystamps Small Hydrangea Blooms die.

Below are links to products used:

Susan's Garden Rose Dies
Marianne Design LOVE
Spellbinders Captivating Squares
Martha Stewart Scoring Board
Memory Box Bamboo Shoots
Poppystamps Massa Leaf Background
Susan's Garden Flower Tool Kit
Poppystamps Small Hydrangea Blooms
Milled Lavender Distress Ink

1212768

Friday, September 19, 2014

Memory Box Grand Merry Christmas


Aren't the new Memory Box die cut sentiments beautiful!  On this card I used the Grand Merry Christmas Script.  Just above it, I die cut just three rows of the Penny Black "Interlocking" background. Clear rhinestones were attached to the center of each "flower" in that die cut design. A piece of red card stock was attached behind the sentiment and the rest of the card attached to a dark green backing.

 A white poinsettia created with Susan's Garden Poinsettia dies was added.  On the petals I added Distress Stickles Clear Rock Dry Glitter.  A Memory Box Beach Sprig was tucked under the poinsettia and a Red Viva Paper pen was used to create the berries.  The Snowflake was die cut from the Marianne Design LR03327 die set. 

Here is a picture of the dies I used.

Here are links to products from Ellen Hutson, LLC:

 
1207526

Tuesday, September 16, 2014

Snow Scene


My sweet friend Eva sent me some new dies and I had so much fun creating a winter scene with them. Thank you Eva.  The snowman is the Marianne Design COL1332.  The other die she sent is the Marianne Design Jingle Bells COL1363.  On top of the design paper, I used the Poppy Stamps "Puffy Cloud Border" to create snow.  This die will make some great clouds, but I also thought it worked great for snow!  Glitter was added to the top edges.  The snowman was die cut and assembled, then tucked into the snow.  The tree is the Memory Box Frosted Christmas Tree.  While the die cut was still in the die, I added glue to the part of the tree showing through the front of the die, then took the die cut out; Distress Stickles Clear Rock Candy Dry Glitter was sprinkled on, for a snowy effect.  The die cut snowflakes from the Jingle Bells die, were die cut using silver glitter card stock.  The poinsettia was created using the Susan's Garden Poinsettia dies; they were die cut using red and green glitter card stock.  The jingle bells were die cut using shiny gold card stock.  They were attached to a gold cord bow and tucked under the poinsettia.

The products available from Ellen Hutson, LLC are linked below.


1206488

Saturday, August 23, 2014

Stair Step Card


Today I have a stair step card created with peach/pink flowers. Last year I created roses with the Spellbinders "Spiral Blossom One" die and the smaller roses and rose buds with the My Favorite Things "Mini Royal Rolled Rose" dies.  I liked the rose arrangement so much I created two panels and never used the second one, so decided I would use it on a card for a friend who sends me beautiful cards.


 The large moss green doily, behind the roses, was die cut from the Marianne Design "Petras Large Ovals" die set. Right behind the roses is the Memory Box "Calypso Flourish", or you could use the similar Memory Box "Quinn Flourish".  The butterflies were cut out from one of the Webster's Pages design papers. 

Thank you for stopping by.  Hope you are having a great weekend.

1196322


Tuesday, July 22, 2014

A Little Time for Golf


We recently returned from a wonderful trip with our son to the St. Eugene Resort in Cranbrook, Canada.  While there, one of the things we did was to spend several days golfing -- I only drove the golf cart and watched my husband, son and grandson golf.  The Resort is located in a breathtaking location in front of the gorgeous Fisher Peak and the Rocky Mountain Range and has a beautiful golf course where we saw a lot of wildlife, closeup,  including a Doe with her fawn.  Here is a picture of my husband in front of the Resort.  This trip was a belated Father's Day gift, which I got to enjoy too!  Here is a picture of the Resort where we stayed.


   My husband asked me to design a thank you card to send to our son.  I used the Memory Box, Golf Club Landscape and Mini Golf Cart dies to create a golfing scene.  Along with the Golf Club Landscape, I also used the Memory Box Country Landscape die to create a series of hills in the landscape.  The additional trees were die cut using the Impression Obsession, Fir Trees dies.  For the sky, I stamped the Impression Obsession, Clouds, Cover A Card background stamp.  I used Stormy Sky Distress Ink for the sky.

Tomorrow I will have a card created with the new Heartfelt Creations "Cut Mat Create Collection.  Hope you will come back to see this beautiful collection.

Below are the links to products from Ellen Hutson, LLC used on my card.


1184445

Monday, June 9, 2014

Craft Hoarders Anonymous Guest Designer


I was very honored to be asked by Gloria Stengel to be a guest designer for the Craft Hoarders Anonymous Challenge this month.  This week the #9 Challenge is "Fold It".  Here is the information for this challenge. 

Use some sort of "fun fold" on your project. You can make a fun fold card, a pop-up card, an explosion box, or other type of project that makes use of folded cardstock or paper. You can share some folding techniques that are perfect for scrapbook layouts or mixed media pieces. Create a mini album with a folded binding. Fold some ribbon to make pleats. De-hoard those supplies and show us your folds....paper folds that is!
sponsors: WorldWin Papers and StencilGirl

For  this challenge I created a 6"x6" Explosion Box. This is a larger explosion box from any others I have seen or made. I created a larger box so I could enclose a a "chest" in the center, with four drawers.   Below I have a tutorial to show you how I created it.

I used a 12"x12" piece of card stock for the bottom of this explosion box. Using my Scor-Pal, I scored at 3" from the edge of the card stock, on all four sides.   Crease each score line well with a bone folder. The corner squares were cut off as shown. If you haven't made an explosion box before, the sides fall down when you remove the lid from the box.  These measurements will create a 6"x6" explosion box

To create the lid for the box, use another 12"x12" piece of card stock.  Score all sides at 3". 


 Cut up to the score line on two sides of this piece, as shown above, then on the "flap" (3"x3") piece cut off a narrow piece forming a "V" shape.  This will help create a smooth edge when you attach the end pieces to the long piece to create a lid.Do this again on the opposite side.

This picture shows you were to add tape to the end pieces so it holds securely.  You need to add tape to folded ends on both sides.

 With the end pieces inside the lid, match end pieces to score lines and press firmly, to create your lid.  You now have all the pieces ready to decorate your explosion box.

This is the Craft Hoarder Anonymous challenge, so I have dug out items, including design paper I have been hoarding to decorate the sides and the top of the box.  On the top I have added a Marianne Design Petra's Ornaments (LR0279) doily to the lower left side.  On top I created a hydrangea using Susan's Garden Hydrangea dies.  The small flowers were created using the Memory Box "Norland Flower dies".  The butterflies were cut out of Graphic 45 Design paper.

 On the front side of the lid, I added a Marianne  Design, Anja's Vintage Frame.  On the other three sides,  I added the Spellbinder Flourish Trim,S2-005.


To create the little "chest" for the center of the Explosion Box, I created four little match boxes (2.25" x 3"), attached them together with ScorTape then enclosed them with a long strip to go completely around the boxes.  The chest was covered with more of the same design paper used on the explosion box then decorated with two hydrangeas created with Susan's Garden dies.  The inside panels were decorated with Marianne Design Anja's Vintage Frame, Memory Box Norland Flowers and Graphic 45 butterflies cut from the Design Paper. 


Close up pictures of the small box inside the Explosion Box.  Susan's Garden Hydrangea flowers decorate the top of this box.


Monday, May 26, 2014

Blessing To You

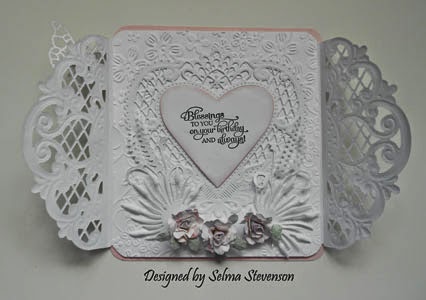
 Today I have designed a special fold card using the Marianne Design Anja's Vintage Decoration Die.  The middle of the card is 5" wide x 5 1/2" and the Anja's Vintage Decoration is 2" wide.   I cut a piece of card stock 5 1/2" x 9   and die cut the Vintage Decoration on each end to create the fold. I scored down the edge of the decoration and again 1/8" over give some room inside the card.  The butterfly was die cut using the Memory Box Pippi Butterfly die.  Ribbon was strung through the opening at the end of the Vintage Decoration die cut to hold the card closed.

A piece of card stock was cut to cover the center section (5"x5 1/2") then embossed with the Embossalicious, Crafters Companion Floral embossing folder.  It was attached to the back of the card.   In the center I die cut the Marianne Design Anja's Fillagran Heart and attached it in the center of the card.  The solid heart die cut from the center of this die was sponged lightly with Spun Sugar Distress Ink then I stamped the verse from the Our Daily Bread Birthday Blessings in the center.  

On the bottom I used the Susan's Garden Mini Petals dies to create three small roses and attached them with a glue dot.  Along each side I added  Marianne decorative elements (Decorative Elegance LR0157 and Creatable Leaves LR0192). 


1158783

Tuesday, April 15, 2014

Susan's Garden Gerbera Daisy


 Today I have a quick card for you.  The pretty daisy was created with the Susan's Garden Gerbera Daisy dies.  Here is the LINK to Susan's instructions for creating a Gerber Daisy.  The background was embossed with the Sizzix, Basket Weave embossing folder.  For a frame I used the Memory Box, Twirling Vine Frame die.  The butterflies are the Memory Box Kaleidoscope and Pippi butterfly dies.  The sentiment is from Hero Arts.

 This is a picture of the Susan's Garden Gerbera Daisy dies and the daisy I created.

A close up of my Gerber Daisy

I still have about half of the new Susan's Garden flowers to create, but want to let you know that the next couple of weeks are going to be pretty hectic for me.    My daughter is going to the hospital, for her second back surgery, early tomorrow morning.   Next week my husband will have his second cataract surgery then later next week  I need to go to the hospital for one day.  Hopefully we will all be a healthy bunch after this!!  As soon as I can, I will work on the rest of the new flower collections and get them posted.  You can go over to Ellen Hutson, LLC to see all the new flowers in the Susan's Garden collection.  I will be able to answer emails, so if you have any questions, just let me know and I will be happy to help you.

Here are the links to the products I used today:
 

Friday, March 28, 2014

Get Well Card

 Today I tried to dream up something different to show you.  I designed a "see through window" card.  The card size is 6"x6".  Below I have a tutorial to show you how I created the window with a piece of clear card stock; you could recycle acetate from some of your craft supplies or use a transparency, for the window.  The embossed frame was created using the Embossalicious embossing folder.   The green frame was die cut using the Memory Box "Twirling Vine Frame" die.  The pretty little pink and blue flowers were created using Susan's Garden Quince dies. I love having these small quince dies because I can create so many different little flowers with them.  They were die cut using white card stock and I sponged ink on the edges of the petals.  Yellow Flower Soft was added for the stamens.  The yellow flowers are Susan's Garden Forsythia.  They were glued to a folded piece of brown wired Sisal Rope. I am sure you will want to watch Susan's video for creating these pretty flowers at this LINK.  You can add extra leaves, pearls and a bow to complete the card.

Here is a view of the card from the side.  A piece of design paper was attached to the inside of the card and shows through the clear card stock window for a background to the flowers.

 You can see the reflection in the clear card stock window.

 Inside of the card.

Tutorial on creating the die cut window and inserting the clear card stock and die cut frame.

 I first centered the Memory Box Twirling Vine Frame on the front of the 6"x6" card.  I use the Sizzix Magnetic Platform to hold the die cut in place.  This platform is great because you do not have to use tape to hold your dies in place. I only need the outline of the Twirling Vine Frame for this step, so will save the actual white Twirling Vine Frame die cut for another use.

 Next I attach the clear card stock (slightly smaller than the front of the card) to the inside of the card, using double sided tape.

The Memory Box, Twirling Vine Frame is die cut using green card stock.

 Place the green Twirling Vine Frame, over the clear card stock, inside the white card stock frame, and tape it down along the edges using regular clear (Scotch) tape.  Make sure you don't get the tape into the inside of the frame, or it will show on the front -- just catch the edges of the frame with the tape. 

 To cover up the tape and make the inside of the card look nice use another piece card stock and die cut the frame.  If your machine will die cut two thickness of card stock, it is easiest to die cut this at the same time you do step no 1.  If not, you can place the die cut frame over the opening, matching it perfectly, and draw lines out the outside edge to create a "cover" for the inside of the card  - it should be approximately 6"x6".   It will look like the picture above.  Using double sided tape attach this piece over the acetate. This will give you a nice finished look to the inside of your card.

You can purchase the following products from Ellen Hutson, LLC:

 Susan's Garden Quince dies
Susan's Garden Forsythia dies
 Memory Box Twirling Vine Frame die
Sizzix Magnetic Platform
Glue Glider Pro Tool

1129917

Monday, March 24, 2014

Whimiscal Susan's Garden Mini Dasies

I think we all love daisies.  If you are like me, you like to be creative with your flower dies to create more than just one style flower. Today I thought I would show you another way to use your Susan's Garden Mini Daisy dies.   I had some polka dot embellishments I thought made cute stamens for these daisies.  These were purchased from  Michaels.  

I have a tutorial below, to show you how I created the daisies but first I'll give you info on the die cuts used to create this scene.  The fence is the Poppy Stamps Picket Fence, the stems for the daisies is the Impression Obsession tall grass, Clouds are the Memory Box Puffy Clouds, Memory Box Gold Finch,  and butterflies were cut from the Memory Box Butterfly vine.  The sentiment is from a Paper Smooches Scripty Sayings stamp set.

Here is a little tutorial on how I created the daisies.

 Use the calyx from the Susan's Garden Mini Daisy die set.  Use the leaf tool from the Susan's Garden Flower Tool Kit to score a line across the middle (on the leaf pad from the kit) leaving four legs on each side of the score line.

 Use the bone folder to crease the calyx in half.  You can see the open calyx on the left and the folded one in the middle.  I used eight daisy petals that were colored with Susan's Garden Pan Pastels at the base then shaped with the small loop tool on the thick shaping pad.

 This picture shows the daisy upside down with the bottom four petals glued to the four bottom calyx points.

 This picture shows the top petals added to the top calyx points.

 This is what the finished flower petal base will look like.  Press down on the fold of the calyx so it is just slightly open.  

You can then add whatever you want to create the center of the flower such as: pearls, rhinestones, Susan's Garden Pollen, etc.

You can purchase the following items from Ellen Hutson, LLC:


1127360

LinkWithin

Related Posts with Thumbnails