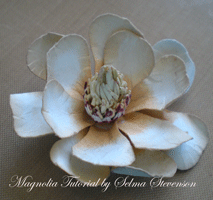
I'm sure most of you know I just love creating "pretty" cards with flowers, lace and pearls. Today I decided to play with the Punch Bunch "Medium Ovoid Petal" punch to see if I could come up with a new flower. I kind of had a magnolia in mind but since I'm not sure I have ever seen a real magnolia, I'll let you decide if that is the type of flower this is or not. You know you can get all the Punch Bunch flower punches from Joan's Gardens.

Here is a picture of the pieces I punched to work with. The leaves are from the Punch Bunch "Mega Lily Petals"; the green flower base I used was punched from a Martha Stewart five petal flower (I don't know the name). The white petals were punched with the Medium Ovoid Petal Punch then chalked on what is actually suppose to be the outer edge (top) of the petal. I wanted a slight point on my flower petal instead of a "dip" so turned the petal around and used the stem end. Nice you can get double use out of these punches! The pink is actually darker than it is showing up in this picture. The stamen was created with 6 Punch Bunch "Medium Suns". Each ray of the sun was cut down toward the center to make it "frilly" after being conditioned and shaped. I used a rose Copic marker to color the very end of each "ray".

The flower was created by assembling two rows of 5 petals each. I created a cupped flower by pressing down on the black flower shaping mat. All the stamens pieces were "cupped" on the black mat and glued together pushing each row up tightly against the center. Sometimes you have to keep working this type of stamen until the glue kind of sets so it will keep it shape. While you are working on something else, go back and push all the levels together to form a nice tight, full stamen. The leaves were shaped with the tools from the Flower Tool Kit then sponged. I kind of "crinkled" the edges down to give them lots of texture.
My card is 6" x 5.5". I love working with the beautiful Marianne Design dies and cut and emboss embossing folders. I die cut the top corners using two "Anji corners" (LR0200) at the same time. The reason you need two corners is because when you run this die back through your machine when embossing, it will flatten out one of the embossed corners if you use just one die. I taped both corners down on the card stock using removable tape, ran it through the machine using the CuttleHUG, then ran it through again using the rubber embossing mat. For the bottom of the card I used the Marianne (DS0915) cut and emboss folder. A small piece of it had to be cut off to fit right under the Anji corners. I used this embossed piece horizontal instead of vertical. A narrow piece of pink card stock was attached across that cut line. The completed front was layered over pink card stock so the cut out designs would show up well.
I wanted something "frilly" under the flower but none of the doilies fit just the way I wanted, so checked out my flourish dies and found two perfect dies. They are the Memory Box "Amira Flourish" (98183) which is placed vertical between the corners, and the Memory Box "Valerian Flourish" (98196) which was attached across the seam under the flower. This was just enough "frill" to make me happy! The flower was attached then the leaves tucked in under it. A little dotted Swiss pink bow was added under the flower. To finish the card, I added some Kaiser Craft "Rose" self stick pearls.
As you know, all the products I use can be purchased from Joan's Gardens.
Hope you are having a fun St Patrick's Day.
460172