Showing posts with label Poppy Stamps. Show all posts

Monday, October 6, 2014

Let It Snow


I love to create scenes with stamps and dies.  Today I decided to work with one of my old Hero Arts snowman stamps called "Stove-Pipe Snowman".  He was stamped on white card stock and colored with Copic Markers.  For the blue background, I used the Metallic Blueberry Gelato.  I scribbled it on the Non-Stick Craft Sheet and sprayed it with water to make a watercolor then brushed it on.  For the snowbanks, I die cut the Poppystamps Puffy Cloud Border a bunch of times and fit it around the snowman.  The trees were die cut with the Impression Obsession Fir Trees Die.  Above the snowman I drew snowballs and glued on some tiny Styrofoam balls I bought at the hobby shop.  Down by the bottom of the snowman, I glued more Styrofoam balls to form a mound of snowballs.  The snowflakes and sentiment are from the JustRite "Large Fancy Holiday Sentiments" stamp set.  (This stamp set is on sale right now.)

Thank you for stopping by.  


1213891

Friday, October 3, 2014

LOVE


I love to create roses with Susan's Garden Rose Dies.  The roses petals were die cut using white card stock and the center petals were sponged with Milled Lavender Distress Ink. Today I combined these lavender and white roses with a new die from Marianne Design called "Love".   The white frame was die cut using the Spellbinders Captivating Squares.  The purple panel behind the white frame was scored on all four sides, three times, using the Martha Stewart Score Board.  Behind the roses I added the Memory Box Bamboo Shoots and the Poppystamps Massa Leaf.  I used the leaf tool and pad from the Susan's Garden Flower Tool Kit to draw veins in each leaf.  Drawing in the veins really makes the leaves look realistic.  For the little flowers in the corner and around the roses, I used the Poppystamps Small Hydrangea Blooms die.

Below are links to products used:

Susan's Garden Rose Dies
Marianne Design LOVE
Spellbinders Captivating Squares
Martha Stewart Scoring Board
Memory Box Bamboo Shoots
Poppystamps Massa Leaf Background
Susan's Garden Flower Tool Kit
Poppystamps Small Hydrangea Blooms
Milled Lavender Distress Ink

1212768

Tuesday, September 16, 2014

Snow Scene


My sweet friend Eva sent me some new dies and I had so much fun creating a winter scene with them. Thank you Eva.  The snowman is the Marianne Design COL1332.  The other die she sent is the Marianne Design Jingle Bells COL1363.  On top of the design paper, I used the Poppy Stamps "Puffy Cloud Border" to create snow.  This die will make some great clouds, but I also thought it worked great for snow!  Glitter was added to the top edges.  The snowman was die cut and assembled, then tucked into the snow.  The tree is the Memory Box Frosted Christmas Tree.  While the die cut was still in the die, I added glue to the part of the tree showing through the front of the die, then took the die cut out; Distress Stickles Clear Rock Candy Dry Glitter was sprinkled on, for a snowy effect.  The die cut snowflakes from the Jingle Bells die, were die cut using silver glitter card stock.  The poinsettia was created using the Susan's Garden Poinsettia dies; they were die cut using red and green glitter card stock.  The jingle bells were die cut using shiny gold card stock.  They were attached to a gold cord bow and tucked under the poinsettia.

The products available from Ellen Hutson, LLC are linked below.


1206488

Saturday, April 12, 2014

Susan's Garden Alstromeria


 I received all my  flower dies in the NEW Susan's Garden Release the same day I got sick and have not felt like working in my studio.  I am finally feeling better and today I created a few of these flowers.  On my card above, I created the Susan's Garden Alstroemeria flowers .  I am totally in love with these gorgeous flowers.  I followed the directions in the package to assemble them, but created them in a different color.  I went to the florist shop to see real Alstroemerias and to see the variety of colors these flowers come in.  My favorite color was this pale pink with the lime green highlights.  The picture above does not show the beauty of these flowers, so I have a closeup picture below so you can see the dimension and details of my Alstroemeria.

The beautiful heart on my card is a new Marianne Design "Anja's Filligran Heart". Isn't it beautiful.  Behind the Alstroemeria I placed some of the new Poppy Stamps Massa Leaf. To finish off the card I added Hero Arts Accent Pale Pink Pearls.

Here is the Susan's Garden Alstroemeria die package along with the three flowers I created. Susan has 14 new die sets; the 13 other new Susan's Garden Flower Dies you are going to love are the Lilac, Clematis, Aster, Bearded Iris, Crocus, Gerbera Daisy, Daylily, Hydrangea, Globe Allium, Primrose, Stephanotis, Zinnia, and Branches & Stem. You can see all these dies at Ellen Hutson, LLC.  In the search box type "Sizzix" and the name of the flower.

 These Alstroemeria were die cut using white card stock and were colored using Susan's Garden Pan Pastels. I used Georgia Pacific 110# card stock.  A lime green marker was used to draw the line on the larger, lower petals. The flowers were shaped using the tools in the Susan's Garden Flower Tool Kit.   You first glue the larger petals on the calyx, then the three smaller ones on.    The stamens were die cut using white card stock.  The upper portion of each stamen was colored with light pink and bright pink Pan Pastels, the brighter pink on top.  The base was left white.  On the very tip, I used a black marker.  To create very thin stamens, I cut each stamen "leg" twice to create three very thin stamens.  They were rolled and glued at the base, then glued into the center of the flower.  The flowers were placed in the Susan's Garden Plastic Flower Pots to hold the shape of the flower, and the stamen glued in the center.  As soon as the stamen was dry, I used the Black Viva Decor Pearl Pen to add tiny little dots to the tip of each stamen.

I have started working with Susan's new lilacs, hydrangeas, and stephanotis.  These are beautiful and also very easy to assemble.  Here is a picture of the flowers I have created so far:


You can purchase the following products from Ellen Hutson, LLC: 

Susan's Garden Alstroemeria dies
Susan's Garden Hydrangea dies
Susan's Garden Lilac dies
Susan's Garden Stephanotis
Black Viva Decor Pearl Pen
Susan's Garden Pan Pastels
Susan's Garden Flower Tool Kit
Susan's Garden Plastic Flower Pots
Ultimate Glue
Poppy Stamps, Massa Leaf Background

Hero Arts Accent Pale Pink Pearls
Memento Pear Tart Marker

1137315

Monday, March 24, 2014

Whimiscal Susan's Garden Mini Dasies

I think we all love daisies.  If you are like me, you like to be creative with your flower dies to create more than just one style flower. Today I thought I would show you another way to use your Susan's Garden Mini Daisy dies.   I had some polka dot embellishments I thought made cute stamens for these daisies.  These were purchased from  Michaels.  

I have a tutorial below, to show you how I created the daisies but first I'll give you info on the die cuts used to create this scene.  The fence is the Poppy Stamps Picket Fence, the stems for the daisies is the Impression Obsession tall grass, Clouds are the Memory Box Puffy Clouds, Memory Box Gold Finch,  and butterflies were cut from the Memory Box Butterfly vine.  The sentiment is from a Paper Smooches Scripty Sayings stamp set.

Here is a little tutorial on how I created the daisies.

 Use the calyx from the Susan's Garden Mini Daisy die set.  Use the leaf tool from the Susan's Garden Flower Tool Kit to score a line across the middle (on the leaf pad from the kit) leaving four legs on each side of the score line.

 Use the bone folder to crease the calyx in half.  You can see the open calyx on the left and the folded one in the middle.  I used eight daisy petals that were colored with Susan's Garden Pan Pastels at the base then shaped with the small loop tool on the thick shaping pad.

 This picture shows the daisy upside down with the bottom four petals glued to the four bottom calyx points.

 This picture shows the top petals added to the top calyx points.

 This is what the finished flower petal base will look like.  Press down on the fold of the calyx so it is just slightly open.  

You can then add whatever you want to create the center of the flower such as: pearls, rhinestones, Susan's Garden Pollen, etc.

You can purchase the following items from Ellen Hutson, LLC:


1127360

Saturday, March 22, 2014

White Poppies

I love poppies!   This is the top of a box decorated with white poppies I created using Susan's Garden Poppy Dies.  Seems like wrapping paper, boxes and bows are so expensive any more.  You can create a beautiful box, using your flower dies, that may be cherished as much as the gift inside.  These boxes could also be used in your home decor.


 This box was purchased from Michaels.  They are on sale a lot or you can use your Michaels coupon; there are so many beautiful boxes to choose from.    I fell in love the white poppies on the brown/gold background on this box. I decided to create a cluster of white poppies to decorate the top.  The top of the box actually had one giant poppy, but I like having the dimensional cluster of flowers on it, to make it special.  I tried to duplicate the poppies on the side of the box.  . 

I created nine poppies for this box.  You can watch Susan's VIDEO at this LINK to see how to create the poppies using the Susan's Garden Poppy Dies. To shade the base of each petal, I used the Faber Castell, Warm Gray III, Pitt Big Brush Artist Pen.   When I first get my dies, I always create the flowers exactly the way Susan's shows us on her videos, but sometimes later,  I experiment and do things a little different.  I am always happy to share these ideas with you.  Below I have a little tutorial on how I create the yellow stamen for the poppy.

In the center of the box I added a piece of Styrofoam to give the flowers more dimension.  It was attached with double sided tape.  A straight pen was used to attach about three poppies to the Styrofoam, then additional poppies were added around the center with Pop Dots.  The poppy leaves that come in the Susan's Garden Poppy die set were die cut using white card stock, and sponged two shades of green, after drawing a line down the center of them with the leaf tool from the Susan's Garden Tool Kit.  They were then shaped and tucked in around the poppies.  The little filler greenery was die cut using the Poppy Stamps, Leafy Sprig die.  A piece Hemp Cord was used to create a bow. I used Susan's Garden Lady Bug Kit to create the ladybugs on some of the leaves.   Bees, a butterfly and a dragonfly were pulled from my stash. To complete the box, I added a large gold flat bead to each corner.

I think this is a much prettier gift box than one just wrapped in paper with a bow.  I hope you will give this idea a try.

My Tutorial for Creating the stamen for the Poppy

Your poppies will be beautiful using the method Susan uses on her video, but I thought I would share how I created the stamens I used today.  I used two of the largest stamen pieces from the Susan's Garden Poppy die set die, cut in both yellow and black.  I like to cut each "leg" on this piece into three to create very thin stamens, for a frilly look.  After they are cut, I pick them up with the self-closing tweezers from the Susan's Garden Tool Kit and add glue to the tips of each one.  The "legs" don't necessarily need to be spread far apart in this step.

Next, still holding the stamen with the tweezers, I dip the tips in the Susan's Garden Yellow Pollen, making sure each tip is coated.  (I store my pollen in a plastic divided box that has dividers that come all the way up to lid.  This is important because you don't want your pollen spilling into the divided area next to it.  I purchased this box at Joann's.)

Next, take a pick and separate each of the legs.  I try to just push down on the center leg and that will separate them.  Do that all the way around.  It is easiest to do this while holding the stamen with the tweezers.

To make a very full stamen for the poppy, I glued two stamens together, alternating legs, to make it full.  In this picture you can see three completed stamens on the left.  In the center you can see four single ones with a dot of glue, and on the right the other four that will be attached on the center ones.  Two black stamens, that were cut the same, were glued together and all of them shaped by pushing them down in the center on the molding mat to cup them.  The black stamens were glued on top of the yellow stamens.  For these poppies I used the Lisa Pavelka "Daisy Chain Border Mold" and Makin's Clay to create the center of the stamen. Makin's Clay is a no bake clay and is easy to color with Susan's Garden Pan Pastels or markers. These products were purchased from Michaels. The clay center was glued in the center of the stamen with Ultimate Glue, and push up around the clay center.

Isn't this box more beautiful than one just wrapped in gift wrap paper and a bow added.  I hope you will give this a try.  It is truly a gift box that will be loved.

You can purchase all the items below from Ellen Hutson, LLC.

 Susan's Garden, Poppy Dies
Susan's Garden, Pollen
 Susan's Garden, Tool Kit
Susan's Garden, Ladybug Kit
Susan's Garden, Pan Pastels
 Hemp Cord
Pop Dots
Poppy Stamps, Leafy Sprig
Hi Tack Double Sided Tape
Ultimate Glue

1126419

Thursday, March 13, 2014

Get Well Card with Poppies


I love to have Oriental Poppies in my flower garden.  Poppies come in a variety of colors such as orange, red, pink and salmon.  Today I created a get well card with pretty orange Poppies. The flowers were created using Susan's Garden Poppy dies.  Here is a link to Susan Tierney Cockburn's Video showing you how to create the poppy.   The base of each petal was colored using the Susan's Garden Black Pan Pastel.  The larger leaves behind the top of the poppies was die cut using the Poppy Stamps "Meadow Leaf" die.

To create the brick wall behind the flowers, I used gray card stock and the Crafter's Workshop "Mini Bricks" 6x6 template.    Embossing Paste was used over the stencil and once dry,  five different Distress Inks (Tea Dye, Walnut Stain, Pumice Stone, Black, and Scattered Straw) were sponged over the bricks for color.  I cut around the bricks and mounted them to a piece of black card stock.  The sentiment was stamped on a Marianne Design tag (CR1211) and sponged around the edges with Tea Dye Distress Ink.  I used a piercing tool to punch holes in each scallop.  The black border was created with the Martha Stewart, Double Arches punches. 

My sister-in-law Judy was diagnosed with breast cancer and is having surgery for a double mastectomy today.  Your prayers would be appreciated for a successful surgery.

The following products used to create this card can be purchased from Ellen Hutson, LLC:


1121709

Monday, February 3, 2014

Susan's Garden Mini Petals

When we think about Valentine's Day, we almost always think about roses.  My very favorite rose dies are from Susan's Garden.  Susan has a set of dies to create larger roses but also a set called "Mini Petals" which you can use to create beautiful small roses.  I have used the Susan's Garden "Mini Petals" dies for this card.  You can watch Susan Tierney-Cockburn's Rose Video showing how to create roses at this link.

I love working with die cuts and have used many on this card.  To start off, I used the Sizzix "Tri-Shutter Card" die for the card shape.  One quick roll through the die cutting machine and the card is die cut and scored.   This die does not fit the average die cutting machine because it measures 12" x 12 3/4".  You will need a Big Shot Pro die cutting machine. 

 On the front panel, I used the Memory Box "Heart Delights" die to cut out the hearts.  This die leaves heart shaped "holes" in the card stock.  I glued a piece of pink card stock behind that panel then covered it again with white to make the back look good.  This die cut creates such a pretty border.  Along the very edge of that left side panel, I added a piece a trim.

To create the pretty roses I made three mini roses, and a bunch of little buds, using the Susan's Garden "Mini Petals" die. You always create such realistic flowers when you use Susan's dies!   They were die cut using white card stock and I sponged on Susan's Garden Pink Pan Pastel, only on the top portion of each petal (leaving the base of the petal white).  To create the buds, I added one small petal to each leg of the calyx then pushed the petals up to form a bud.  Very easy to do!  All the green leaves are from the Susan's Garden Rose and Mini Petals dies.

Behind the roses I added Poppy Stamps "Berry Sprig".  On the right side panel, I first embossed a piece of white card stock using the Cuttlebug, Anna Griffin Matelasse, embossing folder.  I had some small hearts that I glued on this embossed piece.  Three small "Mini Petal" rose buds were added along with some of the Poppy Stamps "Berry Sprig".

 In this picture you can see the shape of the "Tri-Shutter" card.


 On the inside folds, I added some pieces of design paper.  In the center panel, top and bottom, a Poppy Stamps Ivy Tendrils, was added.  In the very center of the card I added the Savvy Stamps, Love Nest, die cut.  It was glued to a piece of pink card stock and I used scissors to cut it slightly larger than the die cut to add a border around the heart.  On the left side of the Love Heart, I added the smaller Memory Box "Precious Heart" hanging from a bow, die cut.  To finish the card, I die cut the Memory Box "Butterfly Vine Border, three times and cut off all the little butterflies.  They were glued around on all sections of the card. 

I am entering this card into the The Craft Hoarders Anonymous Challenge.

"Challenge #1: What's Your Style?
Share a project that showcases your signature style. Dig into your hoard and pull out items that make you shout with crafty joy! Whip up something that has your creative name all over it. Do you, because no one is you-er than you!"

My style is definitely creating dimensional flowers.  I also love to create layers using lots of die cuts. 


You can purchase all the following products from Ellen Hutson, LLC:

Susan's Garden, Mini Petal Dies
Susan's Garden, Rose Dies
Memory Box, Hearts Delights" die
Susan's Garden, Pan Pastels
Ultimate Glue
Susan's Garden Flower Tool Kit
White Card Stock
Poppy Stamps, Berry Sprig
Poppy Stamps, Ivy Tendrils
Savvy, Love Heart die
Memory Box, Precious Hearts die
Memory Box, Butterfly Vine Border die

1101206 

Wednesday, December 11, 2013

Red Poinsettia


I have been so busy getting ready for Christmas. The tree and all the decorations are up, but I still have lots of baking I want to get done.   My whole family will be coming for a family reunion this year and I am trying to get lots of things ready before they start arriving next week.  I have also been working on other projects that will be posted later.  I will have a special post next Sunday I don't think you will want to miss. 

This card was inspired by a "leftover" from another project I am working on.  The colored frame behind the poinsettia is the die cut left after die cutting the Susan's Garden 1 7/8" Grid Works squares that will be used on another project.  I think the frame left from around the squares makes a perfect window that I could not waste.  Behind the Grid Works Frame, I added the Poppy Stamps, "Diamond Background" die cut.

The beautiful poinsettia was die cut using the Susan's Garden Poinsettia dies.  The flower was die cut using red card stock.  The petals were shaped using the Susan's Garden Flower Tool Kit.  On the tips of the stamens, I used both the green and yellow, Susan's Garden Viva Decor Paper Pens.    Behind the poinsettia I placed some Poppy Stamps Delicate Fern, Poppy Stamps Meadow Leaf, and Impression Obsession Pine Branches, for filler.  I love to add birds to my creations. Isn't that fat little bird, behind the poinsettia, cute!  It is an Impression Obsession Bird.  It was stamped on white card stock and colored with Distress Ink. It is an easy stamped image to cut out and mount with a Pop Up Glue Dot.  The poinsettia was also attached with a Pop Up Glue Dot.

You can purchase all the products I used from Ellen Hutson, LLC, by clicking on the links below:


Tuesday, December 3, 2013

Christmas Window

 Today I have a Christmas card designed with another new die from the Susan's Garden Collection called "Conservatory Window".  It is a perfect background for the beautiful poinsettias you can create with the Susan's Garden "Poinsettia" dies.

The Window was die cut and backed with a piece of glittery pale yellow card stock.  In front of the window I added the pretty Memory Box "Glowing Candles" die.  The poinsettia was created using the three smallest petals in the Susan's Garden "Poinsettia" die set.  I love that you can create a variety of sizes of poinsettias with this set.   Behind the flower I placed four of the Poppy Stamps "Berry Sprig" die cuts.  This is a die cut that looks great on your Christmas cards but will also be used a lot with your spring and summer flower die cuts.  On the berries I added "Chipped Sapphire" Distress Stickles, to match the design in the paper.  Also behind the poinsettia are a few Impression Obsession "Pine Branches".   "Clear Rock Candy" Distress Stickles was added to the candles, poinsettia and greenery.  

Here is a closeup so you can see the glitter.

You can purchase the products I used below from Ellen Hutson, LLC.


1069324

Tuesday, November 5, 2013

Believe in the Magic of Christmas


The snow has been falling all morning so I decided to create another Christmas card. For the background I used a new background die from Poppy Stamps called "Diamond Background".  I love the diamond shapes on this die cut.  Behind the die cut I attached an embossed background using the Sizzix "Dots" embossing folder.  It looks like falling snow.   The tree is from Memory Box.  When you die cut this tree, and if you run it back through with the embossing pad, it embosses snow on the bottom of each branch.  Since I used green card stock for the tree, before I removed it from the die, I pressed the VersaMark "Dazzle" watermark stamp pad down over the openings so I could add white embossing powder for the snow.  After adding the ink, remove the die and pour on the embossing powder, then heat set.  I love how realistic this tree looks.  

In the upper left corner I added a poinsettia created with the Susan's Garden "Poinsettia" dies.  Under the poinsettia are two Poppy Stamps die cut "Berry Sprigs".  To color the berries on this sprig, I added Seedless Preserves Distress Glitter.    The sentiment is from the Heartfelt Creations "Holly Berry PreCut Set" (HCPC3551). 

 Below is a link to the products I used from Ellen Hutson, LLC:


1052592 

Monday, October 7, 2013

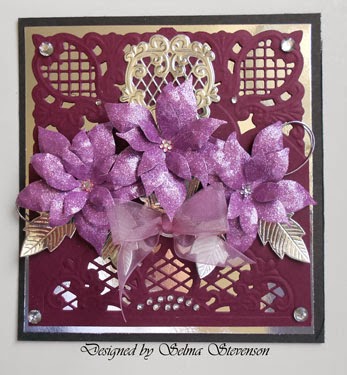
Purple Poinsettias

 Today I have a card for you that I used something I haven't tried before.  I used a piece of purple glitter card stock from a DCWV pad called Complementary Colors.  It die cut very easily. I love the look of the glitter paper to really make these flower "pop"!   I used the Poppy Stamps "Blooming Poinsettia" dies for the flowers and leaves.  The leaves were die cut using a piece of silver shiny card stock from this same pad.   In the center of the flowers I added rhinestones.

To create the background, I used the Marianne Design LR0200 corners and the die cut design on the bottom is the Marianne Design LR0269 die.   I have had questions before on how I die cut these corners.  This picture shows how  I have two corners and tape them down right along the edge.  The other die is placed a little above the bottom of the card stock and taped; this die does not cut along that bottom edge.  Run it through your die cutting machine then you will need to cut the outside edge off around the upper die cut corners.

 I placed a piece of shiny silver card stock behind the die cut background, to match the leaves. The color of the die cut background isn't showing up it's true color -- it matches the poinsettias very well in real life!  Also, I used the Marianne LR0265 die cut to place behind the poinsettias.  It is hard to see in the picture, but I also used some silver cording behind the flower,s then added a bow at the bottom of the arrangement.  Silver rhinestones were added to complete the card.

One more Christmas card completed!

1034514

Monday, September 16, 2013

Warm Holiday Wishes


We had a big storm last night and today is very cloudy and dreary.  I decided to dig out an old Inkadinkado stamp set that has my favorite snowman to make another Christmas card.  

To frame this darling snowman, I first used the Marianne Design DS0908 embossing folder to embossing the bottom of the card.  This is a 6x6" card and I had some empty space on top of the embossed frame,  so embossed that space using the eBosser Darling Dots embossing folder to resemble snow.  The Snowman was stamped in the widest portion of the frame and colored with Copic Markers.  

The poinsettia was die cut using the Poppy Stamps "Blooming Poinsettia" dies.  The center of each petal was shaded with a very light sponging of Milled Lavender Distress Ink.  The sentiment is from the same Inkadinkado stamp set.  I do not know the name of this set or if it is still available because I have had it for a long time.  The sentiment was die cut using scallop Nestabilities and each scallop pierced.  The large snowflakes were punched using the Martha Stewart "Polar Snowflake" punch.  The tiny snowflakes were some previously punched in my stash.  I believe they came out of a border punch.

Well, one more card completed before the holidays arrive!

1022692

Monday, July 15, 2013

Christmas Dies

Have you seen all the new Memory Box Christmas dies and stamps now available at Joan's Gardens?  Here is the direct link.  The new Memory Box "Merry Christmas Tidings" die works great for either the front of your Christmas cards or would also be beautiful on the inside.  Today I have featured it on the front of my card.  I used a piece of older Webster's Pages "Waiting for Santa & Sweet Season" design paper for the background on this 5.5" x 6" card.  When I create layers on my cards, I don't necessarily measure -- I just eyeball it and create smaller layers.  Usually they are in 1/8" or 1/4" increments.

The Memory Box "Merry Christmas Tidings" was die cut using an aqua pearl card stock.  It was attached to the top portion of the card using a new adhesive you can get from Joan's Gardens called "E6000 Adhesive Spray".  After spraying the back of the die cut in a box (to contain the spray), I use a brayer to press the die cut down firmly on the card front.  The poinsettia was created using the Poppy Stamps "Blooming Poinsettia".  It was also die cut using the same card stock.   To finish the card I added turquoise Kaiser Craft pearls.

Be sure to go over to Joan's Gardens to see all the new stamps and dies so you can get an early start on all your holiday cards.

All the products I use can be purchased from Joan's Gardens.

Memory Box "Merry Christmas Tidings" (98643)
Poppy Stamps "Blooming Poinsettia" (861)
Webster's Pages Design Paper
E6000  Adhesive Spray
Brayer
Kaiser Craft Pearls

983370     

Thursday, March 28, 2013

Joan's Gardens Weekly Challenge


It is time for a new challenge at Joan's Gardens  We are thinking flowers this week.  The challenge is to create some kind of container filled with flowers.  Go over to Joan's Gardens for all the challenge information and to see what the prize is this week.

For my card I used the new Nellie Snellen  "Retro Swirls 1" embossing folder for the embossed background.  The bottom piece is from the Echo Park "Dots & Strips" design paper pad.  The little "Rick Rack" border is from the Cheery Lynn  "Expandable Tiny Borders die set. In the upper corners I added the "French Lilly Corner".   The basket is the Cheery Lynn "Spring Basket 1" and was colored with Distress Inks.  

For the mixture of flowers I used the Memory Box "Prim Poppy" and "Fancy Blossoms" die. Stamens from the Cheery Lynn BAF "Embellishments #1" set were added to the center of the yellow flowers. The tall leaf is the Poppy Stamps "Meadow Leaf" and the Cheery Lynn "Flourish Leaf Strip"  and "Build A Flower #2" were used for additional leaves in the basket.  The sentiment and flourish by it are from the Penny Black "Gratitude" stamp set.  The pretty butterfly is the Memory Box "Kaleidoscope and Moonlight Butterflies" layered. 

We are looking forward to seeing your beautiful container of flowers in our challenge this week.  


Nellie Snellen Retro Swirls 1 embossing folder
Echo Park Dots & Stripes Design Paper Pad
Memory Box "Fancy Blossoms" 98312
Memory Box "Prim Poppy" 98310
Poppy Stamps "Meadow Leaf" 806
Memory Box "Kaleidoscope Butterfly" 98261
Memory Box "Moon Light Butterfly" 98260
Cherry Lynn Expandable Tiny Borders B215
Cheery Lynn Flourish Leaf Strip   B178
Cherry Lynn Expandable Tiny Borders B215
Cheery Lynn Flourish Leaf Strip   B178
Cheery Lynn Spring Basket 1   DL214
Cheery Lynn BAF "Embellishment 1" B181A
Penny Black "Gratitude" stamps   30-105


LinkWithin

Related Posts with Thumbnails