Showing posts with label Karen Burniston. Show all posts

Sunday, October 30, 2016

Season's Greetings


 Today I have a Pop Up card I created using Karen Burniston's Anita  Frames Pop Up Die Set, Labels & Circles, Holiday Charms, Pop It Up Merry Christmas die sets and her Holiday Clear Stamp Set.  For the borders I used Els van de Burgt Studio Garland 2 die set.

This Pop Up card looks like it would be complicated to assemble, but it is so easy to create and is such a WOW card when opened!!  You can watch Karen's Pop it Ups 1206 Anita Frames Pop-up Die Set Video at this LINK.  

To decorate the inside of the card, I used the Pop It Up Merry Christmas die set for the die cut Christmas sentiment, and the blue flourishes. The Labels & Circles die set was used to die cut two blue labels and the Holiday Charms die set used to die cut the tree out of blue Shimmer Sheetz; also the snowflakes and the gift dies from the same set.  Along the edges, the Snowflake Holiday Garland 2 die was used to die cut two garlands, then Peel Off Sticker Glitter Dots were added to the center of each snowflake.


To decorate the front of this card, the A Way  With Words - Season's Greetings die was used.  The trees were die cut using the Holiday Charms die set.  Along the top, a small piece of the snowflake Holiday Garland 2 was used.   

I hope you will watch Karen Burniston's YouTube Video and have fun creating your Anita Frames Pop-Up card.

The following products can be purchased from Elizabeth Craft Designs:


Wednesday, October 26, 2016

Let's Have Some Halloween Fun


PopUp cards are always so much fun to receive!  Halloween is almost here and I thought I would show you a card I designed using Karen Burniston's Twist Circle Popup die set.  I am having a problem going to YouTube this morning to get a link for you, but you can go to YouTube and Search for Karen Burniston Twist Circle Popup, and watch her video for complete, easy instructions for creating this PopUp card.  The dies I used from Elizabeth Craft Designs to decorate the inside of this card include Karen Burniston's:


This is the front of the PopUp card.  The products used for this include
Karen Burniston's:


and black circles left on the Sticker Sheet, once corners are pulled off; these were placed on the label.

 Happy Halloween!

Wednesday, September 28, 2016

Gift Card Sleigh Pop Up


Sometimes you know someone who prefers to receive a Gift Card at Christmas time but you would also like to give them something else special.  You can do that when you create this cute Christmas card using Karen Burniston's Sleigh Gift Card Holder Pop Up die set.  Karen gives very clear instructions on her YouTube Sleigh Gift Card Holder Pop Up Video at this LINK.  I'm sure you will love creating this card for your gift cards.

You could leave the Pop Up Sleigh as a simple card, or you can add any embellishments you would like.  I have used Karen's Rudy the Reindeer die set, Outdoor Edges (at bottom of the card), Merry Christmas Pop Up and Iron Fence Pop Up die sets.  It is easy to use the die cut pieces from Pop Up Sets for other things other than just creating pop up cards.  The sentiment was stamped using two stamps from Karen's Merry & Bright Clear Stamp Set.   The Christmas tree was die cut using Els van de Burgt Studio 5-Part Pine die set and decorated with Peel Off Stickers.  Glitter Peel Off Stickers were also added along the bottom of the card across design paper..   


This is a side view so you can see how the Sleigh pops up.  The die cut also includes tabs to hold a gift card to hold it secure.


For the front of the card, I added a piece of design paper from a Christmas pad I have had in my stash.   I used the A Way With Words Merry Christmas die for the sentiment.  It was die cut with Clear Double Sided Adhesive on top of the card stock and Cool Diamond Silk MicroSoft Glitter added.


On the bottom of the card I added one of Els van de Burgt Studio Holiday Garlands 1 die cuts.  This is a string of Christmas lights so I wanted to add glitter to the lights.  A piece of Clear Double Sided Adhesive was used on top of White Soft Finish Cardstock and the Holiday Garland was die cut.  

There are two Elizabeth Craft Tools that are a MUST HAVE for all my card creations; they are the Fine Pointed Scissors and the Fine Pointed Tweezers.  I really don't know how I ever got along without them.  

To glitter the Christmas lights red, I used the Fine Pointed Tweezers to lift the the covering up off the light bulbs and snipped that piece off, leaving just the adhesive over the light bulbs exposed.  I did that for all the bulbs on one side.  I then sprinkled the Ruby Silk Microfine Glitter over the adhesive, then rubbed it in well.   


The same process was done on the other side, having glitter on all the light bulbs. Make sure to rub the glitter with your fingers to bring out the shine. Next I used the Fine Pointed Tweezers to pull the center covering off the string of lights and added Regal Green Silk Microfine Glitter.  The String of Lights was added to the bottom of the card.

The following products can be purchased from Elizabeth Craft Designs:


Tuesday, September 27, 2016

Witches Brew


Pop Up Cards are always so fun.  Today I created a Halloween card using Karen Burniston's Flower Pot Pop Stand die set.


Flower Pot Pop Stand

This Pop Up Flower Pot is so easy to assemble.  You can watch Karen's YouTube Flower Pot Pop Stand Video at this LINK for easy assembly.  If you follow Karen Burniston on FaceBook, you will see a lot of inspiration for using this die set.


Props 9

For my card, I started with a 6x6 inch card.  I covered the inside with design paper.  After creating the box, following Karen's instructions, and attaching it to the inside of my card, I used several of her new die sets to create the Halloween Scene.  

I decided to go "wild" and created a witch falling down into a pot of boiling "something".  I used the dies in the Props 9 die set.  Once the hat was die cut and assembled, I attached it to a strip of clear acetate to attach it to the inside of the box.  Since I wanted it to look like the witch fell in the pot, I attached the shoes to two strips of design paper and glued the "legs" to the shoes.  They were attached on the right side in the Pop Up box.  The broom was put together and attached at the back of the box behind the Witch Hat.   All these pieces were die cut twice and glued together to make them sturdier.


 Now, I had to figure out what to use to make it look like "steam" was coming out around the witch.  I decided to use fluffy white feathers. I'm sorry that the picture does not look as good as the card.  Feathers were attached down in the box and is full of "steam", which does not show well in the pictures. 


Halloween Scene

I used the Graveyard die for the bottom of the card,  I used the Halloween Scene die set, using gray card stock.  A white opaque pen was used to decorate the grave stones.  Four trees from this set were die cut and glittered with Black Silk Microfine Glitter.  (The trees were die cut using Clear Double Sided Adhesive.)  The trees were tucked down behind the grave stones.  Two bats were also die cut, using this die set.  A "moon" was die cut using Els Van de Burgt Studio Fitted Circles.  It has Gold Silk Microfine Glitter added.


Iron Fence Pop-Up

For the Fence, I used Karen's Iron Fence Pop Up die set.


Three fences had to be die cut to fit across the bottom of the card; the bottom of the fence was trimmed off.  Two Crows were die cut and added to the fence.


This is the front of the card.  

Labels & Circles

Karen's Labels and Circles die set was used for the frame on the front of the card.  

 Halloween Clear Stamp

The sentiments used on the card were stamped using Black VersaFine Ink, and stamps from Karen's Halloween Clear Stamp Set.

This card will fold flat and fit into a 6x6 inch envelope.

The following products can be purchased from Elizabeth Craft Designs: 


Thursday, September 8, 2016

Noel


I love creating scenes with my die sets whether it is using Susan's CountryScapes die sets or other dies available from Elizabeth Craft Designs.  I have used a variety of collections to create this card.

This is a 6x6 inch card.  Using the largest Els van de Burgt Fitted Ovals die set to die cut an oval in the center of a piece of Soft Finish White card stock. (This piece should be slightly smaller than your 6x6 inch card.)  Use the two largest  Fitted Ovals dies to die cut 3 outline ovals.  These three oval die cuts will be glued together and will frame the die cut oval opening.  

Add Clear Double Sided Adhesive to a piece of card stock.   Die cut three mountain pieces using Joset Designs Skis die set.  Add Cool Diamond Silk Microfine Glitter to the mountain die cuts.  Arrange and glue them together to create a mountain range scene. 

Using another piece of card stock covered with Clear Double Sided Adhesive, use Karen Burniston's Outdoor Edges die set, to cut one edge with the trees and one snow bank edge.  Add Cool Diamond Silk Microfine Glitter to these die cuts.  Use Karen's  Evergreen Pivot Card die set to die cut three small Evergreen trees, using white card stock. These trees will not be glittered.  Use Karen's All Season Tree die set to die cut 5 snowflakes using white card stock.  

Use Susan Tierney-Cockburn's - Garden Notes Whitepine Boughs die set to die cut four boughs. 

Assemble the card as shown. 

Use Suzanne Cannon's A Way With Words Noel die, to die cut one sentiment, using white card stock.  Use the same die and a piece of white fun foam to cut another sentiment.  The fun foam, die cuts like "butter"!  Using the fun foam will give dimension to the sentiment. Glue the card stock sentiment over the die cut fun foam die cut.  If you use Clear Double Sided Adhesive behind the card stock die cut sentiment, it is easier to attach to the fun foam.   Attach the sentiment to the bottom of the die cut oval.

Creating scenes is very fun.  Have you given it a try?


Products used from Elizabeth Craft Designs:


Sunday, July 17, 2016

Hot Air Balloon Pop Up Card


Good Morning.  I love to watch all the helpful YouTube videos showing how to use the different products available from Elizabeth Craft Designs. Today I watched one of Karen Burniston's YouTube Videos called Pop It Ups Hot Air Balloon.  Here is the LINK to this YouTube Video. I followed along with Karen, creating this pop up as she gives very clear instructions.  

Karen completed her Hot Air Balloon Pop Up for a very cute Baby Card.  I did not have all the products to make the same card, but it was very easy to create my own design.  

I am sure one of my grandchildren will love receiving this Pop Up Hot Air Balloon Birthday card.  On the front of the card I added another Hot Air Balloon with Celebrate for the sentiment.

I used Dotted Scallop Ovals to frame the two sentiments from Karen's What's Up and Farm Greetings Clear Stamps sets.

You will find so much inspiration when you start watching the Elizabeth Craft Designs YouTube Videos  found at this LINK.

The following products used can be purchased from Elizabeth Craft Designs:

Hot Air Balloon with Pop Up
Clouds Embossing Folder
What's Up Clear Stamp Set
Farm Greetings Clear Stamp Set
Dotted Scallop Ovals
Bead Strings 2 (used for border around card)
Glittered Dots Stickers


Tuesday, July 12, 2016

Believe


As many of you know, I like to start making my Christmas cards early so I am not in a rush when the holidays arrive.

How cute is this card!!!!    I love to watch all the Elizabeth Craft Designs YouTube videos for ideas and complete instructions for using their products.  When I saw Karen Burniston's video for this cute Fireplace card, I had to give it a try.  Here is the LINK to Karen's YouTube Pop it Ups - Lots of Pops Fireplace Scene video.  Karen shows how to use the Lots of Pops die to animate this fireplace complete with Santa's boots dangling in the opening.  The boots and stockings are easy to create using Karen's Props 6 Cowboy Boots die set.  It looks like it might be complicated, but Karen's instructions are so easy to follow, giving all the details needed.  I'm sure you will have fun creating this delightful PopUp card.

I love how Karen created this fireplace.  You cut little strips of red card stock and layer them on gray card stock that is covered with a piece of Clear Double Sided Adhesive, then add Pewter Silk Microfine Glitter for the grout.  I was so impressed with how realistic it looks! This technique was used for both the fireplace and the chimney on the front of the card.

I basically created my card the same as Karen, but used my own design paper and added my own touches for the fireplace. Inside the fireplace, I have used Susan's CountryScapes Woods 2 die set.  I have added a piece of design paper to create a wood plank floor on my card.  I love Karen's idea on creating the hearth in front of the fireplace. For the sentiment, I die cut the A Way With Words - Believe using black card stock.


This shows the whole inside of the card.  Don't you love those Santa boots dangling in the fireplace!


This is the front of the card.  Again I used Karen's ideas for the chimney and Santa hat, but decided to use a piece of Els van de Burgt Through The Lens Wood Series Design Paper to create shingles for the roof of the house.  I used a marker to draw in shingle lines on the design paper.  The Elizabeth Craft Alphabet 2 Lower Case Letter die set was used for the ho, ho ho.  

This is the first PopUp Fireplace card I have created, but I had so much fun creating it, I plan to make more.  

To create this fun card, be sure to watch Karen's YouTube video, for complete instructions.

The following products can be purchased from Elizabeth Craft Designs:

Bark Embossing Folder (for mantel)


Wednesday, June 29, 2016

Happy Birthday Cake PopUp


Today I wanted to design a "Fun" card for a birthday.  What better way than to use one of Karen Burniston's PopUp card die sets.  I used her Cake Pop Up die set on the inside of the card.  

On the front of the card,  I used Karen's Props 7 die set for the cute little basket of flowers; there are a few Leafy Branch leaves behind the flowers. For the gingham background, I used Karen's  Pull Card Edges die set.   Since this is a big  birthday wish for a special person, the large die cut A Way With Words - happy birthday was perfect for the front.   Els van de Burgt Corners 1 die set was used to die cut the two corners at the bottom of the card.


Cake Pop Up

On the inside of the card, I watched Karen's Cake Popup YouTube Video for construction.  You can watch the video at this LINK.  My card was designed basically the same using design paper I had in my stash.


This shows the inside of the card when opened.  I know you will have fun creating this cute PopUp card.  Karen's instructions on the video are VERY easy to follow.  You can decorate the card anyway you want.  I hope you will give it a try!

You can purchase these products from Elizabeth Craft Designs:


Monday, June 6, 2016

Jasmine


Jasmine flowers have an exotic, sweet fragrance that permeates the air on warm summer evenings.  You now can purchase Susan's Garden Notes Jasmine dies to create these beautiful flowers.

To create a pretty, delicate background for the Jasmine flowers, I used the Els van de Burgt Dotted Scallop Squares, Stitched Squares and Fitted Frames 2 Lace Squares.  The die cut squares were attached to a piece of yellow dotted design paper.


I die cut all the Garden Notes Jasmine pieces, using Soft Finish White Cardstock, and sponged the leaves with Memento Bamboo Leaves ink. The die cut  flowers and leaves were shaped with Susan's Flower Tools and arranged as shown on the Jasmine packaging.

Two small butterflies from Susan's  Garden Notes Bugs and Butterflies die set were die cut using yellow card stock and sponged in orange ink.  The sentiment is from Karen Burniston's Cheeky Monkey Clear Stamp Set

The following products can be purchased from Elizabeth Craft Designs:


Tuesday, April 5, 2016

We Should Hang Out

Karen-Strawberry-Pull-Card
Good Morning.  Today is my turn to post on the Elizabeth Craft Designs Blog with my design team post.   I have created a card to make your mouth water, wanting strawberries.  I used the Joset Design Strawberries dies.  The card was created using one of Karen Burniston's Pull Card dies.
Karen-Pull-Card-Strawberry

To create this Oval Pull Card, you can watch Karen Burniston's YouTube video at this LINK.  I followed all the steps for assembly exactly the way they are explained on the video.
  1.  Start with card size of 6 x 8 inches.  Score on left side at 3 3/4 inches.  Tape Oval Pull Card die on score line, with die on the 3 3/4 inch side.  Run through die cutting machine.
  2. Cut designer paper of choice for the inside (right side of card), slightly smaller (approximately 4" x 5 3/4", and attach with adhesive/glue.
  3. Cut designer paper of choice for the front of closed card measuring approximately 3 1/2" x 5 3/4" and attach to front panel of card.
  4. This card has an acetate window in the oval "swing" part of the card.  It also has an acetate pull arm to use for movable objects.  I suggest you watch Karen's YouTube video for complete instruction to see how easy this step is completed.
  5. The basic Oval Pull Card is now complete to start decorating.
  6. Die cut 5 large Joset Designs Strawberries and backing.  Glue yellow backing to back of each strawberry.  Die cut and add green stem to each strawberry.  Die cut 4 sets of Strawberry leaves and color.  I used white Soft Finish Cardstock and sponged on Memento Bamboo Leaves green ink.
  7. Die cut 3 small strawberries and assemble.
  8. Use Joset Designs Cupcakes die set to die cut 4 white flowers.
  9. Using Karen Burniston's Barrel Basket with Pop Up die set, die cut the basket.  I did not use the handle.
  10. Use Karen's Garden Bench die set to die cut two grass pieces.  I cut between each of the blades of grass with the Elizabeth Craft Designs Fine Pointed Scissors.
  11.  Use Karen's Accordion Oval Card die set and die cut 2 of the smallest stitched oval.
  12.  Use stamps in Karen's Cheeky Monkey Clear Stamp set for the two sentiments
  13. Assemble the card as shown.  There are two large strawberries that show in the acetate window.  You need to glue two strawberries, back to back so it looks good when the card is closed - One of these strawberries is on the front of the card and one is on the acetate swing arm, on the inside.

Karen-Strawberry-Pull-Card-

This is how the card looks when closed.  The Oval Pull Card die has a little tab, which you can see at the top of the card, to keep it closed so it does not reveal the message inside.

Would you "Hang Out With Me" if I sent you this card?  Perhaps we could go eat some strawberry shortcake!

Supplies:


Tuesday, March 15, 2016

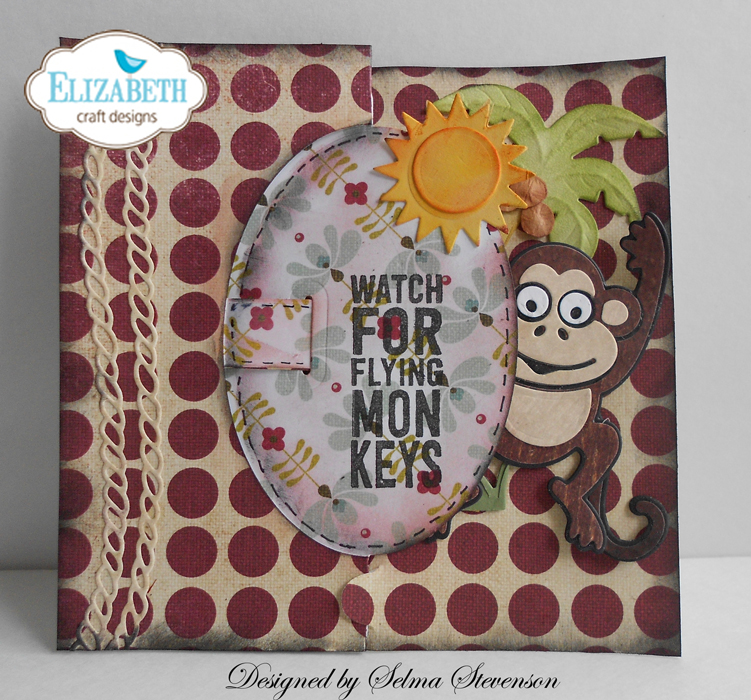
Cute Oval Pull Card


I am going to be needing a few grandson birthday cards this summer. Sometimes it is hard to come up with something for a boy card, that they will get a kick out of.  Karen Burniston has a variety of very cute Character & Prop dies, along with very fun shaped dimensional card shape dies, that make this easy. 

I used the Oval Pull Card for my card base.  A piece of double-sided design card stock was used for this card.  You can watch Karen's YouTube Oval Pull Card Video at this LINK, for easy assembly.

The Character and Prop dies used include:  Jinks the Monkey, Palm Tree & Pail, and the Garden Bench - for the grass die cut.  Also used are the rope die cuts from Els van de Burgt Studio Ropes 1 die set. The sentiment, from Karen's Farm Greeting stamp set, was stamped on tan card stock and die cut with one of the dies from Karen's Gift Card Accordion die set. 


This is the front of the card when it is closed.  This die creates a notch at the bottom, to hold the card closed.

I think one of my grandsons will love receiving this fun card!

Products from Elizabeth Craft Designs include:


Saturday, March 12, 2016

Pop Up Garden Bench


Today I am so excited to show you my new card.  I have been viewing Karen Burniston's, Elizabeth Craft Designs YouTube Video's.  She gives such clear instructions on how to use her Pop Up, Pivot, Pull, Accordion and Pop Stand dies.  It is fun to watch them all, because you can see many different ideas that you will be able to when creating your cards.

With Spring almost here, I couldn't resist creating a card using Karen's Garden Bench die.  You can go to this LINK for complete instructions for assembly.


It was so easy to create the Garden Bench Popup, and also to learn how to add the perfectly cut background paper, by watching the video. Once I had the Bench popped up and the background design paper attached,  I had a blast going through my dies and die cutting items to create a complete Spring scene.

Karen's All Season Tree die set was used to create a flowering tree. The dimensional clouds are also from the same set. 

Behind the Bench, I used Susan's CountryScapes Cloud Grass die to die cut two strips of grass.  I used the Elizabeth Craft  Fine Pointed Scissors to cut between each blade.  The two strips were glued together and added at the fold line on the top portion of the card.  The grass in front of the Bench legs is a die from the Garden Bench die set.  Next Susan's CountryScapes Garden Edges Tulip die was used to create the border of tulips in front of the grass.  

There had to be "critters" in this scene.  The CountryScapes Critters 1 die set was used for the Cat and Squirrel, and CountryScapes Critters 2 was used for the three birds.  The CountryScapes Woods 2 die set used for the die cut Birdhouse.    


 In the upper corners, Els van de Burgt Studio Corners 1 set was used to die cut the corner die cuts, out of tan card stock.  The decoration on the bottom of the card was die cut from Karen's Agatha Edges.  Last but not least, the A Way With Words - Friends die was die cut twice and glued together for a dimensional sentiment.

Pop Up cards are always so fun to receive, and with Karen's dies and all her helpful videos, they are very easy to assemble. The nice thing about pop up dies is you can get dimension, but they fold down flat, will fit into a regular envelope,  and will not require additional postage.   I hope you will give them a try.

Products from Elizabeth Craft Designs:

Garden Bench
All Seasons Tree
CountryScapes Critters 1
CountryScapes Critters 2
CountryScapes Cloud Grass
CountryScapes Garden Edges Tulip
CountryScapes Woods 2
Agatha Edges
A Way With Words - Friends
Corners 1
 Fine Pointed Scissors
Soft Finish Cardstock


LinkWithin

Related Posts with Thumbnails