I have wanted to create very realistic lilies and now we can do that with the new
Sizzix "Susan's Garden" flower dies. There are instructions in each package of flower dies by Susan
to help you, but I thought I would show you my way of creating these gorgeous lilies. Before I do that, I will tell you about the products I used on this card:
The background was embossed with the eBosser "Dotted Elegance" embossing folder. The oval on top was embossed with the Nellie Snellen "Oval Frame 1" and cut out with scissors. The sentiments are from the new JustRite "Grand Sentiments" stamp set. The tiny leaves behind the lilies were die cut using the Impression Obsession leafy branch die.
When you purchase one of the Susan's Garden flower die sets, you receive all the pieces needed to complete the entire flower. I used "Dried Marigold" Distress Ink, the Copic "Dark Red" marker, and Russet Red Flower Soft to create the lilies. The important item in shaping the flowers is the new Sizzix Flower Tool Kit. I used 60# card stock to create the flowers.
My tutorial for creating the Susan's Garden Lily.
Here is a picture of most the items I used to create two lilies.
Start by adding color to the base of each petal, add dots with the Copic marker, then use one of the larger stylus in the Flower tool kit to shape the petals. Rub the stylus around in circles to loosen the fibers in the card stock and this helps to "cup" the petal for a realistic look.
Next use the self-closing tweezers, that come in the Flower Tool Kit, to pinch the base of each petal. Place the tweezers right in the center, as shown, then use your fingers to push the edges up to the tweezers.
In this picture, you can see the difference in the petal (on the bottom left) that has not been shaped with the tweezers, and the rest of the petals. These new tweezers have a very long, fine point and work really great for this step.

To create the stamens, I sponged the Dried Marigold Distress Ink on the bottom of the stamen, then used the Dark Red Copic marker to color the ends of each stamen, on both sides. Susan doesn't do this in her instructions, but I used the scissors in the Flower Tool Kit and cut down the center of each die cut stamen to create a "thinner" stamen. I think the stamen looks more realistic and you get double the stamens. Add a little glue to one end of the stamen, then roll it using the self-closing tweezers. Hold your fingers on the edge a few seconds to let the glue attach, then pull out the tweezers. Wipe off any glue stuck to the tweezers with a baby wipe. Susan is coming out with some special Woodland Powders that can be used on stamens, but it will not be out for a while, so I used some Russet Red Flower Soft to create the "fuzzy" ends of each stamen. Just add a tiny dot of glue to front and back of the tip of each stamen and dip it in the Flower Soft. The Flower Soft pieces are kind of large, so after the glue was dry, I used the little scissors to snip off some of the extra "fuzz". Set the stamen aside to dry.

To assemble the flower, use the Teflon Craft Mat that comes in the kit to work on. Place a small amount of the "Crafter's Pick" glue on one corner, then dip the base of the petal in the glue and attach it to the green (6-point) base. Glue every other point first, then go back and add the other three petals. This gives you a nice layered look. As you glue each petal down, press the end down into the base with the end of the smallest stylus for a couple of second to get it to hold to the base. This helps prevent those petals from slipping around while working on it.
This picture shows the flower once all six petals have been attached to the base.
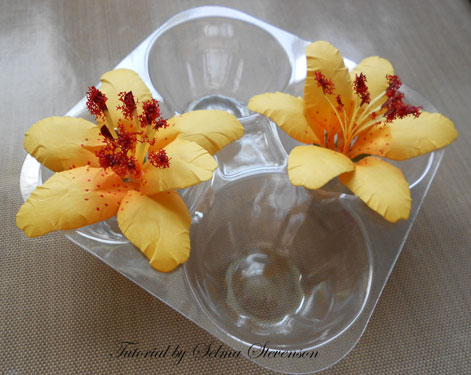
Once you get all the petals glued to the base, place the flower in the
"Plastic Flower Pots" also a Sizzix Accessory created by Susan. This will help the flowers to stay well shaped (cupped up), until they dry. Sometimes the flowers tend to flatten out when left to dry without any support. There are 5 of these trays to a package and are very inexpensive. Add a lot of glue to the end of the stamen and stick it down in the center of the flower. You might have to check it a couple of times, while it is drying, to make sure that it stays sitting straight up. You can pull the stamens further apart (shape them) once they are dried in the center of the flower.

While the flowers are drying, you can work on the leaves, which are included with this set. I forgot to take a picture of it, but if you look at the second picture above in the tutorial, you will see the tools from the tool kit. To shape these leaves, I first used that "loop" tool to draw down the length of the leaf - do not hold the leaf with your fingers. This will shape or slightly cup the leaf. You will do this on the soft shaping mat. Next place the little green hard mat on the soft mat, then use the tool with the point on it - shown in the above picture.
Working on the backside of the leaf, draw a line down the center of the length of the leaf with the point of this tool facing up, but you are drawing with the very tip. It leaves a very nice line. If you were working on leaves that needed veins down the side, you would turn the leaf over and draw those lines on the front coming out from this center line. The lily leaf does not need the lines on the front.
Once the flower is dry, you can add the leaves to the backside. In this picture, the Flower Soft has not been trimmed down yet.
Here is another picture of the finished flowers on the card.
When you have all the needed flower pieces and tools, it is very, very easy to create beautiful flowers. These flowers are very dimensional and look gorgeous on box tops, frames, and even cards. You can purchase Plastic Flower Domes, also inspired by Susan Tierney-Cockburn that will cover and protect your shaped flowers.
I hope this tutorial gives you some additional information to help you create your beautiful paper flower garden. I would love to read your comments to let me know if my tutorials help you.
Products used:
Susan's Garden "Lily" (658275)
Sizzix, Susan's Garden Flower Tool Kit (658437)
60# card stock
Sizzix Plastic Flower Pots, 5 pack (658435)
Crafter's Pick Glue
eBosser "Dotted Elegance" embossing folder
Nellie Snellen "Oval Frame 1" HSF004
JustRite "Grand Sentiments" stamp set (CR-03885)
Dried Marigold Distress Ink
R89 Dark Red Copic Marker
Impression Obsession "Leafy Branch" (DIE-055-N)
949505