Monday, September 10, 2012

Live Love Laugh


I have had questions about the smallest petals on the Cheery Lynn Build A Flower #2 die set; some of you didn't know what type of flower you can create with them. You can create a lot of different small flowers with them including small roses with these petals.  On this card I have used the small petals for the little roses that are on the bottom border.  I will explain below how I created them.

The design paper is from the Echo park Paper Co called "Dots & Stripes".  I love to use that pretty window die from Heartfelt Creations; it is the HCD 710 die.  Across the bottom of it is one of the Spellbinders "Ribbon Banners" with a sentiment from the JustRite stamp set "Faith".  

The pretty border along the bottom of the card is the DieNamics "Dizzy Border".   This is such a delicate looking border that you can string ribbon through; I just added a pearl to the center of three of the centers and added flowers to the other two.  This border is 6" long, but you could easily cut it down. The corners are one of the Cheery Lynn "Lace Corners" set.  

All three of the flowers were built using the new Cheery Lynn Build A Flower #2 dies.  You can build the small roses just like you do the larger ones by using the small 5-point base.  I tried something new today.  I used the pointed end of the white tool from the Flower Tool kit to shape the flowers.  After conditioning them, I added a thin layer of the Ultimate glue to the inside of each petal and wrapped them around the end of the white tool.  It was easy to just keep adding petals until I got the size I wanted.  If you use just a thin layer of glue on the petals, it makes it easy to wrap them around the tool and the glue will actually dry fairly quickly.  I held each petal, firmly around the tool, for about a minute until it stuck together then added the next petal.  Pull the flower off the tool as soon as the flower will keep it shape; it will slide off with a push of your fingernail.  Use scissor to cut off the bottom part of the flower so it will have a flat bottom and sit nicely on your card.  The petals were die cut using white card stock and were sponged with Memento "Lilac Posies" ink.  I created the baby's breath with the Build A Flower #2 Embellishments dies.  
.
Heartfelt Creations window die (HCD 710)
Cheery Lynn Build A Flower #2
Cheery Lynn Build A Flower #2 Embellishments
Cheery Lynn Lace Corner (B174)
Spellbinders "Ribbon Banners" (set of 4)
JustRite "Faith" stamp set (CL-02130)
DieNamics Dizzy Border
Flower Tool Kit

742108

Sunday, September 9, 2012

With Sympathy


Cheery Lynn just came out with four beautiful new die cut sentiments and today I want to show you one I haven't used yet.  This "With Sympathy" die cut is very delicate. Here is a little hint:  when I die cut these delicate sentiments, most of the time they stay in the card stock instead of popping out or staying in the die.  When this happens, I place it on the black mat I use to shape flowers and gently push around the sentiment and it will pop up and away from the card stock.   I brushed on a thin coat of "Glue N' Seal" to adhere it to the design paper.  The design paper is from the Pink Paislee "Butterfly Garden 6x6" pad.

The flower was created using the Cheery Lynn Build A Flower #2 dies.  The stamens are from the Build A Flower #2 Embellishments set.  The flower was created by using yellow vellum for the petals.  I sponged the edges with Wild Honey Distress Ink.  The petals were then spritzed with some water and shaped around the barrel of the white tool from the Flower Tool Kit.  Place the petal around the tool and pinch from side to side to create the wrinkles in each petal.  When you create your flowers from the Build A Flower #2 set, you can mix the style of petals on that plate as long as you keep them approximately the same size especially when you are giving extra shape to the petals as I did here.  It makes it easy to place a piece of card stock/vellum over that section of the die and just die cut all nine petals.  I have even used a variety of these petals when creating roses.  As you know, every petal in a flower is not identical.  I die cut two of the stamens with the little circles on the ends  out of yellow card stock;  then on each little circle used a marker to add  a darker color to help make them stand out.

The flower was placed on the Memory Box "Quinn Flourish".  Marianne leaves and greenery were placed under it.  The pretty butterfly is from the Penny Black "Social Butterfly" stamp set.  This set has four sizes of beautiful butterflies, a dragonfly, a butterfly corner, and a sentiment.  It was stamped on white card stock using "Forest Moss" Distress Ink, cut out then sponged with Tea Dye Distress Ink, then attached with dimensional tape.

Memory Box Quinn Flourish (98267)
Pink Paislee Butterfly Garden Paper Pad
Penny Black "Social Butterfly" stamp stet (30-116)
Marianne Design leaves (LR0227)
Marianne Design leaves (LR0229)
Cheery Lynn "With Sympathy" sentiment (B212)

741352

Saturday, September 8, 2012

Beige and Burgundy Card


I love to work with the new 6"x6" templates from TCW and "Liquitex Light Modeling paste.  They create such a pretty "dimensional" background and are very easy to create.  This is the same template Joan used in her workshops.  I used Distress Ink to color the background then added the Modeling paste over it.  Once it was dry, I added a little more Distress Ink to lightly color the paste.  The die cut tree is one of the new Memory Box dies called "Snowflake Tree".  In the upper corner I added a Spellbinder "Parisian Accent" to go under the burgundy silk bow.  The bow was created with the Bow Easy.  Kaiser Craft pearls were added to complete the card.

All these products can be purchased at Joan's Gardens.  For those of you who don't know, Joan only charges you exactly what it costs her for postage and most items in her store are priced less than retail.  You can always save by shopping with Joan.

Here are the products I used today from Joan's Gardens:

TCW 6x6 Template
Liquitex Light Modeling Paste
Memory Box Snowflake Tree (98405)
Spellbinders "parisian Accent" (S5-034)
Distress Inks
Bow Easy
Silk Ribbon
Kaiser Craft Pearls

740656

Thursday, September 6, 2012

Joan's Weekly Challenge


We have a very different type challenge for you this week at Joan's Gardens.  We are asking you to create some type of shaker box on your card; you can make your own shaker box using acetate or use a pre-made one like I have.  Please go over to Joan's Gardens to read all the details about this week's challenge.

I used a new Spellbinders M-Bossabilities embossing folder for my background.  There are two designs on each of these M-Bossabilities folders.  If you run these through the Big Shot and probably the Cuttlebug, you will probably need to not put down a bottom B plate.  I used the white plate, the embossing folder with the card stock inside, then the C plate on the top.  The Shaker Box is used is by Impression Obsession and are called "Shake It" Shaker Card Pouches.  There are 10 to a package.  I really like these pouches because they are not very high.  I didn't measure it but they are probably only 1/8 inch high which makes it easy to put in an envelope and mail.  I used a Spellbinder Classic Oval Nestability that is the same size as the plastic pouch to die cut an opening in the embossed background.  To create the green scalloped edging on the front I used the same Oval Nestability and a scalloped Nestability one size larger.  First cut out the scallop oval then place the other oval over it and die cut it again.  

I love this new Old World LaBlanche "Smiling Santa" stamp.  He was stamped with Ranger Archival Ink and colored using Nibs and Distress Inks.  It was attached to the Shaker Card Pouch by using the "Perma Tec Glue Glider".  It was real easy just to roll the Glue Glider around the edges of the pouch. EDIT:  It helps to read the back of the package  ---There is tape around the edge of the pouch that you just need to peel off.  I added some small snowflakes that were saved from a border punch, along with some small white seed beads, to the inside of the pouch then held it up and placed the Santa over it to get it centered.  The Marianne Design Sleigh was die cut, then I used the Ranger "Perfect Medium" Brush to go over the embossed area (before taking it out of the die; then I took it out and added gold embossing power and heated it.  By doing it this way you get perfect embossed lines.   The deer is the Memory Box "Leaping Deer".  Before adding the sleigh and deer, I cut two pieces of white card stock to create the snow banks on the bottom of the card.  The sentiment is from the new Cheery Lynn "Merry Christmas Set; there are two sizes of sentiments in this set.  A few of the same snowflakes in the pouch were attached over the embossed background.

I hope you will join us this week in our challenge.  

All the products I used can be purchased from Joan's Gardens:
Spellbinders M-Bossabilites (EL-014)
Impression Obsession "Shake It" Shaker Card Pouches
LaBlanche "Smiling Santa" Silicone Stamp
Ranger Nibs
Ranger Distress Inks
Ranger Black Archival Ink
Ranger Perfect Medium Brush
Ranger Gold Embossing Powder
Perma Tec Glue Glider
Marianne Design "Sleigh" (LR0 178)
Memory Box "Leaping Deer" ( 98390)
Cheery Lynn "Merry Christmas Set" (B186)

738698

Wednesday, September 5, 2012

Birds in Winter


I have some new bird stamps that I wanted to put in a pretty winter scene window.  They are the Impression Obsession (C8589) birds and the pretty window is the Heartfelt Creations die cut (HCD710).  I used a new Spellbinders "M-Bossabilities"  embossing folder from Joan's Gardens.   It is hard to see in this picture but the embossed area is a snowy outdoors scene with a large bow on the lower right hand side.  The area that I colored yellow is not embossed so you can stamp or add die cuts as I did.  The pretty Heartfelt Creations Window fit perfectly over this area not embossed.  I used a few Martha Stewart "branches" along the window pane and attached the birds with dimensional dots over the greenery. 

Do you recognize that tree?  That is the beautiful new Marianne Design tree that I used last week.  I did not want it as large as it die cut, so I used deckle scissors and cut part of the bottom off to make it shorter. This tree is about 6" tall with beautiful embossed snowy branches, but what I love is that you can cut off any portion that is too large for your card/project.  Before taking the tree out of the die, I used the Ranger "Perfect Medium" brush down in all the open areas on the front of the die, took the tree out of the die, then sprinkled on white embossing powder to make the green tree become snowy.  I used some Flower Soft "Polar White" on the branches around the birds then added some over the white embossed areas on the tree.  I don't think this looks as pretty in the picture as it does in real life.  I used a  Diamond Stickles around the edges of the embossed bow below the window.  On the top,  I used the new Cheery Lynn "Holly Corners".  Some red beads were glued to the berries.  

 Joan's Gardens has lots of new products on her blog plus all the products I used on this card: 
Heartfelt Creations Window Die (HCD710)
Impression Obsession Birds (C8589)
Marianne Design Tree (CR1224)
Cheery Lynn Holly Corner (B184)  There is one die - I turned it over for the other side.
Spellbinders M-Bossabilities (EL-013)
Ranger Perfect Medium Brush
Ranger White Embossing Powder
Polar White Flower Soft

737940  

Monday, September 3, 2012

Autumn Flowers


Hope you are enjoying your Labor Day Weekend.  Today I designed a card using the Cheery Lynn Build A Flower #2 dies.  I thought I would answer some of your questions on my blog, which I will do after telling you about this card.  The background paper is from a scrap I had in a box.  The beautiful doily is the new Marianne Design "Anja's Large Oval".  The sentiment and bird are from JustRite stamp sets; Always & Forever Medallion Labels and Spring Rose Medallions.  The large leaf is Memory Box "Cottage Leaf" and the smaller leaves are the Cheery Lynn "Olive Branches".  The flowers were created with the Build A Flower #2 dies. 

This is a picture of the pieces used for the flowers.  The glue I usually use to put my flowers together with is "Crafter's Pick - The Ultimate!" glue.  I put a dab of it on my Teflon craft sheet and dip the tips of the petals in it to attach to the flower base.  I have been asked if you really need the Flower Tool Kit.  In my opinion I couldn't do without it.  There are three pieces I use every single day; they are the self-closing tweezers, the largest stylus, and the white flower shaping tool.  That white tool is always used because it conditions the paper really easy with the large ball end; I use the pointed tip to press the petals down into the center of the base to help shape it; you can curl the petals with that pointed end; and I shape flowers around the center of this tool  when I want that "crinkled" look for the petals. There are a lot of other pieces I use in this kit, but these are the "MUST" haves. This kit is well worth the money! The other important thing for me is to have a good (black) shaping mat and a Teflon Craft Sheet.  When you use the Teflon Craft Sheet, the glue does not stick and your flower will pull right off.    When you have all the right tools, it really helps you make beautiful flowers.  

The picture above shows all the die cut pieces I used for the flowers on my card.  I used Brushed Corduroy Distress Ink on the ends of the petals. The petals I used are the smallest petals in the set - not the ones with the deckled edges.  You can sponge the petals in the die and the lines in the die will show up.   After I put them together, I felt like I needed to add a little Walnut Stain Distress Ink on the very edge so they matched the brown behind the Marianne Doily; I used a small sponge dauber to do that.  As you can see in the top of the picture, I used the four point base from the Cheery Lynn Build A Flower #2 Embellishments  and created two layers, each with four petals, for the flower.  Three pieces from the stamens in this set were used for each flower.

Well I'm off to go shopping with my daughter and then have lunch.  Have a great day.


Cheery Lynn Build A Flower #2
Cheery Lynn Build A Flower #2 Embellishments
Marianne Design "Anja's Large Oval" (LR0236)
Flower Tool Kit
Black Embossing Mat
Teflon Craft Sheet
JustRite "Always & Forever Medallion Labels" (LR0-03535)
JustRite "Spring Rose Medallions" (CL-03685)

736423

Saturday, September 1, 2012

Pink Roses


I can't believe the weekend is already here!   I was out trimming some of my rose bushes and when I came in decided to make a card with roses.  I used the Cheery Lynn Build A Flower #2 dies.

I love the elegance a white embossed background gives, so I used one of my Marianne Design embossing folders.  This embossing folder also cuts out openings, so I attached it to a piece of pink card stock.  Before doing that though, I decided to add a dainty border along both sides.  I used the Cheery Lynn "Daisy Lace Bracelet" border.  I added adhesive down the side and only left about half the the border sticking out, which gives a whole different look to this border.  The rose was created with the dies from Build A Flower #2. The petals were die cut using white card stock and sponged with "Spun Sugar" Distress Ink. The baby's breath is from the Build A Flower #2 Embellishment die set.  A pretty silk bow was added.  I use the Bow Easy template to create my bows.  When you use the Bow Easy, your bows always turn out perfect.  

I hope you are having a fabulous weekend.  Thanks for stopping by.


Cheery Lynn "Build A Flower #2"
Cheery Lynn "Build A Flower #2 Embellishments"
Cheery Lynn "Daisy Lace Bracelet" (DL135)
Marianne Design (DS0914) embossing folder
"Spun Sugar" Distress Ink
Bow Easy
Silk Ribbon

734900

Thursday, August 30, 2012

Joan's Gardens Weekly Challenge


This week at Joan's Gardens we have something different for the challenge.  It is about time to start thinking about cards for Halloween so we thought you would have fun creating a cute card for someone special, using a Jack-o-Lantern as the main theme.  Be sure to go over to Joan's Gardens to read all the details about the challenge.  We look forward to seeing your beautiful cards. 

I always have a lot of fun creating a scene with die cuts.  First I will tell you about the products used on this card then I will give you a tutorial below on how I die cut and colored the pumpkin.

I used the Memory Box Great Pumpkin Stamp and die for the Jack-o-Lantern.  The face is also a Memory Box die called "Perky Pumpkin Face".  The other Memory Box dies I used are the:  Swooping Bats; Ghost Trio; and Estate Fence.  I die cut the ghosts and added a small piece of black card stock behind the faces to make the eyes and mouth dark.  They were attached with dimensional dots.  The bats were also attached with dimensional dots.  The tree is the new Cheery Lynn "Spooky Fence".  Perfect for a Halloween card, don't you think!   The design paper I used is from the Graphic 45 "Happy Haunting".  It has little spiders all over it.  I sponged on "Rusty Hinge" Distress Ink around the edges.  To ground the pumpkin, I add two rows of the Cheery Lynn "Grass Border".  I thought this card needed a few little flowers so pulled some completed flowers out of my "flower box".  Okay now for the tutorial. 

TUTORIAL FOR GREAT PUMPKIN
This is a picture of the Memory Box Great Pumpkin stamp and die.

To start, you need to die cut the pumpkin and save the out side piece as a template.  Stamp the pumpkin on card stock.  I used "Rusty Hinge" Distress Ink to stamp the pumpkin on Glossy Card Stock.  I used the LaBlanche Specialty Stamping Paper.  

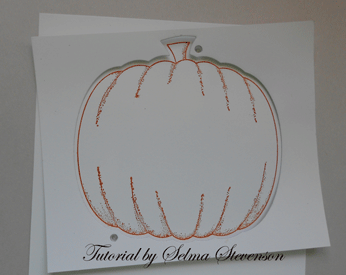
Next you need to line the template up around the stamped image.  There are two little holes, one on top and one on bottom, of the template.  Use a pencil to fill in these little holes once your template is centered around the image.

Now you can place the die over the stamped image and match up the filled in circles with the holes in the die.  This will give you a perfectly cut out image.

This is how your die cut image will look.

I thought I would show you the way I colored my pumpkin.  I stared by sponging on "Squeezed Lemonade" Distress Ink, adding only to the center. 

 Next I sponged on "Wild Honey" Distress Ink, leaving the center yellow.

To add an orange color, I sponged on "Rusty Hinge" Distress Ink, again leaving some of the lighter color in the center.

To give it an even darker pumpkin color, I sponged "Aged Mahogany" Distress Ink around the edges.  You can then go over it again blending in all the colors with the lighter inks.  I wanted to have a speckled look to my pumpkin so I spritzed it with a light spray of water.  You have to let it sit for a couple of minutes to see the "speckles" so don't add too much.  You can always add more water if you need to.  After it dried, I went back over it with the "Rusty Hinge" ink to darken it up.  I like the texture this gave the pumpkin.

All these products can be purchased from Joan's Gardens:
Memory Box "Great Pumpkin" stamp (G1882)
Memory Box "Great Pumpkin" die (98423)
Memory Box "Swooping Bats (set of 3)  (98409)
Memory Box "Ghost Trio" (98376)
Memory Box "Estate Fence (98285)
Cheery Lynn "Spooky Tree" (B191)
Cheery Lynn "Grass Border" (B126)
Graphic 45 "Happy Haunting" Paper Pad
Distress Inks:  Aged Mahogany, Rusty Hinge, Wild Honey, Squeezed Lemonade

7327969

Wednesday, August 29, 2012

Pretty Marianne Design Doily


 Today I have designed a card using some of my favorite dies.   I love this beautiful doily die set from Marianne Design.  Joan (Joan's Gardens) used this doily  in the workshop this past weekend.  Isn't it beautiful.  There are so many things you can do with it. 

  I die cut the two top pieces, using white card stock and the backing piece in dark purple.  I embossed the center piece using the Swiss Dots embossing folder then attached it to a piece of purple card stock.  Scissors were used to trim around this piece to give it a small purple border.  If you use a pair of large scissors it is really easy to cut nice even lines around it.  This piece was attached with dimensional dots.   

Memory Box "Flutter Vine"  (98334)

This is the vine I used for the flowers I used from the Cheery Lynn "Build A Flower #2 Embellishment" die set.  Doesn't it make a perfect stem for these little flowers.  The corners are from the  Cheery Lynn Lace Corners ( B165). A pretty double purple silk bow was added to complete this card.

Tomorrow morning we will have a new fun challenge for you.  Hope you stop by to see what it is.

Monday, August 27, 2012

Joan's Gardens Workshop Projects


Today Joan and I are showing you the projects that were created in her workshops this past weekend. For those of you who don't know, Joan offers about four workshops a year and there is no charge for attending.  She always wants to have projects that everyone will be proud to create and enjoy learning many new techniques while creating them.  I love working with her coming up with ideas for very creative projects.  This year we had most of our projects pretty well planned before going to CHA but did get ideas from the Graphic 45 booth.  We used the design paper from the Graphic 45 "A Ladies Diary" 12" x 12" paper pad on two of the projects.  

The project above is an easel card.  We used mat board for the backing and layered it with different pages from the design paper pad.  The flower was created with the new Cheery Lynn Build A Flower #2. 

We used the Tim Holtz  Sizzix "Small Easel" for the back.  When die cutting this easel, you should use the "Premium Crease Pad" so the score cuts don't go all the way through the board.  
The next project was a card using the new Marianne Design (LR0236) doily.  As soon as we saw this gorgeous die, Joan and I knew we wanted to use it for a workshop project.  Again, my card is different from the one taught in the workshop but will give you another idea.  When at CHA, we saw the 6x6 Template, by the Crafters Workshop, that we used for the background on this card.  There are other templates but this one has "writing" on it.  We used a paste called "Liquitex Light Modeling Paste".  You press the modeling paste over the stencil and have to let it dry.  So fun because it give some dimension to the background.  I used Distress Ink to add color.  I will do a tutorial later on how to do this.  

I am adding this closeup so you can see this beautiful (LR0236) doily by Marianne Design.  There are four pieces in this die:  The pretty die cut doily, a backing die cut so you can add a different color behind it, the small shape you see behind the lady, and also a flourish.  I'm sure you will want to add this gorgeous die set to your collection.

This is the tea box they created in the workshop.  I worked on the template and created the box while at Joan's house, but did not have the paper to recreate it after I came home. I was gone on vacation so this is the box Joan designed using that template. Stamps from Heartfelt Creations were used for the front of the box and the flower on top was created with "Clearly for Art" Modeling Film.

I did visit the workshops via Skype and I think they all had lots of fun creating these projects. 


Saturday, August 25, 2012

Cheery Lynn Sentiments


Have you seen the new Cheery Lynn die cut sentiments now available from Joan's Gardens?  There are four new sentiments in the last release.  They are nice and large and look beautiful on the outside or inside of your card.  Today I used the Happy Birthday sentiment and wanted to let you know that the "package" in the upper right corner is actually attached to the bottom of the Happy Birthday.  I just trimmed it off so I could place it above the sentiment because I wanted to add the flower below the sentiment.  The pretty bow corner is one of the new Memory Box dies.  


To create the flower, I used the Cheery Lynn Build A Flower #2. There are many different types of Begonias and this is one I like.  I created four separate rows of petals -- two rows using the large 5-point base and two rows using the small 5-point base. Each petal was shaped over the white Flower Tool by lightly misting them with water then pinching the petals between my fingers to cause "wrinkles" in them. Most all the petals are shaped so they turn down. The center of the flower was created using the smallest flower petals and rolling them around the self-closing tweezers.
  

This is a close up of my flower.  Remember, there is never a right or wrong when you make your flowers -- that is what is so fun about creating your own flowers using dies and card stock.  You don't even have to shape your flowers, but I always love to see if I can make them look realistic.  I hope this flower gives you another idea on how to use your Build A Flower #2 dies. 

I checked in with Joan and everyone at the workshop again today.  It looked like they were all having a lot of fun!  Everyone yesterday said they loved all the projects.  

All these products can be purchased from Joan's Gardens:
Cheery Lynn Build A Flower #2
Cheery Lynn Build A Flower #2 Embellishments (not used on this card)
Cheery Lynn "Happy Birthday" Sentiment (B211)
Memory Box "Corner Bow" (98371)
Flower Tool Kit

Thursday, August 23, 2012

More new Cheery Lynn Dies


I just received the new Cheery Lynn dies and didn't know where to start because they are all so pretty.    I love butterflies.  I probably should have only used one on this card, but couldn't make up my mind which butterfly corner to use, so used them both.  Notice how the flourish goes out differently on the two corners so you can use them the way I did.   One die is called "Butterfly In" and the other is called "Butterfly Out".  

Something else I just received is my new "eBosser" embossing machine.  This machine is fabulous.  It holds an 8 1/2" x 11" piece of card stock; it will not accept a "sandwich" if it is too thick - therefore you can't jam it; and to start it you just give it a gentle push, let go and it goes through the machine then stops without the plates falling down.  I Love It.  It is large enough that you can put a lot of different dies on it to reduce the number of times you are die cutting.  I don't have any of the eBosser embossing plates yet, but I did emboss the front of this card in the eBosser using one of the Sizzix  embossing folders.  I had to run it through twice to cover the entire front of this 6" x 5.5" card.  The eBosser embossing plates are much larger and would have covered the entire front of this card.  I believe most of the embossing plates are 8 1/2 x 11", but I'm not sure.   I have back and shoulder problems and I love how easy this machine is to operate.   

The flower was created using the new Cheery Lynn "Build A Flower #2" dies.  I used three rows of the largest flower petal.  Each petal was sponged on the edges with "Wild Honey" Distress Ink.  The stamens are from the Build A Flower #2 "Embellishments" set.   I cut apart one of the Cheery Lynn "Mini Flourish One" die cuts and placed them on each side of the flower.  The doily under the flower is the Memory Box "Quinn Flourish".

Well tomorrow starts the exciting weekend at Joan's Gardens.  She will be hosting a workshop Friday, Saturday and Sunday.  We have come up with some beautiful projects and Joan will be teaching a lot of new techniques.  I wish I could be there -- I will be visiting on Skype but I know it would be more fun to be there.  We will show you these projects next week.  

eBosser
Cheery Lynn "Butterfly In" (B205)
Cheery Lynn "Butterfly Out" (B204)
Cheery Lynn "Mini Flourish One" (B170)
Cheery Lynn "Build A Flower #2"
Cheery Lynn "Build A Flower #2 Embellishments"
Memory Box "Quinn Flourish" (98267)
Sizzix "Corners & bLattice Set" (656979)
Distress Ink "Wild Honey"
Card stock from Joan's Gardens

Wednesday, August 22, 2012

Joan's Gardens Weekly Challenge


It is time for a new challenge at Joan's Garden.. This week the challenge is to create a card with:
  • Framed lattice background
  • Any type of flowers
  • A bird
  • A vertical greeting

 I used some new dies from both Cheery Lynn and Memory Box to create this card.  The flowers are Petunias created with the new Build A Flower #2 set.  I shaped 5 of the large flower petals and glued them on the large 5-point flower base.  I used two different stamens from the BAF #2 Embellishment die cut set for the center of the flowers.  The small leaves are from the Cheery Lynn "Flourish Leaf Strip".  The pretty little vine is one of the new Memory Box vines called "Flutter Vine".  It makes a pretty filler behind your flowers.  

For the frame I die cut the Cherry Lynn "Lattice #2" and framed it with the Cheery Lynn "Victoria Garden Doily Frame".   The design paper is from the new Memory Box "Viola" paper pack.  The hummingbird is new from Cheery Lynn; it is so realistic because the wing and tail actually have feathers cut in them.  You can even pull the wing out a little to make it dimensional.  This is the most realistic die cut hummingbird I have ever seen.  I sometimes need sentiments that are vertical so I am loving using the new Memory Box Alphabet dies.  Joan has three different alphabets you can choose from.  

I hope you will join us this week in our challenge. 

Cheery Lynn Lattice #2 (FRM115)
Cheery Lynn Victoria Garden Doily Frame (FRM128)
Cheery Lynn Build A Flower #2 (B187)
Cheery Lynn Build A Flower Embellishments #2 (B188)
Cheery Lynn Hummingbird (B193)
Cheery Lynn Flourish Leaf Strip (B178)
Memory Box "Flutter Vine" (98334)
Memory Box Classic Upper Alphabet Set (98361)
Memory Box Classic Lower Alphabet Set (98360)
Memory Box "Viola" Design Paper Pack


Monday, August 20, 2012

Build A Flower Baby's Breath


I caught a nasty cold since coming home from our trip.  Seems this is so easy to do when you fly - at least it happened after we got home!  I know you are anxious to see more of the Build A Flower #2 components so this is the card I created for you today. 

Other flowers you can create with the new Cheery Lynn dies are roses, rosebuds, and baby's breath.  The largest flower petals on the Build A Flower "B187" die were used for the rose and the largest 5-point flower base from "B188" Embellishment die.  The rose was made by creating  5 separate layers, then they were all stacked. Once the rose was completed, I sprayed it with Perfect Pearls Mist "Pink Gumball" to give it a shimmer.  I used red card stock but love how the pink Perfect Pearls show up on the red.    I prepared a  tutorial on how to build a rose in a previous blog post so to keep this post short, I didn't do another one.  I used punches in my old tutorials but the same steps are taken using the die cut petals.  The rosebuds were made by using one of the elongated petals, and 5 or 6 small flower petals from the "B187" BAF plate.  The number of petals you use will depend on how large you want your rosebud. This set also contains the rose stem and rose leaves.   Below I will show you how I created the baby's breath.  The doily used for the rose is one of the Spellbinders "Romantic Rectangles".  The beautiful sentiment is from the new JustRite "Just The Right Words" design by Becca.  There are many, many beautiful sentiments in this set. 

 I like to die cut my baby's breath stem using white card stock then lightly sponge it with "Scattered Straw" Distress Ink.  

 In this picture I have die cut two stems and die cut the little flowers four times.  You can add as many of the little flowers to the stem as you like.  I like to add a lot so that is why I die cut it twice for each stem.  You will need tweezers and glue.  I like to use the self-closing tweezers from the Flower Tool Kit and "Glue N' Seal" for the adhesive.  To make your little flowers realistic, be sure to push down on the shaping mat,in the very center of each flower, with a small stylus. This will "cup" each flower.  When you put these little flowers on the mat to shape, don't worry about which side is up - it won't make a difference.

It isn't necessary, but I like to brush the Glue n' Seal over the branch, then I also put a little amount on my Teflon Craft Mat.  After brushing the glue over the stem, I pick up a little flower with the tweezers, then dip the back of it into the glue on the mat, then place it on the stem.  I usually press it down with a very small stylus to be sure it sticks.  You can just add a little glue to the back of the flower and not put glue over the entire stem, but I feel I get a better "connection" when they are double glued.  I work on the Teflon Craft Sheet and let the stem dry before pulling it up.  Once dry, it will pull right off.

Here you can see how I start adding the flowers to the stem.

In this picture you can see I brushed glue over the stem, and you can see the little dab of glue on the right side I dip each flower into before adding it to the stem.  You can add as many flowers as you want, depending on how full you want your baby's breath.  I like to fill the stem, then go back and add more to fill in any open spaces.  Each sprig will turn out a little different depending on the placement of the flowers.  This is great because you don't want them all to be identical. 

 Here is a closeup of the baby's breath on this card.  I am very excited about this part of the new Build A Flower #2 dies because I have always wanted this extra filler, especially when I create cards with roses.  I hope you like it as much as I do!

Cheery Lynn "Build A Flower #2" (B187)
Cheery Lynn "Build A Flower #2 embellishments (B188)
JustRite "Just the Right Words" sentiments stamp set (AG04015)
Spellbinders "Romantic Rectangles (S5-090)
Perfect Pearls Mist "Pink Gumball"
Distress Ink "Scattered Straw"
Glue N' Seal adhesive (the small bottle has a brush on the lid)
Flower Tool Kit
Teflon Craft Mat

LinkWithin

Related Posts with Thumbnails