Pages

Thursday, August 30, 2012

Joan's Gardens Weekly Challenge


This week at Joan's Gardens we have something different for the challenge.  It is about time to start thinking about cards for Halloween so we thought you would have fun creating a cute card for someone special, using a Jack-o-Lantern as the main theme.  Be sure to go over to Joan's Gardens to read all the details about the challenge.  We look forward to seeing your beautiful cards. 

I always have a lot of fun creating a scene with die cuts.  First I will tell you about the products used on this card then I will give you a tutorial below on how I die cut and colored the pumpkin.

I used the Memory Box Great Pumpkin Stamp and die for the Jack-o-Lantern.  The face is also a Memory Box die called "Perky Pumpkin Face".  The other Memory Box dies I used are the:  Swooping Bats; Ghost Trio; and Estate Fence.  I die cut the ghosts and added a small piece of black card stock behind the faces to make the eyes and mouth dark.  They were attached with dimensional dots.  The bats were also attached with dimensional dots.  The tree is the new Cheery Lynn "Spooky Fence".  Perfect for a Halloween card, don't you think!   The design paper I used is from the Graphic 45 "Happy Haunting".  It has little spiders all over it.  I sponged on "Rusty Hinge" Distress Ink around the edges.  To ground the pumpkin, I add two rows of the Cheery Lynn "Grass Border".  I thought this card needed a few little flowers so pulled some completed flowers out of my "flower box".  Okay now for the tutorial. 

TUTORIAL FOR GREAT PUMPKIN
This is a picture of the Memory Box Great Pumpkin stamp and die.

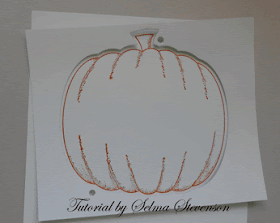
To start, you need to die cut the pumpkin and save the out side piece as a template.  Stamp the pumpkin on card stock.  I used "Rusty Hinge" Distress Ink to stamp the pumpkin on Glossy Card Stock.  I used the LaBlanche Specialty Stamping Paper.  

Next you need to line the template up around the stamped image.  There are two little holes, one on top and one on bottom, of the template.  Use a pencil to fill in these little holes once your template is centered around the image.

Now you can place the die over the stamped image and match up the filled in circles with the holes in the die.  This will give you a perfectly cut out image.

This is how your die cut image will look.

I thought I would show you the way I colored my pumpkin.  I stared by sponging on "Squeezed Lemonade" Distress Ink, adding only to the center. 

 Next I sponged on "Wild Honey" Distress Ink, leaving the center yellow.

To add an orange color, I sponged on "Rusty Hinge" Distress Ink, again leaving some of the lighter color in the center.

To give it an even darker pumpkin color, I sponged "Aged Mahogany" Distress Ink around the edges.  You can then go over it again blending in all the colors with the lighter inks.  I wanted to have a speckled look to my pumpkin so I spritzed it with a light spray of water.  You have to let it sit for a couple of minutes to see the "speckles" so don't add too much.  You can always add more water if you need to.  After it dried, I went back over it with the "Rusty Hinge" ink to darken it up.  I like the texture this gave the pumpkin.

All these products can be purchased from Joan's Gardens:
Memory Box "Great Pumpkin" stamp (G1882)
Memory Box "Great Pumpkin" die (98423)
Memory Box "Swooping Bats (set of 3)  (98409)
Memory Box "Ghost Trio" (98376)
Memory Box "Estate Fence (98285)
Cheery Lynn "Spooky Tree" (B191)
Cheery Lynn "Grass Border" (B126)
Graphic 45 "Happy Haunting" Paper Pad
Distress Inks:  Aged Mahogany, Rusty Hinge, Wild Honey, Squeezed Lemonade

7327969

Wednesday, August 29, 2012

Pretty Marianne Design Doily


 Today I have designed a card using some of my favorite dies.   I love this beautiful doily die set from Marianne Design.  Joan (Joan's Gardens) used this doily  in the workshop this past weekend.  Isn't it beautiful.  There are so many things you can do with it. 

  I die cut the two top pieces, using white card stock and the backing piece in dark purple.  I embossed the center piece using the Swiss Dots embossing folder then attached it to a piece of purple card stock.  Scissors were used to trim around this piece to give it a small purple border.  If you use a pair of large scissors it is really easy to cut nice even lines around it.  This piece was attached with dimensional dots.   

Memory Box "Flutter Vine"  (98334)

This is the vine I used for the flowers I used from the Cheery Lynn "Build A Flower #2 Embellishment" die set.  Doesn't it make a perfect stem for these little flowers.  The corners are from the  Cheery Lynn Lace Corners ( B165). A pretty double purple silk bow was added to complete this card.

Tomorrow morning we will have a new fun challenge for you.  Hope you stop by to see what it is.

Monday, August 27, 2012

Joan's Gardens Workshop Projects


Today Joan and I are showing you the projects that were created in her workshops this past weekend. For those of you who don't know, Joan offers about four workshops a year and there is no charge for attending.  She always wants to have projects that everyone will be proud to create and enjoy learning many new techniques while creating them.  I love working with her coming up with ideas for very creative projects.  This year we had most of our projects pretty well planned before going to CHA but did get ideas from the Graphic 45 booth.  We used the design paper from the Graphic 45 "A Ladies Diary" 12" x 12" paper pad on two of the projects.  

The project above is an easel card.  We used mat board for the backing and layered it with different pages from the design paper pad.  The flower was created with the new Cheery Lynn Build A Flower #2. 

We used the Tim Holtz  Sizzix "Small Easel" for the back.  When die cutting this easel, you should use the "Premium Crease Pad" so the score cuts don't go all the way through the board.  
The next project was a card using the new Marianne Design (LR0236) doily.  As soon as we saw this gorgeous die, Joan and I knew we wanted to use it for a workshop project.  Again, my card is different from the one taught in the workshop but will give you another idea.  When at CHA, we saw the 6x6 Template, by the Crafters Workshop, that we used for the background on this card.  There are other templates but this one has "writing" on it.  We used a paste called "Liquitex Light Modeling Paste".  You press the modeling paste over the stencil and have to let it dry.  So fun because it give some dimension to the background.  I used Distress Ink to add color.  I will do a tutorial later on how to do this.  

I am adding this closeup so you can see this beautiful (LR0236) doily by Marianne Design.  There are four pieces in this die:  The pretty die cut doily, a backing die cut so you can add a different color behind it, the small shape you see behind the lady, and also a flourish.  I'm sure you will want to add this gorgeous die set to your collection.

This is the tea box they created in the workshop.  I worked on the template and created the box while at Joan's house, but did not have the paper to recreate it after I came home. I was gone on vacation so this is the box Joan designed using that template. Stamps from Heartfelt Creations were used for the front of the box and the flower on top was created with "Clearly for Art" Modeling Film.

I did visit the workshops via Skype and I think they all had lots of fun creating these projects. 


Saturday, August 25, 2012

Cheery Lynn Sentiments


Have you seen the new Cheery Lynn die cut sentiments now available from Joan's Gardens?  There are four new sentiments in the last release.  They are nice and large and look beautiful on the outside or inside of your card.  Today I used the Happy Birthday sentiment and wanted to let you know that the "package" in the upper right corner is actually attached to the bottom of the Happy Birthday.  I just trimmed it off so I could place it above the sentiment because I wanted to add the flower below the sentiment.  The pretty bow corner is one of the new Memory Box dies.  


To create the flower, I used the Cheery Lynn Build A Flower #2. There are many different types of Begonias and this is one I like.  I created four separate rows of petals -- two rows using the large 5-point base and two rows using the small 5-point base. Each petal was shaped over the white Flower Tool by lightly misting them with water then pinching the petals between my fingers to cause "wrinkles" in them. Most all the petals are shaped so they turn down. The center of the flower was created using the smallest flower petals and rolling them around the self-closing tweezers.
  

This is a close up of my flower.  Remember, there is never a right or wrong when you make your flowers -- that is what is so fun about creating your own flowers using dies and card stock.  You don't even have to shape your flowers, but I always love to see if I can make them look realistic.  I hope this flower gives you another idea on how to use your Build A Flower #2 dies. 

I checked in with Joan and everyone at the workshop again today.  It looked like they were all having a lot of fun!  Everyone yesterday said they loved all the projects.  

All these products can be purchased from Joan's Gardens:
Cheery Lynn Build A Flower #2
Cheery Lynn Build A Flower #2 Embellishments (not used on this card)
Cheery Lynn "Happy Birthday" Sentiment (B211)
Memory Box "Corner Bow" (98371)
Flower Tool Kit

Thursday, August 23, 2012

More new Cheery Lynn Dies


I just received the new Cheery Lynn dies and didn't know where to start because they are all so pretty.    I love butterflies.  I probably should have only used one on this card, but couldn't make up my mind which butterfly corner to use, so used them both.  Notice how the flourish goes out differently on the two corners so you can use them the way I did.   One die is called "Butterfly In" and the other is called "Butterfly Out".  

Something else I just received is my new "eBosser" embossing machine.  This machine is fabulous.  It holds an 8 1/2" x 11" piece of card stock; it will not accept a "sandwich" if it is too thick - therefore you can't jam it; and to start it you just give it a gentle push, let go and it goes through the machine then stops without the plates falling down.  I Love It.  It is large enough that you can put a lot of different dies on it to reduce the number of times you are die cutting.  I don't have any of the eBosser embossing plates yet, but I did emboss the front of this card in the eBosser using one of the Sizzix  embossing folders.  I had to run it through twice to cover the entire front of this 6" x 5.5" card.  The eBosser embossing plates are much larger and would have covered the entire front of this card.  I believe most of the embossing plates are 8 1/2 x 11", but I'm not sure.   I have back and shoulder problems and I love how easy this machine is to operate.   

The flower was created using the new Cheery Lynn "Build A Flower #2" dies.  I used three rows of the largest flower petal.  Each petal was sponged on the edges with "Wild Honey" Distress Ink.  The stamens are from the Build A Flower #2 "Embellishments" set.   I cut apart one of the Cheery Lynn "Mini Flourish One" die cuts and placed them on each side of the flower.  The doily under the flower is the Memory Box "Quinn Flourish".

Well tomorrow starts the exciting weekend at Joan's Gardens.  She will be hosting a workshop Friday, Saturday and Sunday.  We have come up with some beautiful projects and Joan will be teaching a lot of new techniques.  I wish I could be there -- I will be visiting on Skype but I know it would be more fun to be there.  We will show you these projects next week.  

eBosser
Cheery Lynn "Butterfly In" (B205)
Cheery Lynn "Butterfly Out" (B204)
Cheery Lynn "Mini Flourish One" (B170)
Cheery Lynn "Build A Flower #2"
Cheery Lynn "Build A Flower #2 Embellishments"
Memory Box "Quinn Flourish" (98267)
Sizzix "Corners & bLattice Set" (656979)
Distress Ink "Wild Honey"
Card stock from Joan's Gardens

Wednesday, August 22, 2012

Joan's Gardens Weekly Challenge


It is time for a new challenge at Joan's Garden.. This week the challenge is to create a card with:
  • Framed lattice background
  • Any type of flowers
  • A bird
  • A vertical greeting

 I used some new dies from both Cheery Lynn and Memory Box to create this card.  The flowers are Petunias created with the new Build A Flower #2 set.  I shaped 5 of the large flower petals and glued them on the large 5-point flower base.  I used two different stamens from the BAF #2 Embellishment die cut set for the center of the flowers.  The small leaves are from the Cheery Lynn "Flourish Leaf Strip".  The pretty little vine is one of the new Memory Box vines called "Flutter Vine".  It makes a pretty filler behind your flowers.  

For the frame I die cut the Cherry Lynn "Lattice #2" and framed it with the Cheery Lynn "Victoria Garden Doily Frame".   The design paper is from the new Memory Box "Viola" paper pack.  The hummingbird is new from Cheery Lynn; it is so realistic because the wing and tail actually have feathers cut in them.  You can even pull the wing out a little to make it dimensional.  This is the most realistic die cut hummingbird I have ever seen.  I sometimes need sentiments that are vertical so I am loving using the new Memory Box Alphabet dies.  Joan has three different alphabets you can choose from.  

I hope you will join us this week in our challenge. 

Cheery Lynn Lattice #2 (FRM115)
Cheery Lynn Victoria Garden Doily Frame (FRM128)
Cheery Lynn Build A Flower #2 (B187)
Cheery Lynn Build A Flower Embellishments #2 (B188)
Cheery Lynn Hummingbird (B193)
Cheery Lynn Flourish Leaf Strip (B178)
Memory Box "Flutter Vine" (98334)
Memory Box Classic Upper Alphabet Set (98361)
Memory Box Classic Lower Alphabet Set (98360)
Memory Box "Viola" Design Paper Pack


Monday, August 20, 2012

Build A Flower Baby's Breath


I caught a nasty cold since coming home from our trip.  Seems this is so easy to do when you fly - at least it happened after we got home!  I know you are anxious to see more of the Build A Flower #2 components so this is the card I created for you today. 

Other flowers you can create with the new Cheery Lynn dies are roses, rosebuds, and baby's breath.  The largest flower petals on the Build A Flower "B187" die were used for the rose and the largest 5-point flower base from "B188" Embellishment die.  The rose was made by creating  5 separate layers, then they were all stacked. Once the rose was completed, I sprayed it with Perfect Pearls Mist "Pink Gumball" to give it a shimmer.  I used red card stock but love how the pink Perfect Pearls show up on the red.    I prepared a  tutorial on how to build a rose in a previous blog post so to keep this post short, I didn't do another one.  I used punches in my old tutorials but the same steps are taken using the die cut petals.  The rosebuds were made by using one of the elongated petals, and 5 or 6 small flower petals from the "B187" BAF plate.  The number of petals you use will depend on how large you want your rosebud. This set also contains the rose stem and rose leaves.   Below I will show you how I created the baby's breath.  The doily used for the rose is one of the Spellbinders "Romantic Rectangles".  The beautiful sentiment is from the new JustRite "Just The Right Words" design by Becca.  There are many, many beautiful sentiments in this set. 

 I like to die cut my baby's breath stem using white card stock then lightly sponge it with "Scattered Straw" Distress Ink.  

 In this picture I have die cut two stems and die cut the little flowers four times.  You can add as many of the little flowers to the stem as you like.  I like to add a lot so that is why I die cut it twice for each stem.  You will need tweezers and glue.  I like to use the self-closing tweezers from the Flower Tool Kit and "Glue N' Seal" for the adhesive.  To make your little flowers realistic, be sure to push down on the shaping mat,in the very center of each flower, with a small stylus. This will "cup" each flower.  When you put these little flowers on the mat to shape, don't worry about which side is up - it won't make a difference.

It isn't necessary, but I like to brush the Glue n' Seal over the branch, then I also put a little amount on my Teflon Craft Mat.  After brushing the glue over the stem, I pick up a little flower with the tweezers, then dip the back of it into the glue on the mat, then place it on the stem.  I usually press it down with a very small stylus to be sure it sticks.  You can just add a little glue to the back of the flower and not put glue over the entire stem, but I feel I get a better "connection" when they are double glued.  I work on the Teflon Craft Sheet and let the stem dry before pulling it up.  Once dry, it will pull right off.

Here you can see how I start adding the flowers to the stem.

In this picture you can see I brushed glue over the stem, and you can see the little dab of glue on the right side I dip each flower into before adding it to the stem.  You can add as many flowers as you want, depending on how full you want your baby's breath.  I like to fill the stem, then go back and add more to fill in any open spaces.  Each sprig will turn out a little different depending on the placement of the flowers.  This is great because you don't want them all to be identical. 

 Here is a closeup of the baby's breath on this card.  I am very excited about this part of the new Build A Flower #2 dies because I have always wanted this extra filler, especially when I create cards with roses.  I hope you like it as much as I do!

Cheery Lynn "Build A Flower #2" (B187)
Cheery Lynn "Build A Flower #2 embellishments (B188)
JustRite "Just the Right Words" sentiments stamp set (AG04015)
Spellbinders "Romantic Rectangles (S5-090)
Perfect Pearls Mist "Pink Gumball"
Distress Ink "Scattered Straw"
Glue N' Seal adhesive (the small bottle has a brush on the lid)
Flower Tool Kit
Teflon Craft Mat

Saturday, August 18, 2012

Joan's Weekly Challenge


This is my card for the challenge at Joan's Gardens that should have posted last Thursday.

It's time for a new Challenge at Joan's Gardens.  Are you ready to think snow???   We thought we would get you started working on your Christmas cards early.  Please go over to Joan's Gardens to see all the rules about this week's challenge.

For my card I started with a background that was embossed with the Swiss Dots embossing folder to resemble snow.  I love the new Marianne Design Tree.  It is large and has lots of embossed areas to give it lots of dimension.  I used a light green Distress Ink around the edges of it to help make it stand out a little on this all white card.  It was attached with dimensional dots.  The sleigh and reindeer are also from Marianne Design.  I used some gray ink to sponge around the outside edges of the sleigh and brown ink around the reindeer.  Before attaching the sleigh and deer, I cut several pieces of card stock to use along the bottom of the card to look like snow on the ground.  The snowflake is also from Marianne design.  Diamond Glitter was added to give the card lots of sparkle.  The frame around the card was punched using the Martha Stewart "Aspen Snowflake" border/corner punches.  

I hope you will join us this week in our challenge.  Be sure to go over to Joan's Gardens to check out all the challenge rules and see what the prize for this week will be.  

All the products used on this card can be purchased from Joan's Gardens:
Marianne Design "Tree" (CR1224)
Marianne Design "Sleigh" (LR0178)
Marianne Design "Reindeer" (LR0179)
Marianne Design "Snowflake" (LR0124)
Martha Stewart "Aspen Snowflake" border/corner punches

Friday, August 17, 2012

Build A Flower #2

This post was scheduled to go up on the 15th while I was on vacation but for some reason this post and this week's Joan's Challenge card did not post.   Sorry about that.  We got home from vacation late last night and had a wonderful time. I will tell you more about that later.  I will post the challenge card later today. I'm anxious to hear what you think about this new Build A Flower #2 release.


How Exciting!!!  It is finally time to release our Build A Flower #2 dies from Cheery Lynn.  .  I have been very excited about this release because these dies will add possibilities for making so many more very realistic flowers. So far, I have created 22 different flowers with these dies.  I always love to have Baby's Breath with roses and now the pieces are there for you create very realistic baby's breath to add to your rose creations and other flowers.  Below I am going to show you a close up of some of the flowers I created in the picture above.


This rose was created using the Build A Flower #2 dies.  There are several sizes of petals you can use to build your rose.  The base for the rose is very realistic looking.    The rose stem has thorns and little dimples to make it look very realistic.  And what do you think of the baby's breath!  There is a stem and a panel of little blossoms you die cut and can glue to the stem to make it look so realistic.  All these flowers were shaped by using the Flower Tool Kit, and Black Shaping Mat.

There are flower petals to create a carnation and elongated leaves.  The edges of these petals have a deckle edge.

This pansy was created with flower petals from Build A Flower #2. The small yellow stamen is new in this set and the purple layered over the white petals is one of the stamens from Build A Flower #1.  

 This is a poppy made with this set.  It includes the flower petals, new stamens, center for the poppy and even a small circle to glue in the very center of the flower.  The leaves are also new in this set.

This is a begonia which is similar to a rose but has very different leaves.

These are petunias.  The flowers were created with dies from the Build A Flower #2 dies and the leaves are the Cheery Lynn Flourish Leaf Strip.  You are going to find that the Build A Flower dies are going to work so well with many of the other Cheery Lynn flower dies to help you create very realistic flowers.  

Cheery Lynn designed these dies so that there are many petals on each plate so you don't have to die cut so many times to have enough petals to build your flower.  When I get back from vacation, I will be doing some tutorials  to help you create these different flowers.  


Wednesday, August 8, 2012

Joan's Weekly Challenge


It is time for a new challenge over at Joan's Gardens.  This week we want you to design a "Thank You" card.  Please go over to Joan's Gardens to see all the challenge rules. 

For my thank you card I have used a lot of new products from Joan's Gardens.  The design paper is from a paper pack from Memory Box called "Viola".  I love all the papers in this pack because it is a 6x6 paper collection with 3 sheets of each of 10 patterns including "juicy purples, royal violets and fields of periwinkle".  I can never have enough purple paper!   

To create the large flower on this card I used the Marianne Design (LR0128) flowers. There are 6 layers to this flower; 3 small and 3 large.  I used the white tool in the "Flower Tool Kit' to roll each the petals up tightly and then pressed down in the center of each flower to "cup" it up even tighter.  It was then sprayed with "Perfect Pearls Blue Patina" to give it a hint of blue.  

The musical score is by Poppy Stamps and the bird cage is from Memory Box; these are new dies available from Joan's Gardens. The birds are from Impression Obsession.  Joan has both the stamps and the matching dies.  I love the chickadee bird stamps in this set but since I wanted a blue bird I chose to just die cut the birds and sponge on color. 


Aren't these cut chickadee bird stamps!  If you like birds, I'm sure you will want to add these stamps to your collection, along with the matching dies.


I added a lot of "frill" behind my flower.  I used the new Memory Box "Calypso Flourish" and Poppy Stamps "Curly Wreath" under the flower to give it a dainty look.  There is a Marianne Design "Forest Branch", Cheery Lynn "Olive Branches", and My Favorite Things "Royal Leaves" behind the flower.  Tiny Cheery Lynn "Darling Daisies" were added and a Kaiser Craft rhinestone added in the center of each.  On the bird cage I added the Marianne Design Ivy. The "Thanks" is Memory Box "Script Thanks".  

I hope you will join us in our challenge this week.  I'm in California now visiting one of my sons and family, then next week we will be going over to Phoenix to visit our other son.  While I am in Phoenix, I will be getting to meet Mike from Cheery Lynn.  It has been a pleasure working with him on the "Build A Flower Series" and I'm looking forward to actually meeting him.  

All the products I used on this card can be purchased from Joan's Gardens:
Marianne Design flowers (LR0128)
Marianne Design "Forest Branch" (LR0150)
Marianne Design "Ivy" (LR0206)
Cheery Lynn "Darling Daisies" (A196)
Cheery Lynn "Olive Branches" (B147)
Poppy Stamps "Bird Cage" (801)
Poppy Stamps "Curly Wreath" 842)
Memory Box Virtuso Music (98356)
Memory Box "Script Thanks"(98240)
Memory Box "Calypso Flourish" (98343)
Impression Obsession "birds" (DIE 003-A)
Impression Obsession "10 Clingables stamps" No Place Like Home (3114-XL)
My Favorite Things "Royal Leaves"
Perfect Pearls "Blue Patina"
Flower Tool Kit
Kaiser Craft Rhinestones

Tuesday, August 7, 2012

Pear


This card was designed using a few more new products from Joan's Gardens.  The pear was die cut using the new Memory Box ""Classic Pear" die.  For some reason it looks more orange in the photo than it really is.  I used some Distress Inks to add some shading but the pear was die cut using light yellow card stock.  I have seen many artistic pears and Memory Box also has the pretty "Embellished Pear" die that you can glue over the Classic Pear die cut to make it artistic.  I used a piece of yellow and orange design paper for this die cut.  The stem and leaf are two separate dies that come with the pear; they were die cut in green and sponged with a darker green, then glued to the pear.

For the background I used a scrap piece of design paper.  Over it I used one of the new Spellbinders "Romantic Rectangles" dies; it was sponged with Distress "Tea Dye" ink.  After die cutting the Romantic Rectangle, I stenciled on some wording for the background.  I will tell you more about that later.  Along the side, I used the pretty Memory Box "Riviera Corner".  I had to cut it into two pieces to fit just the way I wanted it to.  I had a few ivory vellum flowers that I attached over the Riviera Corner.  A few black Dew Drop pieces were added to the corners.

I want to let you know that I won't be posting every day, like I usually try to do, for the next couple of weeks. My husband and I are in San Diego right now and then will be going over to Phoenix.  We are visiting both our sons.   I do have the Joan's Gardens Weekly Challenges and the new Cheery Lynn "Build A Flower" posts scheduled to post while I am away. The Build A Flower #2 dies will be released on August 15.  I'm very excited for you to see all the beautiful flowers you can create with this new set of dies. 

The products used on today's card can be purchased from Joan's Gardens:
Memory Box "Classic Pear" (98392)
Memory Box "Embellished Pear" (98393)
Memory Box "Riviera Corner"  (98372)
Spellbinders "Rmantic Rectangles" (S5-090)