Pages

Thursday, December 31, 2009

Melanie's Blog Hop Featuring "Say It With Flowers"


Melanie Muenchinger is celebrating two years of blogging and illustrating for Gina K Designs, and today she has invited 25 designers and YOU to join the party! First hop through the following designers' blogs using every set she has created since January 2008, from the first to the 25th! Then go to Melanie's' blog to leave a comment for a chance to win a number of different prizes!

Melanie asked me to post cards from two different sets today so I have two cards for this blog hop.  This is the first card  featuring her set called  "Say it With Flowers".   The flowers are from Melanie's  "A Year of Flowers" and the verse is from "Say It With Flowers".  There are so many beautiful verses in this set that can be used with many of Melanie's stamp sets.

The flowers on this card were black embossed on Lovely Lilac cs and cut out.  The leaves were stamped on Certainly Celery cs.  The dp is from SU.  Two Nestabilities Label 4 frames were cut to mount the flowers and leaves on.  A Martha Stewart punch was used for the border.  A green bow and pearls were added to complete the card. 

Now for the rest of the Hop!
Here we go!

Just So Hippy- Charmaine
Just So Hoppy- Donna
What’s in Your Tin 1 & 2- Donna
Hip Hop Accessories- Bee
Jumping for Joy- Barb
Cuddles and Hugs-Jessie
Little Tees-Cat
Just So Sporty-Pam
A Year of Flowers-Theresa
Say it with Flowers-Selma (You are here)
Have a Cookie-Carolina
Tee Talk-Gabby
Hand in Hand-Ally
The Best Things in Life-Shannon, Sankari
A Charmed Life-Cathy
Wee Tees-Libby, Laura Jean
Arranged with Love- Selma
Sporty Accessories-Tina
Inspiration Mosaic-Jennie
School Sports Spirit-Melissa
A Year of Leaves-Geri
Hip to Be Square-Karen
Festive Frame-Linda
Tech Talk- Lee

Finally, Nina and Jessica from the GinaK Senior Design Team have joined in, too! You can also get in on the hop yourself and increase your chances of winning a prize by creating your own project with any one of Melanie's sets and linking it in the Mr. Linky in her post, see full details here. Hope you can join the fun! Enjoy your first hop of the year!

Sunday, December 27, 2009

Happy New Year


I want to wish all of you a Happy, Healthy New Year.  It is Magical Monday again.  As you probably know, Nina's new Paper Cupcakes Store is now open and she let the designers pick any of her digital images for our post this week.  Nilla's challenge to us was Happy New Year - Something Sparkling.  We could use blings, stars, glitter or something typically used for the new year. 

The first challenge was trying to decide which of Nina's digital images to use.  I decided on this adorable Snowman with Stars.  I think he is ready to celebrate, don't you!   He was colored using Copic markers then lots of glitter added to give him some sparkle to bring in the New Year.  Flower Soft was added to the fur on his coat and his socks.  He was cut out with Nestabilities and mounted on dp from my scraps.  Some grosgrain ribbon was layered under the design.  The verse is from SU.  A bow and rhinestones were added to complete the card.  This card fits into a business size envelope.

If you started from my blog, be sure to go to the TMITA Paper Cupcakes blog to see what images the other designers used this week.  Please stop by Nina's new Paper Cupcakes store and browse around.  I'm sure you will find lots of cute images that will be hard to resist.

I'm still out celebrating the holidays.  My next post will be Friday with the StampTV Blast From the Past Challenge.   I'll have another fun challenge I'm sure you will want to use when making your Valentine cards. 

Thanks for stopping by.  Happy New Year.

Thursday, December 24, 2009

Merry Christmas


I want to wish all of you a Very Merry Christmas.  It has been a wonderful year making so many blogging friends.  I'm so happy you stop by to visit me on my blog and want to let you know I really appreciate all your comments.  I love to share what I do and it is nice to know you enjoy my work.  Happy Holidays.


My card tonight is one I made for my StampTV  "Blast From The Past" Challenge.  This week your challenge is to watch Gina's technique video "Using Colored Pencils and OMS" then create a card using this technique and add it to the STV gallery.  You can read all the details on the StampTV challenges here.

I used Melanie's "Festive Frame" stamp set for this Christmas card.  Everything was colored using the technique in Gina's video.  Glitter was added the the oval frame and on the pinecones and berries.  Gold beads were added to the center of the poinsettias.  Gina's beautiful "Good As Gold" metallic card stock was used for matting this beautiful design.

I hope you will join in on this fun challenge. 

Wednesday, December 23, 2009

Explore, Dream, Discover


What a busy time of year!   I have been behind on keeping up with my postings but I have a lot of company and find it very hard to find time to stamp.  This year the last week of December is especially busy.   Lots of fun going on. 

Gina K has posted the December Customer Blog Hop and I wanted to participate.  The only requirement is to use one of the Gina K Designs  newly released stamp sets.  One of the new sets I ordered was "Life Is Good" by Theresa Momber. This is my first card made with this great set.   I decided to create a scene using the train and background scenery. 

I used a piece of designer paper in the background.  The trees and pond was stamped using black Memento ink onto a piece of white cs.  The trees and rocks were colored with Copic markers.  I used sponge daubers to color the sky and pond.  VersaMark ink was used on the pond then it was clear embossed to look like water.  Snow was then stamped and white embossed over the scene. Polar White Flower Soft was added to give the feel of real snow on the ground.   The train was stamped and colored with Copic markers then cut out.  A white oval frame that was embossed with the Cuttlebug Swiss Dots embossing folder was attached with dimensionals above the scene.  The train was added with dimensionals.  A narrow blue frame was cut to make a border around the design.  The greeting is part of the stamp set and was mounted on blue and also attached with dimensionals.  Some snowflakes were added in the corner to finish the scene.  This card measures 5x7 inches and does not require extra postage.

Be sure to go over the Gina's Blog to see all the other entries in the December Customer Blog Hop and leave a comment as you visit each blog. 

I want to wish all of you a Merry Christmas.  I will be posting my Blast From The Past Challenge on Christmas Day so be sure to check back. 

Sunday, December 20, 2009

Merry Moose-mas


I love moose so was excited when Nina gave us this super cute image to work with this week.  Our challenge is  to use Danielle's sketch below.  I really enjoyed working with this digi image and the sketch.


I think this is one of the cutest cards I have made this year.  I used two different Basic Grey designer papers.  The background cs is Soft Sky.  The image was colored with Copic markers and cut out with Nestabilities.  The stars are also cut out with Nesties. The card went together very quickly. 

Be sure to go over to the TMITA Paper Cupcakes blog and download this free image.  Hope you will join in on the challege.  If you haven't been over to Nina's new Paper Cupcake's Store, click on this link to see all of her cute digital images. 

Thanks for stopping by.  Have a very Merry Christmas.

Saturday, December 19, 2009

WINNERS ARE ANNOUNCED


If you participated in the Paper Cupcakes Recipe Blog Hop, be sure to go over to the TMITA Blog  to find out who the grand prize winner is .  There are also 13 other winners and  one of you will receive the digi design posted on my recipe blog hop.   Thanks to everyone who participated.  Hope you enjoyed collecting all the recipes.  Nina's Paper Cupcakes Store is now open so be sure to check it out here.   See you next Monday with more Design Team samples  with the free Digi Nina will have available. 
 

Thursday, December 17, 2009

Blast From the Past Challenge #2


It's Friday and time for another STV Blast From the Past Challenge.  I have to tell you I am so excited to host this fun challenge every week.   All my challenges are based from one of Gina K's Videos and it is so much fun to go back and watch these techniques and participate in the challenge.  Her videos are EXCELLENT and not only do you learn a new technique but she also gives us lots of tips to help make our stamping easier.

The video I chose to use for my challenge this week is "How to use it:  Colored Glitter".   We all know how messy working with glitter can be but if you watch Gina's video, you will see how easy it is to do, and get perfect results every time even when using lots of different colors of glitter.  Hope you will watch the video and join in on my challenge.

For my card today I used a new Gina K Designs stamp set.  This set is called "Lovely Shelf"  ,  by Nina Brackett .  I hope you will go over and look at this  set.  It has so many beautiful images and lots of greetings.  There are lots of new samples on StampTV now using this set. 

My background paper is from the Basic Grey Wisteria Paper Pad. In the picture it looks really dark but it is beautiful dp.   I used two different pieces and ran a piece of white grosgrain ribbon across the middle.  I stamped the image with  Memento black ink which is my favorite black ink.  Copic markers were used to color the image then  I applied all the different colors of glitter. I even added two different shades of purple glitter to the flower petals. It was so easy to do.  The secret to applying just the right amount of glue, where you want it,  is explained on Gina's video.

The  design was cut out using Nestabilities and framed with a Nestie scalloped oval.   A verse from the Lovely Shelf stamp set was white embossed on the bottom.  Isn't that a beautiful font.

Well I hope you like my sample for the Blast From the Past Challenge and will join us in this fun challenge.  Remember if you enter a card in the challenge you will be eligible to win a Gina K Designs stamp set of your choice valued up to $24.95.

Wednesday, December 16, 2009

Warm and Wonderful


Today I made a card for the StampTV Sketch Challenge hosted by Jennie Harper.  You can read about this challenge here.  The stamp set used is Warm and Wonderful available from Gina K Designs and the card stock colors are Baja Breeze and Soft Sky.  The embossed panel behind the sweater was made using  the Cuttlebug "Winter House" embossing folder.  Doesn't that scene make you want a warm sweater!  

Rupa's Warm and Wonderful set has so many great winter images to work with.  I chose to use the sweater; it  was white embossed on Soft Sky cs and cut out.  The base layer is a white panel embossed with the Cuttlebug snowflake embossing folder and a piece of Baja Breeze cs attached to Soft Sky cs.  A piece of ribbon was attached using ScorTape across the seam.  The winter scene was attached to soft sky cs. The sweater is on dimensionals.

This was a very quick and easy card to put together.  This challenge ends this evening so I better hurry and get it posted on STV. 

Tuesday, December 15, 2009

Christmas Tags


I have been busy wrapping Christmas presents and wanted to show you the tags I made this year.  I love to make my Christmas tags 3-D.  The stamp sets used were "Winter Friends" and "Holiday Greetings" from Gina K Designs.

To create the tags, I cut the outside cardstock just a little wider than the design I want to use and it has to be long enough so the design stays inside when the tag is closed.  Then a white piece was cut just a little bit smaller to fit inside.  You score and fold the card getting a good crease.  Cut two small slits on the fold of the inside piece about 1/2 inch apart to create a tab for the design to to pop up when opened.  I use Scor-Tape to attach the white inside piece to the red outside because this is a very strong tape.    The top portion of the white piece was embossed with a Cuttlebug embossing folder before attaching it.  You can decorate the tags any way you want from there.

My snowman was colored with Copic markers then cut out.   It was attached to the pop-up tab with Scor-Tape.  "To: and From:"  was stamped on the bottom portion and a snowflake added to the top. 

This picture shows how the snowman is popped up when the tag is opened.


On the outside the greeting was stamped and cut out with Nesties.  The scallops were pierced.  A piece of Gina's plaid ribbon was tied in a knot and added at the top.  A small hole punch was used to punch a hole in the top to string the gold cord through.

Do you like to make your own Christmas Tags?

Sunday, December 13, 2009

Christmas Arrangement


 Did you enjoy Nina's First Recipe Blog Hop?  There sure were lots of  great holiday recipes.  What did you think of all Nina's beautiful images showcased by the Designers?  These are now available in her  new Paper Cupcakes Store.  The winners of those who participated in the TMITA Recipe Blog Hop will be announced Saturday, December 19. 

It is Magical Monday again which means Nina has a new Free digital image for you.  It is "Christmas Arrangement".  As a designer, it was my turn to host the challenge.  I thought since this beautiful image has Christmas ornaments in the design that we should "Glitz It Up".  Please use either glitter and/or Stickles on your card.

Now for my card.  The design was stamped using Memento black ink and colored with Copic markers. Extra fine Gold Glitter was added to the Christmas ornaments and the berries in the flower arrangement. I stamped the design the second time and cut out the bow and large flower and popped them up with dimensionals. A little bit of red glitter was added to the ribbon.   A piece of quilted designer paper was layered on red card stock and a bottom border created with a MS punch.  The image was cut out with Nestabilities and edged with a gold leaf metallic marker then popped up with dimensionals.  Cuttlebug corners were added to the top and a piece of gold and white braid added below the design.

Remember, Nina's new Paper Cupcake store is now open.  Be sure you go over to check it out.  Also,  go to TMITA blog to download your free digital image.  Hope you will participate with us in this challenge.


Saturday, December 12, 2009

Blast From The Past Challenge


Gosh, I have heard the term "Shop Till You Drop" but have never really done it.  I can actually say that is what my daughter and I did today.  We left early morning and spent the entire day out Christmas shopping.  We have family coming in next week and I still have so much to get done.  Just yesterday I got my Christmas tree up and have only half my decorating done.  I love Christmas and usually get started much ealier.  Hopefully tomorrow I will get it all completed. 

I am hosting the "Blast From The Past" Technique Challenge on StampTV.  In this challenge I asked that you watch Gina K's "Partial Cuttlebug Embossing" video then make a card using this technique.  You can read all about the challenge here.

The above card is my sample for this challenge.  I used Asela's "First Christmas" stamp set, available from Gina K Designs.  The cardinal was stamped using Memento black ink and colored with Copic markers.  A few red pearls were added to the greenery.  The image and frame below it were cut out using Nestabilities. 

The background was partially embossed using a Cuttlebug embossing folder.   I love the look of partial embossing on a card front. A paper piercing tool was used to punch the corners on the right side of the card.  The piece was attached to red card stock.  Each layer under the image is seperated with dimensional tape.  The beautiful Gina K ribbon was run across the middle between layers. 

I hope you will go over to StampTV and participate in this challenge.  I look forward to seeing your cards. 

Thursday, December 10, 2009

CSS Christmas Treat Recipe Blog Hop


Several members of the Center Stage Spotlight Team have joined together to share a special Christmas Treat Recipe Blog Hop event with everyone tonight! They have whipped up some treats in their kitchens and their stamp rooms over the past few weeks so we could compile our very first Recipe Book for StampTV!


CHOCOLATE RITZ DELIGHTS

I always have many requests to make these cookies every Christmas.    They have a surprise ingredient which is Ritz Crackers.  If you like chocolate and peanut butter, I'm sure you will love these easy no-bake cookies.

Ingredients

Ritz Crackers (2 rolls)*
Peanut Butter (your favorite brand)*
Wilton Dark Cocoa Candy Melts (1 ½ packages)*

1. Open one roll of Ritz Crackers and spread about a rounded teaspoon of peanut butter over the cracker. Peanut butter can be as thick or thin as you want. Open next package of Ritz Crackers and place one on top of each one spread with peanut butter. You are making a sandwich. I place my cookies on a Silpat but you can use waxed paper or parchment paper if you want.

2. Put Candy Melts in small microwavable bowl and microwave just to melt chocolate, approximately 2 minutes, stirring once. You just want them melted after stirring.

3. Dip each cookie into melted chocolate covering well on sides, top and bottom. I use a small icing spatula to help turn the cookie over in the chocolate. You want it well covered with chocolate.

4. Place chocolate covered cookies on Silpat or waxed paper and let chocolate harden.

*You can use regular or low fat Ritz Crackers
*You can use regular, low fat, crunchy or smooth peanut butter
*I purchase my Wilton Candy Melts from Michael’s Craft Store
---------------------------------------
My treat package and card are made using "Winter Friends" and "Holiday Greetings" from Gina K Designs.  Cuttlebug embossing folders were used for all embossing. A Nestability Labels I was used for the frames.  On the card a MS leaf punch was used to try and create a Christmas tree with rhinestones added for the lights.  A piece of acetate was embossed for the opening in the front of the package.  The top of the package is held closed with a magnet closure.

Check out these designer's blogs for the sweet projects they've designed around their treats:


The Recipe Book will be available as a free download PDF on StampTV tonight as well. Look for it on the Freebie Tab link.


Hope you are enjoying all the great recipes on this hop.

Tuesday, December 8, 2009

TMITA Recipe Blog Hop and Challenge


You have arrived on the 7th stop of the "There is Magic In The Air" Recipe Blog Hop. 


The design Nina asked me to use is this beautiful ornament with Mary and Jesus.  I colored with Copic markers then added lots of glitter.  The verse is from the "Festive Frame" stamp set available from Gina K Designs.

****************************************************************

Here is the recipe for one of my family's  favorite Christmas cookies:

CHOCOLATE COVERED CHERRY COOKIES
A soft brownie type cookie with a cherry on top

1 1/2 cups flour
1/2 cup unsweetened cocoa
1/2 cup butter
1 cup sugar
1/4 tsp salt
1/4 tsp baking powder
1/4 tsp baking soda
1 egg
1 1/2 tsp vanilla
1 10-oz jar Maraschino Cherries (drain and reserve juice)
1 6-oz pkg semisweet chocolate chips
1/2 cup sweetened condensed milk

In a mixing bowl, combine flour and cocoa; set aside.  In large mixing bowl, beat butter on high speed, about 30 seconds, or until softened.  Add sugar, salt, baking powder, and baking soda.  Beat until well combined.  Add egg and vanilla and beat well.  Slowly add flour mixture on low speed then increase speed to mix well.

Shape dough into 1-inch balls;  place on Silpat or lightly greased baking sheet.  Press down center of each ball with thumb.  Place a (drained) cherry in center of each cookie.  In small sauce pan, combine chocolate chips and sweetened condensed milk.  Stirring constantly, heat until chocolate is melted.  Stir in 4 tsp of reserved cherry juice.  Spoon about 1 Tbs of frosting over top of each cherry spreading to cover top of cookie.  (Thin frosting with more juice if necessary.)  Bake in 350 degree oven about 10 minutes or until done.  Makes approximately 40 cookies.

*****************************************************

Now for my secret word:  INGREDIENT 

If you arrived on my blog first, you need to go to the beginning of this blog hop HERE  to get all the directions and collect all the clues. If you arrived from Patti's blog then you are on the right path. Remember to leave a comment on my blog then your next stop now is to go over to Olga's  blog to see another card/project, find a new recipe, and collect the next clue.

Thanks for joining us on this Recipe Blog Hop.

Monday, December 7, 2009

Sweet Trouble


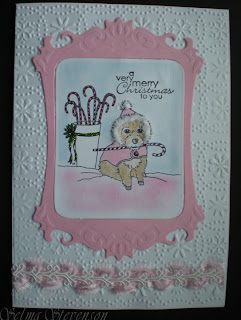
It is Magical Monday again.  This cute image by Nina May is of Kim's little dog.  Kim is another designer for Nina.  This image "Sweet Trouble" will be free this week so be sure to go over to the TMITA blog to download it.  Lots of fun, new things happening at TMITA this week.  Nina is  hosting a Recipe Blog Hop  starting Wednesday (Dec 9 - Dec 13).  There will be lots of great cookie/candy recipes plus a "recipe" for a fun challenge we hope you will participate in.  Be sure to read all about it and join in on the fun at TMITA this week.

Kim's challenge using the Sweet Trouble image is a "Clean and Simple card with limitations on what you can use (e.g., no brads, bows, or anything that would make it challenging to mail) and a color requirement PINK, of course, must appear on your card somewhere."

Since most of us love to take pictures of our animals at Christmas time and frame them, I decided to put "Sweet Trouble" in a Nestabilities frame.  It appears that she is getting into trouble because she is giving away all the candy canes way before Christmas.

Markers were used to color the candy canes and ribbon.  Chalks were used for the rest of the image.  Some white Flower Soft was added to make the fur on the cap fluffy.   The white background was embossed using a Cuttlebug embossing folder then a piece of pretty pink and white  "flat" trim added along the bottom.  Don't you think this little dog is too sweet to be getting into trouble!

Thanks for stopping by today to visit my blog.  See you at the recipe blog hop.

Sunday, December 6, 2009

Two Challenges for STV


Today I am posting two cards I made for Challenges on StampTV.  I had a hard time taking a good picture of this card.  I posted it yesterday on StampTV, but decided since we have a tiny bit of sun today took a new picture.  It does look better with less shadows.  I wanted to exchange it with the one posted on STV but already had lots of comments so decided not to change the picture. 

Jennie Harper is the new STV hostess for the Sketch Challenges.  I love this sketch and wanted to submit a card.  The stamp set used is "Winter Friends" available from GKD.  The gifts were silver embossed on white and cut out.  Two different Cuttlebug embossing folders were used for texture on the  white backgrounds.  Silver cs was added behind the two larger embossed pieces and a silver ribbon added under the design which was cut out with Nestabilities.  The greeting is from Gina's "Holiday Greetings".  Two silver brads were added to complete the Sketch Challenge.


Another STV challenge this week is hosted by Carolina.  She is the hostesses for the "Anything But a Card Challenge: Treat Holder.  I like to make some type of special treat for my grandkid's Christmas packages.  They all love York Pepperment Mints.  I got this idea from Tracy's Inky Doodles blog and put my own "spin" on it.  I had so much fun working on this project.

I used Melanie's Hip To Be Square stamp set available from Gina K Designs.  This set contains all the stamps needed for this cute snowman. The white circles were stamped and punched out. Using a sponge dauber, I added a little blue around the edges of each one.  The face was stamped on one of the circles.  The hat was stamped and cut out then glued onto the head.  A piece of ScorTape was added on the hat so I could sprinkle on red glitter.  Nestabilities were used to cut out six red and six green scalloped.  The front and back of each candy piece is decorated.  The red and green pieces were glued together along with one of the pieces of the snowman.  Small, flat backed, pearls were added for buttons.  A piece of Gina's Christmas ribbon was tied and added for a scarf.  Each piece was added to a small York Peppermint pattie with ScorTape.    Starting with the bottom of the snowman, each piece was pushed down into a Wilton Pretzel bag, which was purchased from Michael's Craft Store.

The topper is a piece of white card stock stamped with the greeting from "Winter Friends".  Isn't this perfect for this project!  A scalloped punch was used along the bottom edge and small red and green rhinestones added in each scallop.  A bow made with another piece of Gina's ribbon was added on the top.  The bag was stapled closed and the topper added with ScorTape.

If you haven't checked them out, be sure to go to StampTV to participate in all the fun challenges.   You will also find my Inspirational Challenge there.


Saturday, December 5, 2009

Red, Green and Gold Color Challenge


This card was made for Shannon's Color Challenge  on StampTV.  The colors to use are red, green and gold.  The set used is Theresa's "A Very Merry Christmas" available from Gina K Designs.  The image was stamped and then colored with Copic markers.  Glitter was added to the bow, leaves and berries.  Nestabilities were used to cut out the design and three matching scalloped mats.  A dot of Gold Stickles was added to each of the green scallops.  The background is a piece of retired SU dp.  A gold ribbon was added under the design and gold corners to finish the card.

Thursday, December 3, 2009

StampTV Inspiration Challenge


This is a very exciting day for me.  I am now hosting the new Stamp TV Inspiration Challenge  every Friday for the next three months, and I hope you will join in.  You can find all the details about the  challenge here.  I have two wonderful, very talented friends I want to thank for helping me out this week.  Pam Imholz (Paper and Ribbons, and Stamps! Oh My!) designed the challenge picture above, and my guest designer is the very creative Geri Utterback  (Geri's Cards).   You won't want to miss seeing the cute card Geri created for this challenge.


The colors in this sweater are Fresh Asparagus , Ballet Blue and Bashful Blue.  I used these colors as well as the snowflakes to create my card.  The stamp set used is "Winter Friends" from Gina K Designs.  The greeting is from Gina's "Holiday Greetings" stamp set.  The little snowman was stamped and the hat and present were colored with Copic Markers.  The scarf and sweater were paper pieced.  I wanted to add snowflakes to the sweater so used a very small snowflake stamp and white embossed it to add a few snowflakes on the sweater.  Some glitter was added on the hat and the ribbon on the package. 

A MS punch was used to create the green frame.  This  fresh asparagus pure luxury cs is available from Gina K designs.  Using a 3 inch square,  I centered each side of the card stock in the punch to create the snowflakes around the square.  It was layered onto a piece of white cs so the snowflakes would be white.  Then this was attached  to a piece of ballet blue cs.

The bottom background piece is ballet blue cs.  A piece of bashful blue cs was embossed using the Cuttlebug snowflake embossing folder and added to the top portion.  A piece of SU dp that had the colors I needed was added to the bottom  of the card.  Green grosgrain ribbon was attached across the seam using ScorTape.  The design was added to the card with dimensionals.  A white dotted Swiss bow was attahed to the top and a few glittered snowflakes  added on each corner to complete the design.

It has been fun preparing this challenge.  I really hope you will support me and join in on this challenge.  When you submit a card, you will be eligible to win any Gina K stamp set valued up to $24.95.  Please go to this link to read all the details.  I'll be looking for your card.

Thanks for visiting my blog.  Hope you will leave a comment and let me know what you think about this new challenge on StampTV.

*The sweater used for this challenge is from the NorthStyle catalog.

Wednesday, December 2, 2009

Merry Christmas Poinsettia


Tonight my card is made using Melanie's "A Year of Flowers" stamp set.  You can purchase this set from Gina K Designs.  The poinsettia was black embossed on watercolor paper then watercolored.  Small gold beads were added to the center. 

The background is a piece of Basic Grey dp.  A  Nestie was used to cut out the olive green scalloped then it was embossed with the Cuttlebug Dotted Swiss  embossing folder.  A Martha Stewart punch was used to create the frame and also the border along the bottom.  The poinsettia was attached with dimensionals.   Martha Stewart leaves were added under the flower.  A piece of dotted Swiss ribbon was added along the bottom then the verse attached with dimensionals.  Pearls were added to finish the card. 


Tuesday, December 1, 2009

Merry Christmas


Good Morning.  Can you believe it is now December.  This year has flown by for me. 

Today I want to post another card I made with one of my favorite Christmas stamp sets:   "Very Merry Christmas" by Theresa Momber.  This set is available from Gina K Designs. 

This card is 5x7 inches.  For color, I only wanted to use red and green.  This beautiful tree was stamped with Memento black ink onto glossy cs and colored with Copic markers.  It was cut out using Nestabilities and mounted on red.  A piece of white cardstock was cut out slightly smaller than the base card.  The right side was embossed using one of the new Cuttlebug Christmas embossing folders "Season's Greetings".  The stamped image fit perfectly on the left side of the embossing.  To add some sparkle,  rhinestones were added to the card. 

Thanks for stopping by to visit my blog.  


Sunday, November 29, 2009

Snowy Flight


Nina's challenge this week at TMITA is to use her cute snowman image for anything but a card.  This image is called "Snowy Flight" and is free this week on the TMITA blog.   Right away I knew I wanted to make an ornament.  I wanted to make it 3-D so guess what I decided to use!!!   It is a Laughing Cow cheese container.  I used a craft knife to cut a circle out of the center of the lid then cut out two different colored scalloped circles with Nestabilities to create the frame around the opening.    A piece of acetate was added on the inside of the lid.  On the inside, a piece of dp was added to the bottom of the box.  Next three white circles were cut with Nesties and torn to create snow banks.  Each layer was attached on dimensionals.  The snowman was colored with Copics and cut out then mounted on dimensionals.  Flower Soft was added to the torn edges of the white cs.  Lots of loose  Flower Soft was added to look like snow. 

A small piece of red ribbon was attached to the inside of the lid and pulled out to form the loop for the ornament.  A piece of green cs was taped around the side of the box then a red ribbon attached  over it using ScorTape.  Glittered snowflakes were added around the front of the ornament.  The back of the ornament was also covered with dp. Additional glitter and a red bow were added to complete the ornament. 

Doesn't this little guy look like he is having a blast!


This is the back.