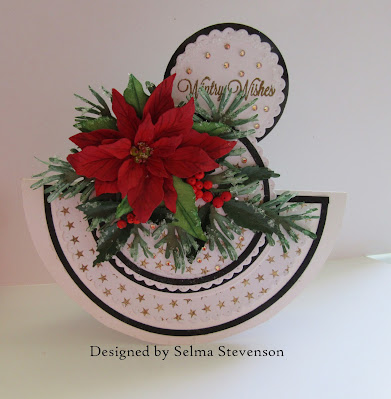
Today I have a fun card! This is a Rocker Card. On June 8th, Susan did a tutorial on how to create a rocker card on her Susan's Garden Club FaceBook Video.
I do not have large circle dies so I had to use scissors to cut out the largest circle. You can trace around a plate for a template. I used a piece of design paper from the Paper Heaven Pad - White As Snow for the design paper. It was die cut using a scalloped die from my stash. I used my largest circle die to die cut one circle. It was smaller than I wanted, so I used the Honey Bee Circle Thin Frames die set to die cut the black circle frames. This is a very fun die set to use. It die cut many different thin frames by using just one die. I have it linked below. The small scalloped circle was die cut using white card stock then a size down circle used to die cut the design paper. Black smaller frames were used from the Circle Thin Frame die set.
At the top, I used a small scallop die set to die cut one of the gold embossed sentiments from Susan's Winter Garden Stamp Set. Gold rhinestone were glued around the sentiment. It was glued to the back of the center circle.
Susan's Poinsettia die set, from her Holiday release last year, was used to create a poinsettia. I used Susan's Specialty Card Stock and brushed on red ink. I used the Waffle Flower Media Mat and Blending Brushes to color the card stock. Susan's Flower Tool Kit was used to shape the poinsettia and leaves.
Behind the poinsettia I added White Pine Branches that were die cut from the Winter Evergreen Foliage Die Set. The Winterberry and Mistletoe die set was used to die cut the Winterberry. For the berries, I colored small bean bag styrofoam balls and glued them to the Winterberry.
Small gold rhinestones were used for embellishments on the two small die cut circles. Twinklets Diamond Dust was used for the snow on the branches.
The back of this rocker card was finished off nicely with room for a personal message.


No comments:
Post a Comment
I always love to read your comments. Thanks for stopping by.