Pages

Friday, August 30, 2013

Vintage Poinsettias


It feels good to be getting so many Christmas cards ready before the holidays are here.  Today I created a vintage looking card.   I used two pieces of design paper from the MME "Vintage Christmas" 6x6 designer paper pad.  I used deckle scissors to cut down, almost half way to the center, on the top piece.  It was sprayed with a fine mist of water so I could roll the edges back to expose the design paper below it.  I used both Distress Tea  Dye and Distress Black inks to age the torn area.  Tea Dye Distress ink was also sponged over the outside edges to give it an aged look.  This piece was attached over the second piece of design paper.  The corners were die cut using the  the New Marianne LR0280 die set.  The two decorative elements, behind the poinsettias,  were die cut using the new Heartfelt Creations "Ornamental Add On Die" from the Christmas Card Collection..  Both the corners and the Ornamental pieces were sponged with Tea Die Distress Ink.


The poinsettias were stamped using black ink on red card stock using the Heartfelt Creations "Petite Poinsettia PreCut Set", then die cut using the matching  Spellbinder dies. They were shaped using the Susan's Garden Flower Tool Kit. On the petals and leaves, I added red/green Distress Glitter.  The glue I used is the Scraperfect "Best Glue Ever".    In the center of each poinsettia,  I added three small yellow Kaiser Craft Pearls.  Under the poinsettias I added holy from the Heartfelt Creations "Holly Berry PreCut Set".  They were die cut using the matching dies from the Heartfelt Creations "Ornamental Add On Die" set.

Have you started on your Christmas cards yet?   I always hate waiting until December when there are so many other things to do for the holidays.

Have a great weekend.

You can purchase all these Products from Joan's Gardens:

MME, Vintage Christmas 6x6 Designer Paper Pad
Heartfelt Creations, Petite Poinsettia PreCut Set, HCPC 3415
Heartfelt Creations, Spellbinders, Layered Poinsettia Shapeabilities dies 

Heartfelt Creations, Holly Berry PreCut Set, HCPC 3551
Heartfelt Creations, Ornamental Add On Die, HCD 738
Susan's Garden, Flower Tool Kit, 658437
Marianne Design, Corners, LR0280
Ranger, Mowed Lawn, Distress Glitter
Ranger, Festive Berries, Distress Glitter
Scraperfect, Best Glue Ever
Distress Ink
Kaiser Craft yellow pearls

1012026

Wednesday, August 28, 2013

Believe


Today I have another card designed using the new Heartfelt Creations "Christmas Card Collection".   I love this collection because there are so many quick and easy cards to you can design whether you use just the design papers or use them along with the beautiful dies and stamps. 

For this card I used a combination of stamps, dies and design paper.  The background for this card is one of the 6x6" squares cut from the Christmas Card Paper Collection.  I stamped the pretty candle from the "Bright Christmas PreCut Set", inside the wreath from the "Love at Christmas PreCut Set",  and colored with Distress Markers.  I then die it using the JustRite "Nested Medallion Labels" and sponged around the edges.  The pretty doily behind the stamped scene was created by die cutting four each of the "Ornamental Add On" embellishment dies alternating them around the die cut.  

Ornamental Add On Die
Here is a picture of the 5 dies in the Ornamental Add On" set in the Heartfelt Creations "Christmas Card Collection".  Can you see from this picture how I tucked the dies in just using the top portion of the dies?

The sentiment, that was white embossed in the lower left corner, is from the "Love At Christmas PreCut Set". To finish the card, I added Stickles to the berries, candle flame, and the candle.   

You can purchase this beautiful Heartfelt Creations "Christmas Card Collection from Joan's Gardens.

Heartfelt Creations, Christmas Card Paper Collection, HCDP1 236
Heartfelt Creations, Love At Christmas PreCut Set, HCPC 3554
Heartfelt Creations, Bright Christmas PreCut Set, HCPC 3552
Heartfelt Creations,  Ornamental Add On Die, HCD 738
JustRite, Nested Medallion Labels,
Stickles
Distress Inks

Tuesday, August 27, 2013

Heartfelt Creations Alumni Designers Blog Hop


It is time for this month's Heartfelt Creations Alumni Design Team Blog Hop.  Be sure to comment on each designer's blog for a chance to win a $25 gift certificate to Heartfelt Creations.   The blog hop will be open for comments until Friday, August 30th at midnight and the winner will be drawn and announced at noon on Saturday August 31st.

The designers participating this month are:

Selma Stevenson - (You are here)

My card was created with a piece of design paper from the Heartfelt Creations "Frosty Blanket" paper collection.  The pretty corner die in upper left corner is one of the Heartfelt Creations  "Ornate Gateway" dies and the large die in the lower corner was die cut using the Heartfelt "Decorative Butterfly Corner die".   

To create the flowers I stamped the Heartfelt Creations "Striped Sun Kissed Fleur" stamp using VersaMark ink and white embossed them.  They were then die cut using the matching "Sun Kissed Fleur" die.  To color the flowers and leaves, I used several colors of VersaMagic Dew Drop Ink pads and rubbed them over the flowers and leaves.  They were then shaped with the tools in the Susan's Garden Flower Tool Kit.  The butterfly is from the Heartfelt Creations "Delicate Asters & Butterflies" stamp set.

Be sure to leave a comment on each designer's blog post participating in this blog hop so you have a chance to win the $25 gift certificate from Heartfelt Creations.

The next Designer in this blog hop is Vicki.

You can purchase the products I use from Joan's Gardens.
 
Products used:
Heartfelt Creations "Striped Sun Kissed Fleur PreCut Set", HCPC 3534
Heartfelt Creations "Sun Kissed Fleur" die, HCD 734
Heartfelt Creations "Delicate Asters & Butterflies PreCut Set", HCPC 3499
Heartfelt Creations "Ornate Gateway" die, HCD 737
Heartfelt Creations "Decorative Butterfly Corner" die, HCD 730
Heartfelt Creations "Frosty Blanket" paper collection, HCDP1225

Monday, August 26, 2013

And the Winner Is . . .

I want to thank all of you who helped me celebrate having over one million visits to my blog. It was fun reading all your comments and I love all the support you give me.  I really appreciate having so many followers and really enjoy creating things you love to see. 

 Here is the name drawn for the Heartfelt Creations "Petite Poinsettia PreCut Set" (HCPC 3415).

Anonymous said...
Selma, this card is Gorgeous! The soft colors are perfect. I love checking in each day to see what wonderful work of art you will share to inspire us. I have been following you for at a couple of years and love seeing the tutorials you offer
Charlene

Monday, August 19, 2013 at 6:26:00 AM PDT

Congratulations Charlene.  Please contact me with your address and I will get your stamp set in the mail.Delete

Saturday, August 24, 2013

Happy Birthday Luke


Today I have a card I designed for my youngest grandson; his birthday is August 28.   He lives in Del Mar, California where there are lots of hot air balloons so thought he might enjoy this card.  

I started out with a marbled blue piece of card stock for the background.  It was sponged around the edges.  Next I die cut the Memory Box "Modern Landscape" using a piece of green card stock and placed it on the bottom of the card.  This card is 5.5" wide and 6" tall, so the landscape piece fit perfectly.  Markers were used to color the trunk of the trees and the house.  I used the Memory Box "Typewriter Upper Alphabet Set" to spell out his name.  I think he will know I made this card special for him!

The hot air balloon was die cut using the Cheery Lynn "Hot Air Balloon with Angel Wing" die.  There is a small piece you need to clip off the main die that is used for a backing (angel wing) in the opening of the hot air balloon.  I used a piece of striped design paper for the backing, glued it on, then used a variety of colors of "Stickles" matching the strips in the paper. The beauty of it does not show up well in this photo.  Next I die cut the Memory Box "Puffy Clouds", sponge lightly around the edges with blue Distress Ink and added to the sky; the small one on the left added with dimensional tape.  The hot air balloon was also added with dimensional tape.  The sentiment is from the JustRite "Botanical Medallions & Banners" stamp set.  It was stamped with Black VersaFine Ink, clear embossed, sponged around the edges with blue ink and attached with dimensional tape.


Cheery Lynn "Hot Air Balloon with Angel Wing" B360
Memory Box, Modern Landscape, 98257
Memory Box, Puffy Clouds, 98172
Memory Box, Typewriter Upper Alphabet Set, 98367
JustRite, Botanical Medallions & Banners stamp set, CR-03710
Black VersaFine Ink
Ranger Super Fine Clear Embossing Powder
Distress Inks
Stickles

1008297

Friday, August 23, 2013

Framed Susan's Garden Flowers


My friend Pat and I found these laser cut frames in the clearance bin at Michael's and thought we could probably do something really pretty with them.    We have been working on this project for a few weeks now,  creating a variety of flowers to create a flower garden in a frame.  All the flowers created in this shadow box were created using a variety of flower dies in the "Susan's Garden"  flower collection.  The flowers were all shaped with the Sizzix, Susan's Garden Flower Tool Kit, and colored using the Susan's Garden Pan Pastels.

This is a close up of the flowers in my Shadow Box. I used 9 different sets of Susan's Garden flower dies.  The flowers are not necessarily a true color of the type of flower -- instead of yellow forsythia, they are pink, and the sunflowers are purple instead of yellow.  It is fun to be creative.


This is the shadow box frame Pat completed.  We worked on the same types of flowers, but she did not use as many as I did because she wanted to place a photograph behind the small laser cut frame in the center of the shadow box. Like I said, these frames were in the clearance bin for I think 80% off.   We used a little sample jar of Valspar purple paint, from Lowe's (which was free with a coupon) to add color to the frames,  and a piece of a wall paper sample on the back of the Shadow Box. This project just cost just a few dollars, but ended up being something we are both very proud of. Hope this gives you some ideas for creating something a little different. 

Thanks for stopping by.  Have a great weekend.

1008004

Thursday, August 22, 2013

Winter Scene Card and Tutorial

I think it is so fun to be able to die cut images and create a scene with them.  There are so many possibilities according to how you decide to arrange them.   I posted a "Winter Village Scene" on my blog August 2, 2013 that many of you really liked and asked for a tutorial on how I created it.  Today I have created a similar card and have a tutorial below to show you how I did it.  First I will tell you about the products I used on this Winter Scene.  The design paper I used is from the Kaiser Kraft "Twig & Berry" 6 1/2" square paper pad.  The die cut house is one of the new Marianne Design houses (COL1327).  The die includes the house, the drifting show pieces you glue on, and a snowflake stamp.  The large tree on the left is the Memory Box "Magnificent Pine" tree. Isn't that a cool tree! The tree in front of it is the Marianne tree (LR0136).  There is also one on the right side of the card.  The deer, lamp post, and the small tree are die cut using the Marianne Design (COL 1330) die set.  I sponged Distress Inks on all the die cuts.  The color used on the trees is Bundled Sage Distress Ink - I love the soft green color on this card. The Sentiment is die cut using the Cheery Lynn "Merry Christmas Set".  I only used the word Christmas.  Green glitter was added to it.  The glitter added to the other pieces is the Ranger, Distress Stickles, Clear Rock Candy, dry glitter.

TUTORIAL

 The card I created today does not show the snow banks as well as the card created on August 2nd, because of all the trees I added, but they are there and this is how I created the base to start adding the pieces to create the scene.  I started with three pieces of card stock wider than the width of the card and cut them as shown above.  The bottom layer is a smaller height than the second layer, and the top one is the largest. 

 The reason I use strips that are wider than the card is so I can "play" with how I layer them.  I have sponged the top of each piece with "Weathered Wood" Distress Ink to help make them show up.  You can see how I moved them around alternating the "mounds of snow"  which made the ends very uneven.

Next I added adhesive only along the very bottom of each layer because I wanted the top open so I cut push the house, trees, etc. down in the snow if I wanted to.  This shows the back layer with the middle layer taped to it.

 Here I have taped the front down. 


 Next I placed the snow bank over the bottom of the card and marked where they needed to be cut off with the paper trimmer.

This is how it looked after the ends were trimmed off and the snowbank was attached to the card along the bottom and the sides.  I did not put adhesive along the top of the snow.
The first die cut piece added with the die cut house.  It is tucked down in the snow just a little.

Next I started adding trees and tucked some of them down in the snow.

 The next step was to add the deer and the lamp post.

I hope this helps you create your winter scene.  It is very easy and creates a lot of dimension to your snow scene.


Marianne Design, house, COL1327
Marianne Design, med tree, LR0136
Marianne Design, winter embellishments, COL 1330
Memory Box, Magnificent Pine, 98485
Cheery Lynn, Merry Christmas Set, B186
Distress Inks
Ranger, Distress Stickles, Clear Rock Candy, dry glitter

1007146

Wednesday, August 21, 2013

Heartfelt Creations Christmas Song


Today I have another card designed with the new Heartfelt Creations "Christmas Card Collection".  I used  the stamps in the "Christmas Song PreCut Set".  The bird and the scroll were stamped using Ranger Black Archival Ink on a 6x6 piece of white card stock.  Once the images were colored, I place the top half of the card front inside a Dotted Swiss embossing folder to emboss just above the scroll.  The bird image was stamped twice.  The bird was cut out and placed over the bird on the card using dimensional dots. 

There is a poinsettia in the stamped scroll image but I created poinsettia with the Heartfelt Creations "Petite Poinsettia PreCut Set" and placed one over the flower on the scroll for added dimension.  The additional poinsettias were placed over the Holly flourishes from the Heartfelt Creations "Holly Berry PreCut Set".  I used all three holly leaf images in this set.  Under the small poinsettia in the upper right corner, I cut out the extra leaves left on the image I cut  the bird from and tucked them under the flower.  The flower was placed on the Heartfelt Creations "Timeless Amour Die".  In the center of the poinsettias, I used the Yellow Paper Pen from the Susan's Garden, Viva Decor Paper Pen Set.  In the center of the yellow dot, I added a tiny dot of black using the Black Paper Pen with the tiny tip, from the Susan's Garden "Ladybug Kit".   Christmas Red Stickles was added to the berries. 

I know you are going to love this new collection from Heartfelt Creations to design all your Christmas Cards. You can go to Joan's Gardens to watch the Heartfelt Creations Video by Emma Lou showing you lots of neat ideas for using the paper, stamps and dies in this collection.  Here is a direct LINK to the video.  Below the video you can see all the products in this Heartfelt Creations Christmas Card Collection.  Be sure to check out the great saving on the "I Want It All" package.

The following products can be purchased from Joan's Gardens:
Heartfelt Creations, Christmas Song PreCut Set, HCPC 3356
Heartfelt Creations, Holly Berry PreCut Set, HCPC 3551
Heartfelt Creations, Poinsettia PreCut Set, HCPC 3415
Heartfelt Creations, Ornamental Add On Die, HCD 738
Heartfelt Creations, Spellbinders, Layered Poinsettia Shapeabilities die
Susan's Garden, Viva Decor Paper Pens, VD003
Susan's Garden, Flower Tool Kit
Susan's Garden, Ladybug Kit
Christmas Red, Stickles
Ranger Black Archival Ink

1005837

Tuesday, August 20, 2013

Flowers For My Friend

Today I have a card that is not real dimensional.  The size of the card is 5.5" x 6.".  For the white embossed background, I used the Anna Griffin "Juliet Damask" embossing folder. The embossing folder is only 4.25" x 5.5" so I had to run the card front through twice, just laying the edge of the design on the folder next to the embossed card stock.  You can barely tell it was pieced.  On top, I used the Spellbinders "Locking Loops" frame for the background for the flowers.  It was die cut then sponged with Distress Ink prior to removing it from the die.  That is a pretty look, isn't it.   I layered the piece onto a piece of purple card stock since both the frame and the background are white.

The pretty flowers and the sentiment are on the Joy! Crafts"Embossing and Embroidery Die - Flowers for a Friend".  die set - there are three dies in this set.  I did not use the large flower die.  It is a large flower that you can actually embroider on it because it has all the little holes die cut.    I die cut the flower stem using white card stock then added glitter to it for sparkle.  First I added some glue to just the flowers, then sprinkled with purple glitter.  I let it sit for a few minutes, then I added glue to the leaves and stem and sprinkled on green glitter.  I love the look.  A rhinestone was added to the center of the flowers.  

The sentiment from this set was attached to the card using ScraPerfect "Best Glue Ever".  It was so easy to use this glue on the little letters.  The opening is very fine and easy to use.  I pulled some flower rhinestones out of my stash for the corners of the card. 

You can purchase the following products from Joan's Gardens:

Spellbinders "Locking Loops" die set (S5-175)
Joy! Crafts "Embossing and Embroidery Die - Flowers for a Friend" 6002/1101
ScraPerfect "Best Glue Ever"

1005235

Monday, August 19, 2013

Brenda Walton Dress Cards

 A couple of friends came over and we worked on designing dresses -- that is . . . card stock dresses.  We used the Sizzix,Brenda Walton "Princess Dress & Deckled Card" die.  This die includes the dress, a bow, three other embellishments plus a deckled edged card.  It is so fun to come up with different fashions for this dress. Besides the dress and embellishments, you also get a die cut card to design.

 These two cards were die cut using double sided design paper.  The dress on the left was placed in an embossing folder to add texture to it (the whole dress is embossed).  For embellishments, a little string of beads were strung, a ribbon put around the waist, and a few little flowers added.  The dress on the right has the bow from the die cuts shaped with the tools from the Susan's Garden Flower Tool Kit, a pearl added in the center then a little string of pearls added for a necklace. 

The yellow dress was die cut using yellow card stock then only the skirt was embossed using an embossing folder.  Beads were strung for the necklace and a bow using very narrow ribbon was created for the waistband.  The card on the right was die cut using double sided design paper then a ribbon wound around for the waistband and a small flower added.  The neckline was cut square for a different look.

These little dress cards are especially loved by anyone who loves to sew, loves clothes, or even for little girls.  The decorating ideas are endless.

You can purchase this die from Joan's Gardens.

Sizzix, Brenda Walton "Princess Dress & Deckled Card" (658358)

1005151

Sunday, August 18, 2013

Celebrating over One Million Visits

 Wow 1,004,589 visits to my blog since I started blogging in 2009.  I remember when I first started  my blog I was so excited when I got to 7 followers and today it is up to 1,120.  I want to thank all of you who are following and those of you who leave comments.  I appreciate all of you so much,  and I do love to hear from you.  I love sitting down everyday and coming up with something new to show you.   I designed a card today using products from Heartfelt Creations and as a Thank You, I will have a random drawing and give one of my Followers the Heartfelt Creations Poinsettia stamp set I used today. This is a beautiful poinsettia stamp set that will be a great addition to your Christmas stamp collection.   I will leave this open for one week and will draw a winner on Sunday, August 25th.  All you need to do is leave a comment on this post and tell me approximately how long you have been following my blog and what inspires you the most about my work.  I will send the winner of the drawing a Heartfelt Creations "Petite Poinsettia PreCut Set" (HCPC 3415).

About my card today.  I used design paper from the Heartfelt Creations "Christmas Card Collection" pad for the background.  The poinsettias in the Heartfelt Creations "Petite Poinsettia PreCut Set"  were stamped using "Scattered Straw" Distress Ink on Ivory card stock and die cut using the Spellbinders "Layered Poinsettia Shapeabilities" dies.  The flowers were colored using Gelatos and the leaves were colored using a combination of "Pine Needles and Forest Moss" Distress Ink.  The pretty white decorative pieces were die cut using the Heartfelt Creations "Ornamental Add On Dies".  There are 5 dies in this collection.

 Shaping your die cut flowers and leaves can make a world of difference on your completed card.  I used the "Leaf Tool" from the Susan's Garden "Flower Tool Kit" to draw lines on the back side of each petal of the flower and on the back side of each leaf.  I then turned the flower/leaf over and drew lines following the stamped lines coming out from the center vein.  Then using the large stylus in this kit, I shaped the leaves on the back and pinched them down the center vein to give them a lot of dimension.

The layers are not glued together yet in this picture, but I wanted to show you the difference between flowers after they are shaped.  On the left the petals have not been shaped and on the right they are.  It seems to bring the flower to "life" doesn't it.

Here is another view to show you the dimension of the flowers.  The sentiment I used down on the lower right corner is from the Heartfelt Creations "Christmas Song PreCut Set".  To finish the card I added a line of pink rhinestones to the bottom of the card and three pink rhinestones in the center of each poinsettia.  On the inside of the card I used the Heartfelt Creations "Enjoy the Sweet Moments of the Season!" stamp from the "Sweet Memories PreCut Set".

I know you are going to love working with all the beautiful papers, stamps, and dies in the Heartfelt Creations "Christmas Card Collection" that came out this month. 

Thanks again for all your visits to my blog. Don't forget to leave a comment if you would like a chance to win the Heartfelt Creations Petite Poinsettia stamp set.

These products are available from Joan's Gardens:

Heartfelt Creations "Christmas Card Collection"  paper pad (HCDP1236)
Heartfelt Creations" Ornamental Add On" dies (HCD 738)
Heartfelt Creations "Petite Poinsettia PreCut Set" (HCPC 3415)
Heartfelt Creations, Spellbinders "Layered Poinsettia Shapeabilities" dies 
Heartfelt Creations "Christmas Song PreCut Set" (HCPC 3556) 
Heartfelt Creations "Sweet Memories PreCut Set" (HCPC 3555)
Susan's Garden "Flower Tool Kit" (658437)
Distress Inks

1004589

Saturday, August 17, 2013

Delicious Huckleberry MuffinTops

Today I am going to share a recipe I love to make.   When Shari and I were over in Montana, we stopped at a fruit stand and bought some huckleberries.   Huckleberries are usually pretty hard to find.  I was anxious to make Susan Tierney Cockburn's blueberry muffin tops with them.  I have made these before using blueberries and they are very delicious.  Huckleberries are smaller than blueberries and have a more intense taste -- so delicious.   These are the finished muffin tops.

 You can get the recipe for these muffin tops at Susan Tierney Cockburn's "My Apron Strings" blogYes, this is the same Susan that created all the Susan's Garden flower dies.  Susan's also has a baking blog with a ton of delicious recipes.  My husband always wants to eat just the muffin tops when I bake muffins, so when I saw this recipe on Susan's Blog, I went to Bed Bath and Beyond and purchased two muffin top pans.  I also use the pans now to bake my large chocolate chip cookies on instead of a cookie sheet.

Look at all those delicious huckleberries in the batter!


The recipe has a delicious streusel topping to add to the muffin tops.  Here I have half of them covered with the streusel  topping -- I did add it to both trays.  I baked them on "Convection" rather than on "Bake" so I could bake both trays at once.   They were ready in 18 min.   I shared them with my daughter and neighbor.   They are so yummy!

 If you love muffin tops, I'm sure you will love this recipe.

I am taking the afternoon off to go to a picnic up in the mountains.  I'll be back tomorrow with a new card.

Friday, August 16, 2013

Susan's Garden Peony and Violets


I have been gone for a few days.  I decided to take my daughter on a little "mini" vacation.  She had reconstructive surgery one her left foot back in March then the same surgery on her right foot the beginning of July. This surgery required 7 incisions on her foot and one on her lower leg; some very long.  Since that first surgery, she has not been able to walk  and has had to keep at least one foot elevated above her heart most of the time.  She has two more weeks before she will be able to walk again.  She can get around on a medical scooter.  But there is more bad news!   She will be having surgery on her spine in a couple of weeks due to injuries received from the auto accident we were in back in January. The injury is very serious and must be done.   It will be a very painful recovery and will take at least six months to recover, then she will have to go back for another back surgery, a little lower,  as soon as she is healed enough from the first back surgery.  This means another year of recovery for her.  I wanted to get her out of the house for a little recreation before she starts another recovery, so I took her up to Flathead Lake in Montana; what beautiful country.  We were limited as to what we could do because getting around on a scooter is not very easy sometimes, but she had a wonderful time.  We saw tons of gorgeous scenery in Montana and even found some great restaurants. The area around the lake has many, many cherries tree farms and we even found fresh huckleberries, which we both love.   We were amazed at all the beautiful hanging baskets in all the towns we visited.  It made me want to come home and create lots of flowers!

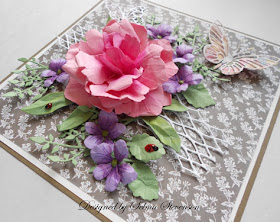
So, creating flowers is what I did this afternoon.  My card today was created using the Susan's Garden "Peony" and "Pansy/violet" dies.  The background paper is from the Webster's Pages "Your Life Beautiful" pad.  The Peony and Violets were made just like Susan's shows on her videos, which you can view at Joan's Gardens.  Behind the Peony, I added the Memory Box "Trellis Border".  The small foliage was die cut using the Impression Obsession " foliage" die.  The two butterflies were die cut using the Memory Box "Peppi Butterfly", The "Kaleidoscope Butterfly", and the "Moonlight Butterfly".  

To color both the center of the peony and the violets, I used Susan's Gardens Pan Pastels and in the center of the violets I used the green Viva Paper Pen from the Susan's Garden "Paper Pen Set".  The flowers were shaped using the Susan's Garden "Flower Tool Kit".    I couldn't resist creating some little lady bugs using the Susan's Garden "Lady Bug Kit".  

I hope you like this card as much as I do, and I hope you are enjoying using your Susan's Garden flower dies to create beautiful flowers as much as I do!

Products used:

Susan's Garden "Peony" dies, 658423
Susan's Garden "Pansy/Violet" dies, 658419
Susan's Garden "Paper Pen Set"
Susan's Garden "Flower Tool Kit"
Susan's Garden "Ladybug Kit"
Impression Obsession "foliage", DIE-055-N
Memory Box Peppi Butterfly, 98508
Memory Box, Kaleidoscope Butterfly, 98261
Memory Box, Moonlight Butterfly, 98260

1003439 

Tuesday, August 13, 2013

Heartfelt Creations August Collection


The Heartfelt "Creations Christmas Card Collection" debuts today. The Christmas Card paper pad has 76 card fronts that will enable you to create quick and easy Christmas cards that are embellished or simple- you pick! This paper pack is a fantastic solution for getting the most beautiful cards for the least amount of time. If you don’t need one side, flip it over and use the other side! The coloring is done for you. There are many panels for utmost variety and the best selection. The stamps and dies released with this collection are absolutely festive and ornamental. The gorgeous type and frames will help you create the most beautiful Christmas project your friends have ever seen!

Above are three cards I created with card fronts from the Christmas Card Paper Pad.  You are going to love the great selection of beautiful things to work with in the new Heartfelt Creations Christmas Card Collection.  On the card on the left,  I used one of the 6x6 panels and added a sentiment and a holly flourish from the "Holly Berry PreCut Set".   Stickles was added to different parts to make it sparkle.  The middle card was designed using just elements from the Christmas Card  Collection paper pad.  Stickles and pearls were added to embellish.  The card on the right, again was designed using designs from the paper pad.  The edges of the blue card stock were distressed and the sentiment attached with dimentional tape.

This is a picture of the inside of each card.  The first two cards have panels cut from the Christmas Card Collection pad and the card on the right I used a sentiment and a pine cone border stamp from the "Sweet Memories PreCut Set".  The variety of cards you can create with this collection is fantastic!

Whether you want to create quick and easy cards with the design paper or combine with the beautiful stamps and dies, I know you are going to love having this great collection to create your Christmas cards.

You can see the entire Heartfelt Creations "Christmas Card Collection" August release over at Joan's Gardens.  Also be sure to check out the great savings from Joan if you order the "I Want It All" set.

Products Used:
Heartfelt Creations "Christmas Card Collection Paper Collection"
Heartfelt Creations " Holly Berry PreCut Set" (HCPC 3551)
Heartfelt Creations "Christmas Card Collection Dies"
Heartfelt Creations "Sweet Memories PreCut Set" (HCPC 3555) 
Zutter "Distrezz-it-All"
Stickles
Ranger Detail White embossing powder 
Kaiser Craft pearls