
Let's do something fun this week for the Challenge at Joan's Gardens. Valentines Day is almost here and most everyone starts thinking about chocolate. I thought it would be fun to create a cute little pouch for one of Joan's favorite candy bars -- the Hershey Bar! This week I am giving you the directions for creating the basic pouch and you can be as creative as you want to decorate it, insert a Hershey bar, and enter it into the Challenge at Joan's Gardens.

This picture shows the Hershey Bar inside. You pull up on the bow and it pulls the candy bar out.
This envelope is for the "King Size" bar. The bar, in the package measure 2" by 7" (2.6 oz). I know there are several size Hershey bars but I chose this size because it was a little larger and gave me more room to decorate. Below I will give you the size for a smaller pouch.
Directions for the 2.6 oz Hershey Bar. Cut card stock 7 1/2" x 6 1/2" for pouch. Score down length at 3" and 6". This leaves you with a 1/2" tab down the side for closure.

For a band around the pouch, cut a piece of card stock 8" x 2 1/2". Score down width at 3 1/8" and 6 1/4". I used the Cheery Lynn "Lace Edger" (B 153) border die along the lower side. This picture is of the back so you can see the die cut border.
Here are the instructions for a smaller Hershey bar. Cut card stock for the pouch 6"x7". Score at 2 3/4" and 5 1/2 " down length. For the band, cut a piece of card stock 2 1/2" x 6 1/2" and score down width at 2 3/4" and 5 1/2".

This picture shows open pouch with score lines. It also shows you where to place the ScoreTape (or other strong adhesive) for closure. Pull the liner off the tape on the bottom and fold over to seal the bottom. Next fold in the side tab, take off the liner on the opposite side and close. This creates your pouch. You need to punch holes at the top for the ribbon to go through. They should be centered. The hole will depend on the width of your ribbon.

Cut a piece of ribbon approximately 30" long. Push ribbon through both holes in the top and pull up until the ends are the same length. Next you push the Hershey Bar down into the pouch, between the ribbon, all the way to the bottom, pushing down the ribbon with the Hershey Bar. Tie a pretty bow at the top. To pull the Hershey Bar out, just pull up on the bow.
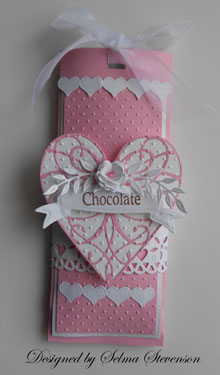
Products I used to decorate my pouch: Memory Box "LaRue Heart" (98255); "Grand Heart" (98254) and "Heart Chain Border" (98277). Spellbinders "Ribbon Banner"; Cheery Lynn "Olive Branches" (B147); "Medium Rose" (B154); "Lace Edger" (B153). Craft Lounge "Granny's Truffles" for the sentiment; Cuttlebug "Swiss Dots" embossing folder; Kaiser Craft Pearls; Sheer Ribbon (5/8" wide) 30 inches long. All these products can be purchased from Joan's Gardens.
Hope you will join us this week for this fun challenge. These little covered bars are fun to give for a cute Valentine to someone special. Please go over to Joan's Gardens to read all the details about the challenge and see what the prize will be this week. Remember, if you are the winner, you will be in the drawing for the $100 Gift Certificate to Joan's Gardens that will be presented at the end of the year.
409760

Oh Selma what a delight it is to call in on your blog every day. This is just so cute and very pretty and many thanks for the tutorial to go with it. You really are amazingly talented.
ReplyDeleteLove Sheila xx
Gorgeous card Selma, all of yours are beautiful. I tried to contact you thru the link on your blog but it's not working. I wish HC had a blog that was participating and challenges with the possibility of winning stamps or sets or dies. I love their stamps but without the challenge blogs it isn't as much fun to use them. I tend to stay with Flourishes and ODBD, and Just Rite, more fun to try and win and get recognition etc.
ReplyDeleteWhat a cute idea...I must play with you guys this week!
ReplyDeletefantastic!!!! Don't know whick I love the most, the candy or that goregous holder LOL
ReplyDeleteSuch a very cute idea. Love it. Edna
ReplyDeleteSo cute! Going to try to play along with this one. I've missed doing Joan's challenges.
ReplyDeleteThis is such a cute idea! Thanks for all your creativity and hard work on the tutorial and photos to share with us! I hope to have time over the weekend to give this a try!
ReplyDeleteAs always, your work is FABULOUS and so inspiring! I've been looking down through your blog and although I didn't comment on each one ... the inspiration is overwhelming! THANKS SO MUCH!!!
This is adorable! Who wouldn't want to get a Hershey bar all decked out like this!! Makes me think of a Hershey bar in its Easter clothes!
ReplyDeleteBeutiful candy bar holder, Selma! I love how you decorated it! Thanks for the tutorial!
ReplyDeleteBeautiful candy wrapper!
ReplyDeleteBeautiful candy wrapper Selma. Thanks so much for the fantastic tutorial. "Hugs"
ReplyDeleteBeautiful. Love the sweet elements that make this project special!
ReplyDeletethanks for the tutorial.
:) Gale
Super pretty Selma!
ReplyDeleteThis is just outstanding!! I hope to try this out this week!!!
ReplyDeleteVery cute card with the Hershey bar. Hugs. Char.
ReplyDeleteSo very pretty!! It'd be fun to receive a treat in this pretty wrapping!!
ReplyDeleteSoooo pretty! Darlene sent me this link. I am definitely making one of these for a very sick little boy in our neighborhood. Imagine the happiness that this will bring to him. Thank you so much for the inspiration.
ReplyDeleteSo pretty, it is gorgeous, thank you for your tutorial, I can't wait to make it. Val Peacock.
ReplyDelete