This is my completed card using Heartfelt Creations stamps and Dies from the Autumn Splendor Collection. The products used are: Bold Falling Leaves Precut set (HCPC 3333); Open Falling Leaves Precut set (HCPC 3334); Falling Leaves Diecut (HCD 707); Elegant Autumn Swirls Precut set (HCPC 3330); and Swirly Autumn Leaves Precut set (HCPC 3328) for the greeting.
All the products I am using today can be purchased from Joan's Gardens.
This is a closeup of the arranged leaves.
To color the leaves, I have used several different Kaleidacolor Rainbow Ink Pads. Here are the names of some of the rainbow pads that work great for this technique: Autumn Leaves; Late November; Desert Heat; Cappuccino Delight; Pumpkin Patch, and even Creole Spice if you delete the blue and purple end. You also need a very fine spray mister.
Using the solid stamp, twist the stamp around on the section of the colors of the pad you want on the leaves. Before stamping, give the stamp a light mist of water. This will kind of blend the colors.
This pictures shows you all the different color combinations I got from just the "Autumn Leaves" rainbow pad. You need to clean the stamp each time you want to pick up color from a different area of the pad.
To over stamp with with Open Falling Leaf stamp, I used the Stamp Positioner so I could perfectly match up the lined image over the solid image.
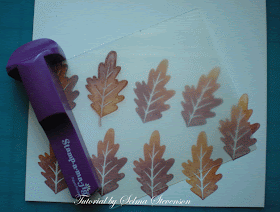
Having both the Bold Falling Leaves set and the Open Leaves set make a big different in the completed look of each leaf. You can see how it looks on the bottom row when just the solid colored leaf is stamped. On the top row you see it after it was stamped with the Open Leaf stamp.
Next I used the Falling Leaves die cut to cut out each leaf. To match up the die with the stamped leaf, you should cut out a leaf and use the negative portion to place over the leaf. There is a piece of tape holding the die in place.
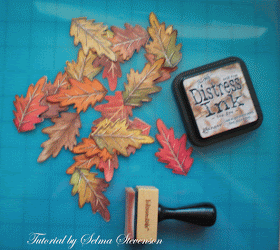
After cutting out the leaves, I used Tim Holtz Distress Ink to sponge the edges and even the center of each leaf. The Tim Holtz sponging tool is great for doing this.
To give the leaves some shine/sparkle, I lightly brushed on DG3 Art Gel. One of my blog followers told me about this great product.
After brushing on the DG3 Gel, I lightly sprinkled on some ultra fine glitter.
When you use the DG3 Gel, it softens the card stock and allows you to shape the leaf. The leaves look so realistic after being shaped.
I hope this tutorial helps you learn an easy way to create beautiful autumn leaves. I would love to read your comments. Thanks for stopping by and have a wonderful weekend.


WOW Selma this is fantastic! I gotta try it for sure! Thanks
ReplyDeleteThanks for some great tips, Selma... another beautiful card.
ReplyDeleteSelma,
ReplyDeleteThis card is just breathtaking! Thanks for the great instructions. I will be looking for the gel also.
Absolutely gorgeous. Thanks for the tutorial.
ReplyDeleteJust fabulous Selma. The poet says "...only God can make a tree"
ReplyDeletewell, Selma makes a bloomin' good paper leaf. Thank you for sharing your creations.
Mary Mac x
Selma, this is beautiful and I love the tutorial. TFS
ReplyDeleteGreat tutorial Selma, definitely something that I would LOVE to try. You are quite the salesperson. I've got that Kaleidascope stamp pad and have used it quite a bit for leave stamps and Fall cards. The gel definitely adds a great life-like element to the leaves.
ReplyDeleteThat is one beautiful card. Thanks so much for sharing how you did it. I can see I'm going to have to get some art gel.
ReplyDeleteSelma--thanks so much for this wonderful tutorial. It also helped me understand the stamps and dies better! Beautiful card. TFS your talents!!!
ReplyDeleteWhat an awesome card! I love how you explained the technique you used for the leaves. I'll be saving this information. I like the way you used two different punches too.
ReplyDeleteSuper fantabulous! Great toot!
ReplyDeleteThis comment has been removed by a blog administrator.
ReplyDeleteVery pretty. Love this card!
ReplyDeleteHi Selma, don't you just love DG3! Your cards are wonderful, love what you did with your leaves. Hugs,Marian
ReplyDeleteI love autumn leaves and this tutorial is so great. Thank you.
ReplyDelete