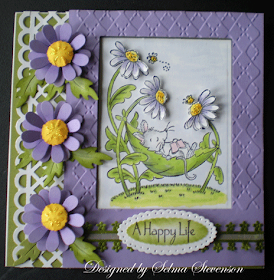
Oh what fun I had creating this cute card. The image is Tina Wenke's "Mouse in a Hammock" by Stampavie. I just couldn't resist buying this one from Joan's Gardens. I will have to admit there is a lot of different steps in completing this card. I must have been trying to see how many different things I could do on one card, LOL.
I started by stamping the image with black Memento ink and coloring it with Copic markers. It was cut out with a rectangle Nestie. I used the same Nestie to cut an opening in a 5.5"x4.25" piece of lavender card stock then embossed it with the Argyle Cuttlebug embossing folder. The reason I did this was to raise the frame up from the design a little bit. The base card is 5.5" square white card stock. A piece of olive cs was attached to the front then a Martha Stewart punched border added to the left side.
The flowers are die cut, sponged in the center with a darker purple ink, and layered with dimensional tape. The yellow centers were cut out with one of the small dies from the Spellbinder's "Classic Frame". They worked out just perfect for the center of the daisies. I was trying to make them look like the ones in the image. The centers were sponged with a darker yellow to give them highlights. In order to give the centers some dimension I used a flower shaper tool to indent the center then put a clear glue pop dot under it so it would hold the rounded shape. The leaves were cut with a Bosskut "daisy leaves" die and sponged with a darker ink.
I wanted to bring in the green, below the framed design, so I used a piece of lace purchased from a craft store. It was too "bright" green so I used a sponge dauber and sponged on olive ink. Turned out perfect. The verse is from MTME and is so perfect for this image. It was cut out with a Nestie and sponged prior to taking it out of the die.
Now when I looked at the image with the dimension around it, I needed to stamp the image again and cut out just the flowers and attach them with dimensional tape. This balanced out the dimension. I added some Stickles to the center of all the flowers to add a little bling. This card is so cute I just don't think I can give it away. I don't say that often.
Hope you enjoy this creation. Hope you will leave a comment and let me know. Thanks for stopping by.


Oh Selma what an adorable, cute and uplifting card. I just love it. It is amazing to me all the steps you did to make it so beautiful. You are making me want time to get creative!!!!!
ReplyDeleteOh my Selma this one is indeed super cute - thanks for all the details on how you made it! I love it. The purple and green are a great combo.
ReplyDeleteSelma, this is absolutely, positively GORGEOUS!! The colors are beautiful together, and I love all the little extras you did to this card. FABULOUS!!!! TFS!
ReplyDeleteOMGosh the work you put into your cards.... amazing! This is way,way,way over the top gorgeous!
ReplyDeleteThis is absolutely beautiful, love your creations and thanks for sharing.
ReplyDeleteSelma, this is another jaw dropping piece of art!!! How long did you spend on this, it's beautiful
ReplyDeleteThis is too cute for words!! Love it!
ReplyDeleteThanks for sharing
Darla
Selma, Your card is just adorable! Such wonder details with gorgeous colors! TFS!
ReplyDeleteOh my gosh this is so adorable and my favorite color too!! Thanks so much for sharing all the deets!! You are amazing!
ReplyDeleteperfect summer card
ReplyDeleteWhat a fun card! Your creativity is inspiring!
ReplyDeleteSo gorgeous as always!! I looked for this stamp at Joan's but I didn't find it.
ReplyDeleteBeautiful cards! I recently discovered stamping and card making through "you tube". I saw a tutorial from Gina K. and was very impressed. I came across a card with vellum flowers that you had made and was enchanted. I am totally inspired. Thank you very much. Sincere Regards. Dianne S. Galyean
ReplyDelete